


3D Gaussian splatting is the emerging rendering technique that is overtaking NeRFs. Since it is centered around point primitives, it is more compatible with traditional graphics pipelines that already support point rendering.
Planet maemo: category "feed:dc2d42ffa90d409ad35691447d64bb45"
Recently there was an large rework to the STB single-file image_resize library (STBIR) bumping it to 2.0. While the v1 was really slow and merely usable if you needed to quickly get some code running, the 2.0 rewrite claims to be more considerate of performance by using SIMD. So lets put it to a test.
As references, I chose the moderately optimized C only implementation of Ogre3D and the highly optimized SIMD implementation in OpenCV.
Below you find time to scale a 1024x1024px byte image to 512x512px. All libraries were set to linear interpolation. The time is the accumulated time for 200 runs.
RGBRGBAOgre3D 14.1.2660 ms668 msSTBIR 2.01632 ms690 msOpenCV 4.8245 ms254 msFor the RGBA test, STIBIR was set to the STBIR_4CHANNEL pixel layout. All libraries were compiled with -O2 -msse. Additionally OpenCV could dispatch AVX2 code. Enabling AVX2 with STBIR actually decreased performance.
Note that while STBIR has no performance advantage over a C only implementation for the simple resizing case, it offers some neat features if you want to handle SRGB data or non-premultiplied alpha.
I recently needed some NAS and went with the “Synology RS1221+” barebone system. The system is competitively priced when compared to the similar “QNAP TS-873AeU-4G”.
Synology HDD
For storage, the sweet spot between price and capacity was at 18TB. Lets look at some options:
Toshiba MG09ACA 18TB270€Seagate Exos X X18280€Synology HAT5310-18T700€Depending on the benchmark sometimes the Toshiba comes out on top and sometimes the Seagate. Both are similarly priced, so thats fine.
However, talking of the price the Synology HDD stands out by asking a 150% premium.
You might now wonder whether you also get a better performance or other features in return. Well.. guess which is the only 18TB HDD that is verified by Synology for the RS1221+?
The scammy part here however is that the HAT5300 series are just rebranded Toshiba Drives with a different firmware. So the HAT5310 likely is just the MG09ACA and the main difference is the profit margin.
Note that different firmware does not result in any noticeable difference in performance.
I went with the unverified Seagate drives and – as one might expect – there are zero issues with doing so.
Synology RAM
At this point you might say, well Synology just did not get to test more 18TB drives.
Well.. I found the 4GB RAM rather tight and wanted to upgrade to 32GB as RAM is currently quite cheap anyway.
The options here are
Kingston KSM26SED8/16HD50€Synology D4ECSO-2666-16G350€I think there appears to be a pattern here. Again, both options have the same specs i.e. DDR4 2666, ECC SO-DIMM. Maybe Synology even rebranded the Kingston modules too, but I did not verify this.
While the DiskManager did not complain about the Seagate HDD, there is a warning when going with Kingston now. I guess this is because it matters even less.
To conclude this, I first want to emphasizes that both the Synology NAS Hardware and their DiskManager software work great with non Synology Hardware – just as one would expect of a standard x86 platform.
It is just a pity that they try to FUD you into buying their overpriced HDD and RAM.
Basically this is the same game as with printer vendors predicting ravages and annihilation when using 3rd party ink.
In this post I want to take a look at the Logitech M720 mouse after having used it for 2.5 years.
GNOME Open Desktop Ratings is the service that enables user ratings in various Linux app stores like the Snap-Store, Gnome Software and KDE Discover.
While it nowadays works for users by providing a mostly useful star rating, from a application developer perspective the story is very grim.
Basically one only gets the users view, which provides an average rating and some reviews in the current locale.
This means you might see something like “2 Stars from 80 Reviews” – but the 3 reviews in your current locale are all 4-5 Star.
To see something else you have to change the locale and restart the app store – which is inconvenient and confusing.
As a developer, seeing the negative reviews is crucial, as people often just post bug reports there and this is the only way to find out why the app did not work for them.
Therefore I quickly hacked together a web-based browser for the ODRS service, skillfully named
ODRS BrowserThis allows accessing the ODRS service from the web and shows the reviews from multiple locales at once. The idea here is that often people write reviews in english – regardless of their current locale. Currently, ODRS has no logic to detect that.
Also, if your app is packaged in different formats like snap and flatpack and deb, you can see the reviews of all variants in the overview.
Unfortunately, ODRS currently does not set the CORS header which prevents browsers from accessing it directly. The data that you see right now was scraped with python script. But once this issue is fixed, the ODRS Browser will be able to use live data.
Lets say you want to debug a python process that is either already running or crashing in native code. Pythons PDB is of no help here and you will have to use low-level GDB debugger. Fortunately, it comes with support for debugging high level python scripts.
However, while the actual python-gdb commands are nicely described here, that page lacks important details on how to get python-gdb in the first place. We are merely told that a python-gdb.py is needed.
On Ubuntu/ Debian, this file is included in the python3-dbg package:
sudo apt install python3.10-dbgInstalling that is sufficient, if you use the matching python3 package. You can go ahead and connect to some running python process via:
gdb -p <PID>
# verify that the script is loaded
(gdb) info auto-load
# get a python backtrace
(gdb) py-bt
Traceback (most recent call first):
  File "/usr/lib/python3.10/selectors.py", line 416, in select
    fd_event_list = self._selector.poll(timeout)
  File "/usr/lib/python3.10/socketserver.py", line 232, in serve_forever
...
In case Ubuntu is merely a host and you use coda, you can still use the host python-gdb.py – even if the python versions dont match. You will have to load the script manually though like:
(gdb) source /usr/share/gdb/auto-load/usr/bin/python3.10-gdb.py
While older SteamOS releases used to map the right trigger to the left mouse button by default, in current SteamOS you can only click by using the touchpad. However due to the way you hold the device it is really fiddly – especially if you try to drag and drop something.
Fortunately, there is a way to fix this via a setting in Steam. For this you need launch Steam when in Desktop Mode. There, switch to big picture mode and go to
Settings > Base configuration > Desktop Configuratiom
In this view you can configure the inputs to your liking
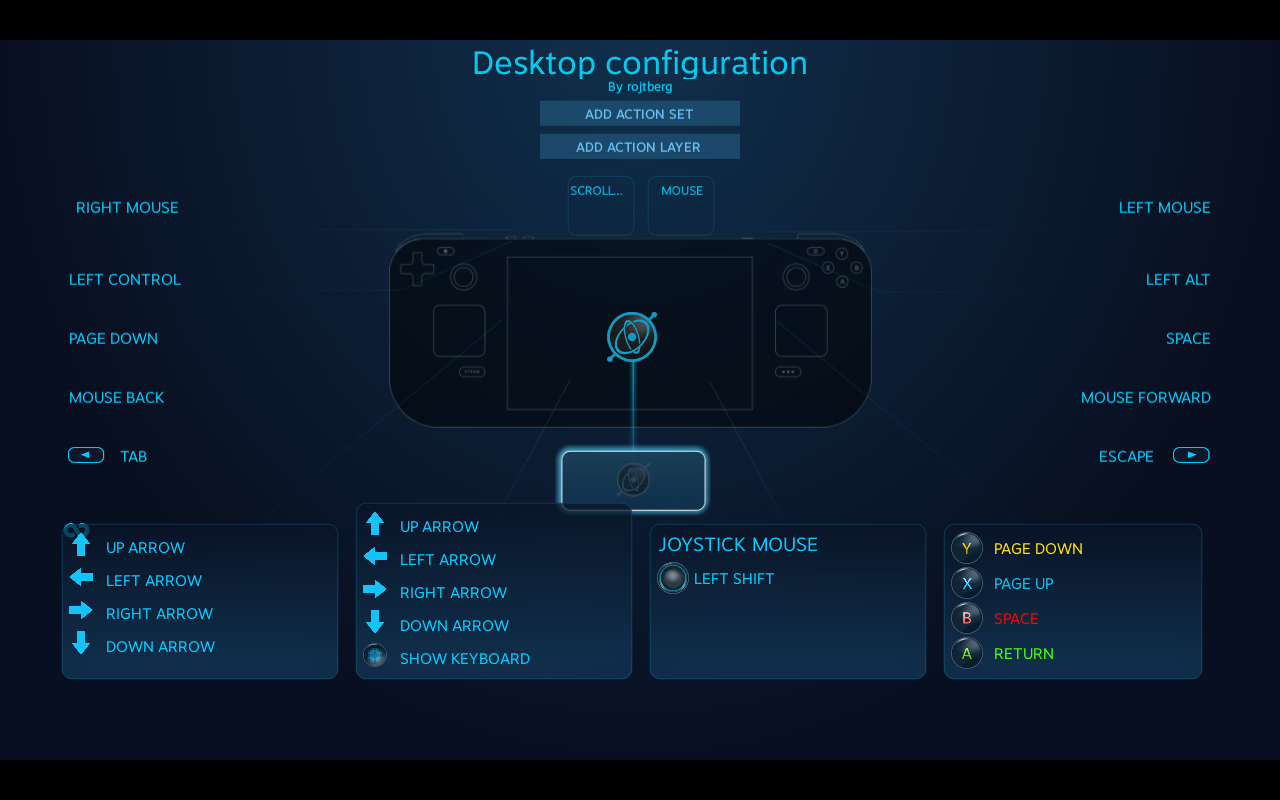 My final configuration
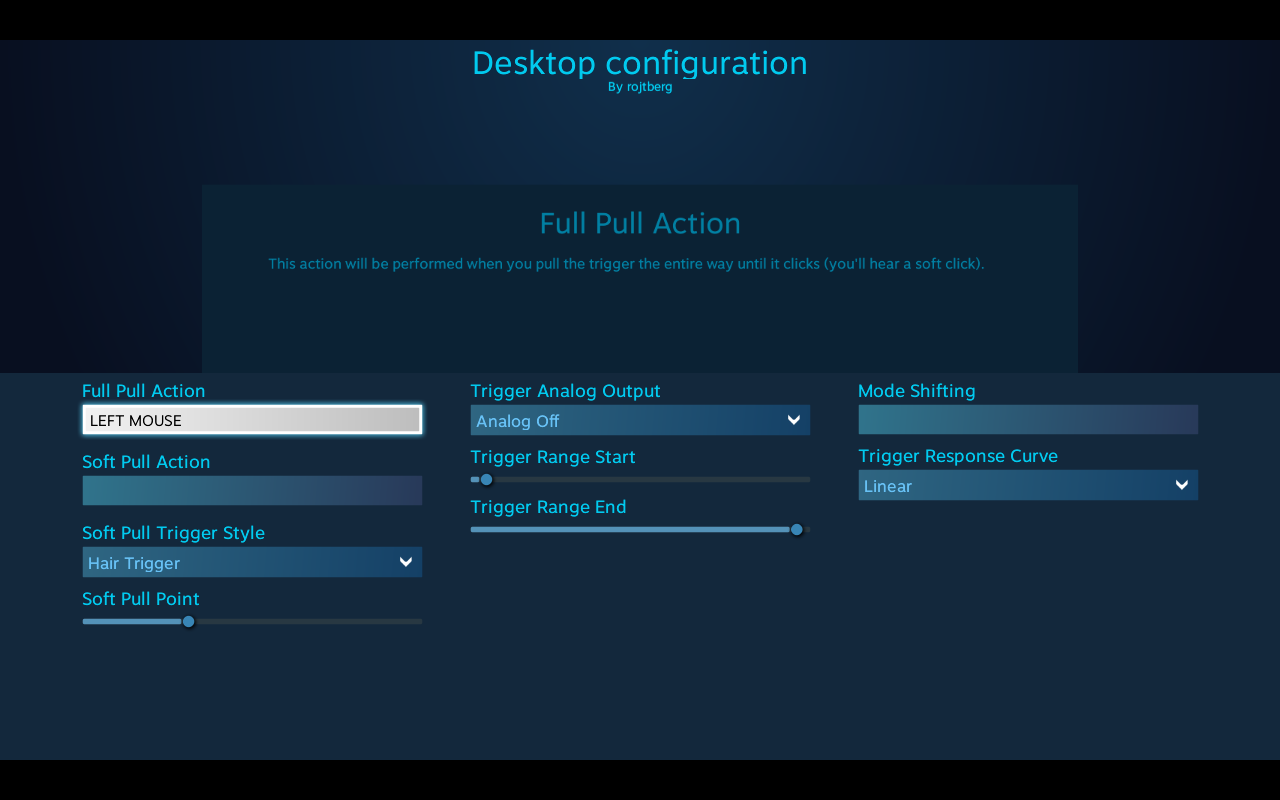 Trigger to click
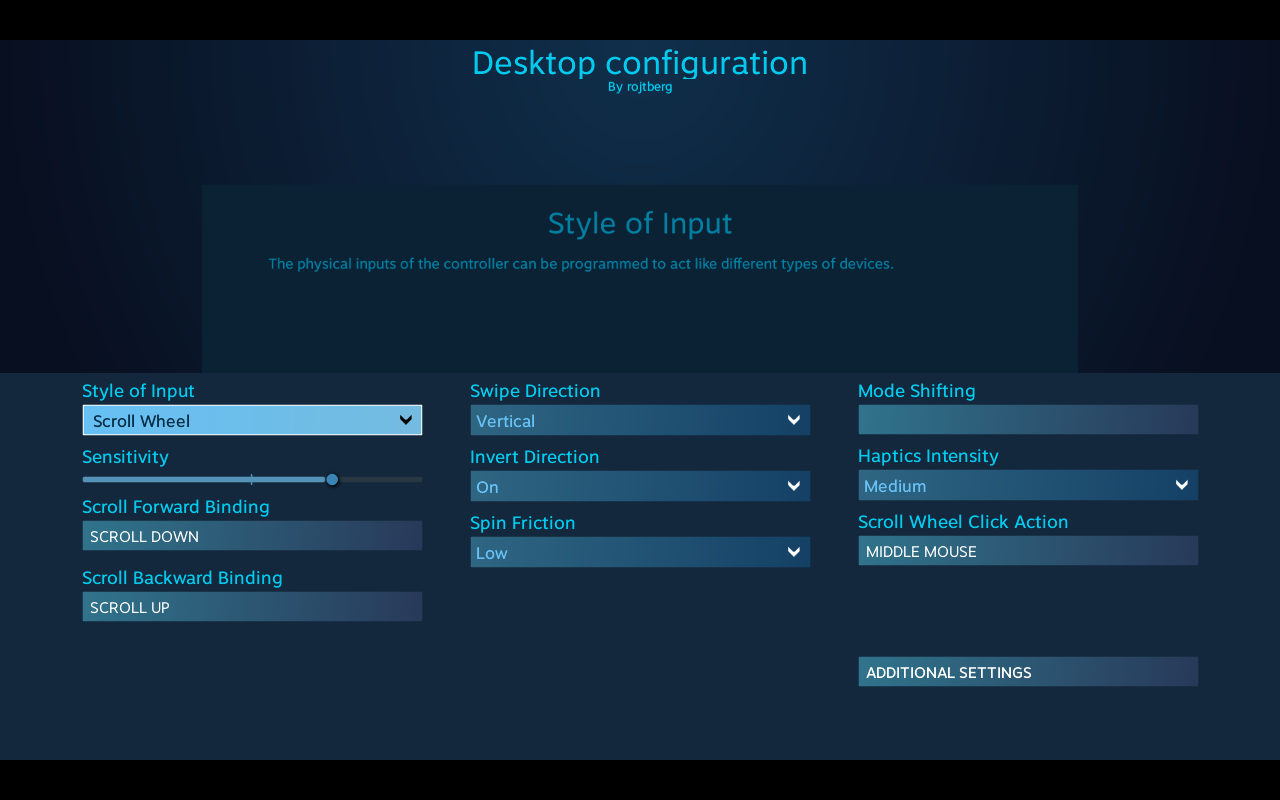 Left touchpad for scrolling
I suggest you to go with the following setup
- Right trigger for left click (sounds counter-intuitive, but works well)
- Left trigger for right click
- Left touchpad for moving the mouse (doh)
- Right touchpad for scroll wheel
With this configuration you can use the desktop mostly pain-free.
The SLURM documentation provides you with the basic information that you can use Docker withing SLURM – as long as you use rootless Docker. However some crucial pieces are missing.
The issue that you will immediately run into is that the SLURM resource allocation is not propagated to docker at all. E.g. if you start your job with srun --gpus 1 docker ... all GPUs will be available to docker nevertheless.
The issue here is that Docker uses a manager daemon that the docker CLI communicates with. And that daemon does not know anything about SLURM or any resources it allocated for the job.
The solution is to start a daemon per job (instead of per user) as one user might want to run different jobs with different allocations on the same machine. The docker documentation gives you an idea on how to do that.
You will need to set at least the following parameters to make the daemon fully job-specific
# dockerd-rootless.sh requires XDG_RUNTIME_DIR
XDG_RUNTIME_DIR=/somewhere/including/$SLURM_JOB_ID
# export, so docker client sees it later on
export DOCKER_HOST=unix://$XDG_RUNTIME_DIR/docker.sock
dockerd-rootless.sh --host=$DOCKER_HOST --data-root=... --exec-root=...
Here, exporting DOCKER_HOST makes the docker CLI use the correct daemon.
The drawback of this method is that each job needs to pull the container again due to the separate data-root paths. Switching to podman might solve that.
If you, like me, went with the entry level Steam Deck option with only 64 GB of internal storage, you likely realized quite soon that some games wont fit on it.
One option is to use the microSD expansion card slot. For current-gen games the throughput of only about 150 MB/s does not seem to degrade loading performance compared to a NVMe SSD.
However, given that the internal storage is upgradable, the only logical choice for keeping your PC master race status is to cram in the fastest NVME SSD inside that thing.
Specifically, you will need a one-sided SSD in the M.2 2230 for factor so it fits the space inside the Steam Deck.
I went with the KIOXIA Client-SSD BG5 512GB. Kioxia is the Toshiba spin-off for SSD drives, if you wonder about the brand. Although it is a PCIe 4.0 drive, its peak read throughput of 3.5 GB/s is within the practical limits of PCIe 3.0 of the Steam Deck.
Also, the active power consumption of 4.1W is quite close to the 3.8W drawn by the custom PHISON PS5013 E13 SSD that Valve uses.
You can follow the iFixit Guide for the steps to actually swap the SSD. Make sure to transfer the ESD shielding wrap to the new SSD.
To get Steam OS on the new drive, follow the official recovery instructions and select the “Re-image Steam Deck” script.
This will install Steam OS on the blank SSD – similar to how you would install Ubuntu from a live USB.
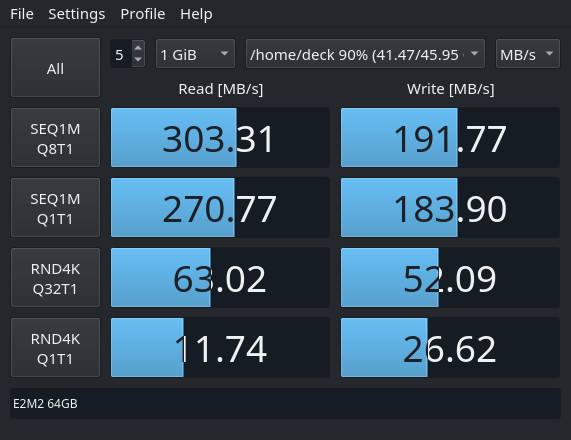
Benchmarking results
Next, I wanted to actually compare the speed of the upgraded NVMe SSD with the one of the stock eMMC memory. To this end I used KDiskMark – an open-source alternative to CrystalDiskMark that runs on Linux natively.
The tests were performed on SteamOS 3.3.1 using KDiskMark 2.3.0.
 eMMC
eMMC
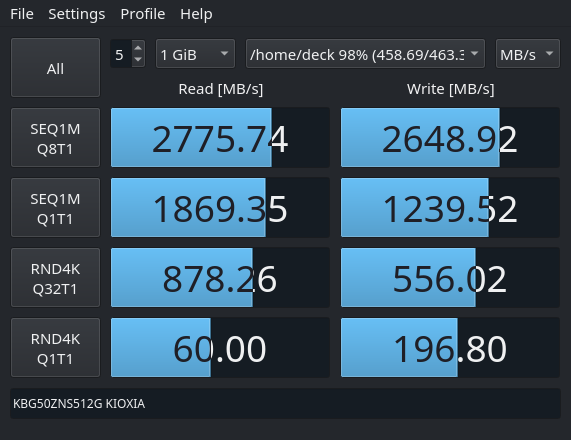 NVMe
The median of 3 KDiskMark runs
NVMe
The median of 3 KDiskMark runs
In short, the NVME offers roughly one order of magnitude faster throughput over the eMMC.
Whether you feel this in-game, highly depends on the given game. For older titles, even the eMMC is so fast, that you cannot read the hints on the loading-screen. However, for something like the Flight Simulator 2020 that shuffles huge assets around, it will surely be noticeable.
Finally, the peak read performance of 3.5GB/s is not reached. This might be due to the PCIe 3.0 bottleneck – I did not bother putting the drive in a PCIe 4.0 device. Still, there is a significant advantage in writing performance over the older Kioxia BG4 series, that only do 1.4 GB/s.
TLDR; command at the end of post
If you want a equal loudness for your Music library the go to solution and the de-facto standard is ReplayGain.
If you are using a music streaming service, the provider is typically taking care of that for you – but maybe you want to migrate towards your own streaming solution.
ReplayGain analyses your audio files and stores their deviation from the baseline loudness as a tag. A compatible audio player can then read the tag and correct the playback volume so all you tracks have the same loudness.
Of course things get messy once you look at details like what the baseline loudness should be and how to determine loudness in the first place. Therefore we set the baseline once and for all as 89db and consider even tracks of the same album individually. If you disagree, feel free to branch off reading up the details now.
The next issue is that ReplayGain was born in a time where mp3 was synonymous to digital music, hence the algorithm was first implemented as the mp3gain CLI tool. Nowadays you also need aacgain and vorbisgain to cover all your formats, which is cumbersome to automate.
The larger issue with ReplayGain is that it defines loudness of a track by its peak volume. While a sane choice in theory, in practice the music and advertising industries raced to increase the perceived loudness without raising the peak volume. As broadcasters also used peak volume normalization, one could blow your eardrum with that very special advertisement.
Therefore the EBU R 128 was proposed which at its core is RMS based, meaning it is considering the average volume of the track.
Remember that ReplayGain merely adds a correction value to the tracks? This allows us to compute that correction value based on the R128 algorithm for a better normalization, which is exactly what the <a href="https://github.com/desbma/r128gain">r128gain</a> tool does.
Being written in modern day, r128gain also processes all possible audio files by hooking into ffmpeg as a filter.
So, without further ado, this is the command to normalize your Music library:
# pip3 install r128gain
r128gain -p -r Music/
This will preserve "-p" the file timestamps and recursively "-r" process all files in the given directory.
Trouble shooting
Note that if you previously used mp3gain, your files might contain non-standard lower-case replaygain_* tags, while r128gain will only write REPLAYGAIN_* tags.
To avoid confusing players with different values, you should remove the non-standard tags. This can be automated with eyeD3
eyeD3 -Q --remove-frame RGAD --preserve-file-times --user-text-frame=replaygain_track_gain: --user-text-frame=replaygain_track_peak: --user-text-frame=replaygain_album_gain: --user-text-frame=replaygain_album_peak: Music/Refer to its documentation for the meaning of the parameters. For RGAD see here.
Header Image: “volume” by christina rutz (CC-BY-2.0)
First one should ask though: why? My main motivation was that many of the apps I use were easily available in the nextcloud store, while with owncloud I had to manually pull them from github.
Additionally some of the app authors migrated to nextcloud and did not provide further updates for owncloud.
Another reason is this:
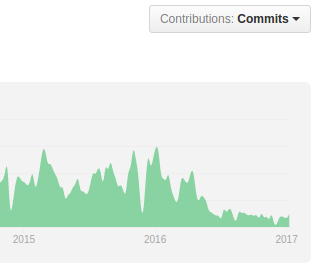
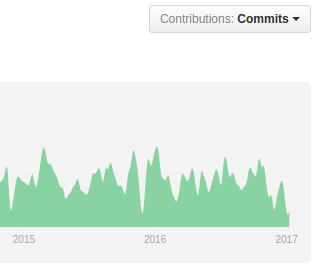
the graphs above show the number of commits for owncloud and nextcloud. Owncloud has taken a very noticeable hit here after the fork – even though they deny it.
From the user perspective the lack of contribution is visible for instance in the admin interface where with nextcloud you get a nice log browser and system stats while with owncloud you do not. Furthermore the nextcloud android app handles Auto-Upload much better and generally seems more polished – I think one can expect nextcloud to advance faster in general.
MigratingFor migrating you can follow the excellent instructions of Jos Poortvliet.
In my case owncloud 9.1 was installed on Ubuntu in /var/www/owncloud and I put nextcloud 11 to /var/www/nextcloud. Then the following steps had to be applied:
- put owncloud in maintenance mode
sudo -u www-data php occ maintenance:mode --on
- copy over the config.php
cp /var/www/owncloud/config/config.php /var/www/nextcloud/config/
- adapt the path in config.php
# from 'path' => '/var/www/owncloud/apps', # to 'path' => '/var/www/nextcloud/apps', - adapt the path in crontab
sudo crontab -u www-data -e
- adapt the paths in the apache config
- run the upgrade script which takes care of the actual migration. Then disable the maintanance mode.
sudo -u www-data php occ upgrade
sudo -u www-data php occ maintenance:mode --off
and thats it.
one of the best resources to learn modern OpenGL and the one which helped me quite a lot is the Book at www.arcsynthesis.org/gltut/ – or lets better say was. Unfortunately the domain expired so the content is no longer reachable.
Luckily the Book was designed as an open source project and the code to generate the website is still available at Bitbucket. Unfortunately this repository does not seem to be actively maintained any more.
Therefore I set out to make the Book to be available again using Github Pages. You can find the results here:
https://paroj.github.io/gltut/
However I did not simply mirror the pages, but also improved it at several places. So what has changed so far?
- converted mathematical expressions from SVG to inline MathML. This does not only improve readability in browsers, but also fixes broken math symbols when generating the PDF.
- replace XSLTHL by highlight.js for better syntax highlighting
- added fork me on github badge to website to visualize that one can easily contribute
- enabled the Optimization Appendix. While it is not complete, it already provides some useful tips and maybe encourages contributions.
- updated the Documentation build to work on Linux
- added instructions how to Build the website/ PDF Docs
hopefully these changes will generate some momentum so this great Book gets extended again. As there were also non-cosmetical changes like the new Chapter I also tagged a 0.3.9 release.
I the process of the above work I found out that there is also a mirror of the original Book at http://alfonse.bitbucket.org/oldtut/. This one is however at the state of the 0.3.8 release, meaning it does not only misses the above changes but also some adjustment happened post 0.3.8 at bitbucket.