The <video>
element implementation in WebKit does its job by using a multiplatform player that relies on a platform-specific implementation. In the specific case of glib platforms, which base their multimedia on GStreamer, that’s MediaPlayerPrivateGStreamer.
Planet maemo: category "feed:218abbb3f30ed17e36476558d8bce9b5"
Move semantics can be very useful to transfer ownership of resources, but as many other C++ features, it’s one more double edge sword that can harm yourself in new and interesting ways if you don’t read the small print.
During all these years using GStreamer, I’ve been having to deal with GstSegments in many situations. I’ve always have had an intuitive understanding of the meaning of each field, but never had the time to properly write a good reference explanation for myself, ready to be checked at those times when the task at hand stops being so intuitive and nuisances start being important. I used the notes I took during an interesting conversation with Alba and Alicia about those nuisances, during the GStreamer Hackfest in A Coruña, as the seed that evolved into this post.
It’s been 8 years since the last time I wrote a videogame just for personal fun. As it’s now become a tradition, I took advantage of the extra focused personal time I usually have on the Christmas season and gave a try to Processing to do my own “advent of code”. It’s a programming environment based on Java that offers a similar visual, canvas-based experience to the one I enjoyed as a child in 8 bit computers. I certainly found coding there to be a pleasant and fun experience.
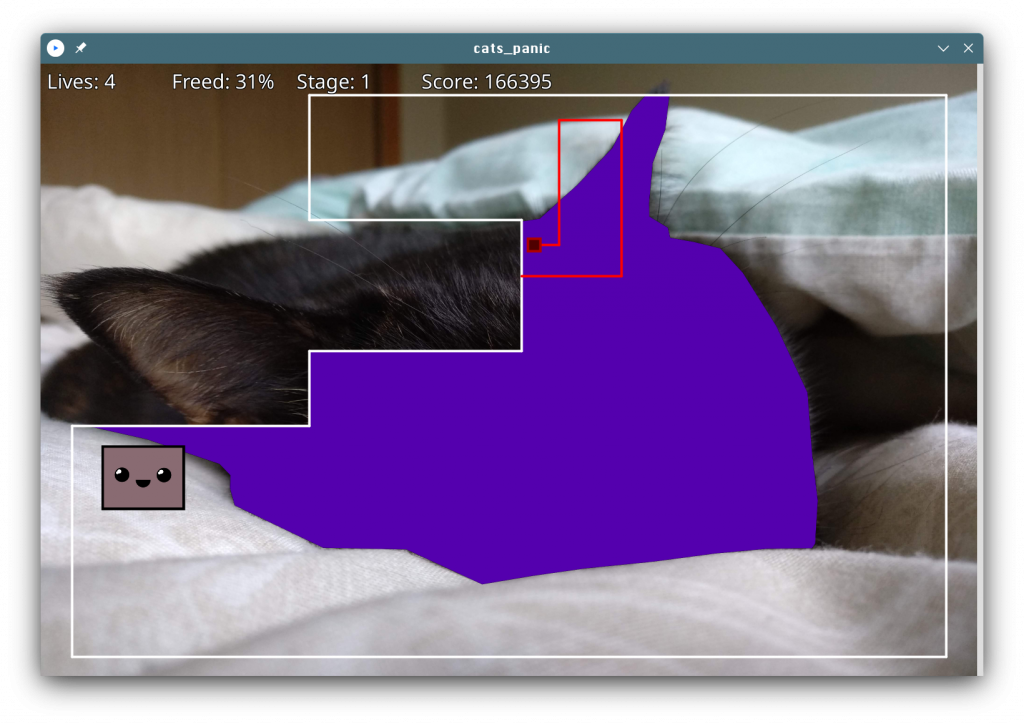
So, what I coded is called Cat’s Panic, my own version of a known arcade game with a similar name. In this version, the player has to unveil the outline of a hidden cute cat on each stage.
The player uses the arrow keys to control a cursor that can freely move inside a border line. When pressing space, the cursor can start an excursion to try to cover a new area of the image to be unveiled. If any of the enemies touches the excursion path, the player loses a life. The excursion can be canceled at any time by releasing the space key. Enemies can be killed by trapping them in a released area. A stage is completed when 85% of the outline is unveiled.
Although this game is released under GPLv2, I don’t recommend anybody to look at its source code. It breaks all principles of good software design, it’s messy, ugly, and it’s only purpose was to make the developing process entertaining for me. You’ve been warned.
I’m open to contributions in the way of new cat pictures that add more stages to the already existing ones, though.
You can get the source code in the GitHub repository and a binary release for Linux here (with all the Java dependencies, which weight a lot).
Meow, enjoy!
I was a happy user of Del.icio.us for many years until the service closed. Then I moved my links to Google Bookmarks, which offered basically the same functionality (at least for my needs): link storage with title, tags and comments. I’ve carefully tagged and filed more than 2500 links since I started, and I’ve learnt to appreciate the usefulness of searching by tag to find again some precious information that was valuable to me in the past.
This is the last post of the series showing interesting debugging tools, I hope you have found it useful. Don’t miss the custom scripts at the bottom to process GStreamer logs, help you highlight the interesting parts and find the root cause of difficult bugs. Here are also the previous posts of the series:
In this new post series, I’ll show you how both existing and ad-hoc tools can be helpful to find the root cause of some problems. Here are also the older posts of this series in case you find them useful:
- GStreamer WebKit debugging tricks using GDB (1/2)
- GStreamer WebKit debugging tricks using GDB (2/2)
- GStreamer WebKit debugging by instrumenting source code (1/3)
- GStreamer WebKit debugging by instrumenting source code (2/3)
- GStreamer WebKit debugging by instrumenting source code (3/3)
Use strace to know which config/library files are used by a program
If you’re becoming crazy supposing that the program should use some config and it seems to ignore it, just use strace to check what config files, libraries or other kind of files is the program actually using. Use the grep rules you need to refine the search:
$ strace -f -e trace=%file nano 2> >(grep 'nanorc') access("/etc/nanorc", R_OK) = 0 access("/usr/share/nano/javascript.nanorc", R_OK) = 0 access("/usr/share/nano/gentoo.nanorc", R_OK) = 0 ...
Know which process is killing another one
First, try to strace -e trace=signal -p 1234
the killed process.
If that doesn’t work (eg: because it’s being killed with the uncatchable SIGKILL signal), then you can resort to modifying the kernel source code (signal.c) to log the calls to kill()
:
SYSCALL_DEFINE2(kill, pid_t, pid, int, sig) { struct task_struct *tsk_p; ... /* Log SIGKILL */ if (sig & 0x1F == 9) { tsk_p = find_task_by_vpid(pid); if (tsk_p) { printk(KERN_DEBUG "Sig: %d from pid: %d (%s) to pid: %d (%s)\n", sig, current->pid, current->comm, pid, tsk_p->comm); } else { printk(KERN_DEBUG "Sig: %d from pid: %d (%s) to pid: %d\n", sig, current->pid, current->comm, pid); } } ... }
Wrap gcc/ld/make to tweak build parameters
If you ever find yourself with little time in front of a stubborn build system and, no matter what you try, you can’t get the right flags to the compiler, think about putting something (a wrapper) between the build system and the compiler. Example for g++
:
#!/bin/bash main() { # Build up arg[] array with all options to be passed # to subcommand. i=0 for opt in "$@"; do case "$opt" in -O2) ;; # Removes this option *) arg[i]="$opt" # Keeps the others i=$((i+1)) ;; esac done EXTRA_FLAGS="-O0" # Adds extra option echo "g++ ${EXTRA_FLAGS} ${arg[@]}" # >> /tmp/build.log # Logs the command /usr/bin/ccache g++ ${EXTRA_FLAGS} "${arg[@]}" # Runs the command } main "$@"
Make sure that the wrappers appear earlier than the real commands in your PATH.
The make
wrapper can also call remake
instead. Remake is fully compatible with make but has features to help debugging compilation and makefile errors.
Analyze the structure of MP4 data
The ISOBMFF Box Structure Viewer online tool allows you to upload an MP4 file and explore its structure.
This is the last post on the instrumenting source code series. I hope you to find the tricks below as useful as the previous ones.
In this post I show some more useful debugging tricks. Check also the other posts of the series:
This is the continuation of the GStreamer WebKit debugging tricks post series. In the next three posts, I’ll focus on what we can get by doing some little changes to the source code for debugging purposes (known as “instrumenting”), but before, you might want to check the previous posts of the series:
I’ve recalled about my old Shishen Sho game, originally developed for N810 (Maemo4) and I was wondering if it would compile for N900 (Maemo5). Well, after some minor corrections to make it work in a more recent version of Vala, it compiled. You can downloaded it here:
https://garage.maemo.org/frs/download.php/7573/shishensho_0.3.1-maemo5_armel.deb
Disclaimer: It’s compiled “as is”, with no adaption for sliding menus, no new hardware keys and no new fancy features. It just works and will let you have a good time while waiting for the bus.
Some simple steps to do tethering over bluetooth to connect to Yoigo Spanish carrier:
- Enable the Maemo Extras-devel catalog (URL: http://repository.maemo.org/extras-devel, Distribution: fremantle, Components: free non-free) and install “Bluetooth Dial-up Networking”.
- In your computer, edit
/etc/bluetooth/rfcomm.conf
to look like this, but using your own bluetooth device address (usehcitool scan
from your laptop to get it):rfcomm1 { # Automatically bind the device at startup bind yes; # Bluetooth address of the device device 00:11:22:33:44:55 # RFCOMM channel for the connection channel 2; # Description of the connection comment "N900"; }
Channels 1 and 3 are also available and can be defined as
rfcomm0
andrfcomm2
, but the scope of that is out of this post. - Now edit the file
/home/youruser/.wvdialrc
in your laptop (using your own username) to look like this:[Dialer YoigoBT] init1 = AT+CGDCONT=1,"IP","internet" Username = '' Password = '' Modem = /dev/rfcomm1 Phone = *99#
To connect to the internet, simply open a terminal and type:
sudo wvdial YoigoBT
To disconnect, just press CTRL+c and it’s done.
Thanks to this post, which was used as a reference on how to connect using Nokia devices.