

Maemo Chinook 4.0.x Tutorial
- Introduction
- Setting up and Testing Development Environment
- Using Development Environment
- Writing maemo GUI Applications
- Other Hildon Widgets
- Using maemo Input Mechanism
- Integrating Applications to maemo Framework
- Usage of Back-up Application
- How to Map MIME Types
- Clipboard Usage
- Global Search Usage
- Writing Control Panel Applets
- Writing Status Bar Plug-ins
- Writing "Send Via" Functionality
- Writing Internet-Connected Applications
- Deploying Applications
- Proceeding
- Code examples
- Links in This Document
Introduction
This tutorial applies to maemo 4.0.
Overview of Tutorial
This document is a basic tutorial for developing on the OS2008. Essentially, it will roughly guide developers through the basic steps towards making a fully-fledged application that can be deployed onto OS2008 devices, divided as follows
- What is maemo and what is inside the maemo platform. (Section: Overview of the maemo Platform)
- Installing and using the maemo SDK. (Sections: Setting up and Testing Development Environment and Using Development Environment)
- Writing maemo GUI applications.
- Using various essential features of the SDK, such as:
- Integrating applications to maemo framework
- Deploying applications onto maemo-powered devices.
- Proceeding to show how to proceed to master maemo
About maemo
To learn about basics of maemo, see maemo Quick Start Guide.
Overview of SDK
With maemo SDK, users are able to:
- Run their own and ready-made applications on the maemo platform, which is installed on the Linux PC. Maemo SDK is not an emulator; for the most parts, the same platform is used in the development PC and in the target device.
- Create their own maemo GUI applications, to be tested and debugged inside maemo SDK with a normal Linux PC. Software development for embedded devices with maemo SDK is just as easy as for desktop PCs.
- Port their favorite open source Linux project as a maemo application. Existing GTK+ applications are relatively easy to convert, the ones using some other toolkit need more UI changes.
- Build application packages to be installed to maemo-compatible devices. After testing the application in SDK, it can also be easily packaged as ARMEL version.
The maemo SDK main components include Platform libraries, such as:
- Binaries and libraries compiled for target architecture (i386 or ARMEL)
- D-BUS
- GnomeVFS
- GConf
Maemo Application Framework, including for example:
- Hildon and GTK+
- libOSSO
- Task navigator
Quick Start
For those who are in a hurry to learn, following quick steps should provide a good start:
- Download and install Scratchbox and related packages as described in SDK installation instructions
- Download also SDK installer (Downloads).
- Install them with the instructions available in here.
- Login into Scratchbox and select the x86 SDK target.
scratchbox
sb-conf select CHINOOK_X86
- Create file "maemo_hello.c" with the source code below:
#include <hildon/hildon-program.h> #include <gtk/gtkmain.h> #include <gtk/gtkbutton.h> int main(int argc, char *argv[]) { /* Create needed variables */ HildonProgram *program; HildonWindow *window; GtkWidget *button; /* Initialize the GTK. */ gtk_init(&argc, &argv); /* Create the hildon program and setup the title */ program = HILDON_PROGRAM(hildon_program_get_instance()); g_set_application_name("Hello maemo!"); /* Create HildonWindow and set it to HildonProgram */ window = HILDON_WINDOW(hildon_window_new()); hildon_program_add_window(program, window); /* Create button and add it to main view */ button = gtk_button_new_with_label("Hello!"); gtk_container_add(GTK_CONTAINER(window), button); /* Connect signal to X in the upper corner */ g_signal_connect(G_OBJECT(window), "delete_event", G_CALLBACK(gtk_main_quit), NULL); /* Begin the main application */ gtk_widget_show_all(GTK_WIDGET(window)); gtk_main(); /* Exit */ return 0; } - Compile the application inside Scratchbox with this command:
[sbox-CHINOOK_X86: ~] > gcc -o maemo_hello maemo_hello.c `pkg-config --cflags gtk+-2.0 hildon-1` -ansi -Wall `pkg-config --libs gtk+-2.0 hildon-1`
-
Start Xephyr from outside Scratchbox:
Xephyr :2 -host-cursor -screen 800x480x16 -dpi 96 -ac -extension Composite
-
Set the DISPLAY variable to direct graphical applications to the display 2.
[sbox-CHINOOK_X86: ~] > export DISPLAY=:2
For future sessions, it is good to set this up automatically. Add the following line to the end of the .bash_profile file inside Scratchbox:
export DISPLAY=:2
-
Start the Hildon desktop:
[sbox-CHINOOK_X86: ~] > af-sb-init.sh start
-
Run your application with "run-standalone.sh" script to make it get the right environment variables and theme:
[sbox-CHINOOK_X86: ~] >run-standalone.sh ./maemo_hello
-
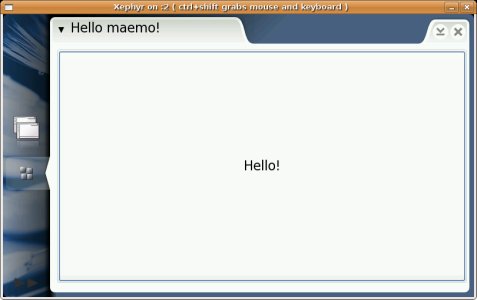
Below is a screenshot of the view you should be seeing now. The application name is shown on the top, and the application view is filled with one big button. Clicking the button does not do anything, as there is no event handling in this application yet. That will be explained in the following sections. For now, just close the application by pressing "X" in the upper right-hand corner.
Here are some options for proceeding:
- To learn what is included in the maemo SDK, read the whole tutorial starting from the next section, Overview
- If already familiar with Linux and GTK+, and wishing to start coding directly, see How to Write New Applications in maemo 4.0 on creating a full-blown maemo text editor application
- If there is an existing GTK+ application, which is wished to be ported on maemo platform, proceed to Maemo 4.0 Porting Guide about converting an existing open source application for the maemo platform
Supported Hardware and Device UI Form Factors
Currently maemo is developed for Internet Tablet devices. The minimum constraints for supported hardware and form-factors are following:
- Screen resolution of 800x480 pixels
- Included pointer device (e.g. touchscreen)
- ARM or x86 CPU
- Minimum of 32 MB ROM and 64 MB RAM
Additionally, maemo supports a set of pre-defined hardware keys.
Setting up and Testing Development Environment
There is a separate clear INSTALL.txt file that comes with each maemo release. Please click here to setup maemo SDK 4.0Pre-requisites
When setting up maemo SDK, the hardware and software requirements are as follows:
- Intel-compatible x86 processor, 500 MHz or faster
- 256 MB RAM or more
- 2 GB free hard disk space
- Linux OS (Debian or Ubuntu are recommended, but other fairly recent distributions should also work)
When starting up the installation, these pieces of software are needed to be downloaded:
- Scratchbox cross-compilation toolkit and toolchains from http://www.scratchbox.org/download/scratchbox-apophis/. See INSTALL.txt for recommended and supported versions of Scratchbox and related packages.
- Maemo SDK installer from Downloads.
Installation
After installing Scratchbox and maemo development environment as explained in the INSTALL.txt file, the environment is ready for use, and the compilation of maemo applications can be started! To be able to also see and test them, proceed to the next section, guiding the installation of a graphical X server for running applications.
Installing Xephyr
To run the maemo environment in a Linux PC, a graphical window is needed for starting. For this purpose, we recommend Xephyr, but there are also alternative options.
- Xephyr is a kdrive-based X Server, targeting a window on a host X Server as its framebuffer. See more about Xephyr at http://www.freedesktop.org/wiki/Software_2fXephyr
- Xephyr is not included anymore in rootstraps, and is meant to be installed to the host system instead. Xephyr can be found, for example, in http://packages.debian.org/unstable/x11/xserver-xephyr.
- On Debian-based Linux distribution, it is possible to try installing using apt-get install xserver-xephyr outside Scratchbox.
Use the following startup-parameters for Xephyr outside Scratchbox:
$ Xephyr :2 -host-cursor -screen 800x480x16 -dpi 96 -ac -extension Composite
After running Xephyr, the following empty Xephyr window should open.

Proceed to the next section to learn how to launch maemo GUI inside this window.
Launching Application Framework Environment
If Xephyr or another graphical window was started using display 2, like instructed earlier, the DISPLAY variable should be set inside Scratchbox to direct graphical applications to the display 2.
[sbox-CHINOOK_X86: ~] > export DISPLAY=:2
For future sessions, it is good to set this up automatically. Add the following line to the end of the .bash_profile file inside Scratchbox:
export DISPLAY=:2
Now you can finally start maemo GUI in the X window with the command:
[sbox-CHINOOK_X86: ~] > af-sb-init.sh start
The following user interface will appear.

Now you are ready to start testing provided applications. If you want to stop the GUI, run
[sbox-CHINOOK_X86: ~] > af-sb-init.sh stop
Using Development Environment
Running Applications
Running applications inside the development environment is easy, and most importantly, they are run in real Linux environment, instead of an emulator. For running GUI and applications, i386 SDK must be used, as the QEMU emulation is not good enough to run ARMEL binaries (See more about ARMEL/QEMU). When maemo GUI has been started with 'af-sb-init.sh start', the pre-installed applications can be experienced.
If merely wanting to see, how the application works in the environment, it can be run with the "run-standalone.sh" script. This will set right environment variables and theme.
[sbox-CHINOOK_X86: ~] >run-standalone.sh ./maemo_hello
To build the whole application from source and to add a menu entry, keep on reading the tutorial.
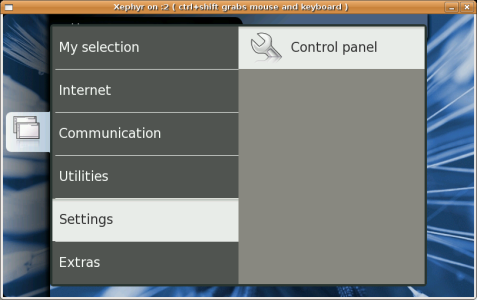
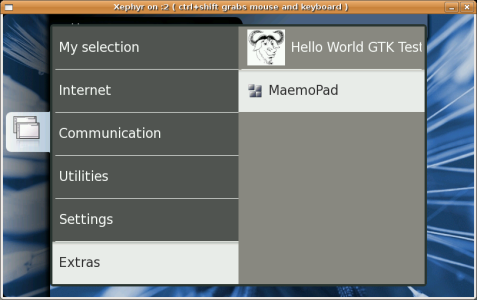
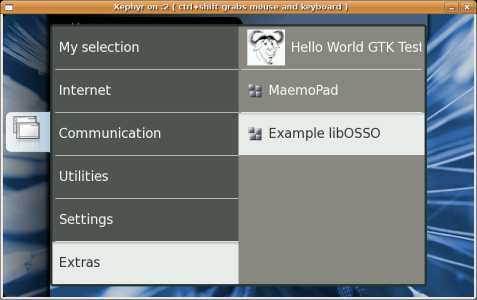
On the left-hand side, there is the task navigator area with buttons, of which the bottom-most is the task launcher menu. That includes all installed applications, so applications can be launched by clicking it and selecting the desired application. Try first starting Control panel.
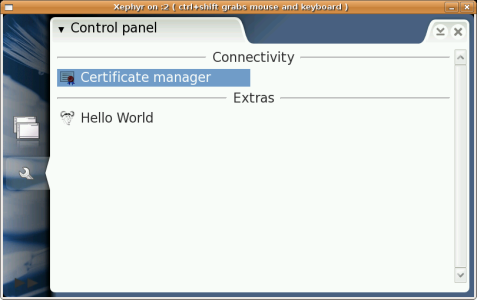
The control panel window opens with icons for a few control panel plug-ins.
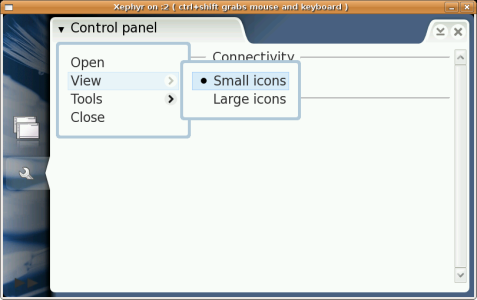
Every maemo application can have an application-specific menu, located on the upper left-hand corner of the application area.
To switch between applications, use Application switcher on the bottom left-hand corner. You have only Control panel and Home to switch between.
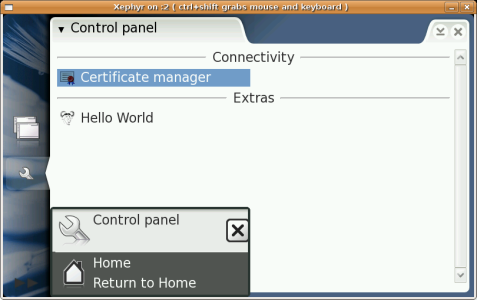
Switch back to Control panel and close it, either from the menu or by pressing "X" in the upper right-hand corner.
Building Applications
This section explains how to build and install MaemoPad application from source files. Applications for the maemo platform are distributed as Application Manager .deb packages. Packaging is described more closely in Creating maemo Packages section. The MaemoPad text editor application, which is built from scratch in the How to Write New Applications in Maemo 4.0, is used as an example:
- ; First download the MaemoPad source .tar.gz file from the subversion repository.
- Copy that file to the user home directory inside Scratchbox, and uncompress it:
[sbox-CHINOOK_X86: ~] > tar xzvf maemopad_2.1.tar.gz
- Go inside application directory:
[sbox-CHINOOK_X86: ~] > cd maemopad-2.1
[sbox-CHINOOK_X86: ~/maemopad-2.1] >
- Install the build dependencies packages. (Remember to have your /etc/apt/sources.list include the correct maemo 4.0 repository)
[sbox-CHINOOK_X86: ~/maemopad-2.1] > fakeroot apt-get build-dep maemopad
- To make Debian package of the application, run 'dpkg-buildpackage' in the application directory.
[sbox-CHINOOK_X86: ~/maemopad-2.1] > dpkg-buildpackage -rfakeroot -b
- If everything went well, the parent directory should contain the Debian package.
[sbox-CHINOOK_X86: ~/maemopad-2.1] > cd ..
[sbox-CHINOOK_X86: ~] > ls
maemopad-2.1
maemopad_2.1_i386.deb
- The MaemoPad package is compatible with Application Manager, but it can also be installed using debian package manager dpkg:
[sbox-CHINOOK_X86: ~] > fakeroot dpkg -i maemopad_2.1_i386.deb
Selecting previously deselected package maemopad.
(Reading database ... 20 files and directories currently installed.)
Unpacking maemopad (from maemopad_2.1_i386.deb) ...
Setting up maemopad (2.1) ...
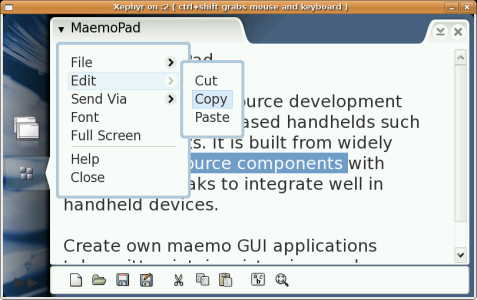
- Now the application should be visible in the task launcher menu. Select the application to launch it.
Write some text, test menu options, such as Copy/Paste or changing font. In case you decide to jump to the full screen mode, it is good to know that "F6" is used to emulate full screen hardware key in maemo, so by pressing that, the normal view can be restored.
Debian packaging is a large subject; and it is not discussed here in detail. For more information, see "Debian New Maintainers' Guide" at http://www.debian.org/doc/manuals/maint-guide/.
Building for ARMEL
Building ARMEL packages for the maemo devices is just as easy as building packages for i386. All that is needed is to change to the preinstalled ARMEL target.
You can also setup additional ARMEL targets manually. There are two ways to get required ARMEL compilation support for the rootstrap:
- To use QEMU to emulate an ARM processor. QEMU is a generic and open source processor emulator, achieving a good emulation speed by using dynamic translation. For more information about QEMU, see: http://fabrice.bellard.free.fr/qemu/
- To use a real ARMEL device as a cross-compilation device. This is performed in Scratchbox with sbrsh, running the configure script test programs on a networked device with the same CPU as the cross-compilation target device, in a way that is transparent to the configuration system. Running programs on actual target device is more reliable than emulating specific target device, because QEMU may not support all required features. For more information about using CPU-transparency device, see http://scratchbox.org.
QEMU is suitable for normal cross-compilation, but an actual target device should be used for more advanced purposes. In this tutorial, however, QEMU is used, as it is much easier to set up, and no extra hardware is required. QEMU emulation is getting more and more complete all the time, although it cannot be used to run applications, yet. That may be possible pretty soon, though.
Setting up a new ARMEL target can be done very similarly as the PC target in an earlier section. Please see the SDK installation INSTALL.txt for further information on how to setup an ARMEL SDK target
For ARMEL target it is possible to build Debian packages with it, just like earlier with the PC rootstrap. N.B. Inside Scratchbox ARMEL target (which uses QEMU CPU emulation) everything may not work as in the device.
Writing maemo GUI Applications
Overview of maemo GUI Applications
Hildon is a graphical user interface designed for small mobile devices. This section aims to assist developers in getting started with the development of Hildon-compatible applications.
Most GTK+ widgets and methods work unaltered in the Hildon environment, but to make applications fit in the maemo GUI environment, some source code changes for plain GTK+ applications are required.
Next sections introduce most important widgets in Hildon; all GTK+ widgets can be used in addition of these. For more information, see the GTK+ Reference Manual at http://library.gnome.org/devel/gtk/unstable/index.html
Most of the source code snippets in the whole tutorial can also be found in the maemo-examples package.
Basic Hildon Layouts
This section shows basic layout modes of the Hildon user interface. Applications can use all of these and switch dynamically between different views. In all the views application area can, of course, be shared in any possible ways using GTK+ containers (e.g. GtkHBox, GtkVBox and GtkTable).
Normal View
The figures below describe the basic layout of the Hildon user interface in the normal view. This view consists of the Task Navigator area, statusbar/titlebar area, application area and three areas of inactive skin graphics.
- Task Navigator area on the left is 80 pixels wide
- Statusbar/titlebar area is 720x60 pixels
- Application area of 696x396 pixels is in the middle

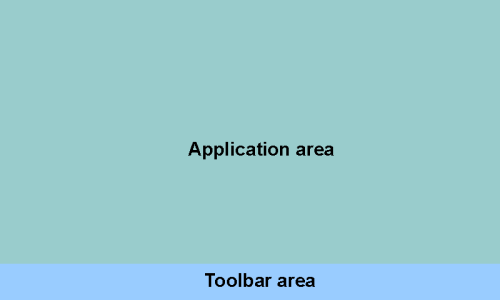
Normal View with Toolbar
This basic layout contains all types of functional areas. The layout is basically the same as Normal View, but there is a toolbar area on the bottom, replacing the inactive skin graphic area. The toolbar area width is 720 pixels and the height varies depending on the toolbar type:
- 360 pixels with a single toolbar
- 310 pixels with both application and Find toolbar

Full Screen View
In this view, the whole screen (800x480 px) is reserved for the application area. The full screen mode can be activated and deactivated by a hardware button, or in the application code. All applications should provide full screen mode to enable maximized screen usage when needed.

Full Screen View with Toolbar
This is a variation of the full screen view. There is a toolbar area at the bottom of the screen, reducing the space available for the application area. The toolbar can be visible in both normal and full screen modes, so it should be made scalable.
- With a single toolbar, the application area height is 422 pixels.
- Multiple toolbars can be used (e.g. the Find toolbar) simultaneously. All of them appear at the bottom of screen, on top of each other, reducing application area. With two toolbars, the application area height is 370 pixels.
Windows
HildonProgram
#include <hildon/hildon-program.h>
#include <gtk/gtkmain.h>
A HildonProgram is the base of any Hildon application. It is inherited from GObject, and represents an application running in the Hildon framework. The HildonProgram tracks the top-most status of an application, and informs Task Navigator when the application can be hibernated. It also provides tools to get/set common menus and toolbars common for all application windows.
The HildonProgram widget is created by calling the function hildon_program_get_instance(), which does not take any parameters, and returns newly-created HildonProgram. For this tutorial, the following API functions are of interest:
HildonProgram *hildon_program_get_instance (void)
- Creates new HildonProgram widget.
void hildon_program_add_window (HildonProgram *self, HildonWindow *window)
- Adds HildonWindow to HildonProgram.
hildon_program_set_can_hibernate (HildonProgram *self, gboolean killable)
- Informs Task Navigator that it can hibernate the HildonProgram.
void hildon_program_set_common_menu (HildonProgram *self, GtkMenu *menu)
- Sets common menu for all application windows.
void hildon_program_set_common_toolbar (HildonProgram *self, GtkToolbar *toolbar)
- Sets common toolbar for all application windows.
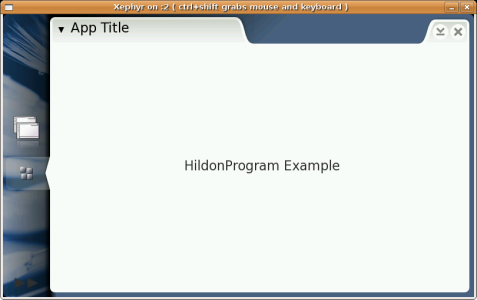
This is an example (example_hildonprogram.c) application which creates new HildonProgram and HildonWindow. It sets a title for the application and creates a sample label.
int main(int argc, char *argv[])
{
    /* Create needed variables */
    HildonProgram *program;
    HildonWindow *window;

    /* Initialize the GTK. */
    gtk_init(&argc, &argv);

    /* Create the Hildon program and setup the title */
    program = HILDON_PROGRAM(hildon_program_get_instance());
    g_set_application_name("App Title");

    /* Create HildonWindow and set it to HildonProgram */
    window = HILDON_WINDOW(hildon_window_new());
    hildon_program_add_window(program, window);

    /* Add example label to window */
    gtk_container_add(GTK_CONTAINER(window),
                      GTK_WIDGET(gtk_label_new("HildonProgram Example")));

    /* Begin the main application */
    gtk_widget_show_all(GTK_WIDGET(window));

    /* Connect signal to X in the upper corner */
    g_signal_connect(G_OBJECT(window), "delete_event",
    G_CALLBACK(gtk_main_quit), NULL);

    gtk_main();

    /* Exit */
    return 0;
}
To compile the program, type
$ gcc -o example_hildonprogram example_hildonprogram.c `pkg-config gtk+-2.0 hildon-1 --cflags --libs` -WallTo run this sample from inside Scratchbox, start the Xephyr server and
$ run-standalone.sh ./example_hildonprogram
And you will be able to see
HildonWindow
#include <hildon/hildon-window.h>
The HildonWindow is inherited from the GtkWindow. It represents a top-level window of an application running in the Hildon framework. It provides facilities to manage window menus and toolbars. GtkWindow API applies to it as well (gtk_window_fullscreen, gtk_window_set_urgency_hint, ...).
Each HildonWindow can have its own menu and toolbars. Application can also have common menu and toolbar, shared between all application windows. To get more information check HildonProgram, Menus and Toolbars sections.
The following HildonWindow functions are the most important ones:
GtkWidget *hildon_window_new (void)
- Creates a new HildonWindow widget.
void hildon_window_set_menu (HildonWindow *self, GtkMenu *menu)
- Sets a menu for the HildonWindow.
void hildon_window_add_toolbar (HildonWindow *self, GtkToolbar *toolbar)
- Adds a toolbar for the HildonWindow.
See previous section for a sample code.
Menus
#include <hildon/hildon-program.h>
#include <gtk/gtk.h>
Menus in maemo use GTK+ menu functions with the exception that the menu is attached to the HildonProgram/Window, and appears in the title bar. A GtkMenu can be created and attached to the HildonProgram to be used as a common menu for all HildonWindows that do not have their own menu. Another way is to use a GtkMenu in a HildonWindow. This way, every application window can have different menu.
GTK+ menus can be made both manually and using GtkUIManager. The GtkUIManager is a new action-based method to create menus and toolbars using an XML description. This tutorial introduces only manual creation. More about GtkUIManager can be read at http://library.gnome.org/devel/gtk/unstable/GtkUIManager.html.
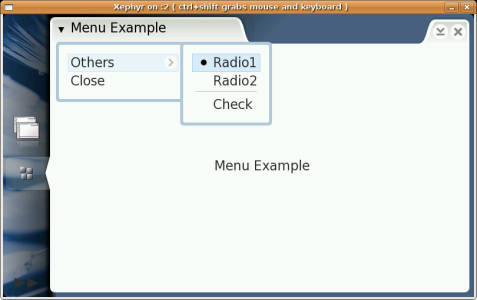
The next example (example_menu.c) creates a menu with a submenu. This submenu contains radio menu items and check menu item, all of which can be toggled. The last item in the menu (Close) is attached to a callback function, so that the application can be closed also from the menu. Here we start with the function creating this menu. In this example, the menu is attached to the one and only HildonWindow.
/* Create the menu items needed for the main view */
static void create_menu(HildonWindow * main_window)
{
    /* Create needed variables */
    GtkWidget *main_menu;
    GtkWidget *menu_others;
    GtkWidget *item_others;
    GtkWidget *item_radio1;
    GtkWidget *item_radio2;
    GtkWidget *item_check;
    GtkWidget *item_close;
    GtkWidget *item_separator;

    /* Create new main menu */
    main_menu = gtk_menu_new();

    /* Create new submenu for "Others" */
    menu_others = gtk_menu_new();

    /* Create menu items */
    item_others = gtk_menu_item_new_with_label("Others");
    item_radio1 = gtk_radio_menu_item_new_with_label(NULL, "Radio1");
    item_radio2 =
        gtk_radio_menu_item_new_with_label_from_widget(GTK_RADIO_MENU_ITEM
                                                       (item_radio1),
                                                       "Radio2");
    item_check = gtk_check_menu_item_new_with_label("Check");
    item_close = gtk_menu_item_new_with_label("Close");
    item_separator = gtk_separator_menu_item_new();

    /* Add menu items to right menus */
    gtk_menu_append(main_menu, item_others);
    gtk_menu_append(menu_others, item_radio1);
    gtk_menu_append(menu_others, item_radio2);
    gtk_menu_append(menu_others, item_separator);
    gtk_menu_append(menu_others, item_check);
    gtk_menu_append(main_menu, item_close);

    /* Add others submenu to the "Others" item */
    hildon_window_set_menu(HILDON_WINDOW(main_window), GTK_MENU(main_menu));
    gtk_menu_item_set_submenu(GTK_MENU_ITEM(item_others), menu_others);

    /* Attach the callback functions to the activate signal */
    g_signal_connect(G_OBJECT(item_close), "activate",
                     GTK_SIGNAL_FUNC(item_close_cb), NULL);

    /* Make all menu widgets visible */
    gtk_widget_show_all(GTK_WIDGET(main_menu));
}
The menu entry "Close" is attached with the function "g_signal_connect" to the callback function "item_close_cb". This function, which is presented next, ends the application by executing "gtk_main_quit()".
/
/* Callback for "Close" menu entry */
void item_close_cb()
{
    g_print("Closing application...\n");
    gtk_main_quit();
}
The main function in this application is similar to others presented earlier. The only new thing here is executing the function "create_menu()" HildonWindow as its parameter. This function creates the menu and attach it to the window.
/* Main application */
int main(int argc, char *argv[])
{
    /* Create needed variables */
    HildonProgram *program;
    HildonWindow *window;

    /* Initialize the GTK. */
    gtk_init(&argc, &argv);

    /* Create the hildon program and setup the title */
    program = HILDON_PROGRAM(hildon_program_get_instance());
    g_set_application_name("Menu Example");

    /* Create HildonWindow and set it to HildonProgram */
    window = HILDON_WINDOW(hildon_window_new());
    hildon_program_add_window(program, window);

    /* Add example label to HildonWindow */
    gtk_container_add(GTK_CONTAINER(window),
                      gtk_label_new("Menu Example"));

    /* Create menu for HildonWindow */
    create_menu(window);

    /* Connect signal to X in the upper corner */
    g_signal_connect(G_OBJECT(window), "delete_event",
      G_CALLBACK(item_close_cb), NULL);

    /* Begin the main application */
    gtk_widget_show_all(GTK_WIDGET(window));
    gtk_main();

    /* Exit */
    return 0;
}
To compile and run, start Xephyr server and
$ gcc -o example_menu example_menu.c `pkg-config gtk+-2.0 hildon-1 --cflags --libs` -Wall
$ run-standalone.sh ./example_menu
Screenshot of the application is presented below, with the submenu opened.
As the maemo menus are GTK+ menus, they are not explained here in more detail. For full API documentation regarding GTK+ menu widgets, see http://library.gnome.org/devel/gtk/unstable/GtkMenu.html
Toolbars
#include <hildon/hildon-program.h>
#include <gtk/gtk.h>
To create an application that has a toolbar, create a normal HildonWindow and then a normal GtkToolbar. The toolbar is used as any GtkToolbar is used, and it can contain normal GtkToolItems, like:
- GtkToolButton - A normal toolbar button that can be clicked.
- GtkToggleToolButton - A toolbar button that can be toggled between two different states. An example of this kind of usage is the 'Bold' button in text editors, it can be either enabled of disabled.
- GtkRadioToolButton - A toolbar button that can be toggled between two different states, with the addition that only one of the buttons in a group can be selected at the same time. Example of this kind on usage are tool buttons (line, box, fill) in drawing applications: only one tool can be selected at any given time.
- GtkSeparatorToolItem - A toolbar item that is used as a separator between real items. It can be visible separation line, or just an empty space.
- GtkToolItem - The base class of widgets that can be added to GtkToolbar. By using this as a parent widget, all kind of widgets can be inserted inside a GtkToolbar. An example of this kind of usage can be seen in the following sample code, where the GtkComboBox is attached to a toolbar.
The main difference compared to normal GTK+ usage is that toolbars can be common to all HildonWindows in an application, or they can be used only in a particular HildonWindow.
The function below creates a toolbar and adds it to the HildonWindow. In this example (example_toolbar.c), the defined function is called in the main function in the same way as in the previous menu example. The callback function for the 'Close' button (tb_close_cb) is similar to the earlier example, also.
/* Create the toolbar needed for the main view */
static void create_toolbar(HildonWindow * main_window)
{
    /* Create needed variables */
    GtkWidget *main_toolbar;
    GtkToolItem *tb_new;
    GtkToolItem *tb_open;
    GtkToolItem *tb_save;
    GtkToolItem *tb_close;
    GtkToolItem *tb_separator;
    GtkToolItem *tb_comboitem;
    GtkComboBox *tb_combo;

    /* Create toolbar */
    main_toolbar = gtk_toolbar_new();

    /* Create toolbar button items */
    tb_new = gtk_tool_button_new_from_stock(GTK_STOCK_NEW);
    tb_open = gtk_tool_button_new_from_stock(GTK_STOCK_OPEN);
    tb_save = gtk_tool_button_new_from_stock(GTK_STOCK_SAVE);
    tb_close = gtk_tool_button_new_from_stock(GTK_STOCK_CLOSE);

    /* Create toolbar combobox item */
    tb_comboitem = gtk_tool_item_new();
    tb_combo = GTK_COMBO_BOX(gtk_combo_box_new_text());
    gtk_combo_box_append_text(tb_combo, "Entry 1");
    gtk_combo_box_append_text(tb_combo, "Entry 2");
    gtk_combo_box_append_text(tb_combo, "Entry 3");
    /* Select second item as default */
    gtk_combo_box_set_active(GTK_COMBO_BOX(tb_combo), 1);
    /* Make combobox to use all available toolbar space */
    gtk_tool_item_set_expand(tb_comboitem, TRUE);
    /* Add combobox inside toolitem */
    gtk_container_add(GTK_CONTAINER(tb_comboitem), GTK_WIDGET(tb_combo));

    /* Create separator */
    tb_separator = gtk_separator_tool_item_new();

    /* Add all items to toolbar */
    gtk_toolbar_insert(GTK_TOOLBAR(main_toolbar), tb_new, -1);
    gtk_toolbar_insert(GTK_TOOLBAR(main_toolbar), tb_separator, -1);
    gtk_toolbar_insert(GTK_TOOLBAR(main_toolbar), tb_open, -1);
    gtk_toolbar_insert(GTK_TOOLBAR(main_toolbar), tb_save, -1);
    gtk_toolbar_insert(GTK_TOOLBAR(main_toolbar), tb_comboitem, -1);
    gtk_toolbar_insert(GTK_TOOLBAR(main_toolbar), tb_close, -1);

    /* Add signal lister to "Close" button */
    g_signal_connect(G_OBJECT(tb_close), "clicked",
                     G_CALLBACK(tb_close_cb), NULL);

    /* Add toolbar HildonWindow */
    hildon_window_add_toolbar(main_window, GTK_TOOLBAR(main_toolbar));
}
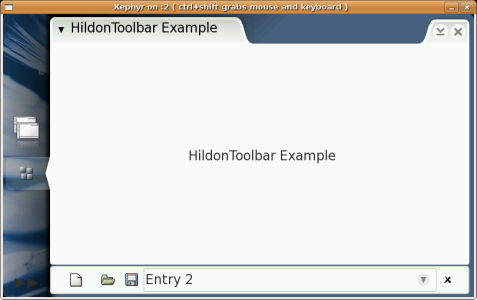
The screenshot presents the created toolbar with several buttons and combobox.
To compile and run, start Xephyr server and
$ gcc -o example_toolbar example_toolbar.c `pkg-config gtk+-2.0 hildon-1 --cflags --libs` -Wall
$ run-standalone.sh ./example_toolbar
HildonFindToolbar
#include <hildon/hildon-program.h>
#include <hildon/hildon-find-toolbar.h>
#include <gtk/gtk.h>
A HildonFindToolbar is a special toolbar for a find feature. Maemo applications may have several toolbars, which are then attached on top of each other. The Find toolbar is generally placed on the top of the main toolbar, as in this example.
Now a bit more complete application (example_findtoolbar.c), for which the Find toolbar needs to be opened and hidden. A structure is created to contain the main UI widget pointers. This is the way a real maemo application should be built to make accessing generated widgets easier. The code is reviewed here piece by piece, at first the data structure, holding important data needed to be accessed by other functions.
/* Application UI data struct */
typedef struct _AppData AppData;
struct _AppData {

    /* View items */
    HildonProgram *program;
    HildonWindow *window;

    /* Toolbar */
    GtkWidget *main_toolbar;

    /* Find toolbar */
    HildonFindToolbar *find_toolbar;

    /* Is Find toolbar visible or not */
    gboolean find_visible;
};
The next part presents all the callback functions required: "Close" and "Find" for the main toolbar, and "Close" and "Search" for the Find toolbar. The actual search is not implemented, but it should be included in the find_tb_search() function.
/* Callback for "Close" toolbar button */
void tb_close_cb(GtkToolButton * widget, AppData * view)
{
    g_print("Closing application...\n");
    gtk_main_quit();
}

/* Callback for "Find" toolbar button */
void tb_find_cb(GtkToolButton * widget, AppData * view)
{
    /* Show or hide find toolbar */
    if (view->find_visible) {
        gtk_widget_hide_all(GTK_WIDGET(view->find_toolbar));
        view->find_visible = FALSE;
    } else {
        gtk_widget_show_all(GTK_WIDGET(view->find_toolbar));
        view->find_visible = TRUE;
    }
}

/* Callback for "Close" find toolbar button */
void find_tb_close(GtkWidget * widget, AppData * view)
{
    gtk_widget_hide_all(GTK_WIDGET(view->find_toolbar));
    view->find_visible = FALSE;
}

/* Callback for "Search" find toolbar button */
void find_tb_search(GtkWidget * widget, AppData * view)
{
    gchar *find_text = NULL;
    g_object_get(G_OBJECT(widget), "prefix", &find_text, NULL);
    /* Implement the searching here... */
    g_print("Search for: %s\n", find_text);
}
Next the HildonFindToolbar is created in a separate function, and connected to the callback listeners presented before. N.B. There is no gtk_widget_show() function for the toolbar here, as it is designed to be kept hidden when application starts.
/* Create the find toolbar */
void create_find_toolbar(AppData * view)
{
    HildonFindToolbar *find_toolbar;
    find_toolbar = HILDON_FIND_TOOLBAR
        (hildon_find_toolbar_new("Find String: "));

    /* Add signal listers to "Search" and "Close" buttons */
    g_signal_connect(G_OBJECT(find_toolbar), "search",
                     G_CALLBACK(find_tb_search), view);
    g_signal_connect(G_OBJECT(find_toolbar), "close",
                     G_CALLBACK(find_tb_close), view);
    hildon_window_add_toolbar(view->window, GTK_TOOLBAR(find_toolbar));

    /* Set variables to AppData */
    view->find_toolbar = find_toolbar;
    view->find_visible = FALSE;
}
The function create_toolbar() is very similar to the earlier example, only a callback is added for the Find toolbar button. Also, in stead of finding, the find button in the main toolbar just shows or hides the find_toolbar
/* Create the toolbar for the main view */
static void create_toolbar(AppData * appdata)
{
    /* Create needed variables */
    GtkWidget *main_toolbar;
    GtkToolItem *tb_new;
    GtkToolItem *tb_open;
    GtkToolItem *tb_save;
    GtkToolItem *tb_find;
    GtkToolItem *tb_close;
    GtkToolItem *tb_separator;
    GtkToolItem *tb_comboitem;
    GtkComboBox *tb_combo;

    /* Create toolbar */
    main_toolbar = gtk_toolbar_new();

    /* Create toolbar button items */
    tb_new = gtk_tool_button_new_from_stock(GTK_STOCK_NEW);
    tb_open = gtk_tool_button_new_from_stock(GTK_STOCK_OPEN);
    tb_save = gtk_tool_button_new_from_stock(GTK_STOCK_SAVE);
    tb_find = gtk_tool_button_new_from_stock(GTK_STOCK_FIND);
    tb_close = gtk_tool_button_new_from_stock(GTK_STOCK_CLOSE);

    /* Create toolbar combobox item */
    tb_comboitem = gtk_tool_item_new();
    tb_combo = GTK_COMBO_BOX(gtk_combo_box_new_text());
    gtk_combo_box_append_text(tb_combo, "Click to show-hide findtoolbar");
    gtk_combo_box_append_text(tb_combo, "Entry 2");
    gtk_combo_box_append_text(tb_combo, "Entry 3");
    /* Select second item as default */
    gtk_combo_box_set_active(GTK_COMBO_BOX(tb_combo), 1);
    /* Make combobox to use all available toolbar space */
    gtk_tool_item_set_expand(tb_comboitem, TRUE);
    /* Add combobox inside toolitem */
    gtk_container_add(GTK_CONTAINER(tb_comboitem), GTK_WIDGET(tb_combo));

    /* Create separator */
    tb_separator = gtk_separator_tool_item_new();

    /* Add all items to toolbar */
    gtk_toolbar_insert(GTK_TOOLBAR(main_toolbar), tb_new, -1);
    gtk_toolbar_insert(GTK_TOOLBAR(main_toolbar), tb_separator, -1);
    gtk_toolbar_insert(GTK_TOOLBAR(main_toolbar), tb_open, -1);
    gtk_toolbar_insert(GTK_TOOLBAR(main_toolbar), tb_save, -1);
    gtk_toolbar_insert(GTK_TOOLBAR(main_toolbar), tb_comboitem, -1);
    gtk_toolbar_insert(GTK_TOOLBAR(main_toolbar), tb_find, -1);
    gtk_toolbar_insert(GTK_TOOLBAR(main_toolbar), tb_close, -1);

    /* Add signal lister to "Close" button */
    g_signal_connect(G_OBJECT(tb_close), "clicked",
                     G_CALLBACK(tb_close_cb), NULL);

    /* Add signal lister to "Find" button */
    g_signal_connect(G_OBJECT(tb_find), "clicked",
                     G_CALLBACK(tb_find_cb), appdata);

    /* Add toolbar HildonWindow */
    hildon_window_add_toolbar(appdata->window, GTK_TOOLBAR(main_toolbar));

    gtk_widget_show_all(main_toolbar);
    appdata->main_toolbar = main_toolbar;
}
Then the main application loop, creating a new AppData structure and storing the newly-created HildonProgram and HildonWindow into it. Both toolbars are created, but only the main toolbar is set visible.
/* Main application */
int main(int argc, char *argv[])
{
    /* Create needed variables */
    HildonProgram *program;
    HildonWindow *window;

    /* Initialize the GTK. */
    gtk_init(&argc, &argv);

    /* Create the Hildon program and setup the title */
    program = HILDON_PROGRAM(hildon_program_get_instance());
    g_set_application_name("HildonFindToolbar Example");

    /* Create HildonWindow and set it to HildonProgram */
    window = HILDON_WINDOW(hildon_window_new());
    hildon_program_add_window(program, window);

    /* Add example label to window */
    gtk_container_add(GTK_CONTAINER(window),
                      gtk_label_new("HildonFindToolbar Example"));

    /* Create AppData */
    AppData *appdata;
    appdata = g_new0(AppData, 1);
    appdata->program = program;
    appdata->window = window;

    /* Create toolbar for view */
    create_toolbar(appdata);

    /* Create find toolbar, but keep it hidden */
    create_find_toolbar(appdata);

    /* Connect signal to X in the upper corner */
    g_signal_connect(G_OBJECT(appdata->window), "delete_event",
      G_CALLBACK(item_close_cb), NULL);

    /* Show all other widgets except the find toolbar */
    gtk_widget_show_all(GTK_WIDGET(appdata->window));

    /* Hide the find toolbar */
    gtk_widget_hide(GTK_WIDGET(appdata->find_toolbar));
    /* Begin the main application */
    gtk_main();

    /* Exit */
    return 0;
}
To compile and run, start Xephyr server and
$ gcc -o example_findtoolbar example_findtoolbar.c `pkg-config gtk+-2.0 hildon-1 --cflags --libs` -Wall
$ run-standalone.sh ./example_findtoolbar
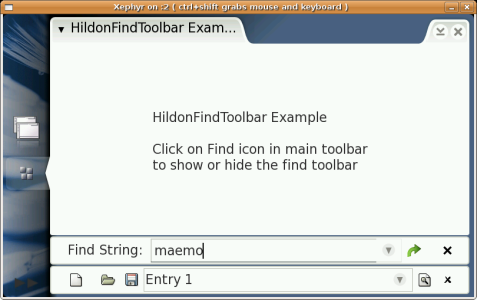
Now the application is ready; the screenshot below presents the result. The Find toolbar can be opened and closed pressing the 'Find' toolbar button (second from right). As no real functionality was created for the search, pressing "Find" only prints the search string into the command line.
Other Hildon Widgets
This section introduces general Hildon widgets, which can and should be used in different maemo applications. Only the most common ones are introduced; see Hildon API documentation for full list of available widgets. Remember that all normal GTK+ widgets can also be used; see GTK+ Reference Manual at http://library.gnome.org/devel/gtk/unstable/index.html.
HildonFileChooserDialog
#include <hildon/hildon-program.h>
#include <hildon/hildon-file-chooser-dialog.h>
#include <gtk/gtk.h>

/* Application UI data struct */
typedef struct _AppData AppData;
struct _AppData {
	HildonProgram *program;
	HildonWindow *window;

	GtkWidget * main_vbox;
	GtkWidget * label;

	/* Menu stuff */
	GtkWidget * main_menu;
	GtkWidget * menu_item_file_open;
	GtkWidget * menu_item_file_save;
	GtkWidget * menu_item_quit;
};
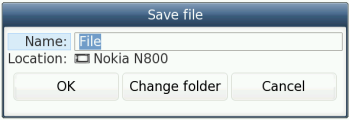
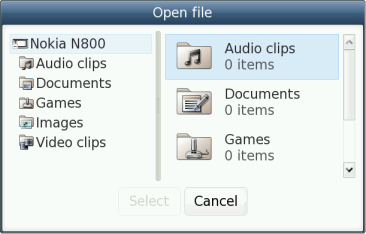
HildonFileChooserDialog is a dialog used to save and open the user files. It is based on the GtkFileChooser, so the API is similar to the one used in GTK+.
HildonFileChooserDialog is usually opened by event callback of "Open" or "Save" menu entries, or toolbar buttons. To use the file dialog, these callbacks should include similar code as below (example_file_chooser.c).
void cb_example_file_open (GtkWidget *w, AppData *data)
{
	gchar *filename = NULL;

	filename = interface_file_chooser (data, GTK_FILE_CHOOSER_ACTION_OPEN);

	if (filename == NULL) {
		filename = "NULL";
	}

	example_show_test_result (data, "File Opened", filename);
}

void cb_example_file_save (GtkWidget *w, AppData *data)
{
	gchar *filename = NULL;
	filename = interface_file_chooser (data, GTK_FILE_CHOOSER_ACTION_SAVE);

	if (filename == NULL) {
		filename = "NULL";
	}
	else {
		FILE *f = fopen (filename, "w");
		fprintf (f, "This file was generated by Hildon File Chooser example.");
		fclose (f);
	}

	example_show_test_result (data, "File saved as", filename);
}
The interface_file_chooser() function creates a dialog, attached to a HildonFileSystemModel:
static HildonFileSystemModel* get_file_system_model(GtkWidget *ref_widget)
{
 return HILDON_FILE_SYSTEM_MODEL(g_object_new(HILDON_TYPE_FILE_SYSTEM_MODEL,
					      "ref_widget", ref_widget, NULL));
}

gchar * interface_file_chooser (AppData * appdata, GtkFileChooserAction action)
{
    GtkWidget *dialog;
    gchar *filename = NULL;
    HildonFileSystemModel *model = NULL;

    if( (model = get_file_system_model(GTK_WIDGET(appdata->window)) ) == NULL)
    {
       g_print("could not get file system model\n\n");
       return NULL;
    }
    dialog = hildon_file_chooser_dialog_new_with_properties
                    (GTK_WINDOW(appdata->window),
		             "file_system_model", model,
		             "action", action,
	         	     NULL);
    gtk_widget_show_all (GTK_WIDGET (dialog));

    if (gtk_dialog_run (GTK_DIALOG (dialog)) == GTK_RESPONSE_OK) {
        filename = gtk_file_chooser_get_filename (GTK_FILE_CHOOSER (dialog));
    }
    gtk_widget_destroy(dialog);
    return filename;
}
To compile and run this program, include additional hildon-fm-2 to the pkg-config path, as follows:
 $ gcc -o example_file_chooser example_file_chooser.c  `pkg-config gtk+-2.0 hildon-1 hildon-fm-2 --cflags --libs`  -Wall
 $ run-standalone.sh ./example_file_chooser
Below are screenshots of both Save and Open dialogs.
For more information about HildonFileChooserDialog, see Hildon FM Reference Manual or How to Write New Applications in Maemo 4.0.
HildonColorChooser
N.B. In Bora, it was named HildonColorSelector, and from Chinook onwards, the name is changed to HildonColorChooser#include <hildon/hildon-program.h> #include <hildon/hildon-color-chooser.h> #include <hildon/hildon-color-chooser-dialog.h> #include <hildon/hildon-color-button.h> #include <gtk/gtk.h>
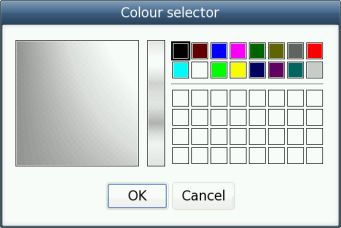
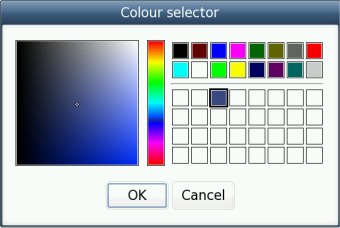
HildonColorChooser is a dialog for selecting colors. It is quite similar to GtkColorSelectionDialog, but more suitable for embedded devices.
There are two different ways to use HildonColorChooser: either by using HildonColorButton, showing the selected color in the button area and launching HildonColorChooser dialog automatically when clicked, or by creating the dialog manually.
First, the HildonColorButton should be created (example_color_chooser.c). It can be created by hildon_color_button_new(), and attached to wherever wanted in the UI.
...
color_button = HILDON_COLOR_BUTTON(hildon_color_button_new());
g_signal_connect(G_OBJECT(color_button), "clicked",
    G_CALLBACK(color_button_clicked), NULL);
...
In the color_button_clicked callback function, the selected color is retrieved from the HildonColorButton using the "color" property of the widget.
void color_button_clicked(GtkWidget * widget, gpointer data)
{
    GdkColor *new_color = NULL;
    g_object_get(widget, "color", &new_color, NULL);
}
That is all that is needed! If HildonColorButton is not needed, HildonColorChooser can be created manually:
void ui_show_color_chooser(GtkWidget * widget, AppData * appdata)
{
    GdkColor *current_color;
    GdkColor *new_color = NULL;
    GtkWidget *chooser;
    gint result;

    /* Create new color chooser (needs access to HildonWindow!) */
    chooser = hildon_color_chooser_new();

    /* Set the current selected color to chooser */
    hildon_color_chooser_set_color(HILDON_COLOR_CHOOSER(chooser),
                                    current_color);

    /* Show dialog */
    result = gtk_dialog_run(GTK_DIALOG(chooser));

    /* Wait for user to select OK or Cancel */
    switch (result) {
    case GTK_RESPONSE_OK:

        /* Get the current selected color from chooser */
        hildon_color_chooser_get_color
                  (HILDON_COLOR_CHOOSER(chooser), new_color);

        /* Now the new color is in 'new_color' variable */
        /* Use it however suitable for the application */

        gtk_widget_destroy(chooser);
        break;

    default:

        /* If dialog did not return OK then it was canceled */
        gtk_widget_destroy(chooser);
        break;
    }

}
In HildonColorChooser, a pre-defined color can be selected, or a new color can be generated. Both are presented in the screenshots below.
To compile and run this program:
 $ gcc -o example_color_chooser example_color_chooser.c  `pkg-config gtk+-2.0 hildon-1 --cflags --libs`  -Wall
 $ run-standalone.sh ./example_color_chooser
HildonFontSelectionDialog
#include <hildon/hildon-program.h>
#include <hildon/hildon-font-selection-dialog.h>
#include <gtk/gtk.h>
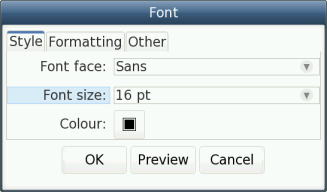
Where HildonColorChooser provides method to query color from the user, HildonFontSelectionDialog is used to define font. It contains three tabs with the different font formatting information, and is ideally used in text editors and other applications, where the font style can be selected (example_font_selector.c).
To be able to use HildonFontSelectionDialog, some knowledge of Pango text formatting is required, as the returned variable is of type PangoAttrList. For more information about Pango, see http://library.gnome.org/devel/pango/unstable/index.html
HildonFontSelectionDialog *dialog;
gint result;
PangoAttrList *list = NULL;
GSList *attrs = NULL;
PangoAttrIterator *iter;
AppData *appdata = (AppData *) data;

/* Create dialog */
dialog = HILDON_FONT_SELECTION_DIALOG
        (hildon_font_selection_dialog_new(GTK_WINDOW(appdata->window), "Font selector"));

/* Show the dialog */
gtk_widget_show_all(GTK_WIDGET(dialog));

/* Wait for user to select OK or Cancel */
result = gtk_dialog_run(GTK_DIALOG(dialog));

if (result == GTK_RESPONSE_OK) {
    /* Get selected font from dialog */
    list = hildon_font_selection_dialog_get_font(dialog);
    iter = pango_attr_list_get_iterator(list);
    attrs = pango_attr_iterator_get_attrs(iter);

    /* Now the new font setting are in 'attrs' variable */
    /* Use it however suitable for the application */
}

/* Close the dialog */
gtk_widget_destroy(GTK_WIDGET(dialog));
To compile and run this program:
 $ gcc -o example_file_chooser example_file_chooser.c  `pkg-config gtk+-2.0 hildon-1 hildon-fm-2 --cflags --libs`  -Wall
 $ run-standalone.sh ./example_file_chooser
The screenshot below shows the HildonFontSelectionDialog with the Style tab open.
HildonFileDetailsDialog
#include <hildon/hildon-program.h>
#include <hildon/hildon-file-details-dialog.h>
#include <gtk/gtk.h>

/* Application UI data struct */
typedef struct _AppData AppData;
struct _AppData {
    HildonProgram *program;
    HildonWindow *window;
};
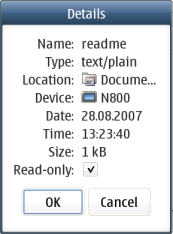
HildonFileDetailsDialog is a dialog to show file information. It has two tabs: first one containing file name, size, last modification date, and some general information; and second one being empty for the use of applications. These kinds of dialogs are used not only in a file manager application, but also in all kinds of applications with user files, such as editors and viewers.
The following source code excerpt from this example example_file_details.c describes how to create HildonFileDetailsDialog. Remember to make sure the file exists first. A HildonFileSystemModel is needed, just like File Open/Save Dialog.
#define TEXT_FILE "file://home/user/MyDocs/.documents/foo.txt"

/* Create a Hildon File System Model to be used in the File details dialog */
static HildonFileSystemModel* get_file_system_model(GtkWidget *ref_widget)
{
 return HILDON_FILE_SYSTEM_MODEL(g_object_new(HILDON_TYPE_FILE_SYSTEM_MODEL,
					      "ref_widget", ref_widget, NULL));
}
This is how the file details dialog is created. A specific file
TEXT_FILE is attached to the HildonFileSystemModel object which is
attached to the file details dialog
void callback_file_details(GtkWidget * widget, AppData * data)
{
    HildonFileDetailsDialog *dialog;
    GtkWidget *label = NULL;
    HildonFileSystemModel *model = NULL;
    gint result;
    GtkTreeIter iter;

    /* Create a hildon file system model */
    if( (model = get_file_system_model(GTK_WIDGET(data->window)) ) == NULL)
    {
       g_print("could not get file system model\n\n");
       return;
    }
    /* Load file uri */
    if( !hildon_file_system_model_load_uri( model,
                                            TEXT_FILE,
                                            &iter ) )
    {
        g_print("couldnot load uri %s\n", TEXT_FILE);
        return;
    }
    /* Create dialog */
    dialog = HILDON_FILE_DETAILS_DIALOG
        (hildon_file_details_dialog_new_with_model(GTK_WINDOW(data->window), model));

    hildon_file_details_dialog_set_file_iter
        (HILDON_FILE_DETAILS_DIALOG(dialog), &iter);
    /*.....*/
}
The file details dialog can also have an additional application-specific tab. In this example, the extra tab only reshows the file name; but in a real application, it could contain line count, preview
of a document, length of the sound etc. The type of the object "additional tab" is GTK_LABEL, so all kind of widgets can be inserted inside it.
#define TEXT_FILE "file://home/user/MyDocs/.documents/foo.txt"
void callback_file_details(GtkWidget * widget, AppData * data)
{
    /*.....*/
    /* Set the dialog to show tabs */
    g_object_set(dialog, "show-tabs", TRUE, NULL);

    /* Create some content to additional tab */
    label = gtk_label_new(g_strdup_printf
            ("Name of this \nfile really is:\n%s", TEXT_FILE));

    /* Add content to additional tab label */
    g_object_set(dialog, "additional-tab", label, NULL);

    /* Change tab label */
    g_object_set(dialog, "additional-tab-label", "More Info", NULL);

    /*.....*/
}
Then the dialog is run just like any other GTK dialog.
    /* Show the dialog */
    gtk_widget_show_all(GTK_WIDGET(dialog));

    /* Wait for user to select OK or CANCEL */
    result = gtk_dialog_run(GTK_DIALOG(dialog));
Here is an example screenshot of the File Details dialog.
  $ gcc -o example_file_details example_file_details.c  `pkg-config gtk+-2.0 hildon-1 hildon-fm-2 --cflags --libs`  -Wall
  $ run-standalone.sh ./example_file_details
HildonBanner
#include <hildon/hildon-program.h>
#include <hildon/hildon-banner.h>
#include <gtk/gtk.h>
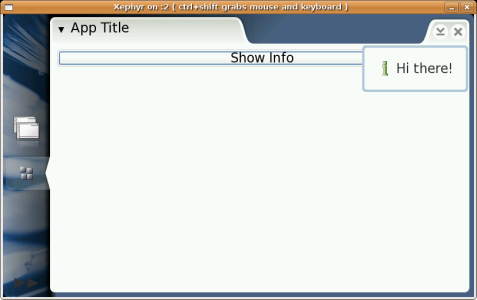
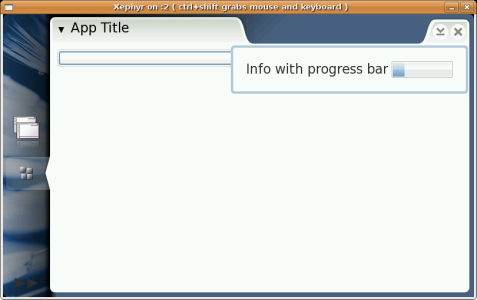
HildonBanners are used in many places in maemo applications. They show a small information banner in the top right-hand corner of the application view for a few seconds, and then disappear automatically. They are used for all kinds of notifications, such as "File Saved", "Unable to make connection" or "Please choose only one option".
There are multiple functions to choose from, depending on the information we want to show. The banner can show plain text, custom icon, or progress bar for the user. The next example (example_banner.c) presents all these alternatives. First the function which shows the different HildonBanners one by one.
static gint banner_type = 1;
GtkWidget *banner = NULL;
/* Callback to show information banners */
void show_banner(GtkButton * widget, HildonWindow * window)
{
switch (banner_type) {
case 1:
/* Show normal information banner and this automatically goes away */
hildon_banner_show_information(GTK_WIDGET(window), NULL, "Hi there!");
break;
case 2:
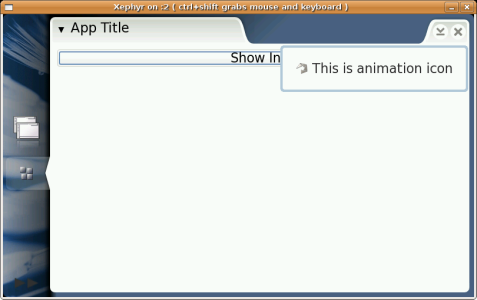
/* Informaton banner with animation icon. This banner does not automatically disapear. */
banner = hildon_banner_show_animation(GTK_WIDGET(window), NULL, "This is animation icon");
break;
case 3:
/* Remove current information banner */
gtk_widget_destroy(GTK_WIDGET(banner));
break;
case 4:
/* Information banner with progressbar */
banner = hildon_banner_show_progress(GTK_WIDGET(window), NULL, "Info with progress bar");
/* Set bar to be 20% full */
hildon_banner_set_fraction(HILDON_BANNER(banner), 0.2);
break;
case 5:
/* Set bar to be 80% full */
hildon_banner_set_fraction(HILDON_BANNER(banner), 0.8);
break;
case 6:
/* With sixth click, end the application */
gtk_main_quit();
}
/* Increase the counter */
banner_type++;
}
The main function introduces how to pack widgets inside the HildonWindow using GtkVBox, which is a vertical box container in GTK+. Inside the vbox it places one button, which is connected to the show_banner callback function.
/* Main application */
int main(int argc, char *argv[])
{
    /* Create needed variables */
    HildonProgram *program;
    HildonWindow *window;
    GtkWidget *main_vbox;
    GtkWidget *button1;

    /* Initialize the GTK. */
    gtk_init(&argc, &argv);

    /* Create the hildon program and setup the title */
    program = HILDON_PROGRAM(hildon_program_get_instance());
    g_set_application_name("App Title");

    /* Create HildonWindow and set it to HildonProgram */
    window = HILDON_WINDOW(hildon_window_new());
    hildon_program_add_window(program, window);

    /* Add vbox to hildon window */
    main_vbox = gtk_vbox_new(FALSE, 0);
    gtk_container_add(GTK_CONTAINER(window), main_vbox);

    /* Add button to vbox */
    button1 = gtk_button_new_with_label("Show Info");
    gtk_box_pack_start(GTK_BOX(main_vbox), button1, FALSE, TRUE, 0);

    /* Add signal listener to button */
    g_signal_connect(G_OBJECT(button1), "clicked",
                     G_CALLBACK(show_banner), window);

    /* Connect signal to X in the upper corner */
    g_signal_connect(G_OBJECT(window), "delete_event",
      G_CALLBACK(gtk_main_quit), NULL);

    /* Begin the main application */
    gtk_widget_show_all(GTK_WIDGET(window));
    gtk_main();

    /* Exit */
    return 0;
}
Using HildonBanner widgets is very simple, as the HildonWindow takes care of showing them. The output of the application can be seen in the screenshots below. When clicking the button, a normal banner appears first, then one with the custom icon, and at last the progress bar. The last click closes the application.
There are a lot more Hildon widgets available; to get more information about them, see the Hildon API documentation
  $ gcc -o example_banner example_banner.c  `pkg-config gtk+-2.0 hildon-1 --cflags --libs`  -Wall
  $ run-standalone.sh ./example_banner
Using maemo Input Mechanism
Touchscreen (Mouse)
The maemo platform is designed to be used with a touchscreen, and the SDK with a mouse to emulate the touchscreen functionality. Some aspects to remember:
- The main functional difference between the use of mouse and touchscreen needs to be remembered: It is not possible to move cursor position on the touchscreen without "pressing" the button all the time. This difference may be noticed e.g. in drawing application or game, where the listening events need to be designed so that user can click left and right side of the screen without ever "moving" the mouse pointer from left to right.
- Only left mouse button should be used. No functionality should be added for the right mouse button. Touchscreen can only recognize one kind of 'clicks'.
- When menus, usually opened by pressing the right mouse button, are wanted to be created, it is possible to implement them using a slightly longer click of the left mouse button. These kinds of context-sensitive menus are supported by the platform; see gtk widget tap and hold setup function in the Hildon API documentation.
- GtkWidget in maemo has been modified to pass a special insensitive_press signal, when the users presses on an insensitive widget. This was added because of the need for actions such as showing a banner when disabled widgets are pressed in menu.
With this information, it is possible to fully emulate touchscreen behavior with the mouse in the maemo SDK, so that there should not be any problems when using the application in the actual device.
Context Sensitive Menu
Context sensitive menus are implemented in the GtkWidget class. An application may register these menus for its widgets, accessed by tap-and-hold over the widget.
An example on how to add this functionality can be found in example_context.c .
Hardware Keys
#include <hildon/hildon-program.h>
#include <hildon/hildon-banner.h>
#include <gtk/gtk.h>
#include <gdk/gdkkeysyms.h>
The maemo device has hardware keys, which are also supported in the SDK using different keyboard events. The actual number and type of keys depends on the device, but the common ones are presented in the table below.
| Button | Description | Keyboard | Key Event |
|---|---|---|---|
| Move up | Arrow key up | GDK_Up | |
| Move down | Arrow key down | GDK_Down | |
| Move left | Arrow key left | GDK_Left | |
| Move right | Arrow key right | GDK_Right | |
| Select, Confirm | Return | GDK_Return | |
| Cancel, Close | Esc | GDK_Escape | |
| Open menu | F4 | GDK_F4 | |
| Full screen | F6 | GDK_F6 | |
| Increase / Zoom in / Volume up | F7 | GDK_F7 | |
| Decrease / Zoom out / Volume down | F8 | GDK_F8 |
Adding support for a wider number of keys is easy, as the actual key pressing signals can be implemented with GDK key events. An example (example_hard_keys.c) of this mapping is presented below, first the callback function that is called whenever keys are pressed.
/* Callback for hardware keys */
gboolean key_press_cb(GtkWidget * widget, GdkEventKey * event,
HildonWindow * window)
{
switch (event->keyval) {
case GDK_Up:
hildon_banner_show_information(GTK_WIDGET(window), NULL, "Navigation Key Up");
return TRUE;
case GDK_Down:
hildon_banner_show_information(GTK_WIDGET(window), NULL, "Navigation Key Down");
return TRUE;
case GDK_Left:
hildon_banner_show_information(GTK_WIDGET(window), NULL, "Navigation Key Left");
return TRUE;
case GDK_Right:
hildon_banner_show_information(GTK_WIDGET(window), NULL, "Navigation Key Right");
return TRUE;
case GDK_Return:
hildon_banner_show_information(GTK_WIDGET(window), NULL, "Navigation Key select");
return TRUE;
case GDK_F6:
hildon_banner_show_information(GTK_WIDGET(window), NULL, "Full screen");
return TRUE;
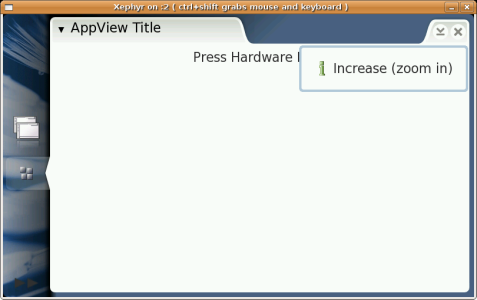
case GDK_F7:
hildon_banner_show_information(GTK_WIDGET(window), NULL, "Increase (zoom in)");
return TRUE;
case GDK_F8:
hildon_banner_show_information(GTK_WIDGET(window), NULL, "Decrease (zoom out)");
return TRUE;
case GDK_Escape:
hildon_banner_show_information(GTK_WIDGET(window), NULL, "Cancel/Close");
return TRUE;
}
return FALSE;
}
In the main function, the callback function is connected with g_signal_connect to listen "key_press_event" signal. Whenever a hardware key is pressed, key_press_cb function is called to process the event.
int main( int argc, char* argv[] )
{
    ...
    /* Add hardware button listener to application */
    g_signal_connect(G_OBJECT(window),
        "key_press_event", G_CALLBACK(key_press_cb), window);
    ...
}
The output of the hardware key example application is shown below in the case zoom in (F7) is pressed.
   guint modifiers;
   modifiers = gtk_accelerator_get_default_mod_mask ();

   if ((event->state & modifiers) == GDK_CONTROL_MASK)
      && (event->keyval == GDK_g || event->keyval == GDK_G))
   {
      hildon_banner_show_information(GTK_WIDGET(window), NULL, "Ctrl+g or Ctrl+G key combination");
   }
More information on the GTK+ key events can be found at http://library.gnome.org/devel/gdk/unstable/gdk-Keyboard-Handling.html .
Maemo's Gtk Accelerator and Mnemonics
GtkAccelerator
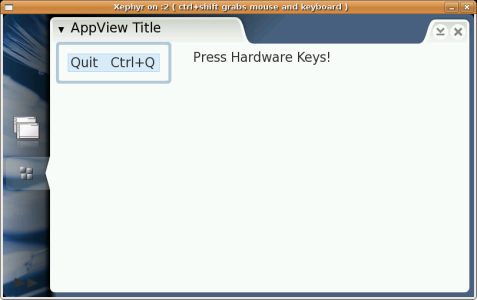
Maemo 4.0 also supports GtkAcceleratorGroup, which is a group of keyboard accelerators, typically attached to a toplevel Gtk Window. To learn more about GtkAccelerator, look at GTK's documentation. As an example, usually Gtk Applications have "Ctrl + Q" as a shortcut for menu item "Quit" to quit the application. The following excerpts from example_hard_keys.c demonstrate how it is implemented in maemo 4.0.1. First of all, create a GtkAccelGroup and add it to the main window
    GtkAccelGroup* accel_group;
    accel_group = gtk_accel_group_new ();
    gtk_window_add_accel_group(GTK_WINDOW(main_window),
                                   accel_group);
2. Create a sample menu item "Quit"
#define ACCEL_PATH_ROOT "/menu"
#define ACCEL_PATH_QUIT ACCEL_PATH_ROOT"/item_quit"

    /* Create new main menu */
    main_menu = gtk_menu_new();
    item_quit = gtk_menu_item_new_with_label("Quit");

    /* Attach the menu item to the Gtk Accelerator defined above */
    gtk_menu_set_accel_group( GTK_MENU(main_menu),
                                 accel_group);
    gtk_menu_item_set_accel_path( GTK_MENU_ITEM(item_quit),
                                      ACCEL_PATH_QUIT);

    gtk_menu_append(main_menu, item_quit);
The accel_group is attached to the main menu, which contains the "Quit" menu item. Also, the item_quit is attached with an accelerator path, which is a constant string "<example-hard-keys>/menu/item_quit". Basically, this string is a unique string that identifies the menu item "Quit" of the application example_hard_keys.c. For example, you can also have "<example-hard-keys>/menu/item_new" as a valid accelerator path for "Open new file" menu item. Please read on for more information on accelerator path.
More information on how to attach an Accelerator with a Menu item can be found in GTK's documentation.
3. Define the accelerator path
gtk_accel_map_add_entry(ACCEL_PATH_QUIT,GDK_q,GDK_CONTROL_MASK);
The above function defines, on the application's level, that a "Ctrl+q" key accelerator is attached to the accelerator path "<example-hard-keys>/menu/item_quit". How to define a proper accelerator path and get it mapped is further explained in GTK's documentation.
Now "Ctrl+q" will activate the menu item "Quit", as illustrated in the following image:
$gconftool-2 -s /apps/osso/gtk/enable-accels -t bool true
Gtk Mnemonics
GTK Mnemonics can also be enabled by:$gconftool-2 -s /apps/osso/gtk/enable-mnemonics -t bool true
Maemo Text Input Methods
The maemo platform includes text input methods used with touch screen. There are two different input types: virtual keyboard and handwriting recognition. Only the virtual keyboard is provided in maemo SDK, but as the input is transparent for the application, all applications will automatically support also handwriting recognition. When using the device, it is possible to select between two keyboard layouts. When touching the screen using a finger, a thumb keyboard is provided.
The input methods work automatically, so that whenever text widgets (entry, text view) are pressed, or text inside them selected, the keyboard pops up. In the same way, the keyboard is hidden automatically when the user selects another widget. A screenshot of the maemo virtual keyboard is visible below, from the MaemoPad example.
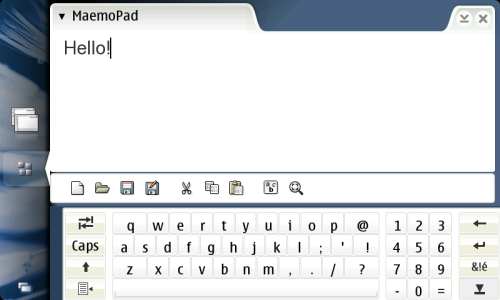
For the development use, it is also possible to use the PC keyboard to input text. It should work without any changes, but if some problems are experienced, it can be also enabled in SDK by pressing the right mouse button on top of a text widget, and then selecting "Input Methods -> X Input Method" from the menu.
Application Layout Considerations
The layout of maemo applications can be described as wide and not very tall, because of the screen dimensions (800x480 pixels). This wideness is emphasized, when a text input method is popped up, so there are some rules that should be followed, when application UI is designed.
- Make the application UI area scalable by using the GTK+ layout containers, such as GtkVBox, and do not use any fixed layout like GtkFixed. In case the application area does not fit into the screen once the keyboard pops up, it should be scrollable. This can be achieved by adding application area widgets inside GtkScrolledWindow.
- Use only one visible toolbar at any given time in one application. An exception for this is the HildonFindToolbar, which should pop up on top of the main toolbar when search is performed. It is also a good design principle to allow the user to hide toolbars through the menu to maximize the application area.
- Enable full screen mode in the application. The mode can be toggled with full screen hardware button. This is easy to implement with gtk_window_fullscreen() and gtk_window_unfullscreen() functions.
- Avoid large dialogs, taking up a large part of the application area height. If the dialog needs text input, this is especially important, because the virtual keyboard is then needed to be visible at the same time.
Integrating Applications to maemo Framework
This section explains how to integrate applications to maemo Application Framework, including adding application to Task Navigator menu and different features provided by the platform.
Getting Application to Task Navigator Menu
Maemo .desktop File
To make application visible in maemo Task Navigator, a Desktop file is needed for the application. This file contains all the essential information needed to show the application entry in the menu, such as name, binary and D-BUS service name. Name of the file should be [application].desktop and location in filesystem "/usr/share/applications/hildon/".
An example_libosso.desktop file for the application looks like this:
[Desktop Entry]
Encoding=UTF-8
Version=1.0
Type=Application
Name=Example libOSSO
Exec=/usr/bin/example_libosso
X-Osso-Service=org.maemo.example_libosso
Icon=qgn_list_gene_default_app
MimeType=application/x-example;
The fields in this file are:
Encoding - The character encoding of the file, should be UTF-8.
Version - Version of the application desktop file.
Type - Type of the entry, should be Application.
Name - The name of the application which will come visible to Task Navigator menu.
Exec - The application binary which will be started from the menu entry. Although D-BUS allows launching of applications by service name, this is useful in order to be able to launch also applications that are not registered as D-BUS services.
X-Osso-Service - D-BUS service name of the application. This will be defined in the [application].service file, see next section.
Icon - Name of icon that represents this application. The icon will be visible in Task Navigator before application name. Application can install its own icon, or use one of the pre-defined icons available in platform. Format of the file should be PNG and the suffix (.png) should not be defined.
MimeType - The MIME type(s) supported by this entry.
Other commonly used fields:
StartupWMClass - Name of the application binary name. This field is optional and only needed when the binary name is different from the D-BUS service name. In this case, if this property is not set, application will not be shown in the Application Switcher of the Task Navigator.
X-Window-Icon - Usually the same as Icon field.
X-Window-Icon-Dimmed - Defines whether the dimmed icon should have different look than normal icon.
X-Osso-Type - Type for the exec, usually application/x-executable.
Terminal - Defines whether the program runs in a terminal window.
N.B. These fields are not to be followed by a whitespace.
See the Desktop Entry Specification for more details.
Desktop file itself does not include the location of the application in the Task Navigator menu. So to make an application visible there, also a symbolic link to desktop file is needed in "/etc/others-menu/". This link assigns the order of the entries as well as the possibility that it is not in the root menu, but instead inside some folder. Application should make this link when package is installed.
The format of the link is such that it begins with four numbers, defining the order of the entry (smallest come on top of the menu) and then underscore (_) following the application name. To create this link for the test application:
[sbox-PC_SDK: /etc/others-menu] > ln -s /usr/share/applications/hildon/example_libosso.desktop \
  /etc/others-menu/0010_example_libosso.desktop
To see the new entry now in Task Navigator, launch the GUI again with "af-sb-init.sh restart". Example LibOSSO entry should come visible to menu like shown below.
Now to launch the application D-BUS service file is still needed. Next section describes how to create it.
D-BUS Service File
D-BUS service file is needed to be able to launch the maemo application and connect it to D-BUS services. One special feature of D-BUS is that if application is not running already when D-BUS message is sent to it, D-BUS will start the application automatically. Also only one instance of a D-BUS service can be run simultaneously, guaranteeing that each application is running only once.
The format of the service file is simpler than desktop file, below is shown what the example_libosso.service looks like.
[D-BUS Service]
Name=org.maemo.example_libosso
Exec=/usr/bin/example_libosso
The fields in this file are:
Name - The D-BUS service name. This needs to be unique, and same that is used in application source codes when initializing application. Usually name is built with application provider URL, following the application name to minimize the possibility for conflicts with other service files.
Exec - The full path of application binary to launch when service name gets called.
D-BUS service file is installed in "/usr/share/dbus-1/services/" and maemo GUI needs to be restarted with "af-sb-init.sh restart" before D-BUS daemon recognizes it.
LibOSSO Library
LibOSSO is the basic library, containing required and helpful functions for maemo applications. The full API documentation of LibOSSO is available in Doxygen format.
Maemo Initialization
All maemo applications need to be initialized correctly, or they will not work as expected. One symptom of missing initialization is that application starts from Task Navigator, but closes automatically after few seconds.
Initializing application is performed with osso_initialize() function. With this function, the application connects to D-BUS session bus and system bus. osso_initialize() function should only be called once in the application, and the structure of type osso_context_t type that is returned should be stored for later use. First parameter of the function is the application D-BUS name, used also in application D-BUS service file. Second parameter is application version as a string. Third is the activation type, with TRUE the library assumes that the application binary has been launched by the D-BUS daemon, and thus will connect to the D-BUS activation bus. Fourth parameter is the GLib main-loop context to connect to, NULL should be used for the default context.
osso_context_t * osso_initialize(const gchar *application, const gchar* version, gboolean activation, GMainContext *context)
When application is closing, osso_deinitialize function should be called to close the message bus connection and free all memory allocated by the library.
void osso_deinitialize(osso_context_t *osso)
Below is an example (example_libosso.c) of this; if the initialization does not succeed function returns NULL.
osso_context_t *osso_context;

/* Initialize maemo application */
osso_context = osso_initialize(
    "example_libosso", "0.0.1", TRUE, NULL);

/* Check that initialization was ok */
if (osso_context == NULL)
{
    return OSSO_ERROR;
}
Remote Process Messages
System wide messages in maemo platform are handled with D-BUS system messaging, which is a Remote Process Communication (RPC) method. LibOSSO has own wrappers to normal D-BUS functions to make usage simpler and to maintain backward compatibility. By using D-BUS applications can send messages from one process to another.
Callback function receiving the messages can be like this (example_libosso.c), where AppData structure contains the initialized osso_context:
#include <hildon/hildon-program.h>
#include <hildon/hildon-banner.h>
#include <gtk/gtk.h>
#include <libosso.h>

#define OSSO_EXAMPLE_NAME    "example_libosso"
#define OSSO_EXAMPLE_SERVICE "org.maemo."OSSO_EXAMPLE_NAME
#define OSSO_EXAMPLE_OBJECT  "/org/maemo/"OSSO_EXAMPLE_NAME
#define OSSO_EXAMPLE_IFACE   "org.maemo."OSSO_EXAMPLE_NAME
#define OSSO_EXAMPLE_MESSAGE "HelloWorld"


/* Application UI data struct */
typedef struct _AppData AppData;
struct _AppData {
    HildonProgram *program;
    HildonWindow *window;
    osso_context_t *osso_context;
};

...

/* Callback for normal D-BUS messages */
gint dbus_req_handler(const gchar * interface, const gchar * method,
                      GArray * arguments, gpointer data,
                      osso_rpc_t * retval)
{
    AppData *appdata;
    appdata = (AppData *) data;

    osso_system_note_infoprint(appdata->osso_context, method, retval);
    osso_rpc_free_val(retval);

    return OSSO_OK;
}
To attach this callback function to receive all the normal D-BUS messages which will come to application, osso_rpc_set_default_cb_f function shall be used:
int main( int argc, char* argv[] )
{
    osso_return_t result;
    ...
    /* Add handler for session bus D-BUS messages */
    result = osso_rpc_set_cb_f(appdata->osso_context,
                               OSSO_EXAMPLE_SERVICE,
                               OSSO_EXAMPLE_OBJECT,
                               OSSO_EXAMPLE_IFACE,
                               dbus_req_handler, appdata);

    if (result != OSSO_OK) {
        g_print("Error setting D-BUS callback (%d)\n", result);
        return OSSO_ERROR;
    }
    ...
 /* Deinitialize OSSO */
    osso_deinitialize(osso_context);
}
Now the application is ready to receive D-BUS messages, and whenever it receives them, dbus_req_handler function is called to process the message. From another test application (example_message.c), it is possible to send the "HelloWorld" that our application was designed to handle, like this:
...
#define OSSO_EXAMPLE_NAME    "example_libosso"
#define OSSO_EXAMPLE_SERVICE "org.maemo."OSSO_EXAMPLE_NAME
#define OSSO_EXAMPLE_OBJECT  "/org/maemo/"OSSO_EXAMPLE_NAME
#define OSSO_EXAMPLE_IFACE   "org.maemo."OSSO_EXAMPLE_NAME
#define OSSO_EXAMPLE_MESSAGE "HelloWorld"

...

ret = osso_rpc_run(osso_context,
		   OSSO_EXAMPLE_SERVICE,
		   OSSO_EXAMPLE_OBJECT,
		   OSSO_EXAMPLE_IFACE,
		   OSSO_EXAMPLE_MESSAGE, &retval, DBUS_TYPE_INVALID);
...
When example_libosso_test is started, it sends an "example_message" D-BUS message to org.maemo.example_libosso service, attached to the example_libosso application (See more about D-BUS service files from an earlier section). Now when example_libosso receives the message, it shows an banner.

One nice thing about D-BUS is that receiving application does not need to be even started: D-BUS can automatically start the application based on its service file, and then pass the message to it!
Hardware State Messages
Maemo applications can connect to listen the system D-BUS messages like "battery low" and "shutdown". When these messages are received, application may want to ask user to save files that are open or react to them however wanted.
A callback function is defined like below, taking osso_hw_state_t and gpointer as the parameters. The changed state can be gotten from state variable.
/* Callback for hardware D-BUS events */
void hw_event_handler(osso_hw_state_t *state, gpointer data)
{
    AppData *appdata;
    appdata = (AppData *) data;

    if (state->shutdown_ind)
    {
        hildon_banner_show_information(GTK_WIDGET(appdata->window), NULL, "Shutdown event!");
    }
    if (state->memory_low_ind)
    {
        hildon_banner_show_information(GTK_WIDGET(appdata->window), NULL, "Memory low event!");
    }
    if (state->save_unsaved_data_ind)
    {
        hildon_banner_show_information(GTK_WIDGET(appdata->window), NULL, "Must save unsaved data event!");
    }
    if (state->system_inactivity_ind)
    {
        hildon_banner_show_information(GTK_WIDGET(appdata->window), NULL, "Minimize application inactivity event!");
    }
}
To attach this handler, e.g. in application main(), use osso_hw_set_event_cb().
    ...
    /* Add handler for hardware D-BUS messages */
    result = osso_hw_set_event_cb( appdata->osso_context,
        NULL, hw_event_handler, (gpointer) appdata );

    if (result != OSSO_OK)
    {
        g_print("Error setting HW state callback (%d)\n", result);
        return OSSO_ERROR;
    }
    ...
N.B. These hardware events are not sent in SDK, so testing them is only possible in maemo device.
System Exit Message
There is a separate system message apart from the hardware state messages presented earlier, sent when the applications are required to close themselves. Callback for it is like this (example_libosso.c):
/* Callback for exit D-BUS event */
void exit_event_handler(gboolean die_now, gpointer data)
{
    AppData *appdata;
    appdata = (AppData *) data;
    g_print("exit_event_handler called\n");
    /* Do whatever application needs to do before exiting */
    hildon_banner_show_information(GTK_WIDGET(appdata->window), NULL,
                                   "Exiting...");
}
The callback is set (e.g. in application main) as follows.
int main( int argc, char* argv[] )
{
...
    /* Add handler for Exit D-BUS messages */
    result = osso_application_set_exit_cb(appdata->osso_context,
                                          exit_event_handler,
                                          (gpointer) appdata);
    if (result != OSSO_OK) {
        g_print("Error setting exit callback (%d)\n", result);
        return OSSO_ERROR;
    }
...
}
Now whenever the system needs to close an application for any reason, it will be performed gracefully.
Application State-Saving and Auto-Save
State-saving is a special feature of maemo platform. It means that applications save their running state from RAM to permanent memory, such as flash memory, and then end the running application process. This state-saving happens when switching out from the application, and device memory is running low. When user then returns to a backgrounded application, it is started again, and application state is read from the flash memory, so that user does not even know that application was not running all the time.
Auto-saving is an addition to state-saving for the editor-like applications containing user data. This data/document is automatically saved at the same time with state save. Main difference is that application state is usually just small amount of variables, describing the state where application was, where the auto-saved file can be any file the user was editing. Auto-saving guarantees that user files are not lost when e.g. battery runs out.
Information on how to implement state-saving can be found in LibOSSO API document.
Application Settings
#include <gconf/gconf.h>
#include <gconf/gconf-client.h>
Maemo uses GConf for maintaining application settings. GConf is widely used in Gnome desktop environment for this same purpose. Read more about GConf from http://www.gnome.org/projects/gconf/
To make compiler and linker find these headers, give additional "pkg-config --cflags gconf-2.0" and "pkg-config --libs gconf-2.0" parameters for gcc or to Makefile.
GConf needs to be initialized first with gconf_client_get_default() function, returning GconfClient type of variable. After this, setting of different type can be stored with gconf_client_set_ functions and restored with gconf_client_get_ functions.
To keep GConf keys unique in maemo, they should be type "/apps/maemo/[application]/[key]" so for example "/apps/maemo/hello_maemo/default_font_size".
Example (example_gconf.c) of basic usage for setting and loading GConf values is following:
...
GConfClient *gc_client;

/* Init type system */
g_type_init();

/* Load default GConf path */
gc_client = gconf_client_get_default();

if (gc_client == NULL) {
    return FALSE;
}

...

/* Set integer variable */
gconf_client_set_int(gc_client, key, my_number, NULL);

/* Set string variable */
gconf_client_set_string(gc_client, key, my_string, NULL);

...

/* Get integer variable */
gint my_number = gconf_client_get_int(gc_client, key, NULL);

/* Get string variable */
gchar *my_string = gconf_client_get_string(gc_client, key, NULL);

...

/* Free gconf settings object */
g_object_unref(gc_client);
The maemo version of GConf is unaltered, so all tips and tricks available from Internet are usable also in maemo.
Use of Back-up Application
The back-up application saves and restores user data stored in ~/MyDocs (by default) and setting directories/files /etc/osso-af-init/gconf-dir (a link to GConf database /var/lib/gconf), /etc/osso-af-init/locale, and /etc/bluetooth/name. It can be configured to back up other locations and/or files as well, by custom configuration files.
The back-up application must not to be disrupted by other applications writing or reading during a back-up or restore operation.
For restore process, back-up therefore will, if the user approves, ask the application killer to close all applications, and then wait until it has been done.
For backing up, the backup_start and backup_finish D-BUS signals will be emitted on the session bus, indicating to applications that they should not write to disk.
D-BUS description and methods of back-up Application
Service      com.nokia.backup
Interfaces   com.nokia.backup
Object Paths /com/nokia/backup

Method: cancel

Name            cancel
Parameters      none
Returns         Empty reply
Description     Cancels any ongoing back-up or restore operation

Method: activate

Name            activate
Parameters      none
Returns         Empty reply
Description     Used to activate the application with auto-activation
Custom Back-up Locations
For other data not normally backed up, the so-called locations configuration is used. It is important that the locations configuration paths MUST NOT overlap with the documents path.
The locations configuration lets applications install a configuration file with a list of files and directories that should be included in the back-up. The files should be installed into /etc/osso-backup/applications, named <application>.conf and consist of simple XML format. For the application, the example_libosso.conf looks the following way:
<backup-configuration>
  <locations>
    <location type="file"
              category="settings" auto="true">/etc/example.ini</location>
    <location type="dir"
              category="documents">/home/user/foo</location>
    <exclusion type="file"
              category="settings">/home/user/bigfile</exclusion>
    <exclusion type="file"
              category="settings">/tmp/*.jpg</exclusion>

  </locations>
</backup-configuration>
With the <location> tag different locations can be given to be backed up. N.B. The path must be absolute. <exclusion> tag can be used if some files in certain directories are not wanted to be backed up, for example, in the case of some setting file changing from one software version to another. This way, the new setting file of updated software will not be destroyed, if the back-up is restored. Wild cards '?' and '*' are supported. too.
Both tags have TYPE and CATEGORY arguments and <location> tag additional AUTO argument:
TYPE - Its value can be "file" or "dir" for a file or directory. This argument must be provided.
CATEGORY - It is used for handling selective back-up and restore. It may be omitted, in which case the location will only be backed up when backing up or restoring everything. The value can be:
- emails
- documents
- media
- contacts
- bookmarks
- settings
- applications
AUTO - Its value can be true or false. It is used to tell the back-up application not to request a user response in case of a conflict, but automatically replace the file. N.B. The auto argument is only used for files, not for directories. It may be omitted, in which case it defaults to false.
After Restore Run Scripts
The back-up application makes it possible to execute scripts after restore operation. There are two kinds of scripts. First, there can be scripts that are executed after every restore operation. Then there are also scripts that are executed only if the restore is made from a back-up created in an earlier product.
For the scripts that are used to transform data between the device software versions, the location for applications to install the scripts is: /etc/osso-backup/restore.d/<dir>, where <dir> is a subdirectory for each transition between two different consecutive version of the platform. For transforming between IT-2006 and IT-2007 versions, the directory is: /etc/osso-backup/restore.d/it2007/. For scripts that are executed after every restore, the location is /etc/osso-backup/restore.d/always.
The files installed here should have the executable bit set. Any files ending with "~" or ".bak" are ignored, just like directories or files starting with a dot (".").
Each script will be executed with a command-line argument that is the path of a file containing the list of all files that have been restored, per category. The format of this file is:
[CATEGORY]
/path/to/file1
/path/to/file2
...
[CATEGORY]
...
CATEGORY is one of the OSSO categories (emails, documents, media, contacts, bookmarks, settings or applications). This makes it possible for the scripts to check, which files they need to upgrade, if any at all. The format is chosen to be easy to parse with a simple script or program.
The scripts will be executed after a successful restoration, or after a restoration has been cancelled. In both cases, the scripts will only be executed if any files were actually restored. Scripts should clean up after transforming, so that old files are not left behind. The script or program should use the common convention and return zero on success, and non-zero in case of failure. Application developers should try to make their programs execute and finish quickly.
How to Map MIME Types
To map a MIME type for an application (that specifies for the platform which application should handle it), it has to be defined in its desktop file with adding MimeType field to its desktop file.
An example_libosso.desktop file for the application looks following:
[Desktop Entry]
Encoding=UTF-8
Version=1.0
Type=Application
Name=Example libOSSO
Exec=/usr/bin/example_libosso
X-Osso-Service=org.maemo.example_libosso
Icon=qgn_list_gene_default_app
MimeType=application/x-example;
The last line is the most important one, and specifies that this application can handle the MIME type "application/x-example".
New MIME Type with OSSO Category Extension
If the application is introducing new MIME-type to the system, it is necessary to provide the mime-info XML (see more at http://standards.freedesktop.org/shared-mime-info-spec/) that defines it, in this case an example-mime.xml file for the application looks as follows:
<?xml version="1.0" encoding="UTF-8"?>
<mime-info xmlns="http://www.freedesktop.org/standards/shared-mime-info"
           xmlns:osso="http://nokia.com/osso/mime-categories">
  <mime-type type="application/x-example">
         <comment>Example application file</comment>
         <osso:category name="images"/>
         <magic priority="50">
                <match type="string" value="FOO" offset="0"/>
         </magic>
         <glob pattern="*.foo"/>
  </mime-type>
</mime-info>
This entry maps one extension and a "magic" string to a certain MIME type.
N.B. The glob pattern shall be given in lower-case.
What is OSSO Category
The platform has a notion of file categories for the user's data files. The available categories are:
- Bookmarks
- Contacts
- Documents
- Emails
- Images
- Audio
- Video
- Other
A mapping is set up between categories and MIME types, so that the MIME type of a file decides which category it is in. The MIME type set-up is handled by the shared-mime-info infrastructure, and the category information is added to that same framework.
Adding a mapping between a category and a number of MIME types is performed much like adding or editing the supported MIME types in the system.
Each application or library that adds a category mapping should add a file in
/usr/share/mime/packages/
The file format is the same XML format used for MIME types, with an added tag "<osso:category>". See the example above, where it sets up a mapping between .foo files and the Images category.
Updating Platform Databases
To introduce the newly defined MIME-type(s) to the platform, it is necessary to
- copy the mime-information XML under /usr/share/mime/packages:
[sbox-PC_SDK: ~] > cp example-mime.xml /usr/share/mime/packages - update the MIME and desktop database:
[sbox-PC_SDK: ~] > update-mime-database /usr/share/mime [sbox-PC_SDK: ~] > update-desktop-database /usr/share/applications - update the osso category database:
[sbox-PC_SDK: ~] > osso-update-category-database /usr/share/mime
If the MIME-type is to be removed from the platform, it is done by simply deleting the XML file under /usr/share/mime/packages/, and updating the databases as above.
Registering MIME Type with Package
Since most of the applications are installed on the platform via pre-compiled packages, the MIME-type registration has to be performed as well.
The steps are similar as above.
To have the MIME information XML installed under /usr/share/mime/packages, the package rules have to be edited and the files installed; in this case it would look as follows:
- in the rules file under install section we need to add the following lines
mkdir -p $(CURDIR)/debian/tmp/usr/share/mime/packages cp $(CURDIR)/example-mime.xml $(CURDIR)/debian/tmp/usr/share/mime/packages - and in example_libosso.install we need to add
usr/share/mime/packages/example-mime.xml
This way, it can be assured that the mime information XML is being installed under /usr/share/mime/packages.
Both in package's postinst and postrm files, the following lines have to be added:
if [ -x /usr/bin/update-mime-database ]; then
 update-mime-database /usr/share/mime
fi

if [ -x /usr/bin/update-desktop-database ]; then
 update-desktop-database /usr/share/applications
fi

if [ -x /usr/bin/osso-update-category-database ]; then
 osso-update-category-database /usr/share/mime
fi
This keeps the platform mime information and osso category databases up-to-date.
Clipboard Usage
In maemo, there is a number of clipboard enhancements to the X clipboard and Gtk+, in order to
- Support retaining the clipboard data when applications that own the clipboard exit.
- Be able to copy and paste rich text data between Gtk+ text views in different applications.
- Provide a generally more pleasant user experience; make it easy for application developers to gray out "Paste" menu items when the clipboard data format is not supported by the application.
GtkClipboard API Changes
gboolean gtk_clipboard_set_can_store (GtkClipboard   *clipboard
                                      GtkTargetEntry *targets,
                                      gint            n_targets);
This function sets what data targets the current clipboard owner can transfer to the clipboard manager. NULL can be passed as targets, together with 0 as n_targets to indicate that all targets can be transferred.
When the clipboard owner changes, these values are reset.
void gtk_clipboard_store (GtkClipboard *clipboard);
This function tells the clipboard to try to store the contents of the targets specified using gtk_clipboard_set_can_store. If no such call has been made, or if there is no clipboard manager around, this function is simply a no-op.
Applications can call this function when exiting, but it is called automatically when the application is quitting, if quitting with gtk_main_quit(). If the application is not the owner of the clipboard, the function will simply be a no-op.
In addition, adding a convenience function for finding out if a target is supported (in order to be able to gray out "Paste" items if none of the existing clipboard targets are supported)
gboolean gtk_clipboard_wait_is_target_available (GtkClipboard *clipboard,
                                                 GdkAtom       target);
GtkTextBuffer API Changes
In order to support rich text copy and paste, some new functions were introduced:
void
gtk_text_buffer_set_enable_paste_rich_text (GtkTextBuffer *buffer,
                                            gboolean       can_paste_rich_text);

gboolean
gtk_text_buffer_get_enable_paste_rich_text (GtkTextBuffer *buffer);
The setter function toggles whether it should be possible to paste rich text in a text buffer.
To prevent applications from getting confused when text with unexpected tags is pasted to a buffer, the notion of "rich text format" was added:
void
gtk_text_buffer_set_rich_text_format (GtkTextBuffer *buffer,
                                      const gchar   *format);
G_CONST_RETURN *
gtk_text_buffer_get_rich_text_format (GtkTextBuffer *buffer);
When a buffer has a certain text format, it can only paste rich text from buffers that have the same text format. If the formats differ, only plain text will be pasted. If a buffer has its format set to NULL, it means that it can paste from any format. For example, a format called "html" could include the tags "bold", "italic" etc. Thus we could only paste text from buffers having the same format specified.
N.B. The string is just an identifier. It is up to the application developers to make sure that when specifying an application as supporting a certain format, also the tags in the buffer are specified for that format.
For further details, MaemoPad source code is a good example to study.
Global Search Use
Global Search framework is provided for making different global searches for the content. It has capabilities to search local, Bluetooth gateway and UPnP server file systems. Some subsystems have their own search plug-ins, e.g. for searching bookmarks or e-mails.
Global Search is launched with a D-BUS message defining the search type:
| OGS_DBUS_METHOD_SEARCH_BROAD | Search on all content. |
| OGS_DBUS_METHOD_SEARCH_FILE | Search only files. |
| OGS_DBUS_METHOD_SEARCH_EMAIL | Search only e-mails. |
| OGS_DBUS_METHOD_SEARCH_BOOKMARK | Search only bookmarks. |
D-BUS call launches a Global Search dialog, which is used to make the search. Below is a simple example of a Global Search D-BUS call, showing the user a file search dialog.
#include <libogs/ogs.h>

osso_context_t *osso = osso_initialize("ogs_test", "0.1", FALSE, NULL);
osso_rpc_t foo;

osso_rpc_run_with_defaults(osso, OGS_DBUS_SERVICE, OGS_DBUS_METHOD_SEARCH_FILE,
                           &foo, DBUS_TYPE_INVALID);

osso_rpc_free_val(&foo);
Global Search Plugins
Search plugins are libraries that are loaded into the process memory when needed for searching. They are implemented as GObjects, using GTypeModule. They are searched for during the runtime and linked dynamically. For exact API descriptions, see the header files in libogs-dev package.
Following ogs_module_* functions are used for loading, registering and unloading the plugin.
#include <libogs/ogs.h>

G_MODULE_EXPORT void ogs_module_load(OgsModule *module) {
    gstest_email_plugin_get_type (G_TYPE_MODULE (module));
}

G_MODULE_EXPORT void ogs_module_query(OgsModule *module) {
    ogs_search_module_register_plugin (OGS_SEARCH_MODULE (module),
                                       OGS_SEARCH_CATEGORY_EMAIL,
                                       gstest_email_plugin_type);
}

G_MODULE_EXPORT void ogs_module_unload (OgsModule *module) {
    /* free allocated memory here if needed */
}
gstest_email_plugin_get_type() simply registers the new type in the type system using a GTypeInfo structure, and finally registering the type with parent_type OGS_TYPE_PLUGIN. In plugin class initialization we set query and finalize functions and search options.
static void gstest_email_plugin_class_init (GSTestEmailPluginClass *class)
{
    OgsPluginClass *plugin_class;
    GObjectClass   *object_class;

    plugin_class = OGS_PLUGIN_CLASS (class);
    object_class = G_OBJECT_CLASS (class);

    parent_class = g_type_class_peek_parent(class);
    plugin_class->query = gstest_email_plugin_query;

    plugin_class->options_type = OGS_TYPE_SEARCH_OPTIONS;
    plugin_class->hit_type = OGS_TYPE_EMAIL_HIT;
    object_class->finalize = gstest_email_plugin_finalize;
}
In plugin initialization we can e.g. set properties.
static void gstest_email_plugin_init(GSTestEmailPlugin *plugin)
{
    g_object_set(plugin,
                 "id", "gstest-email-plugin",
                 "category", (gint) OGS_SEARCH_CATEGORY_EMAIL,
                 NULL);

    ...
}
Query function does the searching and emits a signal when new hits are found.
static void gstest_email_plugin_query(OgsPlugin         *plugin,
                                      const gchar       *query,
                                      OgsSearchContext  *context,
                                      OgsFileSystem     *fs,
                                      OgsSearchCategory  category,
                                      OgsSearchOptions  *options)
{
    GSList *l;
    glong   timestamp;

    if (!ogs_plugin_supports_category (plugin, category)) {
        return;
    }

    if (query == NULL || strlen (query) == 0) {
        return;
    }

    timestamp = time (NULL);

    for (l = GSTEST_EMAIL_PLUGIN(plugin)->mails; l; l = l->next) {
        OgsSearchHit *hit;
        TestEMail *mail;
        int i;

        mail = (TestEMail *) l->data;

        if (!strstr(mail->sender, query) &&
            !strstr(mail->subject, query) &&
            !strstr(mail->mailbox, query)) {
            continue;
        }

        hit = g_object_new(OGS_TYPE_EMAIL_HIT,
                           "name", mail->subject,
                           "folder", mail->mailbox,
                           "contact", mail->sender,
                           "mime-type", "email",
                           "timestamp", timestamp,
                           "size", (glong) 12345,
                           "category", (gint) category,
                           "has_attachment", mail->has_attachment,
                           NULL);

        timestamp += 60*60*24*3;

        g_signal_emit_by_name(plugin, "new-hit", hit, context);

        g_object_unref(hit);

        for (i = 0; i < 4; ++i) {
            if (ogs_search_context_is_cancelled(context)) {
                return;
            }

            g_usleep(500);
        }
    }
}
Finalize function is naturally for finalizing the plugin by freeing memory.
static void gstest_email_plugin_finalize(GObject *object)
{
    GSList *l;
    GSTestEmailPlugin *plugin;

    plugin = GSTEST_EMAIL_PLUGIN (object);

    ...

    G_OBJECT_CLASS(parent_class)->finalize(object);
}
Writing Control Panel Applets
Control panel is designed to be extendable, and items can be added to it with dynamic libraries with certain functions and desktop files describing the library.
Functions
There are two functions needed for a control panel applet (libapplet.c). These functions are defined in
#include <hildon-cp-plugin/hildon-cp-plugin-interface.h>The first, more important one, is called execute. It is called when the applet is activated from Control Panel. Usually this function creates a dialog and waits until it is done. Any dialog created should be modal to the window in parameter. N.B. The library might be unloaded when execute returns, so no g_timeouts, gconf_notifys or such should be left when done. Gtk or osso initialization is not needed, as they are already done at this point.
#include <hildon-cp-plugin/hildon-cp-plugin-interface.h>
#include <gtk/gtk.h>

osso_return_t execute(osso_context_t *osso, gpointer data, gboolean user_activated)
{
	GtkWidget *dialog;
	gint response;

	/* Create dialog with OK and Cancel buttons. Leave the separator out, as we do not have any content. */
	dialog = gtk_dialog_new_with_buttons(
		"Hello control panel",
		GTK_WINDOW(data),
		GTK_DIALOG_MODAL | GTK_DIALOG_NO_SEPARATOR,
		GTK_STOCK_OK,
		GTK_RESPONSE_OK,
		GTK_STOCK_CANCEL,
		GTK_RESPONSE_CANCEL,
		NULL);

	/* ... add something to the dialog ... */

	if (!user_activated)
	{
		/* ... load state ... */
	}

	/* Wait until user finishes the dialog. */
	response = gtk_dialog_run(GTK_DIALOG(dialog));

	if (response == GTK_RESPONSE_OK)
	{
		/* ... do something with the dialog stuff ... */
	}

	/* Free the dialog (and it's children) */
	gtk_widget_destroy(GTK_WIDGET(dialog));

	return OSSO_OK;
}
The other function is called save_state. It is called when application using the applet is saving state. Usually this does nothing, but if support for state saving is needed, this should be used.
osso_return_t save_state(osso_context_t *osso, gpointer data)
{
        /* ... save state ... */

        return OSSO_OK;
}
Building Applet
To use the applet, it needs to be built into a dynamic library aka shared object. This can be accomplished by giving flag -shared to gcc.
[sbox-CHINOOK_X86: ~] > gcc -shared `pkg-config gtk+-2.0 libosso --libs --cflags` applet.c -o libapplet.so
The binary produced by gcc should be installed to path specified in hildon-control-panel pkg-config entry. This path can be obtained with pkg-config hildon-control-panel --variable=pluginlibdir. By default this is /usr/lib/hildon-control-panel.
The .desktop File
Any control panel applet needs a desktop file describing it. The file contains metadata like name, icon name and library of the applet. The applet desktop file is much like the desktop file for any other application.
Here is an example desktop file (applet.desktop) for the applet created above. Maemo 4.0 brings new "Categories" field.
[Desktop Entry]
Encoding=UTF-8
Version=1.0
Name=Control Panel Hello World
Comment=A control panel example applet
Type=HildonControlPanelPlugin
Icon=qgn_list_cp_isetup
X-control-panel-plugin=libapplet.so
Categories=general
The desktop file must be installed to directory specified in pkg-config file for hildon-control-panel. This directory can be obtained by pkg-config hildon-control-panel --variable=plugindesktopentrydir. By default this is /usr/share/applications/hildon-control-panel.
Writing Status Bar Plug-ins
The maemo status bar can contain user-defined items. Detailed introduction, example programs and build instructions are now available in a separate document: Writing Hildon Desktop plug-ins for maemo
Writing Send Via Functionality
Send Via functionality is provided by the platform to enable applications to send data via e-mail or over a Bluetooth connection. Since several applications share this functionality, the platform provides a public interface to facilitate deployment of these services in user applications. The interfaces are defined in two header files: ossoemailinterface.h (in package libosso-email-interface-dev) and conbtdialogs-dbus.h (in package conbtdialogs-dev). The following sample code is an example of the usage of these interfaces. See MaemoPad source code for a fully functional application using these services.
#include <ossoemailinterface.h>
#include <conbtdialogs-dbus.h>

void callback_sendvia_email ( GtkAction * action, gpointer data )
{
    osso_return_t ret = OSSO_ERROR;
    GSList *list = NULL;
    gchar *uri = NULL;
    MainView *mainview = NULL;
    mainview = ( MainView * ) data;

    uri = g_strdup(mainview->file_name);

    list = g_slist_append(list, uri);

    ret = osso_email_files_email(mainview->data->osso, list);

    g_slist_free(list);
    g_free(uri);

    if (ret != OSSO_OK) {
        g_print("Could not send via email\n");
    }

}

gboolean rpc_send_via_bluetooth(gchar *path)
{
    DBusGProxy *proxy = NULL;
    DBusGConnection *sys_conn = NULL;
    GError *error = NULL;
    gboolean result = TRUE;
    gchar **files = NULL;

    sys_conn = dbus_g_bus_get(DBUS_BUS_SYSTEM, &error);

    if(sys_conn == NULL)
    {
        return FALSE;
    }

    files = g_new0(gchar*, 2);
    *files = g_strdup(path);
    files[1] = NULL;

    /* Open connection for btdialogs service */
    proxy = dbus_g_proxy_new_for_name(sys_conn,
                           CONBTDIALOGS_DBUS_SERVICE,
                           CONBTDIALOGS_DBUS_PATH,
                           CONBTDIALOGS_DBUS_INTERFACE);

    /* Send send file request to btdialogs service */
    if (!dbus_g_proxy_call(proxy, CONBTDIALOGS_SEND_FILE_REQ,
                             &error, G_TYPE_STRV, files,
                             G_TYPE_INVALID, G_TYPE_INVALID))
    {
        g_print("Error: %s\n", error->message);
        g_clear_error(&error);
        result = FALSE;
    }

    g_strfreev(files);

    g_object_unref(G_OBJECT(proxy));
    return result;
}
Writing Internet-Connected Applications
The maemo platform is designed to be used with network connection and includes powerful methods to get Internet connection easily for application. Here is some information, but to learn more check the Maemo Connectivity Guide.
Maemo IAP Paradigm
There are devices with two different connectivity modes, connected devices like PCs with broadband connections, always connected to network, and disconnected devices, which are only connected when network connection is really required. Maemo devices are generally the second type.
When user starts applications requiring network connection in maemo device, connectivity wizard is automatically started. This connectivity dialog then handles opening the LAN, WLAN, Bluetooth or whatever connection types automatically, and application does not have the knowledge which connection method is used. Applications should not have any need to know how the connection is made, they just need to know whether the connection is available or should they be started in offline mode.
Automatic Connection
The way to get network connectivity for maemo application is to use LibConIC library. With this method, a connectivity dialog is launched automatically when the application tries to open a network socket connection. For more information, see Maemo Connectivity Guide.
Testing Limitations
There are limitations for testing the connectivity with the SDK. It is possible to make and run Internet-connected application inside Scratchbox with the PC SDK rootstrap, but it is of course not possible to test the WLAN and Bluetooth connections in it without the real hardware.
Deploying Applications
This section instructs how to deploy the application packages to maemo devices and for others to be used in SDK.
Creating maemo Packages
Maemo packages are normal Debian packages with one small difference (see also HOWTO: Making Application Packages):
- Package's section (in control file) must be declared to be like "user/office". So the section is defined with "user/" prefix. There are pre-defined sections like office, internet, multimedia, games, utilities, other, etc..
As the maemo packages are Debian packages, a lot of useful information about building them can be found in the maintainers' guide . Also source codes from How to Write New Applications in Maemo 4.0 and Maemo 4.0 Porting Guide should be checked for real life examples.
The files which specify how packages are build are located in "debian" directory of application:
- "debian/control" - This file contains various values which are used to manage the package like package name, short description, and the maintainer of the packages. This also lists the package dependencies needed to install the package in maemo devices, like "Depends: package_name".
- "debian/rules" - This file is used by dpkg-buildpackage command to actually create the package. It is actually a Makefile for Debian package building, consisting of several rules specifying how to handle the source. Each rule consists of targets, filenames or names of actions that should be carried out (e.g. `build:' or `install:').Unlike other files in debian directory, this one will be marked as executable.
- "debian/changelog" - This lists the changes what has been made for the application and also the version number of package to be created. The structure is very strict and must be filled exactly by the rules.
- "debian/[application].link" - This file is needed to make the symbolic link of application desktop file to "etc/others-menu". Maemo desktop file structure is explained in earlier section.
Once the application is properly 'Debianized', building the application is done easily with the command:
[sbox-PC_SDK: ~/test_application] > dpkg-buildpackage -rfakeroot
This will create the Debian package to parent directory, together with the source package.
Installing Application Packages
Maemo packages can be installed inside Scratchbox as well as to maemo devices.
Installing to SDK
When installing Application Manager package to maemo SDK, debian package installer, like dpkg, should be used:
[sbox-CHINOOK_X86: ~] > fakeroot dpkg -i application_i386.deb
Replace 'application' with the actual name of the package. Packages can be installed in both PC and ARMEL targets. The package architecture must match the Scratchbox target.
Installing to Device
To install application packages in maemo devices, Application Manager should be used. This is a tool handling package installation process and maintaining information of all external packages that have been installed. Usage of the tool is simple, it can be started from Tools menu and application similar to below appears.
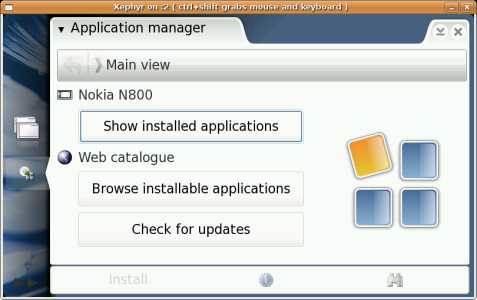
Then click "Browse installable applications" to install packages, select the package you want to install and agree to install it. Another way is to tap the package's filename on the File Manager, which opens automatically the Application Manager and starts to install the package.

The behavior or Application Manager may differ between maemo devices, so please consult the documentation provided with the device for further instructions.
Proceeding
Now all the basic features of maemo platform should be clear and you can start digging deeper! Good places to start are:
- The maemo_examples package includes most of the code snippets presented in the tutorial
- How to Write New Applications in Maemo 4.0 which introduces how to build full-featured text editor application for maemo platform and deploy it in package.
- Maemo 4.0 Porting Guide which demonstrates how to port existing GTK+ application to maemo. Monkey Bubble game is used in this example and all the required modifications to UI are demonstrated.
- API Documentation of the platform is good place to seek more detailed information of functions, Hildon API and LibOSSO API are both available in API section.
Code Examples
You can download the examples used in this tutorial in C source code and a Makefile from here. Each .c file itself also contains instructions on how to compile and run the program.
Links in This Document
External links appearing in this document:
- http://www.gnu.org/copyleft/fdl.html
- http://www.scratchbox.org/
- http://scratchbox.org/documentation/
- http://www.scratchbox.org/download/
- http://projects.o-hand.com/matchbox/
- http://www.gnome.org/projects/gconf/
- http://www.debian.org/
- http://www.debian.org/doc/manuals/maint-guide/
- http://www.ubuntu.com/
- http://fabrice.bellard.free.fr/qemu/
- http://developer.gnome.org/doc/API/gnome-vfs/
- http://library.gnome.org/devel/gtk/unstable/index.html
- http://library.gnome.org/devel/gtk/unstable/GtkUIManager.html
- http://library.gnome.org/devel/gtk/unstable/gtk-Keyboard-Accelerators.html
- http://library.gnome.org/devel/gtk/unstable/GtkMenuItem.html#gtk-menu-item-set-accel-path
- http://library.gnome.org/devel/gtk/unstable/gtk-Accelerator-Maps.html#gtk-accel-map-add-entry
- http://library.gnome.org/devel/gtk/unstable/GtkMenu.html
- http://library.gnome.org/devel/pango/unstable/index.html
- http://www.freedesktop.org/Software/dbus
- http://www.freedesktop.org/wiki/Software_2fXephyr
- http://standards.freedesktop.org/shared-mime-info-spec/
- Desktop Entry Specification
Improve this page