

Maemo Gregale 2.2 Tutorial
This document is released under the GNU Free Documentation license.
Overview of the maemo SDK
Maemo is an open source development platform for Linux-based handhelds, such as Internet Tablets. It is built from widely used open source components with additional features which help the integration to handheld devices.
With the maemo SDK, you can:
- Run your own and ready-made applications on the maemo platform using a Linux PC. The maemo SDK is not an emulator, since the same platform is mostly used in the development PC and in the target device.
- Create your own maemo UI applications which can be tested and debugged inside the maemo SDK with a normal Linux PC. With the maemo SDK, software development for embedded devices is as easy as for desktop PCs.
- Port your favorite open-source Linux project as a maemo application. Existing GTK+ applications are relatively easy to convert, the ones using some other toolkit require some additional UI changes.
- Build application packages which can be installed to maemo-compatible devices. After testing the application in the SDK, it can also be easily packaged as an ARMEL version.
This document is a basic tutorial for the maemo platform and teaches you:
- What is inside the maemo platform (see Section Overview of the maemo platform)
- How to install and use the maemo SDK (see Sections Setting up and testing the development environment and Using the development environment)
- How to write maemo UI applications (see Sections Writing maemo UI applications, Using the maemo input mechanism and Integrating applications to the maemo framework)
- How to write Internet-connected applications with the maemo platform (see Section Writing Internet-connected applications)
- How to deploy the applications in maemo-powered devices (see Section Deploying applications)
- How to proceed after this tutorial to become a master-of-maemo (see Section Learning more)
Quick start
To quickly get started with the maemo platform, follow the instructions below.
- Download Scratchbox 1.0.7 and cs2005q3.2-glibc toolchains from http://www.scratchbox.org/download/scratchbox-apophis/. In addition, download the SDK rootstrap from Maemo Gregale SDK repository.
- Install the toolchains and the rootstrap. For the installation instructions, see Section Setting up and testing the development environment.
- Log in to Scratchbox and select the i386 SDK rootstrap.
- Create a maemo_hello.c
file. The following example illustrates the source code
needed in the file:
#include <hildon-widgets/hildon-program.h> #include <gtk/gtkmain.h> #include <gtk/gtkbutton.h> int main(int argc, char *argv[]) { /* Create needed variables */ HildonProgram *program; HildonWindow *window; GtkWidget *button; /* Initialize the GTK. */ gtk_init(&argc, &argv); /* Create the hildon program and setup the title */ program = HILDON_PROGRAM(hildon_program_get_instance()); g_set_application_name("Hello maemo!"); /* Create HildonWindow and set it to HildonProgram */ window = HILDON_WINDOW(hildon_window_new()); hildon_program_add_window(program, window); /* Create button and add it to main view */ button = gtk_button_new_with_label("Hello!"); gtk_container_add(GTK_CONTAINER(window), button); /* Connect signal to X in the upper corner */ g_signal_connect(G_OBJECT(window), "delete_event", G_CALLBACK(gtk_main_quit), NULL); /* Begin the main application */ gtk_widget_show_all(GTK_WIDGET(window)); gtk_main(); /* Exit */ return 0; } - Compile the application inside Scratchbox with the
following command:
[sbox-SDK_PC: ~] > gcc -o maemo_hello maemo_hello.c `pkg-config --cflags gtk+-2.0 hildon-libs` -ansi -Wall `pkg-config --libs gtk+-2.0 hildon-libs` - Start first Xnest and then the maemo system with the
following command:
[sbox-SDK_PC: ~] > af-sb-init.sh start
- Run your application with the run-standalone.sh script to ensure that it
retrieves the right environment variables and theme. Use the
following command:
[sbox-SDK_PC: ~] >run-standalone.sh maemo_helloFigure 1 illustrates the view that is displayed after running the script. The application name is shown on the top and the application view is filled with one big button. Clicking the button does nothing, since the application contains no event handling at this point (event handling is described in the later sections). For now, close the application by pressing X in the top right corner.
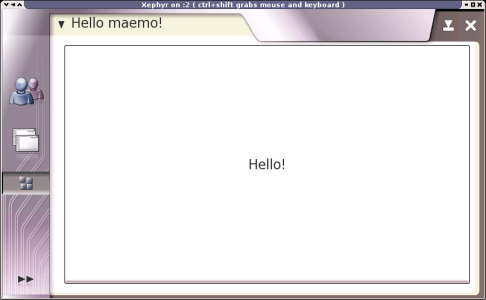
Figure 1. Application screen
To learn more, proceed with one of the following options:
- If you want to learn what the maemo SDK includes, read the whole tutorial starting from Section Overview of the maemo platform.
- If you know Linux and GTK+ already and want to start coding directly, see Developing new applications, a "how to" document about creating a full-blown maemo text editor application.
- If you have an existing GTK+ application which you want to port on the maemo platform, see Porting existing applications, a "how to" document about converting an existing open source application for the maemo platform.
Overview of the maemo platform
This section describes the contents of the maemo platform.
Software inside maemo
Figure 2 illustrates the main components of the maemo platform presented in this section. The component list in not comprehensive, but it includes the software most important for this tutorial.

Figure 2. Main components of the maemo platform
Hildon application framework
Hildon application framework introduces a new desktop for handheld devices. It is composed of the following components:
- Task navigator for starting programs and switching between applications. The task navigator has some novel capabilities build into it, such as its ability to show email headers and browser bookmarks inside the menu.
- Home provides the idle screen to embed different plugins, such as news feed reader plugin and clock plugin.
- Status bar provides a plugin interface used to follow device status changes.
- Control panel provides a framework for running applets used to change user settings. The applets are libraries that provide an interface to change, modify or set configurations.
- Hildon UI provides additional widgets on top of the GTK+ ones, and theming modifications which make the entire UI match the maemo style.
- LibOSSO is an additional library containing required and helpful services for maemo applications to better integrate them with the platform.
GTK+
GTK+ is a multi-platform toolkit for creating graphical user interfaces. Hildon UI is basically a modified GTK+ with additional widgets and suitable theming modifications. The GTK+ toolkit in maemo is based on GTK+ 2.6.
The modified Hildon GTK+ is more suitable for embedded devices, but it is still binary-compatible with a normal GTK+. This means that no changes are needed to make current GTK+ applications run in maemo, although they do not appear as native maemo applications, unless some small changes defined in this tutorial are implemented.
For more information about Hildon UI, see Section Writing maemo UI applications, the Hildon UI Style Guide Summary, or the Hildon API documentation.
Matchbox
Matchbox is a base environment for the X Window System running on embedded platforms. It is a lightweight window manager for X11 supporting PDA style windowing. Matchbox in maemo is modified to fit the platform UI style.
For more information about Matchbox, see http://projects.o-hand.com/matchbox/.
Xserver
Xserver is the part of the platform which handles drawing graphics on the screen. Xserver in maemo is optimised for embedded usage and specific hardware platform.
D-BUS
The D-BUS message bus system is used for applications and libraries to deliver messages to each another. D-BUS supplies both a system daemon and a per-user-login-session daemon (for general IPC needs among user applications). The message bus is built on the top of a general one-to-one message passing framework, which can be used by any two applications to communicate directly.
The maemo platform uses D-BUS for the following purposes:
- For system notifications (for example, “Battery low”). Every application can receive notifications and proceed accordingly.
- For separating the application UI and engine. For example, the email engine can be used from different applications.
- For launching the applications from the task navigator. D-BUS is able to launch each application only once, and the application can receive different messages from the task navigator to, for example, save its state.
D-BUS is mostly used with the assistance functions of the LibOSSO library. For more information about D-BUS, see Section LibOSSO library or the http://www.freedesktop.org/Software/dbus Internet site.
GnomeVFS
GnomeVFS (GNOME Virtual File System) is a library which makes accessing various kinds of file systems transparent to the user and developer. With GnomeVFS, various protocols (such as HTTP, FTP) and local files are all used in exactly the same way. The API for accessing files follows the POSIX standard with a few minor exceptions.
In maemo, GnomeVFS is used to access files in the user space, which abstracts the file tree structure. Access to an external memory is also provided over GnomeVFS.
For more information about GnomeVFS, see http://developer.gnome.org/doc/API/gnome-vfs/.
GConf
GConf is a system for storing application preferences, widely used in the Gnome desktop. GConf provides a preferences database, which is like a simple file system. The file system contains an organised hierarchy of keys and values.
All application settings in maemo are stored in Gconf, which makes handling them easy.
For more information about GConf, see http://www.gnome.org/projects/gconf/.
Main differences between Gnome and Hildon application frameworks
Hildon application framework is based on GNOME open source platform components. From the developer point of view, this means certain differences and additions compared to the mainstream GNOME development:
- Maemo does not contain all GNOME libraries. Only such components that match the requirements of a handheld device are included. For example, Bonobo is not included, since it is considered too heavy although it is an essential element of GNOME.
- Several new widgets are available to help you to build applications faster and make them behave similarly. Most important new widgets, which each maemo application should use, are HildonProgram and HildonWindow.
- Menus and toolbars use GTK+ methods with small additions to make them merge better to the platform. For more information about them, see Writing maemo UI applications.
- Many GTK+ widgets have been slightly modified so that they can be themed for the maemo UI style. GTK+ resource files (RC) are very powerful but still do not include enough properties for the whole maemo UI and layout style. Even with these changes, the Hildon UI is binary-compatible with GTK+ 2.6.
- Better support for the touchscreen usage with tap-and-hold functionality is implemented in the GtkWidget. This means that touchscreen can be used with any widget, usually to open context-sensitive menus.
Supported hardware and device UI form factors
Currently, maemo is developed for Internet Tablet devices, in particular for the Nokia 770 Internet Tablet. In the future, maemo will be developed particularly towards a direction independent of device hardware and form-factors.
The supported hardware and form-factors have the following minimum constraints:
- Screen resolution of 800x480 pixels
- Pointer device (such as a touchscreen)
- ARM or x86 CPU
- Minimum 32 MB ROM and 64 MB RAM
In addition, maemo supports a set of predefined hardware keys.
Unsupported features
The following features are still missing from the maemo SDK and this tutorial:
- Emulation for portable media card (MMC) access
- Multimedia framework support
Some documentation is provided about the mainstream open source software used in the maemo platform (D-BUS, GnomeVFS, GTK+). For more information about the software, see the dedicated websites.
Setting up and testing the development environment
This section describes the development environment setup prerequisites and installation tasks. It also provides instructions for launching the application framework environment.
Prerequisites
When setting up the maemo SDK, the following hardware and software requirements must be met:
- Intel compatible x86 processor, 500 MHz or faster
- 256 MB RAM or more
- 2 GB free hard disk space
- Linux OS (Debian or Ubuntu are recommended, but other fairly recent distributions mostly also work)
When starting up the installation, the following software must be first downloaded:
- Scratchbox cross-compilation toolkit and toolchains from http://scratchbox.org/download/scratchbox-apohis/. The recommended and supported version of Scratchbox is 1.0.7.
- Maemo SDK rootstraps from Maemo Gregale SDK repository.
Installation
Installing Scratchbox
-
Download the following Scratchbox files from http://www.scratchbox.org/scratchbox-apophis/. Alternatively, install the corresponging debian binary packages.
scratchbox-core-1.0.7.tar.gz scratchbox-devkit-debian-1.0.7.tar.gz scratchbox-devkit-cputransp-1.0.7.tar.gz scratchbox-libs-1.0.7.tar.gz scratchbox-toolchain-cs2005q3.2-glibc-arm-1.0.5.tar.gz scratchbox-toolchain-cs2005q3.2-glibc-i386-1.0.5.tar.gz -
Extract the tar files (for each package) to the / directory as a root user using the following command:
# tar zxf <package> -C /NoteDouble-check the packages you are extracting. Rootstraps must not be extracted to the / directory, only the Scratchbox packages. -
Add users to Scratchbox with the following command:
# /scratchbox/sbin/sbox_adduser usernameFor 'username', use your Linux user login name.
-
To update the changes in the groups, restart your user session, for example, by logging out and then loggin in again. You can check what groups you have available with the following command:
$ groups adm dialout cdrom floppy audio video plugdev lpadmin scanner sbox -
Start Scratchbox with the following command:
$ /scratchbox/login Welcome to *Scratchbox*, the cross-compilation SDK! Scratchbox is a self-contained mini-distribution that contains all the tools needed to configure and cross-compile Open Source software using GNU make and *autoconf*. All the software configuration, compilation and installation is done in a sandbox environment exactly like on your target device. This is achieved by using chroot to limit system visibility for configuration scripts you run from this shell, into what exists inside the Scratchbox sandbox. The Scratchbox utilities are: sbox-config - Change your compilation target ps - List processes running inside your sandbox Completed writing configuration to: /targets/HOST.config libtool disabled [sbox-HOST: ~] > -
After you have logged into Scratchbox, add the following two lines into your .bash_profile inside Scratchbox. There are both nano and vim editors available.
        export LANGUAGE=en_GB
        export PAGER=less
The settings are necessary to be able to use the man command inside Scratchbox and for the localisation to work properly.
The Scratchbox installation is now finished. Continue by installing the maemo rootstrap.
Installing maemo rootstrap
This section contains information about how to install the maemo SDK rootstrap to Scratchbox. While Scratchbox contains the toolchain to build software, rootstrap contains all the maemo software to run and build maemo applications.
To test the maemo platform and applications, you need the i386 rootstrap. To be able to build packages for maemo devices, you also need the ARMEL rootstrap, whose installation is covered later.
- Download the SDK ARMEL and i386 rootstraps from our repository, from armel and i386 directories..
- Copy the rootstrap to the /scratchbox/packages directory with the
following command:
# cp Maemo_Dev_Platform_v2.2_armel-rootstrap.tgz /scratchbox/packages/NoteIf you have just installed Scratchbox according to the instructions in the previous section and are already inside it, skip Steps 3 and 4. - If you have booted the computer after installing
Scratchbox, start up Scratchbox with the following command:
# /scratchbox/sbin/sbox_ctl start - Log in to Scratchbox as a normal user with another
terminal window using the following command:
$ /scratchbox/login Welcome to *Scratchbox*, the cross-compilation SDK! Scratchbox is a self-contained mini-distribution that contains all the tools needed to configure and cross-compile Open Source software using GNU make and *autoconf*. All the software configuration, compilation and installation is done in a sandbox environment exactly like on your target device. This is achieved by using chroot to limit system visibility for configuration scripts you run from this shell, into what exists inside the Scratchbox sandbox. The Scratchbox utilities are: sbox-config - Change your compilation target ps - List processes running inside your sandbox [sbox-HOST: ~] > -
Create a new rootstrap target with the sbox-config -ct SDK_PC command and answer the questions as presented below. SDK_PC is the name of your new target.
NoteIf you already have a target with the same name, you have to choose some other string for your new target.For the PC target, select the available i386 compiler and to not use the host-gcc compiler. No CPU transparency is needed as the target CPU is same as the CPU of the host PC. Select "debian" from the available development kits to be able to use all Debian-specific tools.
[sbox-HOST: ~] > sbox-config -ct SDK_PC Available compilers: 0) cs2005q3.2-glibc-arm 1) host-gcc 2) cs2005q3.2-glibc-i386 Enter compiler number: 2 Available CPU-transparency methods: sbrsh qemu-arm qemu-ppc Enter method name (none): none Available devkits: debian Enter list of devkit names (none): debian Completed writing configuration to: /targets/SDK_PC.config [sbox-HOST: ~] > - Select the newly created target with the following
command:
        [sbox-HOST: ~] > sbox-config -st SDK_PC
        Restarting Scratchbox shell...
        Hangup
        Shell restarting...
        [sbox-SDK_PC: ~] >
Note how the command line prompt changes according to the selected target. If you create a new target for the ARMEL rootstrap, this functionality allows you to constantly see which target is selected. You can also add a version number into the target name, if you install newer SDK rootstraps and want to keep the older ones for later use. - Extract the downloaded rootstrap inside your target. This
can take a few minutes, since the tgz package is rather large.
        [sbox-SDK_PC: ~] > sbox-config -er /scratchbox/packages/Maemo_Dev_Platform_v2.2_i386-rootstrap.tgz
        Extracting /scratchbox/packages/Maemo_Dev_Platform_v2.2_i386-rootstrap.tgz to /targets/.tmp/SDK_PC
        Moving /targets/SDK_PC to /targets/.old/SDK_PC
        Moving /targets/.tmp/SDK_PC to /targets/SDK_PC
        Restarting Scratchbox shell...
        Hangup
        Shell restarting...
        [sbox-SDK_PC: ~] >
The maemo development environment is now ready for use and you can start compiling maemo applications. To be able to also see and test the applications, install a graphical X server as described in the following section.
Installing Xephyr
To run the maemo environment in a Linux PC, you need a graphical window in which to start it. For this purpose Xephyr is recommended, but alternative options are also available.
Xephyr is a drive-based X server which targets a window on a host X server as its framebuffer. For more information about Xephyr, see http://www.freedesktop.org/wiki/Software_2fXephyr.
Xephyr is pre-installed in the rootstrap.
- To ease the Xephyr startup, create a start-xephyr.sh script. The following
example illustrates the contents of the script. Replace the
name of the target by the one you are using, the example uses
"SDK_PC".
#!/bin/sh -e prefix=/scratchbox/users/${LOGNAME}/targets/SDK_PC/usr export LD_LIBRARY_PATH=${prefix}/lib; export LD_LIBRARY_PATH exec ${prefix}/bin/Xephyr :2 -host-cursor -screen 800x480x16 -dpi 96 -ac - Make the created script executable with the following
command:
chmod +x start-xephyr.sh - Startup the Xephyr with the script, outside the
scratchbox, using the following command:
$ ./start-xephyr.sh &After running the script, the following empty Xephyr window opens.
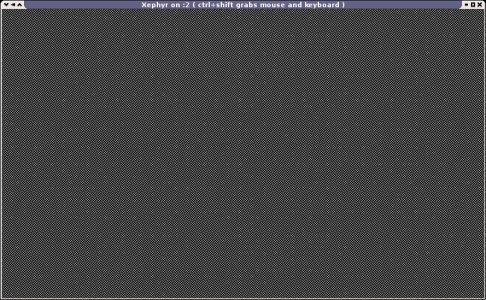
Figure 3. Xephyr window
Graphic window alternatives
There are alternative graphic window options available. Xnest, for example, is an application available in many Linux distributions, and it can be used as a graphical window with maemo. Since Xnest has some problems from which Xephyr does not suffer, using Xephyr over Xnest is recommended. For more information about using Xnest with maemo, see the maemo WIKI Xnest page.
To learn how to launch the maemo UI inside the graphic window, see the next section.
Launching the application framework environment
If you started Xephyr or some other graphical window using display 2 (as instructed in Section Installing ephyr), set the DISPLAY variable inside Scratchbox to direct graphical applications to the display 2. Use the following command:
[sbox-SDK_PC: ~] > export DISPLAY=:2
Then, start the maemo UI in the X window with the following command:
[sbox-SDK_PC: ~] > af-sb-init.sh start
The following user interface appears.

Figure 4. Maemo UI
You are now ready to start testing provided applications. If you want to stop the UI, use the following command:
[sbox-SDK_PC: ~] > af-sb-init.sh stop
Using the evelopment environment
This section describes how to run and build applications.
Running applications
Running applications inside the development environment is easy and, most importantly, they are run in the real Linux environment instead of an emulator. For running the UI and applications, the i386 SDK must be used, as the QEMU emulation is not enough to run ARMEL binaries (for more information, see Section Building for ARMEL). When the maemo UI has been started with the af-sb-init.sh start command, you can experience the preinstalled applications.
If you only want to see how your application works in the environment, simply run it with the run-standalone.sh script. That sets the right environment variables and theme.
[sbox-SDK_PC: ~] >run-standalone.sh maemo_hello
The instructions for building the whole application from source and adding a menu entry are covered in the later sections.
On the left side of the UI, there is a task navigator area with buttons, of which the bottommost is the task launcher menu. The task launcher menu includes all installed applications: to launch an application, click the menu and select the application.
Start the control panel from the task launcher menu.

Figure 5. Task launcher menu
The control panel window opens with icons representing a few control panel plugins.
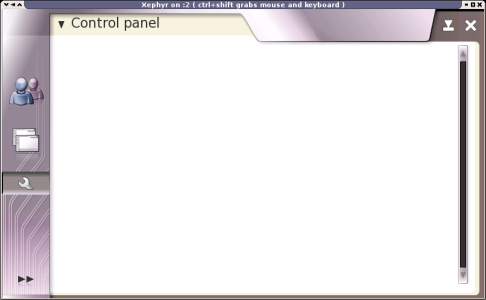
Figure 6. Control panel
Every maemo application can have an application-specific menu, which is located on the top left corner of the application area.
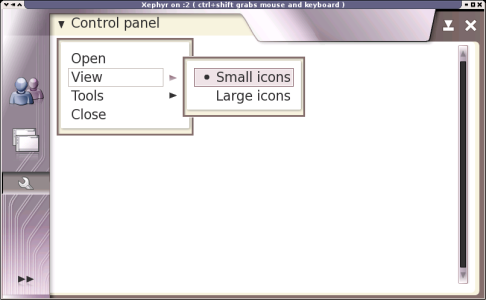
Figure 7. Application-specific menu
To switch between applications, use the application switcher on the bottom left corner of the window. You only have the Control panel and Home applications to switch between.
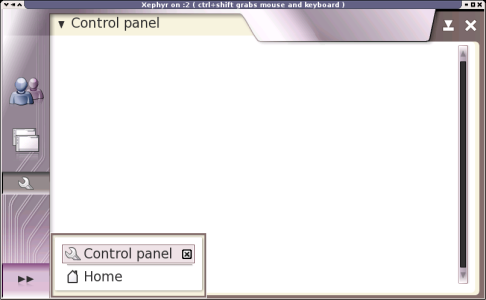
Figure 8. Application switcher
In the control panel, close it either from the menu or by pressing X in the top right corner.
Building applications
The applications for the maemo platform are distributed as Application Manager .deb packages. For more information about packaging, see Section Creating maemo packages.
The maemopad text editor application, which is built from scratch in the Developing new applications "how to" document, is used as an example.
To build and install a maemopad application from source files:
- Download the maemopad source tgz file from the subversion repository.
- Copy the file to your user home directory inside
Scratchbox, and uncompress it with the following command:
[sbox-SDK_PC: ~] > tar xzvf maemopad_1.5.tar.gz - Move to the application directory with the following
command:
[sbox-SDK_PC: ~] > cd maemopad [sbox-SDK_PC: ~/maemopad] > - To make a Debian package of the application, run the
following command in the application directory:
[sbox-SDK_PC: ~/maemopad] > dpkg-buildpackage -rfakeroot -b
- If the build was successful, the parent directory
contains the Debian package. Check the existence of the
package with the following commands:
[sbox-SDK_PC: ~/maemopad] > cd .. [sbox-SDK_PC: ~] > ls maemopad maemopad_1.5_i386.deb - The maemopad package is compatible with the Application
Manager, but it can also be installed using the debian
package manager dpkg:
      [sbox-SDK_PC: ~] > fakeroot dpkg -i maemopad_1.4_i386.deb
      Selecting previously deselected package maemopad.
      (Reading database ... 20 files and directories currently installed.)
      Unpacking maemopad (from maemopad_1.5_i386.deb) ...
      Setting up maemopad (1.5) ...
The application is now visible in the task launcher menu. Select the application to launch it.
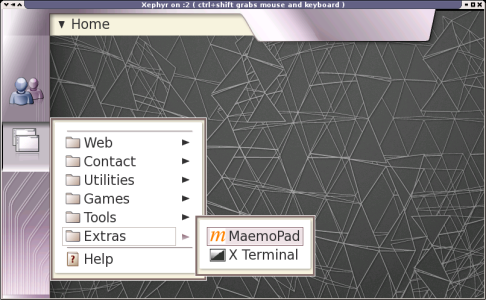
Figure 9. New application in the task launcher menu
Write some text, test menu options like Copy and Paste, and change the font. "F6" is used to emulate full screen hardware key in maemo: in case you want to jump to the full screen mode and back to the normal view, press "F6".
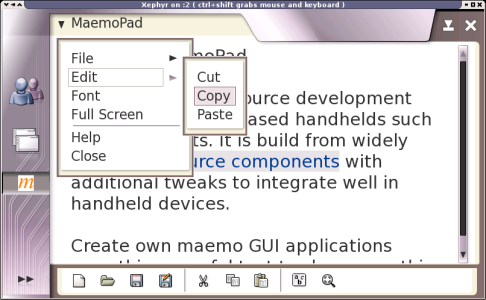
Figure 10. Menu options
Debian packaging is a large subject and this tutorial only covers the basics. For more information, see the Debian New Maintainers' Guide.
Building for ARMEL
Building ARMEL packages for the maemo devices is as easy as building packages for i386. All you need is to create an additional ARMEL target. There are two ways to get the required ARMEL compilation support for the rootstrap:
- Use QEMU to emulate an ARM processor. QEMU is a generic and open source processor emulator which achieves a good emulation speed by using dynamic translation. For more information about QEMU, see http://fabrice.bellard.free.fr/qemu/.
- Use a real ARMEL device as a cross-compilation device. In Scratchbox, this can be done with sbrsh, which runs the configure script test programs on a networked device with the same CPU as the cross-compilation target device, in a way that is transparent to the configuration system. Running programs on the actual target device is more reliable than emulating a specific target device, because QEMU may not support all the required features. For more information about using a CPU transparency device, see http://scratchbox.org.
QEMU is suitable for normal cross-compilation, but an actual target device should be used for more advanced purposes. In this tutorial QEMU is used, because it is much easier to set up and no extra hardware is required. QEMU emulation is getting more and more complete all the time, although it cannot (yet) be used to run applications.
To make ARMEL compilation possible, you need a new Scratchbox target for ARMEL. The target creation is similar to the PC target creation described in the earlier section.
- Download the ARMEL SDK rootstrap from our repository.
- Copy the rootstrap to the /scratchbox/packages directory with the
following command:
# cp Maemo_Dev_Platform_v2.2_armel-rootstrap.tgz /scratchbox/packages/ - Start up Scratchbox (if not running already) with the
following command:
# /scratchbox/sbin/sbox_ctl start - Log in as a normal user with the following command:
$ /scratchbox/login - Create a new rootstrap target with the sbox-config -ct SDK_ARMEL command and
answer the questions as presented below. SDK_ARMEL is the name of your new target.
If a target with that name already exists, select another
name.
[sbox-SDK_PC: ~] > sbox-config -ct SDK_ARMEL Available compilers: 0) cs2005q3.2-glibc-arm 1) host-gcc 2) cs2005q3.2-glibc-i386 Enter compiler number: 0 Available CPU-transparency methods: sbrsh qemu-arm qemu-ppc Enter method name (qemu-arm): qemu-arm Available devkits: debian Enter list of devkit names (none): debian Completed writing configuration to: /targets/SDK_ARMEL.config [sbox-SDK_PC: ~] > - Select the new ARMEL target with the following command:
  [sbox-SDK_PC: ~] > sbox-config -st SDK_ARMEL
  Restarting Scratchbox shell...
  Hangup
  Shell restarting...
  [sbox-SDK_ARMEL: ~] >
- Extract the downloaded rootstrap with the following
command. This can take a few minutes.
  [sbox-SDK_ARMEL: ~] > sbox-config -er /scratchbox/packages/Maemo_Dev_Platform_v2.2_armel-rootstrap.tgz
  Extracting /scratchbox/packages/Maemo_Dev_Platform_v2.2_armel-rootstrap.tgz to /targets/.tmp/SDK_ARMEL
  Moving /targets/SDK_ARMEL to /targets/.old/SDK_ARMEL
  Moving /targets/.tmp/ARMEL_PC to /targets/SDK_ARMEL
  Restarting Scratchbox shell...
  Hangup
  Shell restarting...
  [sbox-SDK_ARMEL: ~] >
Now the ARMEL SDK is installed and you can build Debian packages with it just as with the PC rootstrap. For more information, see Building applications.
When you have created both PC and ARMEL targets, you can toggle between them with the following command:
sbox-config -st [target]
Writing maemo UI applications
Hildon is a graphical user interface designed for small mobile devices. This section aims to assist developers in getting started with the development of Hildon-compatible applications.
Most GTK+ widgets and methods work unaltered in the Hildon environment, but to make the applications fit in the maemo UI environment, some source code changes for plain GTK+ applications are required.
The following sections introduce the most important widgets in Hildon. All GTK+ widgets can be used on top of them. For more information, see the GTK+ Reference Manual.
Most of the source code snippets used in this tutorial can also be found in the maemo-examples package.
Basic Hildon layouts
This section describes the basic layout modes of the Hildon user interface. Applications can use all of these and change dynamically between different views. In all the views, the application area can be shared in any possible ways using the GTK+ containers (such as GtkHBox, GtkVBox and GtkTable).
Normal view
Figure 11 illustrates the basic layout of the Hildon user interface in the normal view. The view consists of the task navigator area, status/title bar area, application area, and three areas of inactive skin graphics:
- Task navigator area on the left is 80 pixels wide.
- Status/title bar area is 720x60 pixels.
- Application area on the middle is 672x396 pixels.
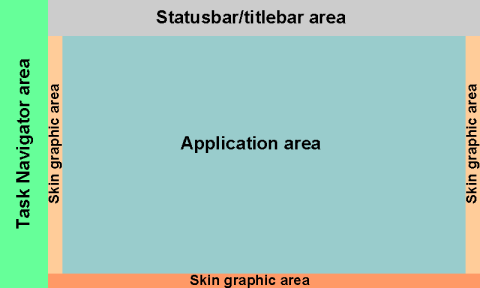
Figure 11. Normal view layout
Normal view with toolbar
The normal view with toolbar layout contains all types of functional areas. The layout is the same as normal view, except that there is a toolbar area at the bottom replacing the inactive skin graphic area. The toolbar area width is 720 pixels and the height varies depending on the toolbar type:
- 360 pixels with a single toolbar
- 310 pixels with both application and Find toolbar
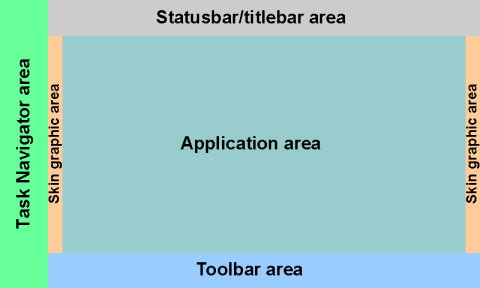
Figure 12. Normal view with toolbar layout
Full screen view
In the full screen view layout, the whole screen (800x480 pixels) is reserved for the application area. The full screen mode can be activated and deactivated by a hardware button or in the application code. All applications should provide the full screen mode to maximise screen usage when needed.

Figure 13. Full screen view layout
Full screen view with toolbar
The full screen view with toolbar layput is a variation of the full screen view. There is a toolbar area at the bottom of the screen reducing the available space for the application area. Since the toolbar can be visible in both normal and full screen modes, it must be made scalable. The application area height varies according to the toolbar:
- With a single toolbar, the application area height is 420 pixels.
- If multiple toolbars are used (such as application and Find toolbar) simultaneously, the application area height is 370 pixels. All of the toolbars appear at the bottom of screen, on top of each other.
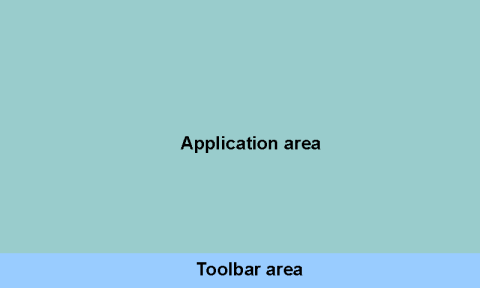
Figure 14. Full screen view with toolbar layout
Windows
This section describes two Hildon application windows: HildonProgram and HildonWindow.
HildonProgram
#include <hildon-widgets/hildon-program.h>
A HildonProgram is the base of any Hildon application. It is inherited from GObject and represents an application running in the Hildon framework. The HildonProgram tracks the top-most status of an application and informs the task navigator when the application can be hibernated. It also provides tools to get and set menus and toolbars which are common for all application windows.
The HildonProgram widget is created by calling the hildon_program_get_instance() function, which takes no parameters and returns a new HildonProgram. For this tutorial, the following API functions are of interest:
- HildonProgram
*hildon_program_get_instance (void)
Creates a new HildonProgram widget. - void hildon_program_add_window
(HildonProgram *self, HildonWindow *window)
Adds a HildonWindow to a HildonProgram. - hildon_program_set_can_hibernate
(HildonProgram *self, gboolean killable)
Informs the task navigator that it can hibernate the HildonProgram. - void
hildon_program_set_common_menu (HildonProgram *self, GtkMenu
*menu)
Sets the common menu for all application windows. - void
hildon_program_set_common_toolbar (HildonProgram *self,
GtkToolbar *toolbar)
Sets the common toolbar for all application windows.
The following example (example_hildonprogram.c) illustrates an application which creates a new HildonProgram and HildonWindow. It sets a title for the application and creates a sample label.
/* Includes */
#include <hildon-widgets/hildon-program.h>
#include <gtk/gtkmain.h>

int main(int argc, char *argv[])
{
/* Create needed variables */
HildonProgram *program;
HildonWindow *window;

/* Initialize the GTK. */
gtk_init(&argc, &argv);

/* Create the hildon program and setup the title */
program = HILDON_PROGRAM(hildon_program_get_instance());
g_set_application_name("App Title");

/* Create HildonWindow and set it to HildonProgram */
window = HILDON_WINDOW(hildon_window_new());
hildon_program_add_window(program, window);

/* Add example label to window */
gtk_container_add(GTK_CONTAINER(window),
GTK_WIDGET(gtk_label_new("HildonProgram Example")));

/* Begin the main application */
gtk_widget_show_all(GTK_WIDGET(window));

/* Connect signal to X in the upper corner */
g_signal_connect(G_OBJECT(window), "delete_event",
G_CALLBACK(gtk_main_quit), NULL);

gtk_main();

/* Exit */
return 0;
}
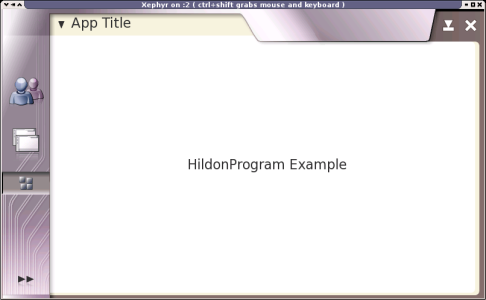
Figure 15. Example application
HildonWindow
#include <hildon-widgets/hildon-window.h>
A HildonWindow is inherited from the GtkWindow. It represents a top-level window of an application running in the Hildon framework. It provides facilities to manage window menus and toolbars. The GtkWindow API also applies to it (for example, gtk_window_fullscreen and gtk_window_set_urgency_hint).
Each HildonWindow can have its own menu and toolbars. The application can also have a common menu and toolbar, which are shared among all application windows. For more information, see Sections HildonProgram, Menus and Toolbars.
The following HildonWindow functions are most important:
- GtkWidget *hildon_window_new
(void)
Creates a new HildonWindow widget. - void hildon_window_set_menu
(HildonWindow *self, GtkMenu *menu)
Sets a menu for the HildonWindow. - void hildon_window_add_toolbar
(HildonWindow *self, GtkToolbar *toolbar)
Adds a toolbar for the HildonWindow.
For the example code, see Section HildonProgram.
Menus
The menus in maemo use the GTK+ menu functions with the exception that the menu is attached to the HildonProgram/Window and appears in the title bar. A GtkMenu can be created and attached to the HildonProgram to be used as a common menu for all HildonWindows that do not have their own menu. Another way is to use a GtkMenu in a HildonWindow. In this way, every application window can have a different menu.
The GTK+ menus can be made both manually or using the GtkUIManager. The GtkUIManager is a new action-based method to create menus and toolbars using an XML description. This tutorial covers only the manual menu creation. For more information about the GtkUIManager, see http://developer.gnome.org/doc/API/2.0/gtk/GtkUIManager.html.
The following examples (example_menu.c) create a menu with a submenu. The submenu contains radio menu items and a check menu item, all of which can be toggled. The last item in the menu (Close) is attached to a callback function so that the application can be closed from the menu. The following example illustrates the function which creates the menu. In this example, the menu is attached to the one and only HildonWindow.
/* Create the menu items needed for the main view */
static void create_menu(HildonWindow * main_window)
{
/* Create needed variables */
GtkWidget *main_menu;
GtkWidget *menu_others;
GtkWidget *item_others;
GtkWidget *item_radio1;
GtkWidget *item_radio2;
GtkWidget *item_check;
GtkWidget *item_close;
GtkWidget *item_separator;

/* Create new main menu */
main_menu = gtk_menu_new();

/* Create new submenu for "Others" */
menu_others = gtk_menu_new();

/* Create menu items */
item_others = gtk_menu_item_new_with_label("Others");
item_radio1 = gtk_radio_menu_item_new_with_label(NULL, "Radio1");
item_radio2 =
gtk_radio_menu_item_new_with_label_from_widget(GTK_RADIO_MENU_ITEM
(item_radio1),
"Radio2");
item_check = gtk_check_menu_item_new_with_label("Check");
item_close = gtk_menu_item_new_with_label("Close");
item_separator = gtk_separator_menu_item_new();

/* Add menu items to right menus */
gtk_menu_append(main_menu, item_others);
gtk_menu_append(menu_others, item_radio1);
gtk_menu_append(menu_others, item_radio2);
gtk_menu_append(menu_others, item_separator);
gtk_menu_append(menu_others, item_check);
gtk_menu_append(main_menu, item_close);

/* Add others submenu to the "Others" item */
hildon_window_set_menu(HILDON_WINDOW(main_window), GTK_MENU(main_menu));
gtk_menu_item_set_submenu(GTK_MENU_ITEM(item_others), menu_others);

/* Attach the callback functions to the activate signal */
g_signal_connect(G_OBJECT(item_close), "activate",
GTK_SIGNAL_FUNC(item_close_cb), NULL);

/* Make all menu widgets visible */
gtk_widget_show_all(GTK_WIDGET(main_menu));
}
The Close menu entry is attached with the g_signal_connect function to the item_close_cb callback function. The item_close_cb function, which is illustrated in the following example, ends the application by executing the gtk_main_quit() function.
/* Callback for "Close" menu entry */
void item_close_cb()
{
g_print("Closing application...\n");
gtk_main_quit();
}
The main function in this application is similar to others presented earlier. The only new feature here is executing the create_menu() HildonWindow function as its parameter. This function creates the menu and attaches it to the window. The following example illustrates the main function:
/* Main application */
int main(int argc, char *argv[])
{
/* Create needed variables */
HildonProgram *program;
HildonWindow *window;

/* Initialize the GTK. */
gtk_init(&argc, &argv);

/* Create the hildon program and setup the title */
program = HILDON_PROGRAM(hildon_program_get_instance());
g_set_application_name("Menu Example");

/* Create HildonWindow and set it to HildonProgram */
window = HILDON_WINDOW(hildon_window_new());
hildon_program_add_window(program, window);

/* Add example label to HildonWindow */
gtk_container_add(GTK_CONTAINER(window),
gtk_label_new("Menu Example"));

/* Create menu for HildonWindow */
create_menu(window);

/* Connect signal to X in the upper corner */
g_signal_connect(G_OBJECT(window), "delete_event",
G_CALLBACK(item_close_cb), NULL);

/* Begin the main application */
gtk_widget_show_all(GTK_WIDGET(window));
gtk_main();

/* Exit */
return 0;
}
Figure 16 illustrates the application with an open submenu.
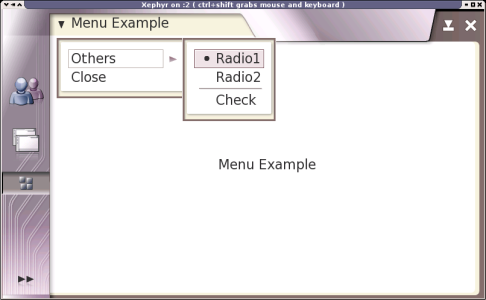
Figure 16. Example application with an open submenu
As the maemo menus are GTK+ menus, they are not explained in more detail. For the full API documentation, see the GTK+ menu widgets.
Toolbars
To create an application that has a toolbar, create a normal HildonWindow and a normal GtkToolbar. The toolbar is used as any GtkToolbar is used and it can contain normal GtkToolItems, such as:
- GtkToolButton –a normal toolbar button which can be clicked.
- GtkToggleToolButton – a toolbar button which can be toggled between two different states. The Bold button in text editors is this kind of button; it can be either enabled of disabled.
- GtkRadioToolButton – a toolbar button which can be toggled between two different states, with the addition that only one of the buttons in the group can be selected at a time. The tool buttons (Line, Box, Fill) in drawing applications are this kind of buttons; only one tool can be selected at a time.
- GtkSeparatorToolItem – a toolbar item which is used as a separator between real items. It can be a visible separation line or just an empty space.
- GtkToolItem – the base class of widgets that can be added to the GtkToolbar. By using this class as a parent widget, all kinds of widgets can be inserted inside the GtkToolbar. The example below illustrates this kind of usage by attaching the GtkComboBox to a toolbar.
The main difference in maemo compared to normal GTK+ usage is that toolbars can be common to all HildonWindows in an application or they can be used only in a particular HildonWindow.
The following example (example_toolbar.c) illustrates a function that creates a toolbar and adds it to the HildonWindow. The defined function is called in the main function in the same way as in the previous menu example. The callback function for the Close button (tb_close_cb) is also similar to the earlier example.
/* Create the toolbar needed for the main view */
static void create_toolbar(HildonWindow * main_window)
{
/* Create needed variables */
GtkWidget *main_toolbar;
GtkToolItem *tb_new;
GtkToolItem *tb_open;
GtkToolItem *tb_save;
GtkToolItem *tb_close;
GtkToolItem *tb_separator;
GtkToolItem *tb_comboitem;
GtkComboBox *tb_combo;

/* Create toolbar */
main_toolbar = gtk_toolbar_new();

/* Create toolbar button items */
tb_new = gtk_tool_button_new_from_stock(GTK_STOCK_NEW);
tb_open = gtk_tool_button_new_from_stock(GTK_STOCK_OPEN);
tb_save = gtk_tool_button_new_from_stock(GTK_STOCK_SAVE);
tb_close = gtk_tool_button_new_from_stock(GTK_STOCK_CLOSE);

/* Create toolbar combobox item */
tb_comboitem = gtk_tool_item_new();
tb_combo = GTK_COMBO_BOX(gtk_combo_box_new_text());
gtk_combo_box_append_text(tb_combo, "Entry 1");
gtk_combo_box_append_text(tb_combo, "Entry 2");
gtk_combo_box_append_text(tb_combo, "Entry 3");
/* Select second item as default */
gtk_combo_box_set_active(GTK_COMBO_BOX(tb_combo), 1);
/* Make combobox to use all available toolbar space */
gtk_tool_item_set_expand(tb_comboitem, TRUE);
/* Add combobox inside toolitem */
gtk_container_add(GTK_CONTAINER(tb_comboitem), GTK_WIDGET(tb_combo));

/* Create separator */
tb_separator = gtk_separator_tool_item_new();

/* Add all items to toolbar */
gtk_toolbar_insert(GTK_TOOLBAR(main_toolbar), tb_new, -1);
gtk_toolbar_insert(GTK_TOOLBAR(main_toolbar), tb_separator, -1);
gtk_toolbar_insert(GTK_TOOLBAR(main_toolbar), tb_open, -1);
gtk_toolbar_insert(GTK_TOOLBAR(main_toolbar), tb_save, -1);
gtk_toolbar_insert(GTK_TOOLBAR(main_toolbar), tb_comboitem, -1);
gtk_toolbar_insert(GTK_TOOLBAR(main_toolbar), tb_close, -1);

/* Add signal lister to "Close" button */
g_signal_connect(G_OBJECT(tb_close), "clicked",
G_CALLBACK(tb_close_cb), NULL);

/* Add toolbar HildonWindow */
hildon_window_add_toolbar(main_window, GTK_TOOLBAR(main_toolbar));
}
Figure 17 illustrates the created toolbar with several buttons and combobox.
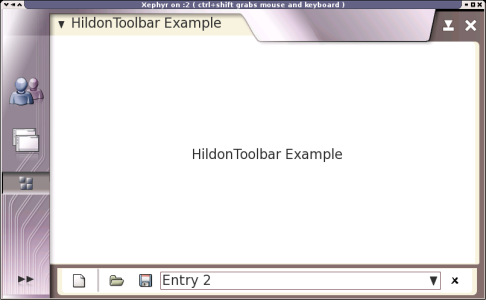
Figure 17. Toolbar with buttons and a combobox
HildonFindToolbar
#include <hildon-widgets/hildon-program.h>

#include <hildon-widgets/hildon-find-toolbar.h>
#include <gtk/gtk.h>
A HildonFindToolbar is a special toolbar for the Find feature. Maemo applications can have several toolbars, which are then attached on top of each other. The Find toolbar is generally placed on the top of the main toolbar, as in the example covered in this section.
The example covers a more complete application (example_findtoolbar.c), since the Find toolbar needs to be opened and hid. The example includes a structure to contain the main UI widget pointers. That approach should be used in real maemo applications to make accessing generated widgets easier. The example is divided to smaller pieces, to allow you to concentrate on all the main issues. The following part of the example illustrates the data structure which holds important data needed by other functions:
/* Application UI data struct */
typedef struct _AppData AppData;
struct _AppData {

/* View items */
HildonProgram *program;
HildonWindow *window;

/* Toolbar */
GtkWidget *main_toolbar;

/* Find toolbar */
HildonFindToolbar *find_toolbar;

/* Is Find toolbar visible or not */
gboolean find_visible;
};
The following part of the example illustrates all the required callback functions: Close and Find icons for the main toolbar and Close and Search buttons for the Find toolbar. The actual search is not implemented, but it should be included in the find_tb_search() function.
/* Callback for "Close" toolbar button */
void tb_close_cb(GtkToolButton * widget, AppData * view)
{
g_print("Closing application...\n");
gtk_main_quit();
}

/* Callback for "Find" toolbar button */
void tb_find_cb(GtkToolButton * widget, AppData * view)
{
/* Show or hide find toolbar */
if (view->find_visible) {
gtk_widget_hide_all(GTK_WIDGET(view->find_toolbar));
view->find_visible = FALSE;
} else {
gtk_widget_show_all(GTK_WIDGET(view->find_toolbar));
view->find_visible = TRUE;
}
}

/* Callback for "Close" find toolbar button */
void find_tb_close(GtkWidget * widget, AppData * view)
{
gtk_widget_hide_all(GTK_WIDGET(view->find_toolbar));
view->find_visible = FALSE;
}

/* Callback for "Search" find toolbar button */
void find_tb_search(GtkWidget * widget, AppData * view)
{
gchar *find_text = NULL;
g_object_get(G_OBJECT(widget), "prefix", &find_text, NULL);
/* Implement the searching here... */
g_print("Search for: %s\n", find_text);
}
The following part of the example illustrates how the HildonFindToolbar is created in a separate function and connected to the callback listeners presented before. Note that the code contains no gtk_widget_show() function for the toolbar, to keep the toolbar hidden when the application starts.
/* Create the find toolbar */
void ui_create_find_toolbar(AppData * view)
{
HildonFindToolbar *find_toolbar;
find_toolbar = HILDON_FIND_TOOLBAR
(hildon_find_toolbar_new("Find String: "));

/* Add signal listers to "Search" and "Close" buttons */
g_signal_connect(G_OBJECT(find_toolbar), "search",
G_CALLBACK(find_tb_search), view);
g_signal_connect(G_OBJECT(find_toolbar), "close",
G_CALLBACK(find_tb_close), view);
hildon_window_add_toolbar(view->window, GTK_TOOLBAR(find_toolbar));

/* Set variables to AppData */
view->find_toolbar = find_toolbar;
view->find_visible = FALSE;
}
The following part of the example illustrates the create_toolbar() function which is very similar to the earlier example, only a callback is added for the Find toolbar button.
/* Create the toolbar for the main view */
static void create_toolbar(AppData * appdata)
{
/* Create needed variables */
GtkWidget *main_toolbar;
GtkToolItem *tb_new;
GtkToolItem *tb_open;
GtkToolItem *tb_save;
GtkToolItem *tb_find;
GtkToolItem *tb_close;
GtkToolItem *tb_separator;
GtkToolItem *tb_comboitem;
GtkComboBox *tb_combo;

/* Create toolbar */
main_toolbar = gtk_toolbar_new();

/* Create toolbar button items */
tb_new = gtk_tool_button_new_from_stock(GTK_STOCK_NEW);
tb_open = gtk_tool_button_new_from_stock(GTK_STOCK_OPEN);
tb_save = gtk_tool_button_new_from_stock(GTK_STOCK_SAVE);
tb_find = gtk_tool_button_new_from_stock(GTK_STOCK_FIND);
tb_close = gtk_tool_button_new_from_stock(GTK_STOCK_CLOSE);

/* Create toolbar combobox item */
tb_comboitem = gtk_tool_item_new();
tb_combo = GTK_COMBO_BOX(gtk_combo_box_new_text());
gtk_combo_box_append_text(tb_combo, "Entry 1");
gtk_combo_box_append_text(tb_combo, "Entry 2");
gtk_combo_box_append_text(tb_combo, "Entry 3");
/* Select second item as default */
gtk_combo_box_set_active(GTK_COMBO_BOX(tb_combo), 1);
/* Make combobox to use all available toolbar space */
gtk_tool_item_set_expand(tb_comboitem, TRUE);
/* Add combobox inside toolitem */
gtk_container_add(GTK_CONTAINER(tb_comboitem), GTK_WIDGET(tb_combo));

/* Create separator */
tb_separator = gtk_separator_tool_item_new();

/* Add all items to toolbar */
gtk_toolbar_insert(GTK_TOOLBAR(main_toolbar), tb_new, -1);
gtk_toolbar_insert(GTK_TOOLBAR(main_toolbar), tb_separator, -1);
gtk_toolbar_insert(GTK_TOOLBAR(main_toolbar), tb_open, -1);
gtk_toolbar_insert(GTK_TOOLBAR(main_toolbar), tb_save, -1);
gtk_toolbar_insert(GTK_TOOLBAR(main_toolbar), tb_comboitem, -1);
gtk_toolbar_insert(GTK_TOOLBAR(main_toolbar), tb_find, -1);
gtk_toolbar_insert(GTK_TOOLBAR(main_toolbar), tb_close, -1);

/* Add signal lister to "Close" button */
g_signal_connect(G_OBJECT(tb_close), "clicked",
G_CALLBACK(tb_close_cb), NULL);

/* Add signal lister to "Find" button */
g_signal_connect(G_OBJECT(tb_find), "clicked",
G_CALLBACK(tb_find_cb), appdata);

/* Add toolbar HildonWindow */
hildon_window_add_toolbar(appdata->window, GTK_TOOLBAR(main_toolbar));

gtk_widget_show_all(main_toolbar);
appdata->main_toolbar = main_toolbar;
}
The following part of the example illustrates the main application loop, which creates a new AppData structure and stores the new HildonProgram and HildonWindow into it. Both toolbars are created, but only the main toolbar is set visible.
/* Main application */
int main(int argc, char *argv[])
{
/* Create needed variables */
HildonProgram *program;
HildonWindow *window;

/* Initialize the GTK. */
gtk_init(&argc, &argv);

/* Create the hildon program and setup the title */
program = HILDON_PROGRAM(hildon_program_get_instance());
g_set_application_name("HildonFindToolbar Example");

/* Create HildonWindow and set it to HildonProgram */
window = HILDON_WINDOW(hildon_window_new());
hildon_program_add_window(program, window);

/* Add example label to window */
gtk_container_add(GTK_CONTAINER(window),
gtk_label_new("HildonFindToolbar Example"));

/* Create AppData */
AppData *appdata;
appdata = g_new0(AppData, 1);
appdata->program = program;
appdata->window = window;

/* Create toolbar for view */
create_toolbar(appdata);

/* Create find toolbar, but keep it hidden */
ui_create_find_toolbar(appdata);

/* Connect signal to X in the upper corner */
g_signal_connect(G_OBJECT(appdata->window), "delete_event",
G_CALLBACK(item_close_cb), NULL);

/* Show all other widgets except the find toolbar */
gtk_widget_show_all(GTK_WIDGET(appdata->window));
gtk_widget_hide_all(GTK_WIDGET(appdata->find_toolbar));

/* Begin the main application */
gtk_main();

/* Exit */
return 0;
}
The application is now ready and Figure 18 presents the result. The Find toolbar can be opened and closed pressing the Find icon in the main toolbar (second from the right). As no real functionality was created for the search, pressing the Search button in the Find toolbar only prints the search string into the command line.
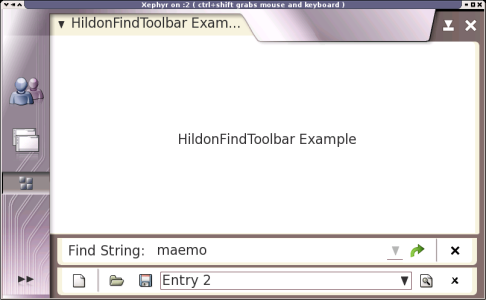
Figure 18. Main and Find toolbars
Other Hildon widgets
This section introduces general Hildon widgets, which can and should be used in different maemo applications. Only the most common widgets are introduced; for a full list of available widgets, see the Hildon API documentation. Remember that all normal GTK+ widgets can also be used; for more information, see the GTK+ Reference Manual.
HildonFileChooserDialog
#include <hildon-widgets/hildon-program.h>
#include <hildon-widgets/hildon-file-chooser-dialog.h>
#include <gtk/gtk.h>

/* Application UI data struct */
typedef struct _AppData AppData;
struct _AppData {
HildonProgram *program;
HildonWindow *window;

GtkWidget * main_vbox;
GtkWidget * label;

/* Menu stuff */
GtkWidget * main_menu;
GtkWidget * menu_item_file_open;
GtkWidget * menu_item_file_save;
GtkWidget * menu_item_quit;
};
;The HildonFileChooserDialog is a dialog used to save and open user files. Since it is based on the GtkFileChooser, the API is similar to the one used in GTK+.
The HildonFileChooserDialog is usually opened by the event callback of the Open or Save menu entries or toolbar buttons. To use the file dialog, these callbacks must include code similar as in the following example (example_file_chooser.c):
void cb_example_file_open (GtkWidget *w, AppData *data)
{
gchar *filename = NULL;

filename = interface_file_chooser (data, GTK_FILE_CHOOSER_ACTION_OPEN);

if (filename == NULL) {
filename = "NULL";
}

example_show_test_result (data, "Open File", filename);
}

void cb_example_file_save (GtkWidget *w, AppData *data)
{
gchar *filename = NULL;
filename = interface_file_chooser (data, GTK_FILE_CHOOSER_ACTION_SAVE);

if (filename == NULL) {
filename = "NULL";
}
else {
FILE *f = fopen (filename, "w");
fprintf (f, "This file was generated by Hildon File Chooser example.");
fclose (f);
}

example_show_test_result (data, "File saved as", filename);
}
The following example illustrates the definition of the interface_file_chooser() function:
gchar *interface_file_chooser (AppData * appdata, GtkFileChooserAction action)
{
GtkWidget *dialog;
gchar *filename = NULL;

dialog = hildon_file_chooser_dialog_new (GTK_WINDOW (appdata->window), action);
gtk_widget_show_all (GTK_WIDGET (dialog));

if (gtk_dialog_run (GTK_DIALOG (dialog)) == GTK_RESPONSE_OK) {
filename = gtk_file_chooser_get_filename (GTK_FILE_CHOOSER (dialog));
}

gtk_widget_destroy(dialog);
return filename;
}
Figures 19 and 20 illustrate the Save and Open dialogs.
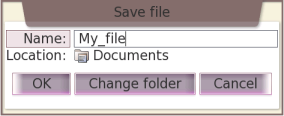
Figure 19. Save dialog
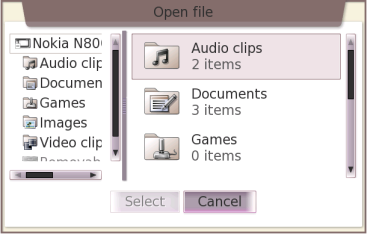
Figure 20. Open dialog
For more information about the HildonFileChooserDialog, see the Hildon API documentation or the Developing new applications "how to" document.
HildonColorSelector
#include <hildon-widgets/hildon-color-selector.h>
#include <hildon-widgets/hildon-color-button.h>
#include <hildon-widgets/hildon-program.h>
#include <gtk/gtk.h>
The HildonColorSelector is a dialog for selecting colors. It is very similar to the GtkColorSelectionDialog, but more suitable for embedded devices.
There are two different ways to use the HildonColorSelector:
- By using the HildonColorButton, which shows the selected color in the button area and launches the HildonColorSelector dialog automatically when clicked
- By creating the dialog manually
The following example (example_color_selector.c) illustrates how to use the HildonColorButton. The button can be created by hildon_color_button_new() and attached to anywhere in the UI.
...
color_button = HILDON_COLOR_BUTTON(hildon_color_button_new());
g_signal_connect(G_OBJECT(color_button), "clicked",
G_CALLBACK(color_button_clicked), NULL);
...
The following example illustrates how, in the color_button_clicked callback function, the selected color is retrieved from the HildonColorButton using the "color" property of the widget.
void color_button_clicked(GtkWidget * widget, gpointer data)
{
GdkColor *new_color = NULL;
g_object_get(widget, "color", &new_color, NULL);
}
That is all that is needed to use the HildonColorButton. If the HildonColorButton is not needed, the following example illustrates how the HildonColorSelector can be created manually:
void ui_show_color_selector(GtkWidget * widget, AppData * appdata)
{
GdkColor *current_color;
const GdkColor *new_color;
GtkWidget *selector;
gint result;

/* Create new color selector (needs access to HildonWindow!) */
selector = hildon_color_selector_new(GTK_WINDOW(appdata->window));

/* Set the current selected color to selector */
hildon_color_selector_set_color(HILDON_COLOR_SELECTOR(selector),
current_color);

/* Show dialog */
result = gtk_dialog_run(GTK_DIALOG(selector));

/* Wait for user to select OK or Cancel */
switch (result) {
case GTK_RESPONSE_OK:

/* Get the current selected color from selector */
new_color = hildon_color_selector_get_color
(HILDON_COLOR_SELECTOR(selector));

/* Now the new color is in 'new_color' variable */
/* Use it however suitable for the application */

gtk_widget_destroy(selector);
break;

default:

/* If dialog didn't return OK then it was canceled */
gtk_widget_destroy(selector);
break;
}

}
The HildonColorSelector has two modes, normal and advanced, which can be launched pressing the More button in the dialog. Figures 21 and 22 illustrate the modes.
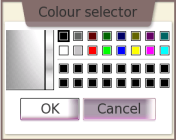
Figure 21. Normal mode of the HildonColorSelector
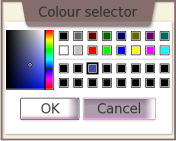
Figure 22. Advanced mode of the HildonColorSelector
HildonFontSelectionDialog
#include <hildon-widgets/hildon-program.h>
#include <hildon-widgets/hildon-font-selection-dialog.h>
#include <gtk/gtk.h>
Where the HildonColorSelector provides a method to query a color from the user, the HildonFontSelectionDialog is used to define the font. It contains three tabs with the different font formatting information, and is ideally used in text editors and other applications where the font style can be selected.
To be able to use the HildonFontSelectionDialog, some knowledge of Pango text formating is required, as the returned variable is of the PangoAttrList type. For more information about Pango, see http://developer.gnome.org/doc/API/2.0/pango/.
The following example illustrates the HildonFontSelectionDialog (example_font_selector.c).
HildonFontSelectionDialog *dialog;
gint result;
PangoAttrList *list = NULL;
GSList *attrs = NULL;
PangoAttrIterator *iter;
AppData *appdata = (AppData *) data;

/* Create dialog */
dialog = HILDON_FONT_SELECTION_DIALOG
(hildon_font_selection_dialog_new(GTK_WINDOW(appdata->window), "Font selector"));

/* Show the dialog */
gtk_widget_show_all(GTK_WIDGET(dialog));

/* Wait for user to select OK or Cancel */
result = gtk_dialog_run(GTK_DIALOG(dialog));

if (result == GTK_RESPONSE_OK) {
/* Get selected font from dialog */
list = hildon_font_selection_dialog_get_font(dialog);
iter = pango_attr_list_get_iterator(list);
attrs = pango_attr_iterator_get_attrs(iter);

/* Now the new font setting are in 'attrs' variable */
/* Use it however suitable for the application */
}

/* Close the dialog */
gtk_widget_destroy(GTK_WIDGET(dialog));
Figure 23 illustrates the HildonFontSelectionDialog with the Style tab open.
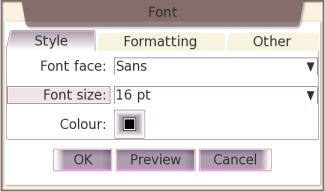
Figure 23. HildonFontSelectionDialog with an open Style tab
HildonFileDetailsDialog
#include <hildon-widgets/hildon-program.h>
#include <hildon-widgets/hildon-file-details-dialog.h>
#include <gtk/gtk.h>

/* Application UI data struct */
typedef struct _AppData AppData;
struct _AppData {
HildonProgram *program;
HildonWindow *window;
};
The HildonFileDetailsDialog is a dialog to show file information. It has two tabs:
- One tab contains the file name, size, last modification date and some general information.
- One tab is empty for the use of applications.
This kind of dialog is used not only in the file manager application, but also in all kinds of applications with user files, such as editors and viewers.
The following example (example_file_details.c) illustrates how to create the HildonFileDetailsDialog with an additional application-specific tab. In the example, the extra tab only shows the file name again, but in a real application it can contain, for example, the line count, preview of a document or length of the sound. The type of the additional tab object is GTK_LABEL, so that all kinds of widgets can be inserted in it.
HildonFileDetailsDialog *dialog;
GtkWidget *label = NULL;
gint result;

/* Create dialog */
dialog = HILDON_FILE_DETAILS_DIALOG
(hildon_file_details_dialog_new(GTK_WINDOW(data->window), TEXT_FILE));

/* Set the dialog to show tabs */
g_object_set(dialog, "show-tabs", TRUE, NULL);

/* Create some content to additional tab */
label = gtk_label_new(g_strdup_printf
("Name of this \nfile really is:\n%s", TEXT_FILE));

/* Add content to additional tab label */
g_object_set(dialog, "additional-tab", label, NULL);

/* Change tab label */
g_object_set(dialog, "additional-tab-label", "More Info", NULL);

/* Show the dialog */
gtk_widget_show_all(GTK_WIDGET(dialog));

/* Wait for user to select OK or CANCEL */
result = gtk_dialog_run(GTK_DIALOG(dialog));

/* Close the dialog */
gtk_widget_destroy(GTK_WIDGET(dialog));
Figure 24 illustrates the HildonFileDetailsDialog in a PDF viewer application.
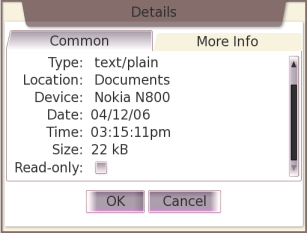
Figure 24. HildonFileDetailsDialog
HildonBanner
The HildonBanners are used in many places in the maemo applications. They show a small information banner in the top right corner of the application view for a few seconds and then disappear automatically. They are used for all kinds of notifications, such as "File Saved", "Unable to make connection" or "Choose one option only".
There are multiple functions to choose, depending on the information you want to show. The banner can show the user plain text, a custom icon, or a progress bar. The following example (example_banner.c) illustrates all these alternatives. The first part of the example shows the different HildonBanners one by one:
/* Includes */
#include <hildon-widgets/hildon-program.h>
#include <hildon-widgets/hildon-banner.h>
#include <gtk/gtk.h>

static gint banner_type = 1;
GtkWidget *banner = NULL;

/* Callback to show information banners */
void show_banner(GtkButton * widget, HildonWindow * window)
{
switch (banner_type) {
case 1:
/* Show normal information banner and this automatically goes away */
hildon_banner_show_information(GTK_WIDGET(window), NULL, "Hi there!");
break;

case 2:
/* Informaton banner with animation icon. This banner does not automatically disapear. */
banner = hildon_banner_show_animation(GTK_WIDGET(window), NULL, "This is animation icon");
break;

case 3:
/* Remove current information banner */
gtk_widget_destroy(GTK_WIDGET(banner));
break;

case 4:
/* Information banner with progressbar */
banner = hildon_banner_show_progress(GTK_WIDGET(window), NULL, "Info with progress bar");
/* Set bar to be 20% full */
hildon_banner_set_fraction(HILDON_BANNER(banner), 0.2);
break;

case 5:
/* Set bar to be 80% full */
hildon_banner_set_fraction(HILDON_BANNER(banner), 0.8);
break;

case 6:
/* With sixth click, end the application */
gtk_main_quit();
}

/* Increase the counter */
banner_type++;
}
The following main function introduces how to pack widgets inside the HildonWindow using GtkVBox, which is a vertical box container in GTK+. Inside the vbox, the function places one button, which is connected to the show_banner callback function.
/* Main application */
int main(int argc, char *argv[])
{
/* Create needed variables */
HildonProgram *program;
HildonWindow *window;
GtkWidget *main_vbox;
GtkWidget *button1;

/* Initialize the GTK. */
gtk_init(&argc, &argv);

/* Create the hildon program and setup the title */
program = HILDON_PROGRAM(hildon_program_get_instance());
g_set_application_name("App Title");

/* Create HildonWindow and set it to HildonProgram */
window = HILDON_WINDOW(hildon_window_new());
hildon_program_add_window(program, window);

/* Add vbox to appview */
main_vbox = gtk_vbox_new(FALSE, 0);
gtk_container_add(GTK_CONTAINER(window), main_vbox);

/* Add button to vbox */
button1 = gtk_button_new_with_label("Show Info");
gtk_box_pack_start(GTK_BOX(main_vbox), button1, FALSE, TRUE, 0);

/* Add signal listener to button */
g_signal_connect(G_OBJECT(button1), "clicked",
G_CALLBACK(show_banner), window);

/* Connect signal to X in the upper corner */
g_signal_connect(G_OBJECT(window), "delete_event",
G_CALLBACK(gtk_main_quit), NULL);

/* Begin the main application */
gtk_widget_show_all(GTK_WIDGET(window));
gtk_main();

/* Exit */
return 0;
}
Using HildonBanner widgets is simple, since the HildonWindow handles showing them. Figures 25, 26 and 27 illustrate the output of the application. When clicking the button, a normal banner appears first, then one with the custom icon, and finally the banner with the progress bar. One more click closes the application.

Figure 25. Banner with plain text
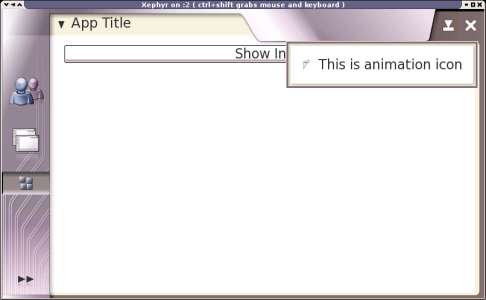
Figure 26. Banner with a custom icon

Figure 27. Banner with a progress bar
There are a lot more Hildon widgets available. For more information, see the Hildon API documentation.
Using the maemo input mechanism
This section describes the use of the different maemo input mechanisms.
Touchscreen (mouse)
The maemo platform is designed to be used with a touchscreen, and the SDK with a mouse emulates the touchscreen functionality. Some touchscreen aspects to remember:
- The main functional difference between the use of mouse and touchscreen is that it is not possible to move the cursor position on the touchscreen without "pressing" the button all the time. This difference can be noticed, for example, in a drawing application or game, where the listening events must be designed so that the user can click the left and right side of the screen without ever "moving" the mouse pointer from left to right.
- Only the left mouse button must be used and no functionality must be added under the right mouse button. The touchscreen can only recognize one kind of "click".
- When menus, usually opened by pressing the right mouse button, are created, it is possible to implement them using a longer click of the left mouse button. These kinds of context-sensitive menus are supported by the platform; for more information, see the gtk widget tap-and-hold setup function in the Hildon API documentation.
- The GtkWidget in maemo has been modified to pass a special insensitive_press signal when the user presses on an insensitive widget. This functionality was added to allow for actions, such as showing a banner, when disabled widgets are pressed.
If these points are kept in mind, it is possible to fully emulate the touchscreen behavior with a mouse in the maemo SDK, and the resulting application is fully usable in the actual device.
Context-sensitive menu
The context-sensitive menus are implemented in the GtkWidget class. For its widgets, an application can register these menus which are accessed by tap-and-hold over the widget.
For an example on how to add these menus, see file example_context.c at stage.maemo.org.
Hardware keys
The maemo device has hardware keys which are also supported in the SDK using different keyboard events. The actual number and type of keys depends on the device, but the common keys are presented in the following table.
Table 1. Harware keys
| Button | Description | Keyboard | Key Event |
|---|---|---|---|
| Move up | Arrow key up | GDK_Up | |
| Move down | Arrow key down | GDK_Down | |
| Move left | Arrow key left | GDK_Left | |
| Move right | Arrow key right | GDK_Right | |
| Select, confirm | Return | GDK_Return | |
| Cancel, close | Esc | GDK_Escape | |
| Open menu | F4 | GDK_F4 | |
| Show Home | F5 | GDK_F5 | |
| Full screen | F6 | GDK_F6 | |
| Increase / zoom in / volume up | F7 | GDK_F7 | |
| Decrease / zoom out / volume down | F8 | GDK_F8 |
Adding support for a wider number of keys is easy as the actual key pressing signals can be implemented with GDK key events. The following example (example_hard_keys.c) illustrates this mapping. The first part of the example illustrates the callback function which is called whenever keys are pressed:
#include <hildon-widgets/hildon-program.h>
#include <gtk/gtk.h>

#include <gdk/gdkkeysyms.h>

/* Callback for hardware keys */
gboolean key_press_cb(GtkWidget * widget, GdkEventKey * event,
HildonWindow * window)
{
switch (event->keyval) {
case GDK_Up:
hildon_banner_show_information(GTK_WIDGET(window), NULL, "Navigation Key Up");
return TRUE;

case GDK_Down:
hildon_banner_show_information(GTK_WIDGET(window), NULL, "Navigation Key Down");
return TRUE;

case GDK_Left:
hildon_banner_show_information(GTK_WIDGET(window), NULL, "Navigation Key Left");
return TRUE;

case GDK_Right:
hildon_banner_show_information(GTK_WIDGET(window), NULL, "Navigation Key Right");
return TRUE;

case GDK_Return:
hildon_banner_show_information(GTK_WIDGET(window), NULL, "Navigation Key select");
return TRUE;

case GDK_F6:
hildon_banner_show_information(GTK_WIDGET(window), NULL, "Full screen");
return TRUE;

case GDK_F7:
hildon_banner_show_information(GTK_WIDGET(window), NULL, "Increase (zoom in)");
return TRUE;

case GDK_F8:
hildon_banner_show_information(GTK_WIDGET(window), NULL, "Decrease (zoom out)");
return TRUE;

case GDK_Escape:
hildon_banner_show_information(GTK_WIDGET(window), NULL, "Cancel/Close");
return TRUE;
}

return FALSE;
}
In the following main function, the callback function is connected with g_signal_connect to listen to the key_press_event signal. Whenever a hardware key is pressed, the key_press_cb function is called to process the event.
int main( int argc, char* argv[] )
{
...
/* Add hardware button listener to application */
g_signal_connect(G_OBJECT(window),
"key_press_event", G_CALLBACK(key_press_cb), window);
...
}
Figure 28 illustrates the output of the hardware key example application, when the zoom key (F7) is pressed.
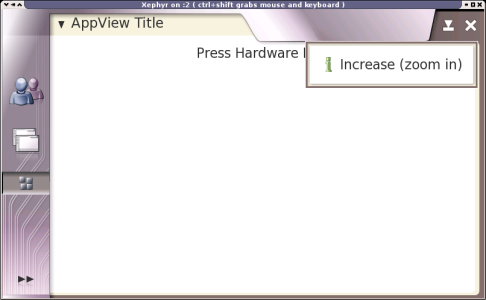
Figure 28. Hardware key application example
Maemo text input methods
The maemo platform includes text input methods used with the touchscreen. There are two different input types: virtual keyboard and hand writing recognition. Only the virtual keyboard is provided in the maemo SDK, but as the input is transparent for the application, all applications automatically also support the handwriting recognition. When using the device, it is possible to select between two keyboard layouts. When you touch the screen using a finger, a thumb keyboard is provided.
The input methods work automatically so that whenever text widgets (entry, text view) are pressed or text inside them selected, a keyboard pops up. In the same way, the keyboard is automatically hid when the user selects some other widget. Figure 29 illustrates the maemo virtual keyboard.
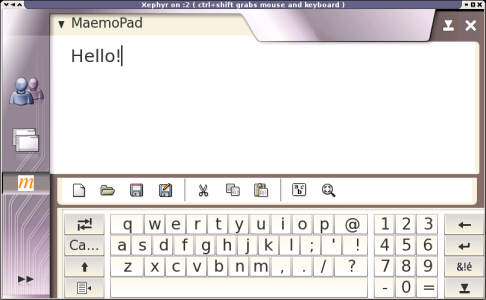
Figure 29. Maemo virtual keyboard
For the development use, it is also possible to use a PC keyboard to input text. This can be enabled in the SDK by pressing the right mouse button on top of some text widget and then selecting Input Methods -> X Input Method from the menu. This disables the virtual keyboard and allows for input from the PC keyboard instead.
Application layout considerations
The layout of maemo applications can be described as wide and not very tall because of the screen dimensions (800x480 pixels). As this wideness is emphasised when a text input method pops up, there are some rules for the application UI design:
- Make the application UI area scalable by using the GTK+ layout containers, like GtkVBox, and do not use any fixed layouts, like GtkFixed. If the application area does not fit into the screen once the keyboard pops up, it must be scrollable. This can be achieved by adding application area widgets inside the GtkScrolledWindow.
- Use only one visible toolbar at a time in one application. An exception for this is the HildonFindToolbar, which must pop up on top of the main toolbar when a search is done. It is also a good design principle to allow the user to hide the toolbars through the menu to maximise the application area.
- Enable the full screen mode in the application. The mode can be toggled with the full screen hardware button. This is easy to implement with the gtk_window_fullscreen() and gtk_window_unfullscreen() functions.
- Avoid large dialogs that require a sizeable part of the application area height. If the dialog needs text input, this is especially important, because the virtual keyboard must then be visible at the same time.
For more information, see the Hildon UI Style Guide Summary.
Integrating applications to the maemo framework
This section explains how to integrate applications to the maemo application framework; it includes instructions for adding the application to the task navigator menu and descriptions of different features provided by the platform.
Adding applications to the task navigator menu
To add an application to the task navigator menu, you need a maemo desktop file and a D-BUS service file.
Maemo desktop file
To make an application visible in the maemo task navigator, a desktop file is required for the application. The file contains all the essential information needed to show the application entry in the menu, such as name, binary and D-BUS service name. The name of the file must be [application].desktop and it must be stored to the /usr/share/applications/hildon directory.
The following example illustrates the contents of the example_libosso.desktop file:
[Desktop Entry]
Encoding=UTF-8
Version=1.0
Type=Application
Name=Example libOSSO
Exec=/usr/bin/example_libosso
X-Osso-Service=org.maemo.example_libosso
Icon=qgn_list_gene_default_app
MimeType=application/x-example;
The file contains the following mandatory fields:
- Encoding – the character encoding of the file. It should be "UTF-8".
- Version – the version of the application desktop file.
- Type – the type of the entry. It should be "Application".
- Name – the name of the application shown in the task navigator menu.
- Exec – the application binary which is started from the menu entry. Although D-BUS allows launching of applications by service name, this is useful in order to be able to launch also applications that are not registered as D-BUS services.
- X-Osso-Service – the D-BUS service name of the application. The service name is defined in the [application].service file. For more information, see the next section.
- Icon – the name of the icon that represents the application. The icon is visible in the task navigator before the application name. The application can install its own icon or use one of the predefined icons available in the platform. The format of the file must be PNG and the suffix (.png) must not be defined.
- MimeType – the MIME types supported by the entry.
The file can also contain the following commonly used fields:
- StartupWMClass – the name of the application binary name. This field is optional and only needed if the binary name differs from the D-BUS service name. If the names are different and this field is not defined, the application is not shown in the task navigator's application switcher.
- X-Window-Icon – the content of this field is usually the same as the Icon field.
- X-Window-Icon-Dimmed – if the dimmed icon must have a different look than the normal icon, the dimmed icon is defined in this field.
- X-Osso-Type – the type for the exec, usually "application/x-executable".
- Terminal – the value determines whether the program runs in a terminal window.
For more information, see the Desktop Entry Specification.
The desktop file itself does not include the location of the application in the task navigator menu. To make the application visible in there, add a symbolic link to the desktop file into /etc/others-menu/. The link assigns the order of the entries as well as the possibility that the entry is located inside a folder in the menu. The application must create the link when the package is installed.
The format of the link is as follows: it begins with four numbers which define the order of the entry (smallest come on top of the menu), followed by an underscore (_) and the application name. To create the link for your test application, use the following command:
[
sbox-PC_SDK: /etc/others-menu] > ln -s /usr/share/applications/hildon/example_libosso.desktop /etc/others-menu/0010_example_libosso.desktop
To see the new entry in the task navigator, relaunch the UI with the af-sb-init.sh restart command. Figure 30 illustrates the LibOSSO entry of the example.
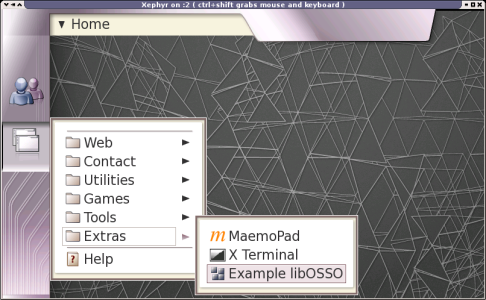
Figure 30. Application entry in the task navigator menu
To launch the application, the D-BUS service file is also needed. For more information, see the next section.
D-BUS service file
The D-BUS service file is needed to launch the maemo application and connect it to D-BUS services. One special feature of D-BUS is that if an application is not running already when a D-BUS message is sent to it, D-BUS starts the application automatically. In addition, only one instance of a D-BUS service is running at a time, guaranteeing that only one instance of each application is running.
The format of the service file is simpler than in the desktop file. The following example illustrates the contents of the example_libosso.service file:
[D-BUS Service]
Name=org.maemo.example_libosso
Exec=/usr/bin/example_libosso
The file contains the following mandatory fields:
- Name– the D-BUS service name. It must be unique and the same name that is used in the application source codes when initialising the application. To minimise the possibility for conflicts with other service files, the name usually contains the application provider URL followed by the application name.
- Exec – the full path of the application binary to launch when the service name is called.
The D-BUS service file is installed in the /usr/share/dbus-1/services directory. The D-BUS daemon recognises the file only after the maemo UI has been restarted with the af-sb-init.sh restart command.
LibOSSO library
LibOSSO is the basic library containing required and helpful functions for maemo applications. The full API documentation of LibOSSO is available in Doxygen format.
Maemo initialisation
All maemo applications must be initialised correctly to ensure that they work as expected. One symptom of missing initialisation is that the application starts from the task navigator but closes automatically after a few seconds.
The application is initialised with the osso_initialize() function. With the function, the application connects to the D-BUS session bus and system bus. The osso_initialize() function must be called only once in the application, and the osso_context_t type structure it returns must be stored for later usage. The osso_initialize() function has three parameters:
- Application D-BUS name, used also in application D-BUS service file
- Application version as a string
- Activation type. If it is set to TRUE, the library assumes that the application binary has been launched by the D-BUS daemon, and connects to the D-BUS activation bus.
- GLib main-loop context to connect to. NULL must be used for the default context.
The following example illustrates the function:
osso_context_t * osso_initialize(const gchar *application, const gchar* version, gboolean activation, GMainContext *context)
The following example (example_libosso.c) illustrates the initialisation. If the initialisation does not succeed, the function returns NULL.
osso_context_t *osso_context;

/* Initialize maemo application */
osso_context = osso_initialize(
"example_libosso", "0.0.1", TRUE, NULL);

/* Check that initialization was ok */
if (osso_context == NULL)
{
return OSSO_ERROR;
}
When the application is closing, the osso_deinitialize function must be called to close the message bus connection and free all the memory allocated by the library.
The following example illustrates the function:
void osso_deinitialize(osso_context_t *osso)
Remote process messages
System-wide messages in the maemo platform are handled with D-BUS system messaging which is a Remote Process Communication (RPC) method. LibOSSO has its own wrappers to normal D-BUS functions to ease the usage and maintain backward compatibility. By using D-BUS, the applications can send messages from one process to another.
The following example (example_libosso.c) illustrates a callback function which receives the messages (the AppData structure contains the initialized osso_context):
#include <hildon-widgets/hildon-program.h>

#include <gtk/gtk.h>
#include <libosso.h>

#define OSSO_EXAMPLE_NAME    "example_libosso"
#define OSSO_EXAMPLE_SERVICE "org.maemo."OSSO_EXAMPLE_NAME
#define OSSO_EXAMPLE_OBJECT  "/org/maemo/"OSSO_EXAMPLE_NAME
#define OSSO_EXAMPLE_IFACE   "org.maemo."OSSO_EXAMPLE_NAME
#define OSSO_EXAMPLE_MESSAGE "HelloWorld"


/* Application UI data struct */
typedef struct _AppData AppData;
struct _AppData {
HildonProgram *program;
HildonWindow *window;
osso_context_t *osso_context;
};

...

/* Callback for normal D-BUS messages */
gint dbus_req_handler(const gchar * interface, const gchar * method,
GArray * arguments, gpointer data,
osso_rpc_t * retval)
{
AppData *appdata;
appdata = (AppData *) data;

osso_system_note_infoprint(appdata->osso_context, method, retval);
osso_rpc_free_val(retval);

return OSSO_OK;
}
To attach the callback function to receive all the normal D-BUS messages which come to the application, the osso_rpc_set_default_cb_f function is used. The following example illustrates the function:
int main( int argc, char* argv[] )              {
osso_return_t result;
...
/* Add handler for session bus D-BUS messages */
result = osso_rpc_set_cb_f(appdata->osso_context,
OSSO_EXAMPLE_SERVICE,
OSSO_EXAMPLE_OBJECT,
OSSO_EXAMPLE_IFACE,
dbus_req_handler, appdata);

if (result != OSSO_OK) {
g_print("Error setting D-BUS callback (%d)\n", result);
return OSSO_ERROR;
}
...
/* Deinitialize OSSO */
osso_deinitialize(osso_context);
}
The application is now ready to receive D-BUS messages and, whenever it receives them, the dbus_req_handler function is called to process them. You can now send the "HelloWorld" from another test application (example_message.c) to your application which has been designed to handle it:
...
#define OSSO_EXAMPLE_NAME    "example_libosso"
#define OSSO_EXAMPLE_SERVICE "org.maemo."OSSO_EXAMPLE_NAME
#define OSSO_EXAMPLE_OBJECT  "/org/maemo/"OSSO_EXAMPLE_NAME
#define OSSO_EXAMPLE_IFACE   "org.maemo."OSSO_EXAMPLE_NAME
#define OSSO_EXAMPLE_MESSAGE "HelloWorld"
...

ret = osso_rpc_run(osso_context,
OSSO_EXAMPLE_SERVICE,
OSSO_EXAMPLE_OBJECT,
OSSO_EXAMPLE_IFACE,
OSSO_EXAMPLE_MESSAGE, &retval, DBUS_TYPE_INVALID);
...
When the example_libosso_test is started, it sends an "example_message" D-BUS message to the org.maemo.example_libosso service which is attached to your example_libosso application (for more information about the D-BUS service files, see the previous section). When example_libosso receives the message, it shows a banner.

Figure 31. Banner resulting from a message
An advantage of D-BUS is that the receiving application does not need to be started: D-BUS can automatically start the application based on its service file and then pass the message to it.
Hardware state messages
Maemo applications can listen to the system D-BUS messages, such as "battery low" and "shutdown". When these messages are received, the application can ask the user to save any open files, or react to them any other way.
The following example illustrates a callback function, taking osso_hw_state_t and gpointer as parameters. The changed state can be retrieved from the state variable.
/* Callback for hardware D-BUS events */
void hw_event_handler(osso_hw_state_t *state, gpointer data)
{
AppData *appdata;
appdata = (AppData *) data;

if (state->shutdown_ind)
{
hildon_banner_show_information(GTK_WIDGET(appdata->window), NULL, "Shutdown event!");
}
if (state->memory_low_ind)
{
hildon_banner_show_information(GTK_WIDGET(appdata->window), NULL, "Memory low event!");
}
if (state->save_unsaved_data_ind)
{
hildon_banner_show_information(GTK_WIDGET(appdata->window), NULL, "Must save unsaved data event!");
}
if (state->system_inactivity_ind)
{
hildon_banner_show_information(GTK_WIDGET(appdata->window), NULL, "Minimize application inactivity event!");
}
}
To attach the handler, for example, in the application main(), use osso_hw_set_event_cb() as in the following example:
...
/* Add handler for hardware D-BUS messages */
result = osso_hw_set_event_cb( appdata->osso_context,
NULL, hw_event_handler, (gpointer) appdata );

if (result != OSSO_OK)
{
g_print("Error setting HW state callback (%d)\n", result);
return OSSO_ERROR;
}
...
System exit message
There is a separate system message apart from the hardware state messages (see the previous section) which occurs when the applications are required to close themselves. The following example (example_libosso.c) illustrates a callback for it:
/* Callback for exit D-BUS event */
void exit_event_handler(gboolean die_now, gpointer data)
{
AppData *appdata;
appdata = (AppData *) data;
g_print("exit_event_handler called\n");
/* Do whatever application needs to do before exiting */
hildon_banner_show_information(GTK_WIDGET(appdata->window), NULL,
"Exiting...");
}
The callback is set, for example, in application main, as in the following example:
int main( int argc, char* argv[] )
{
...
/* Add handler for Exit D-BUS messages */
result = osso_application_set_exit_cb(appdata->osso_context,
exit_event_handler,
(gpointer) appdata);
if (result != OSSO_OK) {
g_print("Error setting exit callback (%d)\n", result);
return OSSO_ERROR;
}
...
}
Whenever the system now needs to close the application for any reason, it is done gracefully.
Application state-saving and auto-save
State-saving is a special feature of the maemo platform. It means that the applications save their running state from RAM to a permanent memory, such as flash memory, and then end the running application process. The state-saving happens when the user switches out from the application and device memory is running low. When the user then returns to the backgrounded application, it is started again and the application state is read from the flash memory. The result is that the user never knows that the application was not running all the time.
Auto-saving is an addition to the state-saving for the editor-like applications which contain user data. This data (such as a user document) is automatically saved at the same time with state-save. The main difference is that the application state usually consists of a small number of variables which describe the state where application was, where as the auto-saved file can be whatever file the user was editing. Auto-saving guarantees that user files are not lost when, for example, the battery runs out.
For more information about implementing state-saving, see the LibOSSO API document.
Application settings
Maemo uses GConf for maintaining application settings. GConf is widely used in the Gnome desktop environment for the same purpose. For more information about GConf, see http://www.gnome.org/projects/gconf/.
To use GConf in an application, the following headers must be included:
#include <gconf/gconf.h>
#include <gconf/gconf-client.h>
To make the compiler and linker find the headers, give the additional pkg-config --cflags gconf-2.0 and pkg-config--libs gconf-2.0 parameters to gcc or Makefile.
First, GConf must be initialised with the gconf_client_get_default() function which returns a GconfClient type variable. Then, a setting of a different type can be stored with the gconf_client_set_ functions and restored with the gconf_client_get_ functions.
To keep the GConf keys unique in maemo, they must be of the type /apps/maemo/[application]/[key], for example /apps/maemo/hello_maemo/default_font_size.
The following example (example_gconf.c) illustrates the basic usage for setting and loading GConf values:
...
GConfClient *gc_client;

/* Init type system */
g_type_init();

/* Load default GConf path */
gc_client = gconf_client_get_default();

if (gc_client == NULL) {
return FALSE;
}

...

/* Set integer variable */
gconf_client_set_int(gc_client, key, my_number, NULL);

/* Set string variable */
gconf_client_set_string(gc_client, key, my_string, NULL);

...

/* Get integer variable */
gint my_number = gconf_client_get_int(gc_client, key, NULL);

/* Get string variable */
gchar *my_string = gconf_client_get_string(gc_client, key, NULL);

...

/* Free gconf settings object */
g_object_unref(gc_client);
The maemo version of GConf is unaltered. as a result, all tips and tricks available from Internet are also usable in maemo.
Using the backup application
The backup application saves and restores user data stored in ~/MyDocs (by default) and setting directories and files in /etc/osso-af-init/gconf-dir (a link to GConf database /var/lib/gconf), /etc/osso-af-init/locale, and /etc/bluetooth/name. The application can be configured to back up other locations and files as well by using custom configuration files.
The backup application must not to be distrupted by other applications that are writing or reading during a backup or restore operation:
- For the restore process, the application asks the user for a permission for the application killer to close all applications, and then waits until it has been done.
- For the backup process, the backup_start and backup_finish D-BUS signals are emitted on the session bus, indicating to the applications that they must not write to disk.
The following example illustrates the D-BUS description and methods of the backup application:
                Service com.nokia.backup Interfaces   com.nokia.backup
                Object Paths /com/nokia/backup

                Method: cancel

                Name            cancel
                Parameters      none
                Returns         Empty reply
                Description     Cancels any ongoing backup or restore operation

                Method: activate

                Name            activate
                Parameters      none
                Returns         Empty reply
                Description     Used to activate the application with auto-activation
Custom backup locations
For all data that is not normally backed up, the so-called locations configuration is used.
The locations configuration allows the applications to install a configuration file with a list of files and directories that must be included in the backup. The configuration file must be installed into the /etc/osso-backup/applications directory and named <application>.conf. The file must consist of simple XML format. The following example illustrates the example_libosso.conf configuration file:
<backup-configuration>
<locations>
<location type="file"
category="settings" auto="true">/etc/example.ini</location>
<location type="dir"
category="documents">/home/user/foo</location>

<exclusion type="file"
category="settings">/home/user/bigfile</exclusion>
<exclusion type="file"
category="settings">/tmp/*.jpg</exclusion>
                </locations>
                </backup-configuration>
With the <location> tag, you can define different locations that must be backed up.
The <exclusion> tag can be used if some files in certain directories are not wanted to be backed up, for example, in case some setting file changes from one software version to another. In this way, the new setting file of the updated software is not destroyed if the backup is restored. Wild cards "?" and "*" are also supported.
Both tags have the TYPE and CATEGORY arguments, and the <location> tag has an additional AUTO argument:
- TYPE – The value can be "file" or "dir" for a file or directory. This argument is mandatory.
-
CATEGORY – is used for handling selective backup and restore. It is optional and, if omitted, the location is only backed up when backing up or restoring everything. The value can be:
- emails
- documents
- media
- contacts
- bookmarks
- settings
- AUTO – the value can be "true" or "false". It is used to tell the backup application not to request a user response in case of a conflict, but automatically replace the file. Note that the AUTO argument is only used for files, not for directories. It is optional and, if omitted, defaults to "false".
Scripts run after the restore process
The backup application makes it possible to execute scripts after the restore process. There are two kinds of scripts:
- Scripts that are executed after every restore operation
The location where the applications must install the scripts is /etc/osso-backup/restore.d/always. The files installed there must have the executable bit set. Any files ending with ~ or .bak are ignored, as are directories or files starting with a dot (".").
- Scripts that are executed only if the restore is made
from a backup created in some earlier product
For the scripts that are used to transform data between the device software versions, the location where the application must install the scripts is: /etc/osso-backup/restore.d/<dir>, where <dir> is a subdirectory for each transition between two different consecutive versions of the platform. For transforming between IT2005 and IT2006 versions,the directory is /etc/osso-backup/restore.d/it2006/.
Each script is executed with a command line argument that is the path of the file containing the list of all files that have been restored, per category. The format of the file is as follows:
[CATEGORY]
/path/to/file1
/path/to/file2
...
[CATEGORY]
...
CATEGORY is one of the OSSO categories (emails, documents, media, contacts, bookmarks, or settings). The categories make it possible for the scripts to check which files they need to upgrade, if any at all. The format is chosen to make it easy to parse with a simple script or program.
The scripts are executed after a successful restoration, or after a restoration has been cancelled. In both cases, the scripts are executed only if any files were actually restored. The scripts should clean up after transforming, so that old files are not left behind. The script or program should use the common convention and return zero on success, and nonzero in case of a failure. Application developers must aim to make their programs execute and finish quickly.
Mapping MIME types
To map a MIME type for an application (that specifies for the platform which application must handle it), you need to define it by adding the MimeType field to the application's desktop file (for more information, see Section Maemo desktop file).
The following example (example_libosso.desktop) illustrates the desktop file for the example_libosso application:
                [Desktop Entry]
                Encoding=UTF-8
                Version=1.0
                Type=Application
                Name=Example libOSSO
                Exec=/usr/bin/example_libosso
                X-Osso-Service=org.maemo.example_libosso
                Icon=qgn_list_gene_default_app
                MimeType=application/x-example;
The last line specifies that this application can handle the MIME type "application/x-example".
New MIME type with OSSO category extension
If the application introduces a new MIME type to the system, you must provide the MIME information XML (for more information, see http://www.freedesktop.org/standards/shared-mime-info) that defines it. The following example illustrates the contents of the example-mime.xml file:
<?xml version="1.0" encoding="UTF-8"?>
<mime-info xmlns="http://standards.freedesktop.org/shared-mime-info-spec/shared-mime-info-spec-latest.html"
xmlns:osso="http://nokia.com/osso/mime-categories">
<mime-type type="application/x-example">
<comment>Example application file</comment>
<osso:category name="images"/>

<magic priority="50">
<match type="string" value="FOO" offset="0"/>
                </magic>
<glob pattern="*.foo"/>
                </mime-type>
                </mime-info>
This entry maps one extension and a "magic" string to a certain MIME type.
Introduction to OSSO categories
The platform contains a notion of file categories for the user's data files. The available categories are:
- Bookmarks
- Contacts
- Documents
- Emails
- Images
- Audio
- Video
- Other
A mapping is a setup between the categories and the MIME types, so that the MIME type of a file decides which category it is in. The MIME type setup is handled by the shared-mime-info infrastructure, and the category information is added to that same framework.
Adding a mapping between a category and a number of MIME types is done as adding or editing the supported MIME types in the system.
Each application or library that adds a category mapping must add a file in the /usr/share/mime/packages/ directory.
The file format is the same XML format as used for the MIME types, with an added "<osso:category>" tag. See the example in the previous section, where the "<osso:category>" tag sets up a mapping between .foo files and the Images category.
Updating the platform's databases
To introduce the new MIME types to the platform, perform the following steps:
- Copy the MIME information XML to the /usr/share/mime/packages directory with the
following command:
[sbox-PC_SDK: ~] > cp example-mime.xml /usr/share/mime/packages - Update the MIME and desktop databases with the following
commands:
[sbox-PC_SDK: ~] > update-mime-database /usr/share/mime [sbox-PC_SDK: ~] > update-desktop-database /usr/share/applications - Update the osso category database with the following
command:
[sbox-PC_SDK: ~] > osso-update-category-database /usr/share/mime
If you want to remove a MIME type from the platform, delete the appropriate XML file from the /usr/share/mime/packages directory and update the databases as above.
Registering the MIME type with the package
Since most of the applications are installed on the platform through precompiled packages, the MIME type registration also has to be performed through the packages.
The steps are similar to the ones in the previous section.
To have the MIME information XML installed to the /usr/share/mime/packages directory, you need to edit the package's rules and install files. In case of the example_libosso application, the following changes are required:
- In the rules file under the
"install" section, add the following lines:
mkdir -p $(CURDIR)/debian/tmp/usr/share/mime/packages cp $(CURDIR)/example-mime.xml $(CURDIR)/debian/tmp/usr/share/mime/packages - In the example_libosso.install file, add the
following line:
/usr/share/mime/packages/example-mime.xml
This approach ensures that the MIME information XML is installed to the /usr/share/mime/packages directory.
To keep the platform's MIME information and OSSO category databases up-to-date, you need to add the following three lines to the package's postinst and postrm files:
if [ -x /usr/sbin/update-mime ]; then
update-mime-database /usr/share/mime
fi

if [ -x /usr/sbin/update-mime ]; then
update-desktop-database /usr/share/applications
fi

if [ -x /usr/bin/osso-update-category-database ]; then
osso-update-category-database /usr/share/mime
fi
Clipboard usage
Maemo contains a number of clipboard enhanchements to the X clipboard and Gtk+, in order to able to:
- Support retaining the clipboard data when applications that own the clipboard exit
- Copy and paste rich text data between Gtk+ text views in different applications
- Provide a generally more pleasant user experience; make it easy for the application developers to gray out Paste menu items when the clipboard data format is not supported by the application.
GtkClipboard API changes
The following function sets what data targets the current clipboard owner can transfer to the clipboard manager. NULL can be passed as targets, together with 0 as n_targets to indicate that all targets can be transferred. When the clipboard owner changes, the values are reset.
gboolean gtk_clipboard_set_can_store (GtkClipboard   *clipboard
GtkTargetEntry *targets,
gint            n_targets);
The following function tells the clipboard to try to store the contents of the targets specified using gtk_clipboard_set_can_store. If no such call has been made, or if there is no clipboard manager, the function is a no-op.
The applications can call the function when exiting, but it is called automatically when the application is quitting with the gtk_main_quit() function. If the application is not the owner of the clipboard, the function is a no-op.
void gtk_clipboard_store (GtkClipboard *clipboard);
The following convenience function finds out if a target is supported (in order to be able to gray out Paste items if none of the existing clipboard targets are supported):
gboolean gtk_clipboard_wait_is_target_available (GtkClipboard *clipboard, GdkAtom target);
GtkTextView API changes
In order to support rich text copy and paste, some new functions were introduced:
void            gtk_text_buffer_set_enable_paste_rich_text (GtkTextBuffer *buffer, gboolean can_paste_rich_text);
gboolean    gtk_text_buffer_get_enable_paste_rich_text (GtkTextBuffer *buffer);
The setter function toggles whether it is possible to paste rich text in a text buffer.
To prevent applications from getting confused when text with unexpected tags is pasted to a buffer, the notion of "rich text format" was added:
void gtk_text_buffer_set_rich_text_format (GtkTextBuffer *buffer, const gchar   *format);
G_CONST_RETURN *
gtk_text_buffer_get_rich_text_format (GtkTextBuffer *buffer);
When a buffer has a certain text format, it can only paste rich text from buffers that have the same text format. If the formats differ, only plain text is pasted. If a buffer has its format set to NULL, it means that it can paste from any format. For example, a format called "html" can include tags, such as "bold" and "italic". Thus you can only paste text from buffers that have the same format specified.
Writing control panel applets
The control panel is designed to be extendable, and items can be added to it with dynamic libraries with certain functions and desktop files describing the library.
Control panel functions
The control panel applet (applet.c) requires two functions that are defined in hildon-cp-plugin/hildon-cp-plugin-interface.h:
-
execute is called when the
applet is activated from the control panel. Usually this
function creates a dialog and waits until it is done. Any
created dialog must be modal to the window in parameter
done.
NoteThe library can be unloaded when execute returns, so do not leave any g_timeouts, gconf_notifys and such when done.
You do not need to do any gtk or osso initialisation, they are already done at this point. The following example illustrates the execute function:
#include <hildon-cp-plugin/hildon-cp-plugin-interface.h> #include <gtk/gtk.h> osso_return_t execute(osso_context_t *osso, gpointer data, gboolean user_activated) { GtkWidget *dialog; gint response; /* Create dialog with OK and Cancel buttons. Leave the separator out, as we don't have any content. */ dialog = gtk_dialog_new_with_buttons( "Hello control panel", GTK_WINDOW(data), GTK_DIALOG_MODAL | GTK_DIALOG_NO_SEPARATOR, GTK_STOCK_OK, GTK_RESPONSE_OK, GTK_STOCK_CANCEL, GTK_RESPONSE_CANCEL, NULL); /* ... add something to the dialog ... */ if (!user_activated) { /* ... load state ... */ } /* Wait until user finishes the dialog. */ response = gtk_dialog_run(GTK_DIALOG(dialog)); if (response == GTK_RESPONSE_OK) { /* ... do something with the dialog stuff ... */ } /* Free the dialog (and it's children) */ gtk_widget_destroy(GTK_WIDGET(dialog)); return OSSO_OK; } -
save_state is called when the
application using the applet is saving its state. Usually
this function does nothing, but if you want the application
to support state-saving, use it. The following example
illustrates the save_state
function:
  osso_return_t save_state(osso_context_t *osso, gpointer data)
  {
  /* ... save state ... */

  return OSSO_OK;
  }
Building the applet
To use the applet, it must be built into a dynamic library (shared object). This can be accomplished by giving a "-shared" flag to gcc:
[sbox-SDK_PC: ~] > gcc -shared `pkg-config gtk+-2.0 libosso --libs --cflags` applet.c -o libapplet.so
The binary produced by gcc must be installed to the path specified in the "hildon-control-panel pkg-config" entry. This path can be obtained with pkg-config hildon-control-panel --variable=pluginlibdir. By default, it is /usr/lib/hildon-control-panel.
Desktop file
All control panel applets need a desktop file describing them. The file contains metadata, such as name, icon name and library of the applet. The applet desktop file is similar to any other application's desktop file.
The following example (applet.desktop) illustrates the desktop file for the applet created above:
[Desktop Entry]
Encoding=UTF-8
Version=1.0
Name=Control Panel Hello World
Comment=A control panel example applet
Type=HildonControlPanelPlugin
Icon=qgn_list_cp_isetup
X-control-panel-plugin=libapplet.so
The desktop file must be installed to the directory specified in the "pkg-config file for hildon-control-panel" entry. This directory can be obtained with pkg-config hildon-control-panel --variable=plugindesktopentrydir. By default, it is /usr/share/applications/hildon-control-panel.
Writing status bar plugins
The maemo status bar can contain user-defined items. Normally, there is room for two additional items. These two slots are used by the usb connection indicator and alarm indicator, but can be used by any plugin. Although plugins can specify a priority, the current version of the status bar does not handle the plugin priorities, so only the two newest plugins are visible.
To make your own status bar plugin, you need to make a shared object with certain functions in it. The status bar plugins are activated with certain dbus messages sent to the control panel. Since the name of the library is retrieved from the message, no other description for the plugin is needed.
Status bar functions
The function declarations cannot be found in any header file, mostly because their names may differ. The most important function is the entry function, which is called when the library is opened. This function defines the other functions needed for the plugin operation. The entry function's name depends on the name of your library. It is [your lib name]_entry, for example for a plugin called hello, the entry function is called hello_entry. The following example (hello.c) illustrates the entry function:
/* Definition of HildonStatusBarPluginFn_st */
#include <hildon-status-bar-lib/hildon-status-bar-item.h>
#include <gtk/gtk.h>

void *hello_initialize(HildonStatusBarItem *item, GtkWidget **button);
void hello_destroy(void *data);
void hello_update(void *data, gint value1, gint value2, const gchar *str);
int hello_get_priority(void *data);

void hello_entry(HildonStatusBarPluginFn_st *fn)
{
/* Sanity check */
if (fn == NULL) {
return;
}
fn->initialize = hello_initialize;
fn->destroy = hello_destroy;
fn->update = hello_update;
fn->get_priority = hello_get_priority;
}
The entry tells the status bar which functions are called at certain events. On the first event, the initialize function is called. The return value of initialize is passed to destroy, update and get_priority functions.
To make it possible to destroy an item, the first parameter of initialize must be stored for later use. The second parameter must be initialised to a new button that is the graphical representation of the plugin. The size of the plugin button should be 40x40 pixels. If any g_timeouts or such are used, the IDs of these must be stored for removal (if not removed, the entire status bar probably crashes). The following example illustrates the initialize function:
struct HelloPlugin {
HildonStatusBarItem *item;
GtkWidget *button;
/* Add here any data for your plugin. */
};

void *hello_initialize(HildonStatusBarItem *item, GtkWidget **button)
{
GtkWidget *image = NULL;
struct HelloPlugin *hello = g_new0(struct HelloPlugin, 1);

hello->item = item;
*button = hello->button = gtk_button_new();

image = gtk_image_new_from_file("hello.png"); /* Should be 40x40 */

gtk_container_add(
GTK_CONTAINER(*button),
GTK_WIDGET(image));

/* Here could add some gconf_notify's, g_timeouts or such. */

gtk_widget_show_all(*button);

return (void *)hello;
}
The plugin is now initialised but deliberately not yet shown. The following example illustrates the update function, which is called whenever the plugin receives events. The plugin interface allows three parameters to be given to the plugin: two integers and one string. The plugin can use the parameters as it wants. In the example, the first integer value is used to define whether to show the plugin.
void hello_update(void *data, gint value1, gint value2, const gchar *str)
{
if (!data) {
return;
}

struct HelloPlugin *hello = (struct HelloPlugin *)data;

if (value1 == 0) {
/* Destroy the applet, we get unloaded by this. Note, destroying the item,
not the button. */
gtk_widget_destroy(GTK_WIDGET(hello->item));
}
else {
/* Reveal the plugin. */
gtk_widget_show_all(hello->button);
}

return;
}
When the item is destroyed, the destroy function is called. It should free all the memory and release all the notifys that can lead to the plugin code. The widget must not be destroyed here, the status bar takes care of that. The following example illustrates the destroy function:
void hello_destroy(void *data)
{
if (!data) {
return;
}

/* You should do g_source_removes and gconf_client_notify_removes here. */

g_free(data);
}
The get_priority function must be used when deciding which plugins are visible and in which order. However, it is not supported yet. The following example illustrates the get_priority function:
gint hello_get_priority(void *data)
{
return 42;
}
Building the shared object
The shared object can be built like any normal binary, by only giving the "-shared" flag to gcc:
[sbox-SDK_PC: ~] > gcc -shared `pkg-config gtk+-2.0 libosso --libs --cflags` hello.c -o libhello.so
The binary produced by gcc must be installed to the path specified in the "hildon-status-bar-lib pkg-config" entry. This path can be obtained with pkg-config hildon-status-bar-lib --variable=pluginlibdir. By default, it is /usr/lib/hildon-status-bar.
Testing the plugin
To see the plugin, you need to send an event to it for it to be loaded. The status bar listens to it in the system bus. Libosso contains an easy-to-use convenience function called osso_statusbar_send_event. The function needs an osso context, the name of the plugin and the three arguments for it (two integers and a string).
In addition, the plugin can be tested with the dbus-send command from the command line:
[sbox-SDK_PC: ~] > dbus-send --session --type=method_call \
--dest=com.nokia.statusbar /com/nokia/statusbar com.nokia.statusbar.event string:hello int32:1 int32:0 string:
where the first string ("hello") is the name of the plugin. The status bar tries to load a library called lib[name].so and seeks for a function called [name]_entry from there. If the first "int32" is changed to 0, the example removes itself from the status bar.
Writing Internet-connected applications
The maemo platform is designed to be used with a network connection, and includes powerful methods to easily get an Internet connection for an application. This section contain the basics about this issue, but for more information, see the Connectivity Guide.
Maemo IAP paradigm
Devices have two different connectivity modes:
- Connected devices, like PCs, with broadband connections which are always connected to the network
- Disconnected devices which are only connected when a network connection is really required
The maemo devices are generally disconnected devices.
When the user starts applications which require a network connection in the maemo device, a connectivity wizard is automatically started. The wizard handles opening the LAN, WLAN, Bluetooth or other connection types automatically and the application has no knowledge on which connection method is used. Applications should have no need to know how the connection is made, they only need to know whether the connection is available or should they be started in an offline mode.
Automatic connection
To get network connectivity for a maemo application, use a special environmental variable.The variable ensures that the connectivity wizard is launched automatically when the application tries to open a network socket connection.
To acquire a network connection on the target device, simply set the LD_PRELOAD environment variable so that libosso-ic-preload.so is loaded before the application is started. The easiest way to do this is to start the application with a shell script instead of starting the application binary directly. In the shell script, first run connectivity_preload.sh, which loads libosso-ic-preload.so. Then, run the application binary. The following example illustrates the contents of the my_application.sh script:
#!/bin/sh
source /usr/bin/connectivity_preload.sh
/usr/bin/my_application
The my_application.sh script is then started from the desktop file where the runnable binary is normally specified. For more information about the desktop files, see Section Maemo desktop file.
To be able to do this when developing on the i386 rootstrap, you need to do apt-get install osso-ic-oss to have the connectivity script included in the target. For more information, see the Porting existing applications "how to" document where an instant messenger application is ported to the maemo platform.
Testing limitations
There are limitations for testing the connectivity with the SDK. It is possible to make and run Internet-connected applications inside Scratchbox with the PC SDK rootstrap, but it is not possible to test the WLAN and Bluetooth connections in it without the real hardware.
Deploying applications
This section instructs how to create and deploy application packages to maemo devices and SDK.
Creating maemo packages
Maemo packages are normal Debian packages with one small difference (see also Making a package for the Application Manager "how to" document):
The package's section (in the control file) must be declared to be like "user/office". Basically, the section is defined with the "user/" prefix. There are predefined sections like office, internet, multimedia, games, utilities and other.
For more information about building maemo packages (which are basically Debian packages), see the Debian New Maintainers' Guide. For real life example, see also the source codes from the Developing new applications and Porting existing applications "how to" documents.
The files which specify how packages are built are located in the debian directory of the application:
- debian/control - this file contains various values which are used to manage the package, for example, package name, short description and the maintainer of the packages. The file also lists the package dependencies needed to install the package in maemo devices, for example, “Depends: package_name”.
- debian/rules - this file is used by the dpkg-buildpackage command to actually create the package. It is actually a Makefile for Debian package building, consisting of several rules specifying how to handle the source. Each rule consists of targets, filenames or names of actions that must be carried out (such as "build:" or "install:"). Unlike other files in the debian directory, this one is marked as executable.
- debian/changelog - this file lists the changes that have been made for the application and also the version number of the package to be created. The structure is very strict and must be filled exactly by the rules.
- debian/[application].link - this file is needed to make the symbolic link of the application desktop file to etc/others-menu. For more information asbout the maemo desktop file structure, see Section Maemo desktop file.
Once the application is properly "Debianised", build the application with the following command:
[sbox-PC_SDK: ~/test_application] > dpkg-buildpackage -rfakeroot
The command creates the Debian package to the parent directory, together with the source package.
Installing application packages
Maemo packages can be installed inside Scratchbox as well as to maemo devices.
Installing to SDK
Three simple steps are required:
- apt-get install fakeroot-net
- start the Application Manager and close it
- edit the /.osso/appinstaller file and change the value of the assume connection to 1
When installing an Application Manager package to the maemo SDK, a debian package installer, like dpkg, should be used:
[sbox-SDK_PC: ~] > fakeroot dpkg -i application_i386.deb
Replace "application" with the actual name of the package. Packages can be installed in both PC and ARMEL targets. The package architecture must match the Scratchbox target.
Installing to device
To install application packages in maemo devices, the Application Manager should be used. This is a tool which handles the package installation process and maintains information of all the external packages which have been installed. Usage of the tool is simple:
- Started the Application Manager from the Tools
menu. The Application Manager application opens.
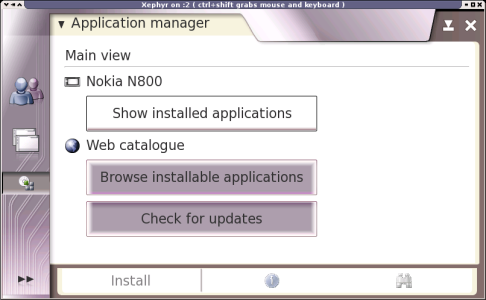
Figure 32. Application Manager
- Click Install new applications, select the
package you want to install and agree to install it.
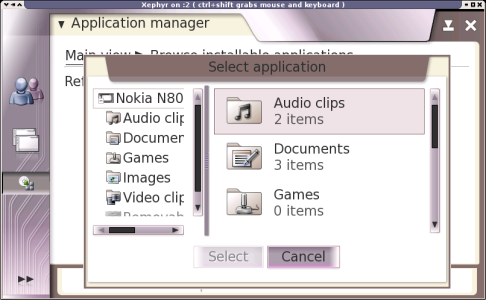
Figure 33. Selecting packages in the Application Manager
Another way to install packages is to tap the package's filename on the File Manager, which opens automatically the Application Manager and starts to install the package.
The behavior of the Application Manager can differ between maemo devices, so, for further instructions, consult the documentation provided with the device.
Learning more
You have now learned all the basic features of the maemo platform and it is time to study more details. The following options are recommended:
- The maemo_examples package, which is a part of the rootstraps, includes most of the code snippets presented in the tutorial.
- Developing new applications "how to" document which introduces how to build a full-featured text editor application for the maemo platform and deploy it in a package.
- Porting existing applications "how to" document which demonstrates how to port an existing GTK+ application to maemo. The document uses the Gaim instant messenger and demonstrates all the required modifications to the UI and connectivity.
- API documentation of the platform is a good place to seek more detailed information of the functions. The Hildon and LibOSSO APIs are both available in the API section.
References
The following external references are used in this tutorial:
- http://www.gnu.org/copyleft/fdl.html
- http://www.scratchbox.org
- maemo.org - HowTo's
- maemo.org - API documentation
- http://projects.o-hand.com/matchbox/
- http://www.freedesktop.org/Software/dbus
- http://developer.gnome.org/doc/API/gnome-vfs/
- http://www.gnome.org/projects/gconf/
- http://www.debian.org/
- http://www.ubuntulinux.org/
- maemo.org - Downloading and installing the maemo SDK
- http://scratchbox.org/documentation/
- http://www.scratchbox.org/download/
- http://www.freedesktop.org/wiki/Software_2fXephyr
- maemo.org - xnest
- maemo.org Subversion repository - maemo_testing
- http://www.debian.org/doc/manuals/maint-guide/
- http://fabrice.bellard.free.fr/qemu/
- http://developer.gnome.org/doc/API/2.0/gtk/
- http://developer.gnome.org/doc/API/2.0/gtk/GtkUIManager.html
- http://developer.gnome.org/doc/API/2.0/gtk/GtkMenu.html
- http://developer.gnome.org/doc/API/2.0/gtk/
- http://developer.gnome.org/doc/API/2.0/pango/
- maemo.org Subversion repository - maemo_examples
- http://www.gnome.org/projects/gconf/
- http://www.freedesktop.org/standards/shared-mime-info
- Desktop Entry Specification
The following code examples are used in this tutorial:
- example_hildonprogram.c
- example_menu.c
- example_toolbar.c
- example_findtoolbar.c
- example_file_chooser.c
- example_color_selector.c
- example_font_selector.c
- example_file_details.c
- example_banner.c
- example_hard_keys.c
- example_libosso.desktop
- example_libosso.c
- example_message.c
- example_gconf.c
- applet.c
- applet.desktop
- hello.c
Improve this page