

2. GTK+ Basics
- 2.1 GLib basics
- 2.2 Signalling mechanism
- 2.3 GTK+ terminology
- 2.4 Hello World learns to terminate itself
- 2.5 GObject interface
- 2.6 Adding menus and layout
- 2.7 Hildon widgets
- 2.8 Using accessors
- 2.9 Handling dynamic memory
- 2.10 Avoiding deprecated functions
2. GTK+ Basics
2.1 GLib basics
All GTK+ programs (and Hildon programs) use the GLib utility library. This library provides a portable set of types for programs written in the C language as well as a lot of utility functions. Together they make writing portable software much easier and reduce the need to re-invent the wheel for each program and developer.
We'll cover the basic GLib types first since they will be used instead of the "standard" ones from now on:
gboolean      Either TRUE or FALSE. FALSE is equal to zero
gint8         8-bit signed integer
gint16        16-bit signed integer
gint32        32-bit signed integer
gint64        64-bit signed integer (there are no >64-bit ones)
gpointer      Untyped pointer ('void *') (32/64-bit)
gconstpointer R/O untyped pointer('const void *') (32/64-bit)
gchar         Compiler's 'char' (8-bit in gcc)
guchar        Compiler's 'unsigned char'
gshort        Compiler's 'short' (16-bit in gcc)
gushort       Compiler's 'unsigned short'
gint          Compiler's 'int' (32-bit normally in gcc)
guint         Compiler's 'unsigned int'
glong         Compiler's 'long' (32/64-bit in gcc)
gulong        Compiler's 'unsigned long' (32/64-bit in gcc)
gfloat        Compiler's 'float' (32-bits in gcc)
gdouble       Compiler's 'double'(64/80/81-bits in gcc)
All signed integers are stored in the 2s complement system. For each signed integer type there is also an equal size unsigned variant. Add u-character after the g (guint64 is a 64-bit wide unsigned integer).
You should try to stick to the types without the number in their names. The only exception is when you want to optimise memory structure layouts or your data comes from an external source with some inherent structure (raw bitmap images, network protocols, hardware programming).
GLib also provides a lot of macros that contain the maximum values for the above types as well as byte ordering and order changing macros which can be very useful when writing portable software. These are all covered in detail in the GLib API documentation, which you should install on your development Linux, but can also be read at maemo.org.
We will concentrate on the bare minimum features to get our applications running and packaged, but with time, you will learn to appreciate all the code that GLib contains (some people depreciate GLib for the same reason, since GLib is quite large for an utility library). Since GLib is a shared library and an Internet Tablet will always have at least one graphical application running, using GLib won't normally cause extra memory use.
Besides the types, GLib also offers the following functionality that you might find useful:
- Memory allocation
- Message output, debugging and logging functions
- String processing (UTF-8 and UCS-4)
- Date and time processing and counting timers
- Data structures:
- Dynamic strings
- Linked lists (single and double)
- Hash tables
- Dynamic arrays (also with pointers)
- Binary and N-ary trees
- Caching support
- And other miscellany
As was mentioned before, the API documentation for GLib can be browsed online at maemo.org. For other libraries that are available in maemo you should use the master API reference index at maemo.org
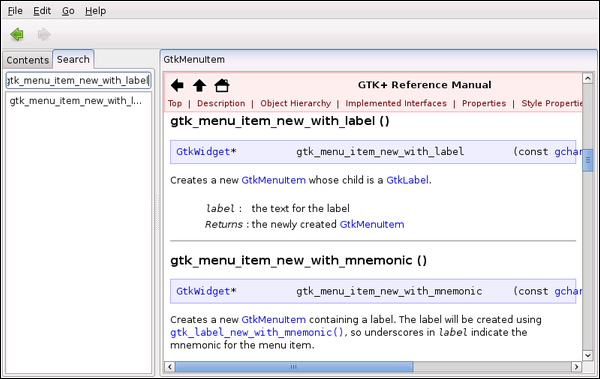
If you have the suitable documentation packages installed on your development system, you should also try devhelp, a nice application that allows you to browse through the GNOME library documentation and provides hypertext and search facilities. Please be careful about difference in version numbers between the libraries installed on your SDK and the ones that the distribution provides in the devhelp packages.
2.2 Signalling mechanism
In order to handle interaction between components (graphical or otherwise), different libraries have invented various ways of implementing event and change notifications. Each of them have a bit different design and restrictions. The design model used in GTK+ is based on registration/auto-delivery with callbacks as the delivery method.
The mechanism is called GSignal, and it is implemented in a library called GObject. GObject is a framework and infrastructure library for the C language and is used to implement object-oriented constructs similar to the ones used in Java and C++. This is done in a portable way and without special pre-processing step necessary for source files. This is in contrast to some other similar solutions used in libraries. Since no special tools are required, GObject is very portable. It also uses the GLib exclusively for data structure implementations and memory management.
Using GObject (implementing your own classes, extending existing classes and so on) is not covered in this material as this subject is quite complicated and also unnecessary when starting GTK+ programming.
GTK+ widgets (and widgets in Hildon) use the GSignal mechanism to implement notification "messages" that come from widgets when something happens (normally some action caused by HID-event). These messages are then "passed" to interested listeners by means of callback functions. There is no shared event bus (like in Windows GDI) but rather you can think of a system where you can connect as many "links" between widgets and callback functions as you like. GSignal also offers a rich mechanism to specify at which point of signal delivery to invoke some specified callback (so that the handlers can be prioritised), but we'll settle for the default priority since it's enough for normal GUI-programs.
Each class defines what kind of signals an instance of that class can emit (send). Signals are identified by a text string (which allows dynamic introspection) and the signal source (either an object that has something interesting to notify, or some core system component). We "connect a signal" by means of specifying the object that is capable of emitting the signal and giving the name of signal. You can think of the name as type, but it's just used to differentiate between different signals, like "clicked" and "selected". Since we're connecting, we obviously need some target for this connection. This target is a function implemented in C language which will be called when the signal is emitted. Note that the object that emits the signal does not call the callback function directly, but rather uses the generic signal delivery framework that GObject provides. This allows simple API interfaces for both the emitter and the receiver as well as for connecting the signals.
Given that C language was designed before object-oriented programming had matured, GObject and signals are quite elegant. However, if you only have programmed using object-oriented languages, GObject will seem strange to you (at start, since the concepts are the same, just the syntax is different). You will also have to type more when writing programs.
By the way, GObject documentation calls signals as "A means of customisation of object behaviour and a general purpose notification mechanism". Basically it means that signals can be used outside GTK+ and sometimes are.
You can learn more about the GObject by either reading the API or reading a fairly extensive book which spends a lot of time explaining the GObject-system [The Official Gnome 2 Developer's Guide, by Matthias Wirkus, published in 2004 by No Starch Press]. Learning from existing code base is probably not always a good idea since the system is quite complex.
2.3 GTK+ terminology
Before jumping into GTK+, we need to cover some GTK+ terminology:
- Widget
- Is some code that draws on screen and allows the user to interact with itself (there are exceptions to both rules). Examples: Scrollbars, Buttons, Menus and so on.
- Container
- A special kind of Widget (that might be invisible) that allocates space for other widgets and groups them together on screen. A Container can contain another container. Examples: Window, VBox, HBox, Toolbar.
- Packing
- The action that is done by a container when a widget is added to it. Normally we'd say that "we pack this widget into a container". Packing will execute space allocation and layout code, but if the widget is not currently visible, nothing user perceivable will happen.
- Child Widget
- A widget that is packed into a Container. Conversely, a Widget has a parent which is always a container. A widget cannot have more than one parent.
- Widget Tree
- All widgets and containers that are children to one root widget (which is a Container by necessity). There is exactly one widget tree for each Window (even if the Window is not visible).
- Event
- An notification from outside the process that something has happened. Normally these come from the HID-system and are transformed into signals by GTK+. Normal signal handling mechanisms are used to process them.
- Visibility
- Each widget can be told to be invisible or visible. Only if the parent container is visible, will this cause any user perceived graphics on screen. To see all widgets in one widget tree we need to tell all the widgets in the tree to "show" themselves. Normally we do this after we've created the widget tree completely so that the user will not see unnecessary screen redrawing.
- Property
- This is actually related to GObject, but is used with GTK+ widgets as well. Generally speaking a property is some named data or value that can be set and retrieved. When setting the property, the object can execute some code to reflect the change of the value. Reading (getting) a property will also normally trigger some code in the widget (class) implementation.
Most graphics toolkits contain similar elements and most toolkits for UNIX (X11) also use similar terminology.
2.4 Hello World learns to terminate itself
These concepts can now be combined by extending our Hello World program to terminate itself in a controlled fashion when the window manager tells the program to close its window.
Hello World with basic signals (gtk_helloworld-2.c)
/**
 * gtk_helloworld-2.c
 *
 * This maemo code example is licensed under a MIT-style license,
 * that can be found in the file called "License" in the same
 * directory as this file.
 * Copyright (c) 2007-2008 Nokia Corporation. All rights reserved.
 *
 * This version adds proper mechanisms to end the program.
 *
 * Look for lines with "NEW" or "MODIFIED" in them.
 */

#include <stdlib.h>
#include <gtk/gtk.h>

/**
 * NEW
 *
 * Callback function (event handler) for the "delete" event.
 * This event is emitted by GTK+ main loop after a window manager has
 * requested this window to be closed.
 *
 * NOTES:
 * - This is really a signal handler.
 * - The first parameter to a signal handler is a pointer to the
 *   object that caused the signal to be emitted (when using
 *   gobject_signal_connect).
 * - There are zero or more parameters in between the first one and
 *   the last one. The count of parameters depends on the signal
 *   type.
 * - The last parameter is always an untyped pointer (again, when
 *   using gobject_signal_connect).
 *
 * Parameters:
 * - widget: Pointer to the widget that emitted the delete-event.
 * - event:  GdkEvent-structure describing what kind of event this
 *           is. We'll register this handler to handle only the
 *           "destroy-event", so we'll know what kind of event this
 *           is without checking the "event"-parameter.
 * - data:   Untyped pointer for passing data between the main loop
 *           and handlers. We ignore it for now.
 *
 * Returns:
 * - gboolean: Whether the event has been consumed by this handler or
 *             not.
 * NOTE:
 *   Signal handlers may exit with an return value. Whether this
 *   value will be used by anyone, depends on the signal type. For
 *   events, we must always return a boolean value.
 */
static gboolean delete_event(GtkWidget* widget, GdkEvent event,
                                                gpointer data) {
  /* Print out an informational message. */
  g_print("CB:delete_event\n");

  /* We want to tell the gtk_main that we're done with this widget.
     Since it's the top-level widget in our window (it is the
     window), returning FALSE to our caller signifies that the event
     has not been processed by us, and this in turn means that it
     will be propagated to the default window delete-event handler
     which will terminate the program. This is done in by the caller
     so that it will issue a "destroy"-signal next. If we would
     return TRUE, the program wouldn't stop. This behavior is
     specific to the "delete-event" signal. */
  return FALSE;
}

/**
 * NEW
 *
 * Our callback function for the "destroy"-signal which is issued
 * when the Widget is going to be destroyed.
 * NOTE:
 *   In this case we don't need to return anything, since we're just
 *   processing a simple signal.
 *
 * This is used by widgets that are going away that want to notify us
 * that they will not be around for much longer. They will remove
 * themselves eventually.
 *
 * We call gtk_main_quit() which is a routine that will tell gtk_main
 * that it's time to terminate.
 *
 * Note, you must not terminate your program here! (do not use the
 * exit()-library function). This would leave the GTK+ library in a
 * slightly confused state and might leave other threads hanging
 * around. In this material we won't be using threads, but consider
 * yourself warned.
 *
 * Parameters:
 * - widget: Same as with event handler callbacks.
 * - data:   Same as with event handler callbacks.
 *
 * Returns:
 * void
 */
static void end_program(GtkWidget* widget, gpointer data) {
  /* Print out an informational message to stdout. */
  g_print("CB:end_program: calling gtk_main_quit()\n");

  /* Tell gtk_main to terminate the application. */
  gtk_main_quit();

  /* Display message about what is happening. */
  g_print("CB:end_program: back from gtk_main_quit & returning\n");
}

/**
 * MODIFIED
 *
 * We connect the signals to the handlers so that the application may
 * be terminated properly from the GUI.
 */
int main(int argc, char** argv) {

  /* We'll have two references to two GTK+ widgets. */
  GtkWindow* window;
  GtkLabel* label;

  /* Initialize the GTK+ library. */
  gtk_init(&argc, &argv);

  /* Create a window with window border width of 12 pixels and a
     title text. */
  window = g_object_new(GTK_TYPE_WINDOW,
    "border-width", 12,
    "title", "Hello GTK+",
    NULL);

  /* Create the label widget. */
  label = g_object_new(GTK_TYPE_LABEL,
    "label", "Hello World!",
    NULL);

  /* Pack the label into the window layout. */
  gtk_container_add(GTK_CONTAINER(window), GTK_WIDGET(label));

  /**
   * NEW
   *
   * Here we "install" event and signal handlers.
   *
   * Events are handled by the GTK+ as signals. Their difference is
   * explained in the text that follows.
   *
   * g_signal_connect(GtkWidget*, gchar*, CB*, gpointer*) is the API
   * function to connect signals from some object to some signal
   * receiver (callback function when using C).
   *
   * The second parameter should point to a string giving the event
   * or signal name. GLib treats underscores and dashes in signal
   * names as they would be the same character. The API documentation
   * uses the dash (-) and so will we. Needless to say, different
   * kind of widgets are capable of emitting different events.
   *
   * Third parameter is the address of the callback function that
   * should receive the signal. We use G_CALLBACK()-macros to force a
   * typecast into the type specification that g_signal_connect
   * expects. Depending on the signal the callback will receive
   * different number of parameters and is expected to return
   * something in some cases. There is no hard and set rule.
   *
   * THIS MEANS THAT YOU HAVE TO BE SURE ABOUT THE CAST VALIDITY.
   *
   * It is possible to pass an extra pointer (the last parameter)
   * that will be carried with the signal to the signal receiver. We
   * will see uses for this later, but in real applications it is
   * quite important. This last parameter is defined as a gpointer
   * (untyped pointer, void*), and if one needs to pass other data
   * in the pointer's place, one will need to do additional
   * typecasting (we'll see this later).
   */
  g_signal_connect(window, "delete-event",
                   G_CALLBACK(delete_event), NULL);
  g_signal_connect(window, "destroy",
                   G_CALLBACK(end_program), NULL);

  /* Show all widgets that are contained by the window. */
  gtk_widget_show_all(GTK_WIDGET(window));

  /* Start the main event loop. */
  g_print("main: calling gtk_main\n");
  gtk_main();

  /* Display a message to the standard output and exit. */
  g_print("main: returned from gtk_main and exiting with success\n");

  /* Return success as exit code. */
  return EXIT_SUCCESS;
}
It would be very inefficient to comment your code with such verbosity as has been done here (and for all source code of this material). Use comments for the first couple of simple programs you write so that you can return to them later. Documenting the sources and reasons for signals in for each handler (callback function) is recommended so that you don't have to read all of the source code to find out which event the signal comes from and what kind of a signal you have connected it to.
After building the program, it will be run, and then user will click on the "X" window close button:
[sbox-DIABLO_X86: ~/appdev] > gcc -Wall `pkg-config --cflags gtk+-2.0` \
 gtk_helloworld-2.c -o gtk_helloworld-2 `pkg-config --libs gtk+-2.0`
[sbox-DIABLO_X86: ~/appdev] > ./gtk_helloworld-2
main: calling gtk_main
Window closing button engaged by the user
CB:delete_event
CB:end_program: calling gtk_main_quit()
CB:end_program: back from gtk_main_quit & returning
main: returned from gtk_main and exiting with success
There is no associated screenshot as graphically the application looks exactly the same as before. But in this case we're more interested in the g_print():ed output of the program. Notice the order and the names of the functions in the printed lines. This is the sequence one would expect to terminate a GTK+-based application.
If the output of your build or test phase is significantly different, it could be that there is some known issues in this version of the maemo training material. To verify this you can go to the following maemo community maintained training material wiki page on wiki.maemo.org/Maemo_Training).
2.5 GObject interface
We still have some functions to cover, so let's go through the basic functionality that any GObject class must implement and hence the functionality that you can use with any widget in GTK+.
We'll start with an example using the accessor interface and then compare that with the same functionality implemented using the property-interface.
Create a window with window border width of 12 pixels and title of Hello GTK+:
window = (GtkWindow*)gtk_window_new(GTK_WINDOW_TOPLEVEL);
gtk_window_set_title(window, "Hello GTK+");
gtk_container_set_border_width((GtkContainer*)window, 12);
Instead of using the accessors, we can use the generic object creation framework introduced by GObject, and use class-names (GType-names really) to select which class to use for object creation.
Coupled with this, we can also pass a list of properties to set at the same time as the object is created (just before we receive the object).
This allows us to concentrate on one API instead of multitude of different creation functions and different accessor functions like in the example above. You will see code that uses both ways, but it is largely a matter of taste whether you find the new (GTK+ 2.0) way cleaner and/or more coherent.
As an example, we'll create an object of class GtkWindow by giving the GType value GTK_TYPE_WINDOW. We also want to set two properties to this new object, namely the "border-width" (which is inherited from GtkContainer-class and "title" which is implemented in GtkWindow (in the GTK+ API reference, all class specific signals and properties are listed on the same page with the old style accessor functions). We terminate the list of properties to set with the NULL value.
window = g_object_new(GTK_TYPE_WINDOW,
  "border-width", 12,
  "title", "Hello GTK+",
  NULL);
We later to decide to disable window resizing by the user. For this, we need to set the "resizable"-property. Note that this is done only to illustrate the property-based API, and does not mean that disabling window resizing is a good idea (it's not).
/* Set the value of one property. */
g_object_set_property(window, "resizable", FALSE);
Suppose now that we want to set multiple properties each along the class hierarchy of an object. Using accessor functions for this would be tedious.
Instead we collect the properties in a list and set them all using one function call:
gchar* data = "Some random data";
g_object_set(window,
  "resizable", FALSE,/* GtkWindow-property */
  "has-focus", TRUE, /* GtkWidget-property */
  "width", 300,      /* GtkWidget-property */
  "height", 150,     /* GtkWidget-property */
  "user-data", data, /* GObject-property */
  NULL);
To round off, we present the property-reader interface which is very similar to the setting interface, but the direction is reversed.
gint width = 0;
gint height = 0;
gboolean isVisible = FALSE;
g_object_get(window,
  "width", &width,       /* GtkWidget-property */
  "height", &height,     /* GtkWidget-property */
  "visible", &isVisible, /* GtkWidget-property */
  NULL);
Note that the API reference doesn't always list all properties that a class implements, and in some cases they're not implemented as properties, and you'll have to use old style accessor functions. This is a sad thing but hopefully it will be fixed with time. Also, sometimes there is an property but no suitable accessor function.
In the next code snippet you will notice GObject casting macros. These are used to make proper casts for functions that expect a certain type arguments.
For example, below we use gtk_container_add() which accepts two parameters:
GtkContainer*: A Container into which to add the widget.GtkWidget*: The widget to add. Any widget will do.
Since a window is also a container, we can cast it safely into a container (along the class hierarchy). Since the GtkLabel widget is also a GtkWidget we can cast that safely into a widget.
This will keep the compiler happy. Obviously you will need to know the names of the various macros to be able to use them. All of the GTK+ widget casting macros obey the rule that each "word" is written in capital letters and there is an underscore between the "word". Thus, a GtkWidget becomes GTK_WIDGET and GtkRadioMenuItem becomes GTK_RADIO_MENU_ITEM.
Besides keeping the compiler from complaining about mismatched types, the macros may implement type checking (and instance checking against the class hierarchy).
/* Pack the label into the window layout. */
gtk_container_add(GTK_CONTAINER(window), GTK_WIDGET(label));
We'll finish off with an example where using the property-based interface would be too tedious. Sometimes the accessor interface contains nice utility functions that take some work off your shoulders.
/* Show all the widgets that are contained by the window. */
gtk_widget_show_all(GTK_WIDGET(window));
Start with a widget-tree and set all contained widgets' "visible"-property to TRUE.
There is also gtk_widget_show(GtkWidget*), gtk_widget_hide(GtkWidget*) and gtk_widget_hide_all(GtkWidget*).
2.6 Adding menus and layout
We'll next test out the concepts covered so far by implement a nice menu for our application. The example includes using signals and using the property-based system.
We'll try to use the property based interface as much as possible in order to demonstrate the compactness of code that can be achieved. Note that each property lookup will involve a hash table lookup inside GObject. Finding the perfect balance between code size and speed is never easy. Smaller code tends to lead to faster programs because there is more CPU cache left to utilise and smaller code also improves cache locality. It is generally quite difficult to say which of the two approaches will end up being faster. Since the interface selection will affect code readability and teamwork, this is something that should be decided within a team or by coding standards if they exist.
Listing of gtk_helloworld-3.c
/**
 * gtk_helloworld-3.c
 *
 * This maemo code example is licensed under a MIT-style license,
 * that can be found in the file called "License" in the same
 * directory as this file.
 * Copyright (c) 2007-2008 Nokia Corporation. All rights reserved.
 *
 * We add a menu and callbacks to process menu selections.
 *
 * Look for lines with "NEW" or "MODIFIED" in them.
 */

#include <stdlib.h>
#include <gtk/gtk.h>

/**
 * NEW
 *
 * We will use a single callback function to process the activation
 * of all of the menu items.
 *
 * We could also use strings to identify which menu item was
 * selected, or if our callback would have a list of pointers to the
 * menu items themselves, we could compare against that. Instead,
 * we'll define an enumeration that will contain all the possible
 * menu items that our application will have. This allows use to use
 * a simple switch statement to determine what to do.
 */
typedef enum {
  MENU_FILE_OPEN = 1,
  MENU_FILE_SAVE = 2,
  MENU_FILE_QUIT = 3
} MenuActionCode;

/**
 * Callback function (event handler) for the "delete" event.
 */
static gboolean delete_event(GtkWidget* widget, GdkEvent event,
                                                gpointer data) {
  /* Print out an informational message. */
  g_print("CB:delete_event\n");

  /* Done with the widget. */
  return FALSE;
}

/**
 * Our callback function for the "destroy"-signal which is issued
 * when the Widget is going to be destroyed.
 */
static void end_program(GtkWidget* widget, gpointer data) {
  /* Print out an informational message to stdout. */
  g_print("CB:end_program: calling gtk_main_quit()\n");

  /* Tell gtk_main to terminate the application. */
  gtk_main_quit();

  /* Display message about what is happening. */
  g_print("CB:end_program: back from gtk_main_quit & returning\n");
}

/**
 * NEW
 *
 * Signal handler for the menu item selections.
 *
 * Gets the menu action code as a parameter but since we'll cast it
 * into an pointer on callback registration, we'll need to cast it
 * back internally.
 */
static void cbActivation(GtkMenuItem* mi, gpointer data) {

  /* Convert the pointer into an integer, irrespective of the pointer
     size. */
  MenuActionCode aCode = GPOINTER_TO_INT(data);

  switch(aCode) {
    case MENU_FILE_OPEN:
      g_print("Selected open\n");
      break;
    case MENU_FILE_SAVE:
      g_print("Selected save\n");
      break;
    case MENU_FILE_QUIT:
      g_print("Selected quit\n");
      gtk_main_quit();
      break;
    default:
      /* Besides g_print, there are two other output functions in
         GLib: g_warning and g_error. g_error will stop our program
         (using abort() internally), so we'll choose to use g_warning
         instead since we want our program to continue running. The
         situation is not lethal, but should be investigated.

         g_warning prints out a warning message in the same format as
         g_print and printf. */
      g_warning("cbActivation: Unknown menu action code %d.\n", aCode);
  }
}

/**
 * NEW
 *
 * A convenience function to create menu items with internal label
 * objects.
 *
 * NOTE:
 *   Most existing programs use a convenience function that GTK+
 *   provides (gtk_menu_item_new_with_label).
 *
 * We want to use the GObject API for this example to demonstrate its
 * compactness.
 *
 * Parameters:
 * - const gchar*: string to display in the label inside the item.
 *
 * Returns:
 * - A pointer to a new MenuItem that holds the label
 */
static GtkMenuItem* buildMenuItem(const gchar* labelText) {

  GtkLabel* label;
  GtkMenuItem* mi;

  /* Create the Label object first. We set the text using its "label"
     property. We also set its alignment using a property that its
     superclass (GtkMisc) has. Namely "xalign". xalign with 0.0 is
     left and 1.0 is right extreme. Default value for xalign is 0.5
     which would align the text using center justification. */
  label = g_object_new(GTK_TYPE_LABEL,
    "label", labelText,     /* GtkLabel property */
    "xalign", (gfloat)0.0,  /* GtkMisc property */
    NULL);

  /* Next we create the GtkMenuItem.

     A MenuItem is a container that can hold one child (this
     restriction comes from GtkBin-class, which is an abstract class
     for containers that are capable of holding only one one child).
     We use the "child" property of the Container class to set its
     child on creation. Normally a Container would allow us to add
     multiple children in a similar way (by setting the "child"-
     property multiple times). */
  mi = g_object_new(GTK_TYPE_MENU_ITEM, "child", label, NULL);

  /* Return the GtkMenuItem to caller. */
  return mi;
}

/**
 * NEW
 *
 * Utility function to build a menubar and the menu.
 *
 * Uses the buildMenuItem-function from above and will connect the
 * signals that can be generated by MenuItems when they're selected
 * (the "activate"-signal).
 *
 * Returns:
 * - the completed MenuBar
 */
static GtkMenuBar* buildMenubar(void) {

  /* The visible menubar widget that will hold one submenu called
     "File". */
  GtkMenuBar* menubar;
  /* The menu item representing the menu-name in the menubar. It is
     necessary in order to attach the menu to the menubar. Will open
     the submenu when activated. */
  GtkMenuItem* miFile;

  /* A container implementing a menu that holds multiple items. */
  GtkMenu* fileMenu;
  /* The individual menu items and a separator item. */
  GtkMenuItem* miOpen;
  GtkMenuItem* miSave;
  GtkMenuItem* miSep;
  GtkMenuItem* miQuit;

  /* Create the container for items. */
  fileMenu = g_object_new(GTK_TYPE_MENU, NULL);

  /* Create the menu items. */
  miOpen = buildMenuItem("Open");
  miSave = buildMenuItem("Save");
  miQuit = buildMenuItem("Quit");
  miSep = g_object_new(GTK_TYPE_SEPARATOR_MENU_ITEM, NULL);

  /* Add the items into the container.

     Here we again use the "child"-property. But since Menu is a
     proper container that can hold multiple children, we can use a
     list of widgets to add. */
  g_object_set(fileMenu,
    "child", miOpen,
    "child", miSave,
    "child", miSep,
    "child", miQuit,
    NULL);

  /* Connect the signals from the individual menu items.
     NOTE:
       We need to cast the CB data into a gpointer since that is what
       the prototype of g_signal_connect tells the compiler to
       enforce. Luckily for us there is a macro to do exactly this
       (in GLib). */
  g_signal_connect(G_OBJECT(miOpen), "activate",
    G_CALLBACK(cbActivation), GINT_TO_POINTER(MENU_FILE_OPEN));
  g_signal_connect(G_OBJECT(miSave), "activate",
    G_CALLBACK(cbActivation), GINT_TO_POINTER(MENU_FILE_SAVE));
  g_signal_connect(G_OBJECT(miQuit), "activate",
    G_CALLBACK(cbActivation), GINT_TO_POINTER(MENU_FILE_QUIT));

  /* Create the menu item that will be added to the menubar. */
  miFile = buildMenuItem("File");

  /* Associate the "File" menu item to the Menu container so that it
     will open it as a submenu when activated.

     There is no property to set this, so we use an accessor
     function. */
  gtk_menu_item_set_submenu(miFile, GTK_WIDGET(fileMenu));

  /* Create the menubar. */
  menubar = g_object_new(GTK_TYPE_MENU_BAR, NULL);

  /* Add the "File" menu item to the menubar.

     We want to add from left to right, so again, the "child"
     property will be used. */
  g_object_set(menubar, "child", miFile, NULL);

  /* Return the completed menubar to the caller. */
  return menubar;
}

/**
 * MODIFIED
 *
 * We add a container that can hold more than one widget since
 * GtkWindow can hold only one at a time. We need to put our menubar
 * somewhere, and display a label. We select a container that will
 * split the area that it will get into horizontal sections according
 * to the needs to its children (GtkVBox).
 */
int main(int argc, char** argv) {

  GtkWindow* window;
  GtkLabel* label;
  GtkMenuBar* menubar;
  GtkVBox* vbox;

  /* Initialize the GTK+ library. */
  gtk_init(&argc, &argv);

  /* Create a window with window border width of 12 pixels and a
     title text. */
  window = g_object_new(GTK_TYPE_WINDOW,
    "border-width", 12,
    "title", "Hello GTK+",
    NULL);

  /* Create the label widget. */
  label = g_object_new(GTK_TYPE_LABEL,
    "label", "Hello World! (with menus)",
    NULL);

  /* Build the menubar (NEW). */
  menubar = buildMenubar();

  /* Create a layout box for the window since it can only hold one
     widget (NEW). */
  vbox = g_object_new(GTK_TYPE_VBOX, NULL);

  /* Add the vbox as the only child for the window (NEW). */
  g_object_set(window, "child", vbox, NULL);

  /* NEW

     Add it to the container that now controls the area inside the
     window.

     Both VBox and HBox implement an abstract class called GtkBox.
     Adding child widgets to GtkBoxes is possible by using an
     old-style API (gtk_box_pack_start and _end), or we can use the
     context based one with properties.

     We need to control three properties (besides the "child", GtkBox
     is also a container):
     - "pack-type": selects whether to add the next child to the
       start or end of box. Default is GTK_PACK_START.
       For VBox start is top and end is bottom.
     - "expand": Controls whether the child will receive extra space
       when the Box will grow (if it get's new space itself). Default
       is TRUE.
     - "fill": If "expand" is set, controls whether extra new space
       should be given to the child or used as padding. Default is
       TRUE.

    Based on this information we now must select a sequence that will
    create a split between the menubar and the label.

    We want the menubar to take only the amount of space that it
    requires, and for the label to fill up the rest. Should the
    window grow, we want the area allocated to label to grow as well.
    We'll see a growing window later on.

    We have two choices (A or B):
    A) Insert the menubar first:
       1) Set "expand" to FALSE.
       2) Use "child" to insert menubar.
       3) Set "pack-type" to GTK_PACK_END so that label will be added
          from bottom-up.
       4) Set "expand" back to TRUE.
       5) Use "child" to insert the label.
    B) Insert the Label first:
       1) Set "pack-type" to GTK_PACK_END.
       2) Insert label using "child".
       3) Set "expand" to FALSE.
       4) Set "pack-type" to GTK_PACK_START.
       5) Use "child" to insert the menubar.

    As you can see, both approaches will require an equal amount of
    property operations, so we can choose either one. There are other
    possible orders as well, but all of them require at least the
    five operations. We'll choose the first approach (A):

    g_object_set(vbox,
      "fill", FALSE,
      "child", menubar,
      "pack-type", GTK_PACK_END,
      "expand", TRUE,
      "child", label,
      NULL);

    NOTE:
      This won't work currently since the VBox implementation does
      not implement the properties of the abstract GtkBox class.

      This means that we'll need to use the accessor interface which
      requires us to give both fill and expand each time we add a
      widget.

      The order of parameters for the accessor function:
      - GtkBox into which we're adding the widget.
      - The widget that we're adding.
      - "fill".
      - "expand".
      - "padding", which is how many pixels are used around the
        widget. */
  gtk_box_pack_start(GTK_BOX(vbox), GTK_WIDGET(menubar), FALSE,
                     FALSE, 0);
  gtk_box_pack_end(GTK_BOX(vbox), GTK_WIDGET(label), TRUE, TRUE, 0);

  /* Connect the termination signals */
  g_signal_connect(window, "delete-event",
                   G_CALLBACK(delete_event), NULL);
  g_signal_connect(window, "destroy",
                   G_CALLBACK(end_program), NULL);

  /* Show all widgets that are contained by the window. This will
     also include the menubar, and its widget tree. */
  gtk_widget_show_all(GTK_WIDGET(window));

  /* Start the main event loop. */
  g_print("main: calling gtk_main\n");
  gtk_main();

  /* Display a message to the standard output and exit. */
  g_print("main: returned from gtk_main and exiting with success\n");

  /* Return success as exit code. */
  return EXIT_SUCCESS;
}
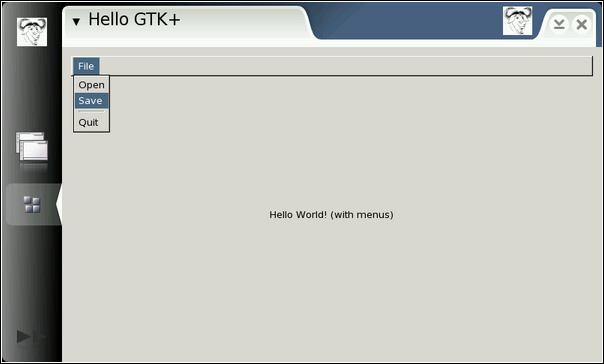
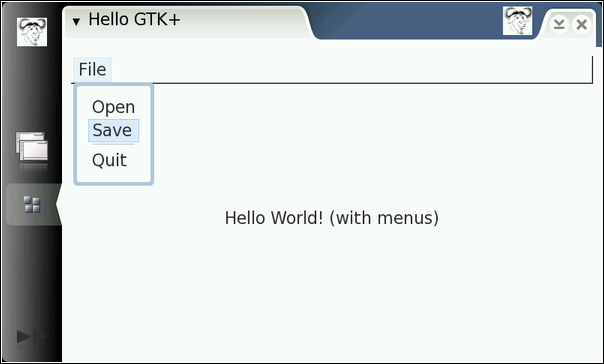
The application will also now quit when "Quit" is selected from the menu.
2.7 Hildon widgets
The platform contains a set of widgets that have been optimised for smaller devices with a stylus-like HID. The screen is quite small (physically) compared to modern desktop TFT-displays, so some thinking needed to be done on how to switch between running GUI applications and whether a traditional window manager or graphical desktop was suitable.
In order to integrate nicely into the AF-environment, we start by switching our application model to the one that Hildon expects us to use.
Mainly, Hildon provides two widgets: HildonProgram and HildonWindow which replace some of the functionality that GtkWindow normally provides.
HildonProgram is an "super-window" object that provides a shell through which we can integrate our graphical views into the runtime environment. Views are similar to windows, but only one view can be visible at any given time. You might think of an Hildon application as being a dialog with multiple tabs, but in this case the tabs will be the only interface that the user will see. The views are implemented by using HildonWindow-widgets, which basically are layout Containers into which we place our widgets.
This requires some thinking when it comes to UI design, especially if you plan to port existing GUI software to use Hildon widgets.
Other points to keep in mind:
- Each view will have one GtkMenu that the application can use. This is in contrast to using a MenuBar in a regular desktop environment.
- Each Window has a container to hold a toolbar (automatically).
- Input fields may activate the virtual keyboard when they get focus. This will cause the size of the application layout area to resize. Application dialogs will also be resized if necessary. If your content is not capable of being resized easily, you might want to use a GtkScrolledWindow to hold it.
- Avoid deep hierarchies in Menus as the screen estate is limited.
- Design your application so that it will display only one main "Window" at any given time. Applications which normally would have multiple separate windows/dialogs all open simultaneously need to be re-engineered.
- Avoid trying to show too much information at once.
We will now modify our Hello World to use the HildonProgram and HildonWindow widgets. We'll also use the Menu that HildonWindow provides. The Menu starts empty and we'll add MenuItems into it directly, instead of creating a separate Menu widget like was done before.
Listing of hildon_helloworld-1.c
/**
 * hildon_helloworld-1.c
 *
 * This maemo code example is licensed under a MIT-style license,
 * that can be found in the file called "License" in the same
 * directory as this file.
 * Copyright (c) 2007-2008 Nokia Corporation. All rights reserved.
 *
 * Let's hildonize our application. Most of the application stays
 * unchanged, but the menu building utility needs some changes and
 * 'main' will need to be modified.
 *
 * Look for lines with "NEW" or "MODIFIED" in them.
 */

#include <stdlib.h>
#include <gtk/gtk.h>

/**
 * NEW
 *
 * When using widgets from the Hildon library, we need to use
 * additional include files. We could just pull in <hildon/hildon.h>,
 * but that is unnecessary since we only use a small number of Hildon
 * widgets. Instead we'll opt to pull in only the Hildon header files
 * that are necessary for the widgets that we use.
 *
 * For our first Hildon application, we'll need the Hildon Program
 * framework widgets whose API and types are declared in
 * hildon-program.h
 */
#include <hildon/hildon-program.h>

/* Menu codes. */
typedef enum {
  MENU_FILE_OPEN = 1,
  MENU_FILE_SAVE = 2,
  MENU_FILE_QUIT = 3
} MenuActionCode;

/**
 * Callback function (event handler) for the "delete" event.
 */
static gboolean delete_event(GtkWidget* widget, GdkEvent event,
                                                gpointer data) {
  return FALSE;
}

/**
 * Our callback function for the "destroy"-signal which is issued
 * when the Widget is going to be destroyed.
 */
static void end_program(GtkWidget* widget, gpointer data) {
  gtk_main_quit();
}

/**
 * Signal handler for the menu item selections.
 */
static void cbActivation(GtkMenuItem* mi, gpointer data) {

  MenuActionCode aCode = GPOINTER_TO_INT(data);

  switch(aCode) {
    case MENU_FILE_OPEN:
      g_print("Selected open\n");
      break;
    case MENU_FILE_SAVE:
      g_print("Selected save\n");
      break;
    case MENU_FILE_QUIT:
      g_print("Selected quit\n");
      gtk_main_quit();
      break;
    default:
      g_warning("cbActivation: Unknown menu action code %d.\n", aCode);
  }
}

/**
 * A convenience function to create menu items with internal label
 * objects.
 */
static GtkMenuItem* buildMenuItem(const gchar* labelText) {

  GtkLabel* label;
  GtkMenuItem* mi;

  /* Create the Label object. */
  label = g_object_new(GTK_TYPE_LABEL,
    "label", labelText,     /* GtkLabel property */
    "xalign", (gfloat)0.0,  /* GtkMisc property */
    NULL);

  /* Create the GtkMenuItem and add the Label as its child. */
  mi = g_object_new(GTK_TYPE_MENU_ITEM, "child", label, NULL);

  /* Return the GtkMenuItem to caller. */
  return mi;
}

/**
 * MODIFIED
 *
 * This utility adds the menu items into the given HildonProgram.
 * It uses the buildMenuItem-function internally to build each menu
 * item. It will connect the signals that can be generated by
 * MenuItems when they're selected ("activate"-signal).
 *
 * Since there is no menubar, so this becomes quite simple.
 */
static void buildMenu(HildonProgram* program) {

  GtkMenu* menu;
  GtkMenuItem* miOpen;
  GtkMenuItem* miSave;
  GtkMenuItem* miSep;
  GtkMenuItem* miQuit;

  /* Create the menu items. */
  miOpen = buildMenuItem("Open");
  miSave = buildMenuItem("Save");
  miQuit = buildMenuItem("Quit");
  miSep = g_object_new(GTK_TYPE_SEPARATOR_MENU_ITEM, NULL);

  /* Create a new menu. */
  menu = g_object_new(GTK_TYPE_MENU, NULL);

  /* Add the items to the container. */
  g_object_set(menu,
    "child", miOpen,
    "child", miSave,
    "child", miSep,
    "child", miQuit,
    NULL);

  /* Set the top-level menu for Hildon program (NEW). */
  hildon_program_set_common_menu(program, menu);

  /* Connect the signals from the individual menu items. */
  g_signal_connect(G_OBJECT(miOpen), "activate",
    G_CALLBACK(cbActivation), GINT_TO_POINTER(MENU_FILE_OPEN));
  g_signal_connect(G_OBJECT(miSave), "activate",
    G_CALLBACK(cbActivation), GINT_TO_POINTER(MENU_FILE_SAVE));
  g_signal_connect(G_OBJECT(miQuit), "activate",
    G_CALLBACK(cbActivation), GINT_TO_POINTER(MENU_FILE_QUIT));

  /**
   * NEW
   *
   * We need to explicitly set the visibility for the menu since by
   * default it's not visible when we get it from window. Safest bet
   * is to show the widget tree that is inside the menu.
   */
  gtk_widget_show_all(GTK_WIDGET(menu));
}

/**
 * MODIFIED
 *
 * We switch to the application framework that Hildon provides.
 */
int main(int argc, char** argv) {

  /* Our GtkWindow has been replaced with HildonProgram (NEW). */
  HildonProgram* program;
  /* And we'll have one window, which will act as the container for
     our needs (NEW). */
  HildonWindow* window;
  GtkWidget* label;
  GtkWidget* vbox;

  /* Initialize the GTK+. */
  gtk_init(&argc, &argv);

  /**
   * NEW
   *
   * Create the Hildon provided window and controller widgets.
   */
  program = HILDON_PROGRAM(hildon_program_get_instance());
  /* Set the application title using an accessor function. */
  g_set_application_name("Hello Hildon!");
  /* Create a window that will handle our layout and menu. */
  window = HILDON_WINDOW(hildon_window_new());
  /* Bind the HildonWindow to HildonProgram. */
  hildon_program_add_window(program, HILDON_WINDOW(window));

  /* Create the label widget. */
  label = g_object_new(GTK_TYPE_LABEL,
    "label", "Hello Hildon (with menus)!",
    NULL);

  /* Build the menu. We'll create the menu for the HildonProgram, so
     we pass the pointer to our revised buildMenu (NEW). */
  buildMenu(program);

  /* Create a layout box for the window since it can only hold one
     widget. */
  vbox = g_object_new(GTK_TYPE_VBOX, NULL);

  /* Add the vbox as a child to the Window. */
  g_object_set(window, "child", vbox, NULL);

  /* Pack the label into the VBox. */
  gtk_box_pack_end(GTK_BOX(vbox), GTK_WIDGET(label), TRUE, TRUE, 0);

  /* Connect the termination signals. Note how the HildonWindow
     object has taken the responsibilities that a GtkWindow normally
     would have (NEW). */
  g_signal_connect(G_OBJECT(window), "delete-event",
                   G_CALLBACK(delete_event), NULL);
  g_signal_connect(G_OBJECT(window), "destroy",
                   G_CALLBACK(end_program), NULL);

  /* Show all widgets that are contained by the window. This also
     includes the menu (if it has been setup by this point) (NEW). */
  gtk_widget_show_all(GTK_WIDGET(window));

  /* Start the main event loop. */
  g_print("main: calling gtk_main\n");
  gtk_main();

  g_print("main: returned from gtk_main and exiting with success\n");

  return EXIT_SUCCESS;
}
In order to get the required flags for the compiler and linker, we'll use pkg-config again. Since now we'll be pulling flags from multiple packages at the same time, we can combine the package names for each invocation of pkg-config. The package that contains the Hildon widgets is called hildon-1.
[sbox-DIABLO_X86: ~/appdev] > gcc -Wall `pkg-config --cflags gtk+-2.0  \
 hildon-1` hildon_helloworld-1.c -o hildon_helloworld-1 \
 `pkg-config --libs gtk+-2.0 hildon-1`
When run using run-standalone.sh our small program is starting to look like a proper application:
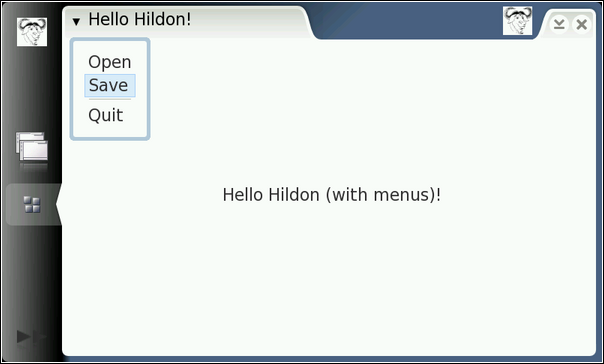
This corresponds to the Normal View layout in the maemo tutorial:
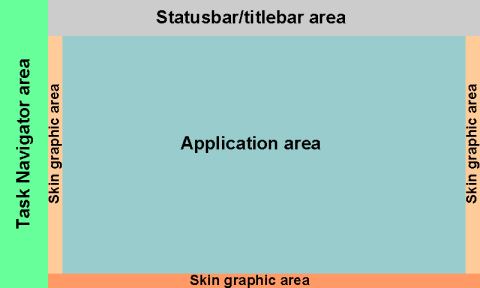
The pixel space available for components:
- The Task navigator takes 80x480 pixels on the left.
- The Statusbar takes 720x60 pixels from the top. This area is partly used by HildonProgram to display the title and by HildonWindow to implement the menu.
- The area left for the application is 672x396 pixels.
2.8 Using accessors
You have now gone through the basic program and function structure that you will encounter in GTK+ development. Needless to say, there are many more useful things to learn too. The concept of events and signals is however very important to understand. It is also useful to know the basics of the GObject system even if its use is sometimes difficult.
Most hard-core GTK+ developers will find the use of GObject properties distasteful (at least). They might use the following rationale: since g_object_set does not require typecast macros, it will make it impossible for the compiler to check the proper types used when compiling. This is true. However, even by using type-cast macros one might get into trouble.
GTK+ functions check their arguments on use, so in practise when you will pass the wrong types to functions, you will get rather nice warnings during the run time. You should of course fix these, as they are indicators for possible problems. Just bear in mind that according to one leading GTK+ developer "those are just a convenience to the programmer" (meaning the typecast macro expansions and runtime checks) so you should not rely on their presence (indeed, one can use black magic flags to disable their code-expansion and that would lead to somewhat faster code).
The main reason to use the accessor based style is that most existing GTK+ code is written using it. This includes the GTK+ tutorials and the example codes that are sometimes included in the GTK+ API documentation.
Now that you've seen what the GObject-property based style looks like, we will switch to the accessor style for the rest of the material. This is mainly done because that is the style that you'll encounter anyway.
In order to complete this chapter, we round it off with yet another hello world program, which will look and taste exactly the same as the previous one, but we'll be using only the accessor functions. It's possible to mix the styles, but it would be best to pick one and stay consistent. Most projects have already selected their style so you will need to use the existing style in order to facilitate source code comprehension within the project.
Listing of hildon_helloworld-2.c - an accessor-style Hello World
/**
 * hildon_helloworld-2.c
 *
 * This maemo code example is licensed under a MIT-style license,
 * that can be found in the file called "License" in the same
 * directory as this file.
 * Copyright (c) 2007-2008 Nokia Corporation. All rights reserved.
 *
 * We now convert into accessor functions. Program logic is same as
 * in hildon_helloworld-1.c.
 *
 * Look for lines with "NEW" or "MODIFIED" in them.
 */

#include <stdlib.h>
#include <gtk/gtk.h>
#include <hildon/hildon-program.h>

/* Menu codes. */
typedef enum {
  MENU_FILE_OPEN = 1,
  MENU_FILE_SAVE = 2,
  MENU_FILE_QUIT = 3
} MenuActionCode;

/**
 * Callback function (event handler) for the "delete" event.
 */
static gboolean delete_event(GtkWidget* widget, GdkEvent event,
                                                gpointer data) {
  return FALSE;
}

/**
 * Our callback function for the "destroy"-signal which is issued
 * when the Widget is going to be destroyed.
 */
static void end_program(GtkWidget* widget, gpointer data) {
  gtk_main_quit();
}

/**
 * Signal handler for the menu item selections.
 */
static void cbActivation(GtkMenuItem* mi, gpointer data) {

  MenuActionCode aCode = GPOINTER_TO_INT(data);

  switch(aCode) {
    case MENU_FILE_OPEN:
      g_print("Selected open\n");
      break;
    case MENU_FILE_SAVE:
      g_print("Selected save\n");
      break;
    case MENU_FILE_QUIT:
      g_print("Selected quit\n");
      gtk_main_quit();
      break;
    default:
      g_warning("cbActivation: Unknown menu action code %d.\n", aCode);
  }
}

/**
 * MODIFIED
 *
 * This utility creates the menu for the HildonProgram.
 * GTK+ offers a convenience function to create MenuItems with
 * GtkLabels with alignment already included. We'll use the
 * convenience function instead of the GObject properties.
 */
static void buildMenu(HildonProgram* program) {

  GtkMenu* menu;
  GtkWidget* miOpen;
  GtkWidget* miSave;
  GtkWidget* miSep;
  GtkWidget* miQuit;

  /* Create the menu items. */
  miOpen = gtk_menu_item_new_with_label("Open");
  miSave = gtk_menu_item_new_with_label("Save");
  miQuit = gtk_menu_item_new_with_label("Quit");
  miSep =  gtk_separator_menu_item_new();

  /* Create a new menu. */
  menu = GTK_MENU(gtk_menu_new());

  /* Add the items to the container.

     Now that we're using accessor functions, things look a bit
     different. We're still doing the same logic though.

     The prototype for adding children to a container is:
     gtk_container_add(GtkContainer*, GtkWidget*)

     This is why we don't need to cast the menu items. */
  gtk_container_add(GTK_CONTAINER(menu), miOpen);
  gtk_container_add(GTK_CONTAINER(menu), miSave);
  gtk_container_add(GTK_CONTAINER(menu), miSep);
  gtk_container_add(GTK_CONTAINER(menu), miQuit);

  /* Connect the signals from individual menu items. */
  g_signal_connect(G_OBJECT(miOpen), "activate",
    G_CALLBACK(cbActivation), GINT_TO_POINTER(MENU_FILE_OPEN));
  g_signal_connect(G_OBJECT(miSave), "activate",
    G_CALLBACK(cbActivation), GINT_TO_POINTER(MENU_FILE_SAVE));
  g_signal_connect(G_OBJECT(miQuit), "activate",
    G_CALLBACK(cbActivation), GINT_TO_POINTER(MENU_FILE_QUIT));

  /* Set the top level menu for Hildon program. */
  hildon_program_set_common_menu(program, menu);
}

/**
 * MODIFIED
 *
 * We use the accessor functions instead of GObject-properties.
 * Because Hildon API creator functions return GtkWidget pointers,
 * we'll change our pointer types accordingly. This is done for GTK+
 * widgets as well.
 */
int main(int argc, char** argv) {

  HildonProgram* program;
  HildonWindow* window;
  GtkWidget* label;
  GtkWidget* vbox;

  /* Initialize the GTK+. */
  gtk_init(&argc, &argv);

  /* Create the Hildon program. */
  program = HILDON_PROGRAM(hildon_program_get_instance());
  /* Set the application title using an accessor function. */
  g_set_application_name("Hello Hildon!");
  /* Create a window that will handle our layout and menu. */
  window = HILDON_WINDOW(hildon_window_new());
  /* Bind the HildonWindow to HildonProgram. */
  hildon_program_add_window(program, HILDON_WINDOW(window));

  /* Create the label widget (NEW). */
  label = gtk_label_new("Hello Hildon (with accessors)!");

  /* Build the menu and attach it to the HildonProgram. */
  buildMenu(program);

  /* Create a layout box for the window since it can only hold one
     widget (NEW).

     Using the creator function, we need to pass two parameters to
     it:
     - gboolean: should all children be given equal amount of space?
     - gint:     pixels to leave between the child widgets. */
  vbox = gtk_vbox_new(FALSE, 0);

  /* Add the vbox as a child to the Window (NEW). */
  gtk_container_add(GTK_CONTAINER(window), vbox);

  /* Pack the label into the VBox. */
  gtk_box_pack_end(GTK_BOX(vbox), GTK_WIDGET(label), TRUE, TRUE, 0);

  /* Connect the termination signals. */
  g_signal_connect(G_OBJECT(window), "delete-event",
                   G_CALLBACK(delete_event), NULL);
  g_signal_connect(G_OBJECT(window), "destroy",
                   G_CALLBACK(end_program), NULL);

  /* Show all widgets that are contained by the Window. */
  gtk_widget_show_all(GTK_WIDGET(window));

  /* Start the main event loop. */
  g_print("main: calling gtk_main\n");
  gtk_main();

  g_print("main: returned from gtk_main and exiting with success\n");

  return EXIT_SUCCESS;
}
You might be wondering what is the point of having two different APIs for writing GUIs in GTK+? The GObject-property model was written in order to provide an easy way for other programming languages to bind into GTK+ objects. Since some of the languages support dynamic binding (python is a prime example), these language bindings may inspect properties on the fly and keep the glue code quite simple.
2.9 Handling dynamic memory
You've seen GTK+ in use so far, but what you haven't encountered is the memory handling mechanisms that GTK+ and Hildon use internally. This material will act cowardly and steer away from the GObject reference counting mechanism and will not tell you how to interact with it. Handling memory allocation and freeing it is done automatically by GTK+ in all normal circumstances for all the widgets and unless you're creating your own, you will not need to know.
In practise, when ever a widget or any data structure part is created within GTK+ (also Hildon), the routines will allocate some memory from the heap (dynamic memory area) and use GObject-functions to increase the reference count on that memory area. When ever a widget is added to a container (for example), the container code will increase the widget's reference count. When a widget is removed from a container, the removal code will decrease the reference count. When reference count is decreased, it will check whether references hit zero, and if so, it will free the memory. If reference count never goes to zero, that memory will not be freed.
A GTK+ widget will emit a "destroy" signal when it wants to destroy itself (for one reason or another). This is a signal to all the reference holders that they should remove their knowledge about that widget and hence decrease the reference counts. After all other objects have done this, that widget may die in piece and its memory will be freed by the reference-decrement code.
For more information, see the official reference counting documentation of GtkObject and GObject at maemo.org.
2.10 Avoiding deprecated functions
On your journey to the land of existing GTK+ code you will undoubtedly encounter code that uses functions that are about to be removed from GTK+ (or at least the GTK+ developers would like to get rid of them in time). By looking at the API function names it is very difficult to know whether they are deprecated or not (unless you're a GTK+ guru).
For this reason the following compile time flags are useful:
GTK_DISABLE_DEPRECATED: Set to 1 to disable all currently deprecated functions from GTK+GDK_DISABLE_DEPRECATED: Similar to above but will disable deprecated functions from GDKGDK_PIXBUF_DISABLE_DEPRECATED: For GDK-PixbufG_DISABLE_DEPRECATED: For GLibGTK_MULTIHEAD_SAFE: Not really deprecation related, but will disable GTK+ functions that might cause problems in a multihead system (one X display over multiple physical displays).
To use these, pass them as parameters to your compiler (they affect the include files that you use) like this: -DGTK_DISABLE_DEPRECATED=1
If you're dealing with software that uses the older version of GTK+ (the older version is actually called Gtk, version 1.2), then you should expect some problems. The older version has a lot of functions whose prototype has changed in the modern GTK+ and also some functions have been implemented in a totally different way. The widget model is about the same, but without GObjects and without the property-based access API.
Improve this page