- 7.1 Introduction
- 7.2 File System - GnomeVFS
- 7.3 Message Bus System - D-Bus
-
- 7.3.1 D-Bus Basics
- 7.3.2 LibOSSO
- 7.3.3 Using GLib Wrappers for D-Bus
- 7.3.4 Implementing and Using D-Bus Signals
- 7.3.5 Asynchronous GLib/D-Bus
- 7.3.6 D-Bus Server Design Issues
- 7.4 Application Preferences - GConf
-
- 7.5 Alarm Framework
-
- 7.6 Usage of Back-up Application
-
- 7.7 Using Maemo Address Book API
-
- 7.7.1 Using Library
- 7.7.2 Accessing Evolution Data Server (EDS)
- 7.7.3 Creating User Interface
- 7.7.4 Using Autoconf
- 7.8 Clipboard Usage
-
- 7.9 Global Search Usage
-
- 7.10 Writing "Send Via" Functionality
- 7.11 Using HAL
-
- 7.12 Certificate Storage Guide
-
- 7.12.1 Digital Certificates
- 7.12.2 Certificates in Maemo Platform
- 7.12.3 Creating Own Certificates with OpenSSL
- 7.12.4 Maemo Certificate Databases
- 7.12.5 Creating Databases
- 7.12.6 Importing Certificates and Keys
- 7.12.7 Sample Program for Searching and Listing Certificates
- 7.12.8 Deleting Certificates
- 7.12.9 Validating Certificate Files
- 7.12.10 Exporting Certificates
- 7.13 Extending Hildon Input Methods
7. Using Generic Platform Components
7.1 Introduction
The following code examples are used in this chapter:
- hildon_helloworld-8.c
- libdbus-example
- libosso-example-sync
- libosso-example-async
- libosso-flashlight
- glib-dbus-sync
- glib-dbus-signals
- glib-dbus-async
- hildon_helloworld-9.c
- gconf-listener
- example_alarm.c
- example_abook.c
- MaemoPad
- Certificate Manager Examples
- hildon-input-method-plugins-example
The underlying system services in the maemo platform differ slightly from those used in desktop Linux distributions. This chapter gives an overview of the most important system services.
7.2 File System - GnomeVFS
Maemo includes a powerful file system framework, GnomeVFS. This framework enables applications to use a vast number of different file access protocols without having to know anything about the underlying details. Some examples of the supported protocols are: local file system, HTTP, FTP and OBEX over Bluetooth.
In practice, this means that all GnomeVFS file access methods are transparently available for both developer and end user just by using the framework for file operations. The API for file handling is also much more flexible than the standard platform offerings. It features, for example, asynchronous reading and writing, MIME type support and file monitoring.
All user-file access should be done with GnomeVFS in maemo applications, because file access can be remote. In fact, many applications that come with the operating system on the Internet tablets do make use of GnomeVFS. Access to files not visible to the user should be done directly for performance reasons.
A good hands-on starting point is taking a look at the GnomeVFS example
in maemo-examples package. Detailed API information can be found in the
GnomeVFS API reference[31].
GnomeVFS Example
In maemo, GnomeVFS also provides some filename case insensitivity support, so that the end users do not have to care about the UNIX filename conventions, which are case-sensitive.
The GnomeVFS interface attempts to provide a POSIX-like interface, so that when one would use open() with POSIX, gnome_vfs_open can be used instead. Instead of write(), there is gnome_vfs_write, etc. (for most functions). The GnomeVFS function names are sometimes a bit more verbose, but otherwise they attempt to implement the basic API. Some POSIX functions, such as mmap(), are impossible to implement in the user space, but normally this is not a big problem. Also some functions will fail to work properly over network connections and outside the local filesystem, since they might not always make sense there.
Shortly there will follow a simple example of using the GnomeVFS interface functions.
In order to save and load data, at least the following functions are needed:
- gnome_vfs_init(): initializes the GnomeVFS library. Needs to be done once at an early stage at program startup.
- gnome_vfs_shutdown(): frees up resources inside the library and closes it down.
- gnome_vfs_open(): opens the given URI (explained below) and returns a file handle for that if successful.
- gnome_vfs_get_file_info(): get information about a file (similar to, but with broader scope than fstat).
- gnome_vfs_read(): read data from an opened file.
- gnome_vfs_write(): write data into an opened file.
In order to differentiate between different protocols, GnomeVFS uses Uniform Resource Location syntax when accessing resources. For example in file:///tmp/somefile.txt, the file:// is the protocol to use, and the rest is the location within that protocol space for the resource or file to manipulate. Protocols can be stacked inside a single URI, and the URI also supports username and password combinations (these are best demonstrated in the GnomeVFS API documentation).
The following simple demonstration will be using local files.
A simple application will be extended in the following ways:
- Implement the "Open" command by using GnomeVFS with full error checking.
- The memory will be allocated and freed with g_malloc0() and g_free(), when loading the contents of the file that the user has selected.
- Data loaded through "Open" will replace the text in the GtkLabel that is in the center area of the HildonWindow. The label will be switched to support Pango simple text markup, which looks a lot like simple HTML.
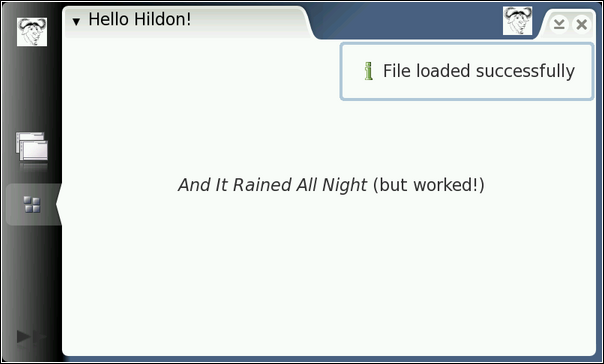
- Notification about loading success and failures will be communicated to the user by using a widget called HildonBanner, which will float a small notification dialog (with an optional icon) in the top-right corner for a while, without blocking the application.
- N.B. Saving into a file is not implemented in this code, as it is a lab exercise (and it is simpler than opening).
- File loading failures can be simulated by attempting to load an empty file. Since empty files are not wanted, the code will turn this into an error as well. If there is no empty file available, one can easily be created with the touch command (under MyDocs, so that the open dialog can find it). It is also possible to attempt to load a file larger than 100 KiB, since the code limits the file size (artificially), and will refuse to load large files.
- The goto statement should normally be avoided. Team coding guidelines should be checked to see, whether this is an allowed practice. Note how it is used in this example to cut down the possibility of leaked resources (and typing). Another option for this would be using variable finalizers, but not many people know how to use them, or even that they exist. They are gcc extensions into the C language, and you can find more about them by reading gcc info pages (look for variable attributes).
- Simple GnomeVFS functions are used here. They are all synchronous, which means that if loading the file takes a long time, the application will remain unresponsive during that time. For small files residing in local storage, this is a risk that is taken knowingly. Synchronous API should not be used when loading files over network, since there are more uncertainties in those cases.
- I/O in most cases will be slightly slower than using a controlled approach with POSIX I/O API (controlled meaning that one should know what to use and how). This is a price that has to be paid in order to enable easy switching to other protocols later.
N.B. Since GnomeVFS is a separate library from GLib, you will have to add the flags and library options that it requires. The pkg-config package name for the library is gnome-vfs-2.0.
/**
 * hildon_helloworld-8.c
 *
 * This maemo code example is licensed under a MIT-style license,
 * that can be found in the file called "License" in the same
 * directory as this file.
 * Copyright (c) 2007-2008 Nokia Corporation. All rights reserved.
 *
 * We add file loading support using GnomeVFS. Saving files using
 * GnomeVFS is left as an exercise. We also add a small notification
 * widget (HildonBanner).
 *
 * Look for lines with "NEW" or "MODIFIED" in them.
 */

#include <stdlib.h>
#include <hildon/hildon-program.h>
#include <hildon/hildon-color-button.h>
#include <hildon/hildon-find-toolbar.h>
#include <hildon/hildon-file-chooser-dialog.h>
/* A small notification window widget (NEW). */
#include <hildon/hildon-banner.h>
/* Pull in the GnomeVFS headers (NEW). */
#include <libgnomevfs/gnome-vfs.h>

/* Declare the two slant styles. */
enum {
  STYLE_SLANT_NORMAL = 0,
  STYLE_SLANT_ITALIC
};

/**
 * The application state.
 */
typedef struct {
  gboolean styleUseUnderline;
  gboolean styleSlant;

  GdkColor currentColor;

  /* Pointer to the label so that we can modify its contents when a
     file is loaded by the user (NEW). */
  GtkWidget* textLabel;

  gboolean fullScreen;

  GtkWidget* findToolbar;
  GtkWidget* mainToolbar;
  gboolean findToolbarIsVisible;
  gboolean mainToolbarIsVisible;

  HildonProgram* program;
  HildonWindow* window;
} ApplicationState;

  /*... Listing cut for brevity ...*/

/**
 * Utility function to print a GnomeVFS I/O related error message to
 * standard error (not seen by the user in graphical mode) (NEW).
 */
static void dbgFileError(GnomeVFSResult errCode, const gchar* uri) {
  g_printerr("Error while accessing '%s': %s\n", uri,
             gnome_vfs_result_to_string(errCode));
}

/**
 * MODIFIED (A LOT)
 *
 * We read in the file selected by the user if possible and set the
 * contents of the file as the new Label content.
 *
 * If reading the file fails, the label will be left unchanged.
 */
static void cbActionOpen(GtkWidget* widget, ApplicationState* app) {

  gchar* filename = NULL;
  /* We need to use URIs with GnomeVFS, so declare one here. */
  gchar* uri = NULL;

  g_assert(app != NULL);
  /* Bad things will happen if these two widgets don't exist. */
  g_assert(GTK_IS_LABEL(app->textLabel));
  g_assert(GTK_IS_WINDOW(app->window));

  g_print("cbActionOpen invoked\n");

  /* Ask the user to select a file to open. */
  filename = runFileChooser(app, GTK_FILE_CHOOSER_ACTION_OPEN);
  if (filename) {
    /* This will point to loaded data buffer. */
    gchar* buffer = NULL;
    /* Pointer to a structure describing an open GnomeVFS "file". */
    GnomeVFSHandle* fileHandle = NULL;
    /* Structure to hold information about a "file", initialized to
       zero. */
    GnomeVFSFileInfo fileInfo = {};
    /* Result code from the GnomeVFS operations. */
    GnomeVFSResult result;
    /* Size of the file (in bytes) that we'll read in. */
    GnomeVFSFileSize fileSize = 0;
    /* Number of bytes that were read in successfully. */
    GnomeVFSFileSize readCount = 0;

    g_print("  you chose to load file '%s'\n", filename);

    /* Convert the filename into an GnomeVFS URI. */
    uri = gnome_vfs_get_uri_from_local_path(filename);
    /* We don't need the original filename anymore. */
    g_free(filename);
    filename = NULL;
    /* Should not happen since we got a filename before. */
    g_assert(uri != NULL);
    /* Attempt to get file size first. We need to get information
       about the file and aren't interested in other than the very
       basic information, so we'll use the INFO_DEFAULT setting. */
    result = gnome_vfs_get_file_info(uri, &fileInfo,
                                     GNOME_VFS_FILE_INFO_DEFAULT);
    if (result != GNOME_VFS_OK) {
      /* There was a failure. Print a debug error message and break
         out into error handling. */
      dbgFileError(result, uri);
      goto error;
    }

    /* We got the information (maybe). Let's check whether it
       contains the data that we need. */
    if (fileInfo.valid_fields & GNOME_VFS_FILE_INFO_FIELDS_SIZE) {
      /* Yes, we got the file size. */
      fileSize = fileInfo.size;
    } else {
      g_printerr("Couldn't get the size of file!\n");
      goto error;
    }

    /* By now we have the file size to read in. Check for some limits
       first. */
    if (fileSize > 1024*100) {
      g_printerr("Loading over 100KiB files is not supported!\n");
      goto error;
    }
    /* Refuse to load empty files. */
    if (fileSize == 0) {
      g_printerr("Refusing to load an empty file\n");
      goto error;
    }

    /* Allocate memory for the contents and fill it with zeroes.
       NOTE:
         We leave space for the terminating zero so that we can pass
         this buffer as gchar to string functions and it is
         guaranteed to be terminated, even if the file doesn't end
         with binary zero (odds of that happening are small). */
    buffer = g_malloc0(fileSize+1);
    if (buffer == NULL) {
      g_printerr("Failed to allocate %u bytes for buffer\n",
                 (guint)fileSize);
      goto error;
    }

    /* Open the file.

       Parameters:
       - A pointer to the location where to store the address of the
         new GnomeVFS file handle (created internally in open).
       - uri: What to open (needs to be GnomeVFS URI).
       - open-flags: Flags that tell what we plan to use the handle
         for. This will affect how permissions are checked by the
         Linux kernel. */

    result = gnome_vfs_open(&fileHandle, uri, GNOME_VFS_OPEN_READ);
    if (result != GNOME_VFS_OK) {
      dbgFileError(result, uri);
      goto error;
    }
    /* File opened succesfully, read its contents in. */
    result = gnome_vfs_read(fileHandle, buffer, fileSize,
                            &readCount);
    if (result != GNOME_VFS_OK) {
      dbgFileError(result, uri);
      goto error;
    }
    /* Verify that we got the amount of data that we requested.
       NOTE:
         With URIs it won't be an error to get less bytes than you
         requested. Getting zero bytes will however signify an
         End-of-File condition. */
    if (fileSize != readCount) {
      g_printerr("Failed to load the requested amount\n");
      /* We could also attempt to read the missing data until we have
         filled our buffer, but for simplicity, we'll flag this
         condition as an error. */
      goto error;
    }

    /* Whew, if we got this far, it means that we actually managed to
       load the file into memory. Let's set the buffer contents as
       the new label now. */
    gtk_label_set_markup(GTK_LABEL(app->textLabel), buffer);

    /* That's it! Display a message of great joy. For this we'll use
       a dialog (non-modal) designed for displaying short
       informational messages. It will linger around on the screen
       for a while and then disappear (in parallel to our program
       continuing). */
    hildon_banner_show_information(GTK_WIDGET(app->window),
      NULL, /* Use the default icon (info). */
      "File loaded successfully");

    /* Jump to the resource releasing phase. */
    goto release;

  error:
    /* Display a failure message with a stock icon.
       Please see http://maemo.org/api_refs/4.0/gtk/gtk-Stock-Items.html
       for a full listing of stock items. */
    hildon_banner_show_information(GTK_WIDGET(app->window),
      GTK_STOCK_DIALOG_ERROR, /* Use the stock error icon. */
      "Failed to load the file");

  release:
    /* Close and free all resources that were allocated. */
    if (fileHandle) gnome_vfs_close(fileHandle);
    if (filename) g_free(filename);
    if (uri) g_free(uri);
    if (buffer) g_free(buffer);
    /* Zero them all out to prevent stack-reuse-bugs. */
    fileHandle = NULL;
    filename = NULL;
    uri = NULL;
    buffer = NULL;

    return;
  } else {
    g_print("  you didn't choose any file to open\n");
  }
}

/**
 * MODIFIED (kind of)
 *
 * Function to save the contents of the label (although it doesn't
 * actually save the contents, on purpose). Use gtk_label_get_label
 * to get a gchar pointer into the application label contents
 * (including current markup), then use gnome_vfs_create and
 * gnome_vfs_write to create the file (left as an exercise).
 */
static void cbActionSave(GtkWidget* widget, ApplicationState* app) {
  gchar* filename = NULL;

  g_assert(app != NULL);

  g_print("cbActionSave invoked\n");

  filename = runFileChooser(app, GTK_FILE_CHOOSER_ACTION_SAVE);
  if (filename) {
    g_print("  you chose to save into '%s'\n", filename);
    /* Process saving .. */

    g_free(filename);
    filename = NULL;
  } else {
    g_print("  you didn't choose a filename to save to\n");
  }
}

  /*... Listing cut for brevity ...*/

/**
 * MODIFIED
 *
 * Add support for GnomeVFS (it needs to be initialized before use)
 * and add support for the Pango markup feature of the GtkLabel
 * widget.
 */
int main(int argc, char** argv) {

  ApplicationState aState = {};

  GtkWidget* label = NULL;
  GtkWidget* vbox = NULL;
  GtkWidget* mainToolbar = NULL;
  GtkWidget* findToolbar = NULL;

  /* Initialize the GnomeVFS (NEW). */
  if(!gnome_vfs_init()) {
    g_error("Failed to initialize GnomeVFS-libraries, exiting\n");
  }

  /* Initialize the GTK+ */
  gtk_init(&argc, &argv);

  /* Setup the HildonProgram, HildonWindow and application name. */
  aState.program = HILDON_PROGRAM(hildon_program_get_instance());
  g_set_application_name("Hello Hildon!");
  aState.window = HILDON_WINDOW(hildon_window_new());
  hildon_program_add_window(aState.program,
                            HILDON_WINDOW(aState.window));

  /* Create the label widget, with Pango marked up content (NEW). */
  label = gtk_label_new("<b>Hello</b> <i>Hildon</i> (with Hildon"
                        "<sub>search</sub> <u>and</u> GnomeVFS "
                        "and other tricks<sup>tm</sup>)!");

  /* Allow lines to wrap (NEW). */
  gtk_label_set_line_wrap(GTK_LABEL(label), TRUE);

  /* Tell the GtkLabel widget to support the Pango markup (NEW). */
  gtk_label_set_use_markup(GTK_LABEL(label), TRUE);

  /* Store the widget pointer into the application state so that the
     contents can be replaced when a file will be loaded (NEW). */
  aState.textLabel = label;

  buildMenu(&aState);

  vbox = gtk_vbox_new(FALSE, 0);
  gtk_container_add(GTK_CONTAINER(aState.window), vbox);
  gtk_box_pack_end(GTK_BOX(vbox), label, TRUE, TRUE, 0);

  mainToolbar = buildToolbar(&aState);
  findToolbar = buildFindToolbar(&aState);

  aState.mainToolbar = mainToolbar;
  aState.findToolbar = findToolbar;

  /* Connect the termination signals. */
  g_signal_connect(G_OBJECT(aState.window), "delete-event",
                   G_CALLBACK(cbEventDelete), &aState);
  g_signal_connect(G_OBJECT(aState.window), "destroy",
                   G_CALLBACK(cbActionTopDestroy), &aState);

  /* Show all widgets that are contained by the Window. */
  gtk_widget_show_all(GTK_WIDGET(aState.window));

  /* Add the toolbars to the Hildon Window. */
  hildon_window_add_toolbar(HILDON_WINDOW(aState.window),
                            GTK_TOOLBAR(mainToolbar));
  hildon_window_add_toolbar(HILDON_WINDOW(aState.window),
                            GTK_TOOLBAR(findToolbar));

  /* Register a callback to handle key presses. */
  g_signal_connect(G_OBJECT(aState.window), "key_press_event",
                   G_CALLBACK(cbKeyPressed), &aState);

  g_print("main: calling gtk_main\n");
  gtk_main();
  g_print("main: returned from gtk_main and exiting with success\n");

  return EXIT_SUCCESS;
}
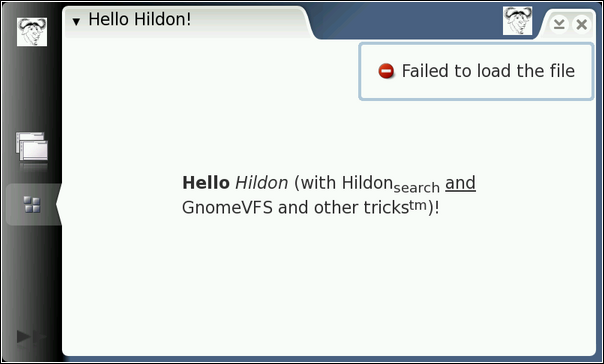
In order to experiment with loading other content, a simple file can be created, containing Pango markup like this: echo "<b>Hello world</b>" > MyDocs/hello.txt , and then loading hello.txt.
As can be imagined, these examples have only scratched the surface of GnomeVFS that is quite a rich library, and contains a broad API and a large amount of plug-ins. Many things have been completely avoided, such as directory content iteration, the asynchronous interface, callback signaling on directory content changes etc. Please see GnomeVFS API [57] for more information. The API also contains some mini tutorials on various GnomeVFS topics, so it is well worth the time spent reading. It will also show that GnomeVFS has been overloaded with functions, which are not even file operation related (such as ZeroConf and creating TCP/IP connections etc.).
GTK+ does not have to be used in order to use GnomeVFS. One such example program is Midnight Commander (a Norton Commander clone, but better), which is a menu-based "text" mode program. GnomeVFS uses GLib though, so if using GnomeVFS, one should think about using GLib as well, as it will be loaded anyway.
7.3 Message Bus System - D-Bus
For interprocess communications (IPC), maemo relies heavily on D-Bus. D-Bus makes it possible for programs to export their programming interfaces, so that other processes can call them in a consistent manner, without having to define a custom IPC protocol. Using these exported APIs is also language agnostic, so as long as programming language supports D-Bus, it can also access the interfaces.
A maemo-specific library called libosso provides helpful wrappers for D-BUS communication. It also contains the required functionality for every maemo application. Applications must be initialized using this library. With it, applications can connect to listen to system hardware state messages, such as "battery low". The library is used also for application state saving and auto-save functionality. Section LibOSSO Library 6.9.2 of the chapter Application Development of Maemo Reference Manual provides a good introduction to libosso.
7.3.1 D-Bus Basics
7.3.1.1 Introduction
D-Bus (the D originally stood for "Desktop") is a relatively new interprocess communication (IPC) mechanism designed to be used as a unified middleware layer in free desktop environments. Some example projects, where D-Bus is used, are GNOME and Hildon. Compared to other middleware layers for IPC, D-Bus lacks many of the more refined (and complicated) features, and thus is faster and simpler.
D-Bus does not directly compete with low-level IPC mechanisms, such as sockets, shared memory or message queues. Each of these mechanisms have their uses, which normally do not overlap the ones in D-Bus. Instead, D-Bus aims to provide higher level functionality, such as:
- Structured name spaces
- Architecture-independent data formatting
- Support for the most common data elements in messages
- A generic remote call interface with support for exceptions (errors)
- A generic signaling interface to support "broadcast" type communication
- Clear separation of per-user and system-wide scopes, which is important when dealing with multi-user systems
- No bindings to any specific programming languages (while providing a design that readily maps to most higher level languages, via language-specific bindings)
The design of D-Bus benefits from the long experience of using other middleware IPC solutions in the desktop arena, and this has allowed the design to be optimized. Also, it does not yet suffer from "creeping featurism", e.g. having extra features just to satisfy niche use cases.
All this said, the main problem area that D-Bus aims to solve is facilitating easy IPC between related (often graphical) desktop software applications.
D-Bus has a very important role in maemo, as it is the IPC mechanism to use when using the services provided in the platform (and devices). Providing services over D-Bus is also the easiest way to assure component re-use from other applications.
7.3.1.2 D-Bus Architecture and Terminology
In D-Bus, the bus is a central concept. It is the channel through which applications can make the method calls, send signals and listen to signals. There are two pre-defined buses: the session bus and the system bus.
- The session bus is meant for communication between applications that are connected to the same desktop session, and normally started and run by one user (using the same user identifier, or UID).
- The system bus is meant for communication when applications (or services), running with disparate sessions, wish to communicate with each other. The most common use for this bus is sending system-wide notifications, when system-wide events occur. Adding of a new storage device, network connectivity change events and shutdown-related events are all examples of when system bus would be the more suitable bus for communication.
Normally only one system bus will exist, but there might be several session buses (one per each desktop session). Since in Internet Tablets all user applications will run with the same user id (user), there will only be one session bus as well.
A bus exists in the system in the form of a bus daemon, a process that specializes in passing messages from one process to another. The daemon will also forward notifications to all applications on the bus. At the lowest level, D-Bus only supports point-to-point communication, normally using the local domain sockets (AF_UNIX) between the application and the bus daemon. The point-to-point aspect of D-Bus is however abstracted by the bus daemon, which will implement addressing and message passing functionality, so that applications do not need to care about which specific process will receive each method call or notification.
The above means that sending a message using D-Bus will always involve the following steps (under normal conditions):
- Creation and sending of the message to the bus daemon. This will cause at minimum two context switches.
- Processing of the message by the bus daemon and forwarding it to the target process. This will again cause at minimum two context switches.
- The target application will receive the message. Depending on the message type, it will either need to acknowledge it, respond with a reply or ignore it. The last case is only possible with notifications (i.e., signals in D-Bus terminology). An acknowledgment or reply will cause further context switches.
Coupled together, the above rules mean that if planning to transfer large amounts of data between processes, D-Bus will not be the most efficient way to do it. The most efficient way would be using some kind of shared memory arrangement. However, it is often quite complex to implement correctly.
7.3.1.3 Addressing and Names in D-Bus
In order for the messages to reach the intended recipient, the IPC mechanism needs to support some form of addressing. The addressing scheme in D-Bus has been designed to be flexible, but at the same time efficient. Each bus has its private name space, which is not directly related to any other bus.
In order to send a message, a destination address is needed. It is formed in a hierarchical manner from the following elements:
- The bus on which the message is to be sent. A bus is normally opened only once per application lifetime. The bus connection will then be used for sending and receiving messages for as long as necessary. This way, the target bus will form a transparent part of the message address (i.e., it is not specified separately for each message sent).
- The well-known name for the service provided by the recipient. A close analogy to this would be the DNS system in Internet, where people normally use names to connect to services, instead of specific IP addresses providing the services. The idea in D-Bus well-known names is very similar, since the same service might be implemented in different ways in different applications. It should be noted, however, that currently most of the existing D-Bus services are "unique" in that each of them provides their own well-known name, and replacing one implementation with another is not common.
- A well-known name consists of characters A-Z (lower or uppercase), dot characters, dashes and underscores. There must be at least two dot-separated elements in a well-known name. Unlike DNS, the dots do not carry any additional information about management (zones), meaning that the well-known names are NOT hierarchical.
- In order to reduce clashes in the D-Bus name space, it is recommended that the name is formed by reversing the order of labels of a DNS domain that you own. A similar approach is used in Java for package names.
- Examples: org.maemo.Alert and org.freedesktop.Notifications.
- Each service can contain multiple different objects, each of which provides a different (or same) service. In order to separate one object from another, object paths are used. A PIM information store, for example, might include separate objects to manage the contact information and synchronization.
- Object paths look like file paths (elements separated with the character '/').
- In D-Bus, it is also possible to make a "lazy binding", so that a specific function in the recipient will be called on all remote method calls, irrespective of object paths in the calls. This allows on-demand targeting of method calls, so that a user might remove a specific object in an address book service (using an object path similar to /org/maemo/AddressBook/Contacts/ShortName). Due to the limitations in characters that can be put into the object path, this is not recommended. A better way would be to supply the ShortName as a method call argument instead (as a UTF-8 formatted string).
- It is common to form the object path using the same elements as in the well-known name, but replacing the dots with slashes, and appending a specific object name to the end. For example: /org/maemo/Alert/Alerter. It is a convention, but also solves a specific problem, when a process might re-use an existing D-Bus connection without explicitly knowing about it (using a library that encapsulates D-Bus functionality). Using short names here would increase the risk of name-space collisions within that process.
- Similar to well-known names, object paths do not have inherent hierarchy, even if the path separator is used. The only place where some hierarchy might be seen because of path components is the introspection interface (which is out of the scope of this material).
- In order to support object-oriented mapping, where objects are the units providing the service, D-Bus also implements a naming unit called the interface. The interface specifies the legal (i.e. defined and implemented) method calls, their parameters (called arguments in D-Bus) and possible signals. It is then possible to re-use the same interface across multiple separate objects implementing the same service, or more commonly, a single object can implement multiple different services. An example of the latter is the implementation of the org.freedesktop.DBus.Introspectable interface, which defines the method necessary to support D-Bus introspection (more about this later on). When using the GLib/D-Bus wrappers to generate parts of the D-Bus code, the objects will automatically also support the introspection interface.
- Interface names use the same naming rules as well-known names. This might seem somewhat confusing at start, since well-known names serve a completely different purpose, but with time, one will get used to it.
- For simple services, it is common to repeat the well-known name in the interface name. This is the most common scenario with existing services.
- The last part of the message address is the member name. When dealing with remote procedure calls, this is also sometimes called method name, and when dealing with signals, signal name. The member name selects the procedure to call, or the signal to emit. It needs to be unique only within the interface that an object will implement.
- Member names can have letters, digits and underscores in them. For example: RetrieveQuote.
- For a more in-depth review on these, please see the Introductionto D-Bus page.
That about covers the most important rules in D-Bus addresses that one is likely to encounter. Below is an example of all four components that will also be used shortly to send a simple message (a method call) in the SDK:
#define SYSNOTE_NAME  "org.freedesktop.Notifications"
#define SYSNOTE_OPATH "/org/freedesktop/Notifications"
#define SYSNOTE_IFACE "org.freedesktop.Notifications"
#define SYSNOTE_NOTE  "SystemNoteDialog"
Even if switching to use the LibOSSO RPC functions (which encapsulate a lot of the D-Bus machinery), operations will still be performed with all of the D-Bus naming components.
7.3.1.4 Role of D-Bus in Maemo
D-Bus has been selected as de facto IPC mechanism in maemo, to carry messages between the various software components. The main reason for this is that a lot of software developed for the GNOME environment is already exposing its functionality through D-Bus. Using a generic interface, which is not bound to any specific service, makes it also easier to deal with different software license requirements.
The SDK unfortunately does not come with a lot of software that is exposed via D-Bus, but this document will be using one component of the application framework as demonstration (it works also in the SDK).
An item of particular interest is asking the notification framework component to display a Note dialog. The dialog is modal, which means that users cannot proceed in their graphical environment, unless they first acknowledge the dialog. Normally such GUI decisions should be avoided, but later in this document it will be discussed why and when this feature can be useful. N.B. The SystemNoteDialog member is an extension to the draft org.freedesktop.Notifications specification, and as such, is not documented in that draft.
The notification server is listening for method calls on the .freedesktop.Notifications well-known name. The object that implements the necessary interface is located at /org/freedesktop/Notifications object path. The method to display the note dialog is called SystemNoteDialog, and is defined in the org.freedesktop.Notifications D-Bus interface.
D-Bus comes with a handy tool to experiment with method calls and signals: dbus-send. The following snippet will attempt to use it to display the dialog:
[sbox-DIABLO_X86: ~] > run-standalone.sh dbus-send --print-reply  \
 --type=method_call --dest=org.freedesktop.Notifications  \
 /org/freedesktop/Notifications org.freedesktop.Notifications
Error org.freedesktop.DBus.Error.UnknownMethod: Method "Notifications" with
 signature "" on interface "org.freedesktop" doesn't exist
Parameters for dbus-send:
--session: (implicit since default) which bus to use for sending (the other option being system)--print-reply: ask the tool to wait for a reply to the method call, and print out the results (if any)--type=method_call: instead of sending a signal (which is the default), make a method call--dest=org.freedesktop.Notifications: the well-known name for the target service/org/freedesktop/Notifications: object path within the target process that implements the interfaceorg.freedesktop.Notifications: (incorrectly specified) interface name defining the method
When using dbus-send, extra care needs to be taken, when specifying the interface and member names. The tool expects both of them to be combined into one parameter (without spaces in between). Thus, the command line needs to be modified a bit before a new try:
[sbox-DIABLO_X86: ~] > run-standalone.sh dbus-send --print-reply  \
 --type=method_call --dest=org.freedesktop.Notifications  \
 /org/freedesktop/Notifications org.freedesktop.Notifications.SystemNoteDialog
Error org.freedesktop.DBus.Error.UnknownMethod: Method "SystemNoteDialog" with
 signature "" on interface "org.freedesktop.Notifications" doesn't exist
Seems that the RPC call is still missing something. Most RPC methods will expect a series of parameters (or arguments, as D-Bus calls them).
SystemNoteDialog expects these three parameters (in the following order):
- string: The message to display
- uint32: An unsigned integer giving the style of the dialog. Styles 0-4 mean different icons, and style 5 is a special animated "progress indicator" dialog.
- string: Message to use for the "Ok" button that the user needs to press to dismiss the dialog. Using an empty string will cause the default text to be used (which is "Ok").
Arguments are specified by giving the argument type and its contents separated with a colon as follows:
[sbox-DIABLO_X86: ~] > run-standalone.sh dbus-send --print-reply  \
 --type=method_call --dest=org.freedesktop.Notifications  \
 /org/freedesktop/Notifications org.freedesktop.Notifications.SystemNoteDialog  \
 string:'Hello, world!' uint32:0 string:'NAO OK!'
method return sender=:1.1 -> dest=:1.15
   uint32 4
Since dbus-send was asked to print replies, the reply will come out as a single unsigned integer, with value of 4. This is the unique number for this notification, and could be used with the CloseNotification method of the Notifications interface to pre-emptively close the dialog. It might be especially useful, if the software can notice that some warning condition has ended, and there is no need to bother the user with the warning anymore.
Assuming that the above command is run while the application framework is already running, the end result should more or less look like this:
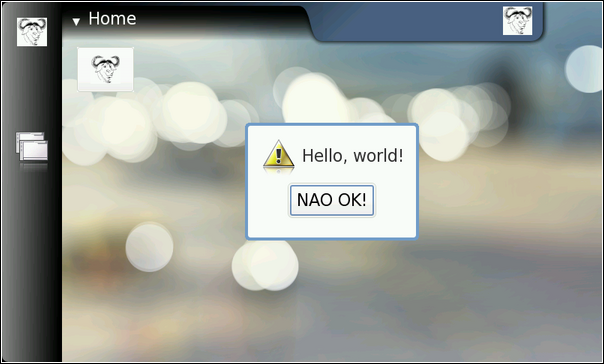
If the command is repeated multiple times, one will notice that the notification service is capable of displaying only one dialog at a time. This makes sense, as the dialog is modal anyway. It can also be noticed that the method calls are queued somewhere, and not lost (i.e. the notification service will display all of the requested dialogs). The service also acknowledges the RPC method call without delay (which is not always the obvious thing to do), giving a different return value each time (incrementing by one each time).
7.3.1.5 Programming Directly with Libdbus
The lowest level library to use for D-Bus programming is libdbus. Using this library directly is discouraged, mostly because it contains a lot of specific code to integrate into various main-loop designs that the higher level language bindings use.
The libdbus API reference documentation [57] contains a helpful note:
/**
 * Uses the low-level libdbus which shouldn't be used directly.
 * As the D-Bus API reference puts it "If you use this low-level API
 * directly, you're signing up for some pain".
 */
At this point, this example will ignore the warnings, and use the library to implement a simple program that will replicate the dbus-send example that was seen before. In order to do this with the minimum amount of code, the code will not process (or expect) any responses to the method call. It will, however, demonstrate the bare minimum function calls that are needed to use to send messages on the bus.
The first step is to introduce the necessary header files. libdbus-example/dbus-example.c
#include <dbus/dbus.h> /* Pull in all of D-Bus headers. */
#include <stdio.h>     /* printf, fprintf, stderr */
#include <stdlib.h>    /* EXIT_FAILURE, EXIT_SUCCESS */
#include <assert.h>    /* assert */
/* Symbolic defines for the D-Bus well-known name, interface, object
   path and method name that we're going to use. */
#define SYSNOTE_NAME  "org.freedesktop.Notifications"
#define SYSNOTE_OPATH "/org/freedesktop/Notifications"
#define SYSNOTE_IFACE "org.freedesktop.Notifications"
#define SYSNOTE_NOTE  "SystemNoteDialog"
Unlike the rest of the code in this material, dbus-example does not use GLib or other support libraries (other than libdbus). This explains why it uses printf and other functions that would normally be replaced with GLib equivalents.
Connecting to the session bus will (hopefully) yield a DBusConnection structure: libdbus-example/dbus-example.c
/**
 * The main program that demonstrates a simple "fire & forget" RPC
 * method invocation.
 */
int main(int argc, char** argv) {

  /* Structure representing the connection to a bus. */
  DBusConnection* bus = NULL;
  /* The method call message. */
  DBusMessage* msg = NULL;

  /* D-Bus will report problems and exceptions using the DBusError
     structure. We'll allocate one in stack (so that we don't need to
     free it explicitly. */
  DBusError error;

  /* Message to display. */
  const char* dispMsg = "Hello World!";
  /* Text to use for the acknowledgement button. "" means default. */
  const char* buttonText = "";
  /* Type of icon to use in the dialog (1 = OSSO_GN_ERROR). We could
     have just used the symbolic version here as well, but that would
     have required pulling the LibOSSO-header files. And this example
     must work without LibOSSO, so this is why a number is used. */
  int iconType = 1;

  /* Clean the error state. */
  dbus_error_init(&error);

  printf("Connecting to Session D-Bus\n");
  bus = dbus_bus_get(DBUS_BUS_SESSION, &error);
  terminateOnError("Failed to open Session bus\n", &error);
  assert(bus != NULL);
N.B. Libdbus will attempt to share existing connection structures when the same process is connecting to the same bus. This is done to avoid the somewhat costly connection set-up time. Sharing connections is beneficial, when the program is using libraries that would also open their own connections to the same buses.
In order to communicate errors, libdbus uses DBusError structures, whose contents are pretty simple. The dbus_error_init will be used to guarantee that the error structure contains a non-error state before connecting to the bus. If there is an error, it will be handled in terminateOnError: libdbus-example/dbus-example.c
/**
 * Utility to terminate if given DBusError is set.
 * Will print out the message and error before terminating.
 *
 * If error is not set, will do nothing.
 *
 * NOTE: In real applications you should spend a moment or two
 *       thinking about the exit-paths from your application and
 *       whether you need to close/unreference all resources that you
 *       have allocated. In this program, we rely on the kernel to do
 *       all necessary cleanup (closing sockets, releasing memory),
 *       but in real life you need to be more careful.
 *
 *       One possible solution model to this is implemented in
 *       "flashlight", a simple program that is presented later.
 */
static void terminateOnError(const char* msg,
                             const DBusError* error) {

  assert(msg != NULL);
  assert(error != NULL);

  if (dbus_error_is_set(error)) {
    fprintf(stderr, msg);
    fprintf(stderr, "DBusError.name: %s\n", error->name);
    fprintf(stderr, "DBusError.message: %s\n", error->message);
    /* If the program wouldn't exit because of the error, freeing the
       DBusError needs to be done (with dbus_error_free(error)).
       NOTE:
         dbus_error_free(error) would only free the error if it was
         set, so it is safe to use even when you're unsure. */
    exit(EXIT_FAILURE);
  }
}
libdbus also contains some utility functions, so that everything does not have to be coded manually. One such utility is dbus_bus_name_has_owner that checks, whether there is at least some process that owns the given well-known name at that moment: libdbus-example/dbus-example.c
  /* Normally one would just do the RPC call immediately without
     checking for name existence first. However, sometimes it is useful
     to check whether a specific name even exists on a platform on
     which you are planning to use D-Bus.

     In our case it acts as a reminder to run this program using the
     run-standalone.sh script when running in the SDK.

     The existence check is not necessary if the recipient is
     startable/activateable by D-Bus. In that case, if the recipient
     is not already running, the D-Bus daemon will start the
     recipient (a process that has been registered for that
     well-known name) and then passes the message to it. This
     automatic starting mechanism will avoid the race condition
     discussed below and also makes sure that only one instance of
     the service is running at any given time. */
  printf("Checking whether the target name exists ("
         SYSNOTE_NAME ")\n");
  if (!dbus_bus_name_has_owner(bus, SYSNOTE_NAME, &error)) {
    fprintf(stderr, "Name has no owner on the bus!\n");
    return EXIT_FAILURE;
  }
  terminateOnError("Failed to check for name ownership\n", &error);
  /* Someone on the Session bus owns the name. So we can proceed in
     relative safety. There is a chance of a race. If the name owner
     decides to drop out from the bus just after we check that it is
     owned, our RPC call (below) will fail anyway. */
Creating a method call using libdbus is slightly more tedious than using the higher-level interfaces, but not very difficult. The process is separated into two steps: creating a message structure, and appending the arguments to the message: libdbus-example/dbus-example.c
  /* Construct a DBusMessage that represents a method call.
     Parameters will be added later. The internal type of the message
     will be DBUS_MESSAGE_TYPE_METHOD_CALL. */
  printf("Creating a message object\n");
  msg = dbus_message_new_method_call(SYSNOTE_NAME, /* destination */
                                     SYSNOTE_OPATH,  /* obj. path */
                                     SYSNOTE_IFACE,  /* interface */
                                     SYSNOTE_NOTE); /* method str */
  if (msg == NULL) {
    fprintf(stderr, "Ran out of memory when creating a message\n");
    exit(EXIT_FAILURE);
  }

  /*... Listing cut for brevity ...*/

  /* Add the arguments to the message. For the Note dialog, we need
     three arguments:
       arg0: (STRING) "message to display, in UTF-8"
       arg1: (UINT32) type of dialog to display. We will use 1.
                      (libosso.h/OSSO_GN_ERROR).
       arg2: (STRING) "text to use for the ack button". "" means
                      default text (OK in our case).

     When listing the arguments, the type needs to be specified first
     (by using the libdbus constants) and then a pointer to the
     argument content needs to be given.

     NOTE: It is always a pointer to the argument value, not the value
           itself!

     We terminate the list with DBUS_TYPE_INVALID. */
  printf("Appending arguments to the message\n");
  if (!dbus_message_append_args(msg,
                                DBUS_TYPE_STRING, &dispMsg,
                                DBUS_TYPE_UINT32, &iconType,
                                DBUS_TYPE_STRING, &buttonText,
                                DBUS_TYPE_INVALID)) {
    fprintf(stderr, "Ran out of memory while constructing args\n");
    exit(EXIT_FAILURE);
  }
When arguments are appended to the message, their content is copied, and possibly converted into a format that will be sent over the connection to the daemon. This process is called marshaling, and is a common feature to most RPC systems. The method call will require two parameters (as before), the first being the text to display, and the second one being the style of the icon to use. Parameters passed to libdbus are always passed by address. This is different from the higher level libraries, and this will be discussed later.
The arguments are encoded, so that their type code is followed by the pointer where the marshaling functions can find the content. The argument list is terminated with DBUS_TYPE_INVALID, so that the function knows where the argument list ends (since the function prototype ends with an ellipsis, ...). libdbus-example/dbus-example.c
  /* Set the "no-reply-wanted" flag into the message. This also means
     that we cannot reliably know whether the message was delivered or
     not, but since we don't have reply message handling here, it
     doesn't matter. The "no-reply" is a potential flag for the remote
     end so that they know that they don't need to respond to us.
     If the no-reply flag is set, the D-Bus daemon makes sure that the
     possible reply is discarded and not sent to us. */
  dbus_message_set_no_reply(msg, TRUE);
Setting the no-reply-flag effectively tells the bus daemon that even if there is a reply coming back for this RPC method, it is not wanted. In this case, the daemon will not send one.
Once the message is fully constructed, it can be added to the sending queue of the program. Messages are not sent immediately by libdbus. Normally this allows the message queue to accumulate to more than one message, and all of the messages will be sent at once to the daemon. This in turn cuts down the number of context switches necessary. In this case, this will be the only message that the program ever sends, so the send queue is instructed to be flushed immediately, and this will instruct the library to send all messages to the daemon without a delay: libdbus-example/dbus-example.c
  printf("Adding message to client's send-queue\n");
  /* We could also get a serial number (dbus_uint32_t) for the message
     so that we could correlate responses to sent messages later. In
     our case there won't be a response anyway, so we don't care about
     the serial, so we pass a NULL as the last parameter. */
  if (!dbus_connection_send(bus, msg, NULL)) {
    fprintf(stderr, "Ran out of memory while queueing message\n");
    exit(EXIT_FAILURE);
  }

  printf("Waiting for send-queue to be sent out\n");
  dbus_connection_flush(bus);

  printf("Queue is now empty\n");
After the message is sent, the reserved resources should be freed. Here, the first one to be freed is the message, and then the connection structure. libdbus-example/dbus-example.c
  printf("Cleaning up\n");

  /* Free up the allocated message. Most D-Bus objects have internal
     reference count and sharing possibility, so _unref() functions
     are quite common. */
  dbus_message_unref(msg);
  msg = NULL;

  /* Free-up the connection. libdbus attempts to share existing
     connections for the same client, so instead of closing down a
     connection object, it is unreferenced. The D-Bus library will
     keep an internal reference to each shared connection, to
     prevent accidental closing of shared connections before the
     library is finalized. */
  dbus_connection_unref(bus);
  bus = NULL;

  printf("Quitting (success)\n");

  return EXIT_SUCCESS;
}
After building the program, attempt to run it:
[sbox-DIABLO_X86: ~/libdbus-example] > ./dbus-example
Connecting to Session D-Bus
process 6120: D-Bus library appears to be incorrectly set up;
 failed to read machine uuid:
  Failed to open "/var/lib/dbus/machine-id": No such file or directory
See the manual page for dbus-uuidgen to correct this issue.
  D-Bus not built with -rdynamic so unable to print a backtrace
Aborted (core dumped)
The D-Bus library needs environmental variables set correctly in order to locate the session daemon. The command was not prepended with run-standalone.sh, and this caused the library to internally abort the execution. Normally, dbus_bus_get would have returned a NULL pointer and set the error structure, but the version on the 4.1 SDK will assert internally in this condition, and programs cannot avoid the abort. After correcting this, try again:
[sbox-DIABLO_X86: ~/libdbus-example] > run-standalone.sh ./dbus-example
Connecting to Session D-Bus
Checking whether the target name exists (org.freedesktop.Notifications)
Creating a message object
Appending arguments to the message
Adding message to client's send-queue
Waiting for send-queue to be sent out
Queue is now empty
Cleaning up
Quitting (success)
/dev/dsp: No such file or directory
The error message (about /dev/dsp) printed to the same terminal where AF was started is normal (in SDK). Displaying the Note dialog normally also causes an "Alert" sound to be played. The sound system has not been setup in the SDK, so the notification component complains about failing to open the sound device.

In order to get libdbus integrated into makefiles, pkg-config has to be used. One possible solution is presented below (see section GNU Make and Makefiles 4.2 in chapter GNU Build System, if necessary): libdbus-example/Makefile
# Define a list of pkg-config packages we want to use
pkg_packages := dbus-glib-1
PKG_CFLAGS  := $(shell pkg-config -cflags $(pkg_packages))
PKG_LDFLAGS := $(shell pkg-config -libs $(pkg_packages))
# Additional flags for the compiler:
#    -g : Add debugging symbols
# -Wall : Enable most gcc warnings
ADD_CFLAGS := -g -Wall
# Combine user supplied, additional, and pkg-config flags
CFLAGS  := $(PKG_CFLAGS) $(ADD_CFLAGS) $(CFLAGS)
LDFLAGS := $(PKG_LDFLAGS) $(LDFLAGS)
The above shows one possibility to integrate user-supplied variables into makefiles, so that they will still be passed along the toolchain. This allows the user to execute make with custom flags, overriding those that are introduced via other means. For example: "CFLAGS='-g0' make" would result in -g0 being interpreted after the -g that is in the Makefile, and this would lead to debugging symbols being disabled. Environmental variables can be taken into account in exactly the same way.
For more complicated programs, it is likely that multiple different CFLAGS settings are required for different object files or multiple different programs that are being built. In that case, the combining in each target rule would be performed separately. In this material, all the example programs are self-contained and rather simple, so the above mechanism will be used in all the example makefiles.
7.3.2 LibOSSO
7.3.2.1 Introduction to LibOSSO
LibOSSO is a library that all applications designed for maemo are expected to use. Mainly because it automatically allows the application to survive the task killing process. This task killing is performed by the Desktop environment, when an application launched from the Task navigator does not register the proper D-Bus name on the bus within a certain time limit after the launch. LibOSSO also conveniently isolates the application from possible implementation changes on D-Bus level. D-Bus used to be not API stable before as well, so LibOSSO provided "version isolation" with respect D-Bus. Since D-Bus has reached maturity (1.0), no API changes are expected for the low level library, but the GLib/D-Bus wrapper might still change at some point.
Besides the protection and isolation services, LibOSSO also provides useful utility functions to handle auto saving and state saving features of the platform, process hardware state and device mode changes, and other important events happening in Internet Tablets. It also provides convenient utility wrapper functions to send RPC method calls over the D-Bus. The feature set is aimed at covering the most common GUI application needs, and as such, will not be enough in all cases. In these cases, it will be necessary to use the GLib/D-Bus wrapper functions (or libdbus directly, which is not recommended).
7.3.2.2 Using LibOSSO for D-Bus Method Calls
The first step is to re-implement the functionality from the libdbus example that was used before, but use LibOSSO functions instead of direct libdbus ones. The new version will use exactly the same D-Bus name-space components to pop up a Note dialog. LibOSSO also contains a function to do all this automatically (osso_system_note_dialog), which will be used directly later on. It is, however, instructive to see what LibOSSO provides in terms of RPC support, and using a familiar RPC method is the easiest way to achieve this.The starting point here will be the header section of the example program: libosso-example-sync/libosso-rpc-sync.c
#include <libosso.h>
  /*... Listing cut for brevity ...*/
#define SYSNOTE_NAME  "org.freedesktop.Notifications"
#define SYSNOTE_OPATH "/org/freedesktop/Notifications"
#define SYSNOTE_IFACE "org.freedesktop.Notifications"
#define SYSNOTE_NOTE  "SystemNoteDialog"
LibOSSO by itself only requires the libosso.h header file to be included. The example will also use the exact same D-Bus well-known name, object path, interface name and method name as before.
When reading other source code that implements or uses D-Bus services, one might sometimes wonder, why the D-Bus interface name is using the same symbolic constant as the well-known name (in the above example SYSNOTE_IFACE would be omitted, and SYSNOTE_NAME would be used whenever an interface name would be required). If the service in question is not easily reusable or re-implementable, it might make sense to use an interface name that is as unique as the well-known name. This goes against the idea of defining interfaces, but is still quite common, and is the easy way out without bothering with difficult design decisions.
The following will take a look at how LibOSSO contexts are created, and how they are eventually released: libosso-example-sync/libosso-rpc-sync.c
int main(int argc, char** argv) {

  /* The LibOSSO context that we need to do RPC. */
  osso_context_t* ossoContext = NULL;

  g_print("Initializing LibOSSO\n");
  /* The program name for registration is communicated from the
     Makefile via a -D preprocessor directive. OSSO_SERVICE has
     'com.nokia.' prefix added to the program name. */
  ossoContext = osso_initialize(OSSO_SERVICE, "1.0", FALSE, NULL);
  if (ossoContext == NULL) {
    g_error("Failed to initialize LibOSSO\n");
  }

  g_print("Invoking the method call\n");
  runRPC(ossoContext);

  g_print("Shutting down LibOSSO\n");
  /* Deinitialize LibOSSO. The function does not return status code so
     we cannot know whether it succeeded or failed. We assume that it
     always succeeds. */
  osso_deinitialize(ossoContext);
  ossoContext = NULL;

  g_print("Quitting\n");
  return EXIT_SUCCESS;
}
A LibOSSO context is a small structure, containing the necessary information for the LibOSSO functions to communicate over D-Bus (both session and system buses). When a context is created, the "application name" needs to be passed to osso_initialize. This name is used to register a name on the D-Bus, and this will keep the task killer from killing the process later on (assuming the application was started via the Task navigator). If the application name does not contain any dot characters in it, com.nokia. will be prepended to it automatically in LibOSSO. The application name is normally not visible to users, so this should not be a big problem. Application name collisions might be encountered, if some other application uses the same name (even without the dots), so it might be a good idea to provide a proper name based on a DNS domain you own or control. If planning to implement a service to clients over the D-Bus (with osso_rpc_set_cb-functions), it is necessary to be extra careful about the application name used here.
The version number is currently still unused, but 1.0 is recommended for the time being. The second to last parameter is obsolete, and has no effect, while the last parameter tells LibOSSO, which mainloop structure to integrate into. Using NULL here means that LibOSSO event processing will integrate into the default GMainLoop object created, as is most often desired.
Releasing the LibOSSO context will automatically close the connections to the D-Bus buses, and release all the allocated memory related to the connections and LibOSSO state. When using LibOSSO functions after this, a context will have to be reinitialized.
The following snippet shows the RPC call using LibOSSO, and also contains code suitable for dealing with possible errors in the launch, as well as the result of the RPC. The ossoErrorStr function is covered shortly, as is the utility function to print out the result structure. libosso-example-sync/libosso-rpc-sync.c
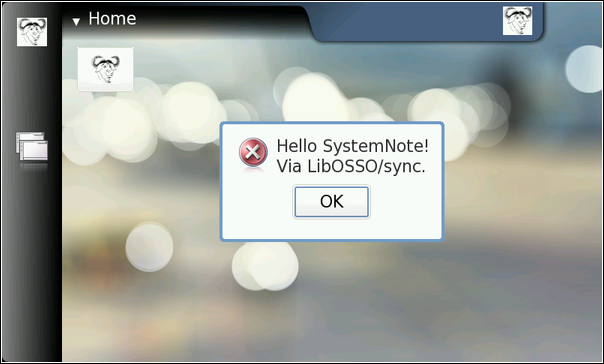
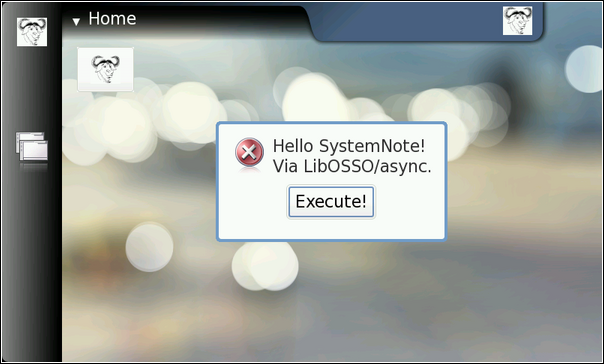
/**
 * Do the RPC call.
 *
 * Note that this function will block until the method call either
 * succeeds, or fails. If the method call would take a long time to
 * run, this would block the GUI of the program (which we do not have).
 *
 * Needs the LibOSSO state to do the launch.
 */
static void runRPC(osso_context_t* ctx) {

  /* Message to display. */
  const char* dispMsg = "Hello SystemNote!\nVia LibOSSO/sync.";
  /* Icon type to use. */
  gint iconType = OSSO_GN_ERROR;
  /* Button label text to use, "" means leaving the defaults. */
  const char* labelText = "";

  /* Will hold the result from the RPC invocation function. */
  osso_return_t result;
  /* Will hold the result of the method call (or error). */
  osso_rpc_t methodResult = {};

  g_print("runRPC called\n");

  g_assert(ctx != NULL);

  /* Compared to the libdbus functions, LibOSSO provides conveniently
     a function that will do the dispatch and also allows us to pass
     the arguments all with one call.

     The arguments for the "SystemNoteDialog" are the same as in
     dbus-example.c (since it is the same service). You might also
     notice that even if LibOSSO provides some convenience, it does
     not completely isolate us from libdbus. We still supply the
     argument types using D-Bus constants.

     NOTE Do not pass the argument values by pointers as with libdbus,
          instead pass them by value (as below). */
  result = osso_rpc_run(ctx,
                        SYSNOTE_NAME,      /* well-known name */
                        SYSNOTE_OPATH,         /* object path */
                        SYSNOTE_IFACE,           /* interface */
                        SYSNOTE_NOTE,          /* method name */
                        &methodResult, /* method return value */
                        /* The arguments for the RPC. The types
                           are unchanged, but instead of passing
                           them via pointers, they are passed by
                           "value" instead. */
                        DBUS_TYPE_STRING, dispMsg,
                        DBUS_TYPE_UINT32, iconType,
                        DBUS_TYPE_STRING, labelText,
                        DBUS_TYPE_INVALID);
  /* Check whether launching the RPC succeeded. */
  if (result != OSSO_OK) {
    g_error("Error launching the RPC (%s)\n",
            ossoErrorStr(result));
    /* We also terminate right away since there is nothing to do. */
  }
  g_print("RPC launched successfully\n");

  /* Now decode the return data from the method call.
     NOTE: If there is an error during RPC delivery, the return value
           will be a string. It is not possible to differentiate that
           condition from an RPC call that returns a string.

     If a method returns "void", the type-field in the methodResult
     will be set to DBUS_TYPE_INVALID. This is not an error. */
  g_print("Method returns: ");
  printOssoValue(&methodResult);
  g_print("\n");

  g_print("runRPC ending\n");
}
It is important to note that osso_rpc_run is a synchronous (blocking) call, which will wait for either the response from the method call, a timeout or an error. In this case, the method will be handled quickly, so it is not a big problem, but in many cases the methods will take some time to execute (and might require loading external resources), so this should be kept in mind. Asynchronous LibOSSO RPC functions will be covered shortly.
If the method call will return more than one return value (this is possible in D-Bus), LibOSSO currently does not provide a mechanism to return all of them (it will return the first value only).
Decoding the result code from the LibOSSO RPC functions is pretty straightforward, and is done in a separate utility: libosso-example-sync/libosso-rpc-sync.c
/**
 * Utility to return a pointer to a statically allocated string giving
 * the textural representation of LibOSSO errors. Has no internal
 * state (safe to use from threads).
 *
 * LibOSSO does not come with a function for this, so we define one
 * ourselves.
 */
static const gchar* ossoErrorStr(osso_return_t errCode) {
  switch (errCode) {
    case OSSO_OK:
      return "No error (OSSO_OK)";
    case OSSO_ERROR:
      return "Some kind of error occurred (OSSO_ERROR)";
    case OSSO_INVALID:
      return "At least one parameter is invalid (OSSO_INVALID)";
    case OSSO_RPC_ERROR:
      return "Osso RPC method returned an error (OSSO_RPC_ERROR)";
    case OSSO_ERROR_NAME:
      return "(undocumented error) (OSSO_ERROR_NAME)";
    case OSSO_ERROR_NO_STATE:
      return "No state file found to read (OSSO_ERROR_NO_STATE)";
    case OSSO_ERROR_STATE_SIZE:
      return "Size of state file unexpected (OSSO_ERROR_STATE_SIZE)";
    default:
      return "Unknown/Undefined";
  }
}
Decoding the RPC return value is, however, slightly more complex, as the return value is a structure containing a typed union (type is encoded in the type field of the structure): libosso-example-sync/libosso-rpc-sync.c
/**
 * Utility to print out the type and content of given osso_rpc_t.
 * It also demonstrates the types available when using LibOSSO for
 * the RPC. Most simple types are available, but arrays are not
 * (unfortunately).
 */
static void printOssoValue(const osso_rpc_t* val) {
  g_assert(val != NULL);
  switch (val->type) {
    case DBUS_TYPE_BOOLEAN:
      g_print("boolean:%s", (val->value.b == TRUE)?"TRUE":"FALSE");
      break;
    case DBUS_TYPE_DOUBLE:
      g_print("double:%.3f", val->value.d);
      break;
    case DBUS_TYPE_INT32:
      g_print("int32:%d", val->value.i);
      break;
    case DBUS_TYPE_UINT32:
      g_print("uint32:%u", val->value.u);
      break;
    case DBUS_TYPE_STRING:
      g_print("string:'%s'", val->value.s);
      break;
    case DBUS_TYPE_INVALID:
      g_print("invalid/void");
      break;
    default:
      g_print("unknown(type=%d)", val->type);
      break;
  }
}
N.B. LibOSSO RPC functions do not support array parameters either, so there is a restriction: the used method calls can only have simple parameters.
Now the example will be built and run. The end result is the now-familiar Note dialog.
[sbox-DIABLO_X86: ~/libosso-example-sync] > run-standalone.sh ./libosso-rpc-sync
Initializing LibOSSO
Invoking the method call
runRPC called
/dev/dsp: No such file or directory
RPC launched successfully
Method returns: uint32:8
runRPC ending
Shutting down LibOSSO
Quitting
The only difference is the location of the audio device error message. It will now appear before runRPC returns, since runRPC waits for RPC completion. This kind of ordering should never be relied on, because the RPC execution could also be delayed (and the message might appear at a later location when trying this program).
One point of interest in the Makefile (see section GNU Make and Makefiles 4.2 in chapter GNU Build System) is the mechanism by which the ProgName define is set. It is often useful to separate the program name related information outside the source code, so that the code fragment may then be re-used more easily. In this case, there is control over the application name that is used when LibOSSO is initialized from the Makefile. libosso-example-sync/Makefile
# define a list of pkg-config packages we want to use
pkg_packages := glib-2.0 libosso

# ... Listing cut for brevity ...

libosso-rpc-sync: libosso-rpc-sync.c
        $(CC) $(CFLAGS) -DProgName=\"LibOSSOExample\" \
          $< -o $@ $(LDFLAGS)
7.3.2.3 Asynchronous Method Calls with LibOSSO
Sometimes the method call will take long time to run (or one cannot be sure, whether it might take long time to run). In these cases, it is advisable to use the asynchronous RPC utility functions in LibOSSO, instead of the synchronous ones. The biggest difference is that the method call will be split into two parts: launching of the RPC, and handling its result in a callback function. The same limitations with respect to method parameter types and the number of return values still apply.
In order for the callback to use LibOSSO functions and control the mainloop object, it is necessary to create a small application state. The state will be passed to the callback, when necessary. libosso-example-async/libosso-rpc-async.c
/**
 * Small application state so that we can pass both LibOSSO context
 * and the mainloop around to the callbacks.
 */
typedef struct {
  /* A mainloop object that will "drive" our example. */
  GMainLoop* mainloop;
  /* The LibOSSO context which we use to do RPC. */
  osso_context_t* ossoContext;
} ApplicationState;
The osso_rpc_async_run function is used to launch the method call, and it will normally return immediately. If it returns an error, it will be probably a client-side error (since the RPC method has not returned by then). The callback function to handle the RPC response will be registered with the function, as will the name-space related parameters and the method call arguments: libosso-example-async/libosso-rpc-async.c
/**
 * We launch the RPC call from within a timer callback in order to
 * make sure that a mainloop object will be running when the RPC will
 * return (to avoid a nasty race condition).
 *
 * So, in essence this is a one-shot timer callback.
 *
 * In order to launch the RPC, it will need to get a valid LibOSSO
 * context (which is carried via the userData/application state
 * parameter).
 */
static gboolean launchRPC(gpointer userData) {

  ApplicationState* state = (ApplicationState*)userData;
  /* Message to display. */
  const char* dispMsg = "Hello SystemNote!\nVia LibOSSO/async.";
  /* Icon type to use. */
  gint iconType = OSSO_GN_ERROR;
  /* Button label text to use. */
  const char* labelText = "Execute!";

  /* Will hold the result from the RPC launch call. */
  osso_return_t result;

  g_print("launchRPC called\n");

  g_assert(state != NULL);

  /*... Listing cut for brevity ...*/

  /* The only difference compared to the synchronous version is the
     addition of the callback function parameter, and the user-data
     parameter for data that will be passed to the callback. */
  result = osso_rpc_async_run(state->ossoContext,
                              SYSNOTE_NAME,     /* well-known name */
                              SYSNOTE_OPATH,        /* object path */
                              SYSNOTE_IFACE,          /* interface */
                              SYSNOTE_NOTE,         /* method name */
                              rpcCompletedCallback,    /* async cb */
                              state,           /* user-data for cb */
                              /* The arguments for the RPC. */
                              DBUS_TYPE_STRING, dispMsg,
                              DBUS_TYPE_UINT32, iconType,
                              DBUS_TYPE_STRING, labelText,
                              DBUS_TYPE_INVALID);
  /* Check whether launching the RPC succeeded (we don't know the
     result from the RPC itself). */
  if (result != OSSO_OK) {
    g_error("Error launching the RPC (%s)\n",
            ossoErrorStr(result));
    /* We also terminate right away since there's nothing to do. */
  }
  g_print("RPC launched successfully\n");

  g_print("launchRPC ending\n");

  /* We only want to be called once, so ask the caller to remove this
     callback from the timer launch list by returning FALSE. */
  return FALSE;
}
The return from the RPC method is handled by a simple callback function that will need to always use the same parameter prototype. It will receive the return value, as well as the interface and method names. The latter two are useful, as the same callback function can be used to handle returns from multiple different (and simultaneous) RPC method calls.
The return value structure is allocated by LibOSSO, and will be freed once the callback returns, so it does not need to be handled manually. libosso-example-async/libosso-rpc-async.c
/**
 * Will be called from LibOSSO when the RPC return data is available.
 * Will print out the result, and return. Note that it must not free
 * the value, since it does not own it.
 *
 * The prototype (for reference) must be osso_rpc_async_f().
 *
 * The parameters for the callback are the D-Bus interface and method
 * names (note that object path and well-known name are NOT
 * communicated). The idea is that you can then reuse the same
 * callback to process completions from multiple simple RPC calls.
 */
static void rpcCompletedCallback(const gchar* interface,
                                 const gchar* method,
                                 osso_rpc_t* retVal,
                                 gpointer userData) {

  ApplicationState* state = (ApplicationState*)userData;

  g_print("rpcCompletedCallback called\n");

  g_assert(interface != NULL);
  g_assert(method != NULL);
  g_assert(retVal != NULL);
  g_assert(state != NULL);

  g_print(" interface: %s\n", interface);
  g_print(" method: %s\n", method);
  /* NOTE If there is an error in the RPC delivery, the return value
          will be a string. This is unfortunate if your RPC call is
          supposed to return a string as well, since it is not
          possible to differentiate between the two cases.

          If a method returns "void", the type-field in the retVal
          will be set to DBUS_TYPE_INVALID (it's not an error). */
  g_print(" result: ");
  printOssoValue(retVal);
  g_print("\n");

  /* Tell the main loop to terminate. */
  g_main_loop_quit(state->mainloop);

  g_print("rpcCompletedCallback done\n");
}
In this case, receiving the response to the method call will cause the main program to be terminated.
The application set-up logic is covered next: libosso-example-async/libosso-rpc-async.c
int main(int argc, char** argv) {

  /* Keep the application state in main's stack. */
  ApplicationState state = {};
  /* Keeps the results from LibOSSO functions for decoding. */
  osso_return_t result;
  /* Default timeout for RPC calls in LibOSSO. */
  gint rpcTimeout;

  g_print("Initializing LibOSSO\n");
  state.ossoContext = osso_initialize(ProgName, "1.0", FALSE, NULL);
  if (state.ossoContext == NULL) {
    g_error("Failed to initialize LibOSSO\n");
  }

  /* Print out the default timeout value (which we don't change, but
     could, with osso_rpc_set_timeout()). */
  result = osso_rpc_get_timeout(state.ossoContext, &rpcTimeout);
  if (result != OSSO_OK) {
    g_error("Error getting default RPC timeout (%s)\n",
            ossoErrorStr(result));
  }
  /* Interestingly the timeout seems to be -1, but is something else
     (by default). -1 probably then means that "no timeout has been
     set". */
  g_print("Default RPC timeout is %d (units)\n", rpcTimeout);

  g_print("Creating a mainloop object\n");
  /* Create a GMainLoop with default context and initial condition of
     not running (FALSE). */
  state.mainloop = g_main_loop_new(NULL, FALSE);
  if (state.mainloop == NULL) {
    g_error("Failed to create a GMainLoop\n");
  }

  g_print("Adding timeout to launch the RPC in one second\n");
  /* This could be replaced by g_idle_add(cb, &state), in order to
     guarantee that the RPC would be launched only after the mainloop
     has started. We opt for a timeout here (for no particular
     reason). */
  g_timeout_add(1000, (GSourceFunc)launchRPC, &state);

  g_print("Starting mainloop processing\n");
  g_main_loop_run(state.mainloop);

  g_print("Out of mainloop, shutting down LibOSSO\n");
  /* Deinitialize LibOSSO. */
  osso_deinitialize(state.ossoContext);
  state.ossoContext = NULL;

  /* Free GMainLoop as well. */
  g_main_loop_unref(state.mainloop);
  state.mainloop = NULL;

  g_print("Quitting\n");
  return EXIT_SUCCESS;
}
The code includes an example on how to query the method call timeout value as well; however, timeout values are left unchanged in the program.
The RPC method call is launched in a slightly unorthodox way, via a timeout call that will launch one second after the mainloop processing starts. One could just as easily use g_idle_add, as long as the launching itself is performed after the mainloop processing starts. Since the method return value callback will terminate the mainloop, the mainloop needs to be active at that point. The only way to guarantee this is to launch the RPC after the mainloop is active.
Testing the program yields few surprises (other than the default timeout value being -1):
[sbox-DIABLO_X86: ~/libosso-example-async] > run-standalone.sh ./libosso-rpc-async
Initializing LibOSSO
Default RPC timeout is -1 (units)
Creating a mainloop object
Adding timeout to launch the RPC in one second
Starting mainloop processing
launchRPC called
RPC launched successfully
launchRPC ending
rpcCompletedCallback called
 interface: org.freedesktop.Notifications
 method: SystemNoteDialog
 result: uint32:10
rpcCompletedCallback done
Out of mainloop, shutting down LibOSSO
Quitting
/dev/dsp: No such file or directory
There is another shift to be noticed in the audio device error string. It is now displayed after all other messages (similar to the libdbus example). It seems that the audio playback is started "long after" the dialog itself is displayed, or maybe the method returns before SystemNote starts the dialog display. Again, one should not rely on exact timing, when dealing with D-Bus remote method calls.
The label text was modified slightly, to test that non-default labels will work.
The Makefile for this example does not contain anything new or special.
7.3.2.4 Device State and Mode Notifications
Since Internet Tablets are mobile devices, it is to be expected that people use them (and the software) while on the move, and also on airplanes and other places that might restrict network connectivity. If the program uses network connectivity, or needs to adapt to the conditions in the device better, it is necessary to handle changes between the different devices states. The changes between the states are normally initiated by the user of the device (when boarding an aircraft for example).
In order to demonstrate the handling of the most important device state, the next example implements a small utility program that will combine various utility functions from LibOSSO, as well as handle the changes in the device state. The state that is of particular interest is the "offline" mode. This mode is initiated by the user by switching the device into "Offline" mode.
The following application is a simple utility program that keeps the backlight of the device turned on by periodically asking the system to delay the automatic display dimming functionality. Normally the backlight is turned off after a short period of inactivity, although this setting can be changed by the user. It is the goal of the application then to request a postponement of this mechanism (by 60 seconds at a time). Here an internal timer frequency of 45 seconds is chosen, so that it can always extend the time by 60 seconds (and be sure that the opportunity is not missed due to using a lower frequency than the maximum).
The program will also track the device mode, and once the device enters the offline mode, the program will terminate. Should the program be started when the device is already in offline mode, the program will refuse to run.
Since the program has no GUI of its own, Note dialogs and the infoprint facility will be used to display status information to the user. The Note is used to remind the user that leaving the program running will exhaust the battery. The infoprints are used when the application terminates, or if it refuses to run.
Most of the work required will be contained in the application set-up logic, which allows reducing the code in main significantly: (Please note that the 'Flight-Mode' in sample code means means 'Offline-Mode') libosso-flashlight/flashlight.c
/**
 * Main program:
 *
 * 1) Setup application state
 * 2) Start mainloop
 * 3) Release application state & terminate
 */
int main(int argc, char** argv) {

  /* We'll keep one application state in our program and allocate
     space for it from the stack. */
  ApplicationState state = {};

  g_print(PROGNAME ":main Starting\n");
  /* Attempt to setup the application state and if something goes
     wrong, do cleanup here and exit. */
  if (setupAppState(&state) == FALSE) {
    g_print(PROGNAME ":main Setup failed, doing cleanup\n");
    releaseAppState(&state);
    g_print(PROGNAME ":main Terminating with failure\n");
    return EXIT_FAILURE;
  }

  g_print(PROGNAME ":main Starting mainloop processing\n");
  g_main_loop_run(state.mainloop);
  g_print(PROGNAME ":main Out of main loop (shutting down)\n");
  /* We come here when the application state has the running flag set
     to FALSE and the device state changed callback has decided to
     terminate the program. Display a message to the user about
     termination next. */
  displayExitMessage(&state, ProgName " exiting");

  /* Release the state and exit with success. */
  releaseAppState(&state);

  g_print(PROGNAME ":main Quitting\n");
  return EXIT_SUCCESS;
}
In order for the device state callbacks to force a quit of the application, the LibOSSO context needs to be passed to it. Also access to the mainloop object is needed, as well as utilizing a flag to tell when the timer should just quit (since timers cannot be removed externally in GLib). (Please note the 'Flight-Mode' in the example code means 'Offline-Mode') libosso-flashlight/flashlight.c
/* Application state.
   Contains the necessary state to control the application lifetime
   and use LibOSSO. */
typedef struct {
  /* The GMainLoop that will run our code. */
  GMainLoop* mainloop;
  /* LibOSSO context that is necessary to use LibOSSO functions. */
  osso_context_t* ossoContext;
  /* Flag to tell the timer that it should stop running. Also utilized
     to tell the main program that the device is already in Flight-
     mode and the program shouldn't continue startup. */
  gboolean running;
} ApplicationState;
All of the setup and start logic is implemented in setupAppState, and contains a significant number of steps that are all necessary: (Please note the 'Flight-Mode' in the example code means 'Offline-Mode') libosso-flashlight/flashlight.c
/**
 * Utility to setup the application state.
 *
 * 1) Initialize LibOSSO (this will connect to D-Bus)
 * 2) Create a mainloop object
 * 3) Register the device state change callback
 *    The callback will be called once immediately on registration.
 *    The callback will reset the state->running to FALSE when the
 *    program needs to terminate so we'll know whether the program
 *    should run at all. If not, display an error dialog.
 *    (This is the case if the device will be in "Flight"-mode when
 *    the program starts.)
 * 4) Register the timer callback (which will keep the screen from
 *    blanking).
 * 5) Un-blank the screen.
 * 6) Display a dialog to the user (on the background) warning about
 *    battery drain.
 * 7) Send the first "delay backlight dimming" command.
 *
 * Returns TRUE when everything went ok, FALSE when caller should call
 * releaseAppState and terminate. The code below will print out the
 * errors if necessary.
 */
static gboolean setupAppState(ApplicationState* state) {

  osso_return_t result;

  g_assert(state != NULL);

  g_print(PROGNAME ":setupAppState starting\n");

  /* Zero out the state. Has the benefit of setting all pointers to
     NULLs and all gbooleans to FALSE. This is useful when we'll need
     to determine what to release later. */
  memset(state, 0, sizeof(ApplicationState));

  g_print(PROGNAME ":setupAppState Initializing LibOSSO\n");

  /*... Listing cut for brevity ...*/

  state->ossoContext = osso_initialize(OSSO_SERVICE, "1.0", FALSE, NULL);
  if (state->ossoContext == NULL) {
    g_printerr(PROGNAME ": Failed to initialize LibOSSO\n");
    return FALSE;
  }

  g_print(PROGNAME ":setupAppState Creating a GMainLoop object\n");
  /* Create a new GMainLoop object, with default context (NULL) and
     initial "running"-state set to FALSE. */
  state->mainloop = g_main_loop_new(NULL, FALSE);
  if (state->mainloop == NULL) {
    g_printerr(PROGNAME ": Failed to create a GMainLoop\n");
    return FALSE;
  }

  g_print(PROGNAME
          ":setupAddState Adding hw-state change callback.\n");
  /* The callback will be called immediately with the state, so we
     need to know whether we're in offline mode to start with. If so,
     the callback will set the running-member to FALSE (and we'll
     check it below). */
  state->running = TRUE;
  /* In order to receive information about device state and changes
     in it, we register our callback here.

     Parameters for the osso_hw_set_event_cb():
       osso_context_t* :  LibOSSO context object to use.
       osso_hw_state_t* : Pointer to a device state type that we're
                          interested in. NULL for "all states".
       osso_hw_cb_f* :    Function to call on state changes.
       gpointer :         User-data passed to callback. */
  result = osso_hw_set_event_cb(state->ossoContext,
                                NULL, /* We're interested in all. */
                                deviceStateChanged,
                                state);
  if (result != OSSO_OK) {
    g_printerr(PROGNAME
               ":setupAppState Failed to get state change CB\n");
    /* Since we cannot reliably know when to terminate later on
       without state information, we will refuse to run because of the
       error. */
    return FALSE;
  }
  /* We're in "Flight" mode? */
  if (state->running == FALSE) {
    g_print(PROGNAME ":setupAppState In offline, not continuing.\n");
    displayExitMessage(state, ProgName " not available in Offline mode");
    return FALSE;
  }

  g_print(PROGNAME ":setupAppState Adding blanking delay timer.\n");
  if (g_timeout_add(45000,
                    (GSourceFunc)delayBlankingCallback,
                    state) == 0) {
    /* If g_timeout_add returns 0, it signifies an invalid event
       source id. This means that adding the timer failed. */
    g_printerr(PROGNAME ": Failed to create a new timer callback\n");
    return FALSE;
  }

  /* Un-blank the display (will always succeed in the SDK). */
  g_print(PROGNAME ":setupAppState Unblanking the display\n");
  result = osso_display_state_on(state->ossoContext);
  if (result != OSSO_OK) {
    g_printerr(PROGNAME ": Failed in osso_display_state_on (%s)\n",
               ossoErrorStr(result));
    /* If the RPC call fails, odds are that nothing else will work
       either, so we decide to quit instead. */
    return FALSE;
  }

  /* Display a "Note"-dialog with a WARNING icon.
     The Dialog is MODAL, so user cannot do anything with the stylus
     until the Ok is selected, or the Back-key is pressed. */

  /*... Listing cut for brevity ...*/

  /* Other icons available:
      OSSO_GN_NOTICE: For general notices.
     OSSO_GN_WARNING: For warning messages.
       OSSO_GN_ERROR: For error messages.
        OSSO_GN_WAIT: For messages about "delaying" for something (an
                      hourglass icon is displayed).
                   5: Animated progress indicator. */

  /*... Listing cut for brevity ...*/

  g_print(PROGNAME ":setupAppState Displaying Note dialog\n");
  result = osso_system_note_dialog(state->ossoContext,
                                   /* UTF-8 text into the dialog */
                                   "Started " ProgName ".\n"
                       "Please remember to stop it when you're done, "
                                "in order to conserve battery power.",
                                   /* Icon to use */
                                   OSSO_GN_WARNING,
                                   /* We're not interested in the RPC
                                      return value. */
                                   NULL);
  if (result != OSSO_OK) {
    g_error(PROGNAME ": Error displaying Note dialog (%s)\n",
            ossoErrorStr(result));
  }
  g_print(PROGNAME ":setupAppState Requested for the dialog\n");

  /* Then delay the blanking timeout so that our timer callback has a
     chance to run before that. */
  delayDisplayBlanking(state);

  g_print(PROGNAME ":setupAppState Completed\n");

  /* State set up. */
  return TRUE;
}
The callback to handle device state changes is registered with the _hw_set_event_cb, and it can also be seen how to force the backlight on (which is necessary so that the backlight dimming delay will accomplish something). Also the timer callback will be registered, and it will then start firing away after 45 seconds, and will keep delaying the backlight dimming and perform the first delay so that the backlight is not dimmed right away.
The callback function will always receive the new "hardware state" as well as the user data. It is also somewhat interesting to note that just by registering the callback, it will be triggered immediately. This will happen even before starting the mainloop in order to tell the application the initial state of the device, when the application starts. This can be utilized to determine whether the device is already in offline mode, and keep from starting the program if that is the case. Since it cannot always be known whether the mainloop is active (the callback can be triggered later on as well), the program also utilizes an additional flag to communicate the timer callback that it should eventually quit. (Please note the 'Flight-Mode' in the example code means 'Offline-Mode') libosso-flashlight/flashlight.c
/**
 * This callback will be called by LibOSSO whenever the device state
 * changes. It will also be called right after registration to inform
 * the current device state.
 *
 * The device state structure contains flags telling about conditions
 * that might affect applications, as well as the mode of the device
 * (for example telling whether the device is in "in-flight"-mode).
 */
static void deviceStateChanged(osso_hw_state_t* hwState,
                               gpointer data) {
  ApplicationState* state = (ApplicationState*)data;

  g_print(PROGNAME ":deviceStateChanged Starting\n");

  printDeviceState(hwState);

  /* If device is in/going into "flight-mode" (called "Offline" on
     some devices), we stop our operation automatically. Obviously
     this makes flashlight useless (as an application) if someone gets
     stuck in a dark cargo bay of a plane with snakes.. But we still
     need a way to shut down the application and react to device
     changes, and this is the easiest state to test with.

     Note that since offline mode will terminate network connections,
     you will need to test this on the device itself, not over ssh. */
  if (hwState->sig_device_mode_ind == OSSO_DEVMODE_FLIGHT) {
    g_print(PROGNAME ":deviceStateChanged In/going into offline.\n");

    /* Terminate the mainloop.
       NOTE: Since this callback is executed immediately on
             registration, the mainloop object is not yet "running",
             hence calling quit on it will be ineffective! _quit only
             works when the mainloop is running. */
    g_main_loop_quit(state->mainloop);
    /* We also set the running to correct state to fix the above
       problem. */
    state->running = FALSE;
  }
}
The printDeviceState is a utility function to decode the device state structure that the callback will be invoked with. The state contains the device mode, but also gboolean flags, which tell the application to adapt to the environment in other ways (like memory pressure and other indicators): (Please note the 'Flight-Mode' in the example code means 'Offline-Mode') libosso-flashlight/flashlight.c
/* Small macro to return "YES" or "no" based on given parameter.
   Used in printDeviceState below. YES is in capital letters in order
   for it to "stand out" in the program output (since it's much
   rarer). */
#define BOOLSTR(p) ((p)?"YES":"no")

/**
 * Utility to decode the hwstate structure and print it out in human
 * readable format. Mainly useful for debugging on the device.
 *
 * The mode constants unfortunately are not documented in LibOSSO.
 */
static void printDeviceState(osso_hw_state_t* hwState) {

  gchar* modeStr = "Unknown";

  g_assert(hwState != NULL);

  switch(hwState->sig_device_mode_ind) {
    case OSSO_DEVMODE_NORMAL:
      /* Non-flight-mode. */
      modeStr = "Normal";
      break;
    case OSSO_DEVMODE_FLIGHT:
      /* Power button -> "Offline mode". */
      modeStr = "Flight";
      break;
    case OSSO_DEVMODE_OFFLINE:
      /* Unknown. Even if all connections are severed, this mode will
         not be triggered. */
      modeStr = "Offline";
      break;
    case OSSO_DEVMODE_INVALID:
      /* Unknown. */
      modeStr = "Invalid(?)";
      break;
    default:
      /* Leave at "Unknown". */
      break;
  }
  g_print(
    "Mode: %s, Shutdown: %s, Save: %s, MemLow: %s, RedAct: %s\n",
    modeStr,
    /* Set to TRUE if the device is shutting down. */
    BOOLSTR(hwState->shutdown_ind),
    /* Set to TRUE if our program has registered for autosave and
       now is the moment to save user data. */
    BOOLSTR(hwState->save_unsaved_data_ind),
    /* Set to TRUE when device is running low on memory. If possible,
       memory should be freed by our program. */
    BOOLSTR(hwState->memory_low_ind),
    /* Set to TRUE when system wants us to be less active. */
    BOOLSTR(hwState->system_inactivity_ind));
}
The delaying of the display blanking is achieved with a utility function of LibOSSO (osso_display_blanking_pause), which is implemented in a separate function since it is called from multiple places: libosso-flashlight/flashlight.c
/**
 * Utility to ask the device to pause the screen blanking timeout.
 * Does not return success/status.
 */
static void delayDisplayBlanking(ApplicationState* state) {

  osso_return_t result;

  g_assert(state != NULL);

  result = osso_display_blanking_pause(state->ossoContext);
  if (result != OSSO_OK) {
    g_printerr(PROGNAME ":delayDisplayBlanking. Failed (%s)\n",
               ossoErrorStr(result));
    /* But continue anyway. */
  } else {
    g_print(PROGNAME ":delayDisplayBlanking RPC succeeded\n");
  }
}
The timer callback will normally just ask the blanking delay to be further extended, but will also check whether the program is shutting down (by using the running field in the application state). If the application is indeed shutting down, the timer will ask itself to be removed from the timer queue by returning FALSE: libosso-flashlight/flashlight.c
/**
 * Timer callback that will be called within 45 seconds after
 * installing the callback and will ask the platform to defer any
 * display blanking for another 60 seconds.
 *
 * This will also prevent the device from going into suspend
 * (according to LibOSSO documentation).
 *
 * It will continue doing this until the program is terminated.
 *
 * NOTE: Normally timers shouldn't be abused like this since they
 *       bring the CPU out from power saving state. Because the screen
 *       backlight dimming might be activated again after 60 seconds
 *       of receiving the "pause" message, we need to keep sending the
 *       "pause" messages more often than every 60 seconds. 45 seconds
 *       seems like a safe choice.
 */
static gboolean delayBlankingCallback(gpointer data) {
  ApplicationState* state = (ApplicationState*)data;

  g_print(PROGNAME ":delayBlankingCallback Starting\n");

  g_assert(state != NULL);
  /* If we're not supposed to be running anymore, return immediately
     and ask caller to remove the timeout. */
  if (state->running == FALSE) {
    g_print(PROGNAME ":delayBlankingCallback Removing\n");
    return FALSE;
  }

  /* Delay the blanking for a while still (60 seconds). */
  delayDisplayBlanking(state);

  g_print(PROGNAME ":delayBlankingCallback Done\n");

  /* We want the same callback to be invoked from the timer
     launch again, so we return TRUE. */
  return TRUE;
}
There is also a small utility function that will be used to display an exit message (there are two ways of exiting): libosso-flashlight/flashlight.c
/**
 * Utility to display an "exiting" message to user using infoprint.
 */
static void displayExitMessage(ApplicationState* state,
                               const gchar* msg) {

  osso_return_t result;

  g_assert(state != NULL);

  g_print(PROGNAME ":displayExitMessage Displaying exit message\n");
  result = osso_system_note_infoprint(state->ossoContext, msg, NULL);
  if (result != OSSO_OK) {
    /* This is rather harsh, since we terminate the whole program if
       the infoprint RPC fails. It is used to display messages at
       program exit anyway, so this isn't a critical issue. */
    g_error(PROGNAME ": Error doing infoprint (%s)\n",
            ossoErrorStr(result));
  }
}
And finally comes the application state tear-down function, which will release all the resources that have been allocated by the set-up function. libosso-flashlight/flashlight.c
/**
 * Release all resources allocated by setupAppState in reverse order.
 */
static void releaseAppState(ApplicationState* state) {

  g_print(PROGNAME ":releaseAppState starting\n");

  g_assert(state != NULL);

  /* First set the running state to FALSE so that if the timer will
     (for some reason) be launched, it will remove itself from the
     timer call list. This shouldn't be possible since we are running
     only with one thread. */
  state->running = FALSE;

  /* Normally we would also release the timer, but since the only way
     to do that is from the timer callback itself, there's not much we
     can do about it here. */

  /* Remove the device state change callback. It is possible that we
     run this even if the callback was never installed, but it is not
     harmful. */
  if (state->ossoContext != NULL) {
    osso_hw_unset_event_cb(state->ossoContext, NULL);
  }

  /* Release the mainloop object. */
  if (state->mainloop != NULL) {
    g_print(PROGNAME ":releaseAppState Releasing mainloop object.\n");
    g_main_loop_unref(state->mainloop);
    state->mainloop = NULL;
  }

  /* Lastly, free up the LibOSSO context. */
  if (state->ossoContext != NULL) {
    g_print(PROGNAME ":releaseAppState De-init LibOSSO.\n");
    osso_deinitialize(state->ossoContext);
    state->ossoContext = NULL;
  }
  /* All resources released. */
}
The Makefile for this program contains no surprises, so it is not shown here. Now the program is built, and run in the SDK:
[sbox-DIABLO_X86: ~/libosso-flashlight] > run-standalone.sh ./flashlight
flashlight:main Starting
flashlight:setupAppState starting
flashlight:setupAppState Initializing LibOSSO
flashlight:setupAppState Creating a GMainLoop object
flashlight:setupAddState Adding hw-state change callback.
flashlight:deviceStateChanged Starting
Mode: Normal, Shutdown: no, Save: no, MemLow: no, RedAct: no
flashlight:setupAppState Adding blanking delay timer.
flashlight:setupAppState Unblanking the display
flashlight:setupAppState Displaying Note dialog
flashlight:setupAppState Requested for the dialog
flashlight:delayDisplayBlanking RPC succeeded
flashlight:setupAppState Completed
flashlight:main Starting mainloop processing
/dev/dsp: No such file or directory
flashlight:delayBlankingCallback Starting
flashlight:delayDisplayBlanking RPC succeeded
flashlight:delayBlankingCallback Done
...

The application will display a modal dialog when it starts, to remind the user of the ramifications.
Since the SDK does not contain indications about backlight operations, it will not be noticeable that the application is running in the screen. From the debugging messages, it can be seen that it is. It just takes 45 seconds between each timer callback launch (and for new debug messages to appear).
7.3.2.5 Simulating Device Mode Changes
In order to test the flashlight application without requiring a device, it is useful to know how to simulate device mode changes in the SDK. From the stand-point of LibOSSO (and programs that use it), it will feel and look exactly as it does on a device. When LibOSSO receives the D-Bus signal, it will be exactly the same signal as it would be on a device. D-Bus signals are covered more thoroughly later on.
To see how this works, start flashlight in one session and leave it running (you might want to dismiss the modal dialog). Then open another session and send the signal using the system bus that signifies a device mode change (below).
[sbox-DIABLO_X86: ~/libosso-flashlight] > run-standalone.sh  \
 dbus-send --system --type=signal /com/nokia/mce/signal  \
 com.nokia.mce.signal.sig_device_mode_ind string:'offline'
The argument for the signal is a string, stating the new device mode. They are defined (for LibOSSO) in the LibOSSO source code (src/osso-hw.c), which can be downloaded with apt-get source libosso. The start of that file also defines other useful D-Bus well-known names, object paths and interfaces, as well as method names relating to hardware and system-wide conditions. This example covers only switching the device mode from 'normal' to 'offline' and then back (see below).
flashlight:delayBlankingCallback Starting
flashlight:delayDisplayBlanking RPC succeeded
flashlight:delayBlankingCallback Done
...
flashlight:deviceStateChanged Starting
Mode: Flight, Shutdown: no, Save: no, MemLow: no, RedAct: no
flashlight:deviceStateChanged In/going into offline.
flashlight:main Out of main loop (shutting down)
flashlight:displayExitMessage Displaying exit message
flashlight:releaseAppState starting
flashlight:releaseAppState Releasing mainloop object.
flashlight:releaseAppState De-init LibOSSO.
flashlight:main Quitting
Once the signal is sent, it will eventually be converted into a callback call from LibOSSO, and the deviceStateChanged function gets to run. It will notice that the device mode is now OFFLINE_MODE, and shutdown flashlight.

If the flashlight is started again, something peculiar can be noticed. It will see that the device is still in offline mode. How convenient! This allows testing the rest of the code paths remaining in the application (when it refuses to start if the device is already in offline mode).
[sbox-DIABLO_X86: ~/libosso-flashlight] > run-standalone.sh ./flashlight
flashlight:main Starting
flashlight:setupAppState starting
flashlight:setupAppState Initializing LibOSSO
flashlight:setupAppState Creating a GMainLoop object
flashlight:setupAddState Adding hw-state change callback.
flashlight:deviceStateChanged Starting
Mode: Flight, Shutdown: no, Save: no, MemLow: no, RedAct: no
flashlight:deviceStateChanged In/going into offline.
flashlight:setupAppState In offline, not continuing.
flashlight:displayExitMessage Displaying exit message
flashlight:main Setup failed, doing cleanup
flashlight:releaseAppState starting
flashlight:releaseAppState Releasing mainloop object.
flashlight:releaseAppState De-init LibOSSO.
flashlight:main Terminating with failure
In this case, the user is displayed the cause why flashlight cannot be started, since it would be quite rude not to display any feedback to the user.
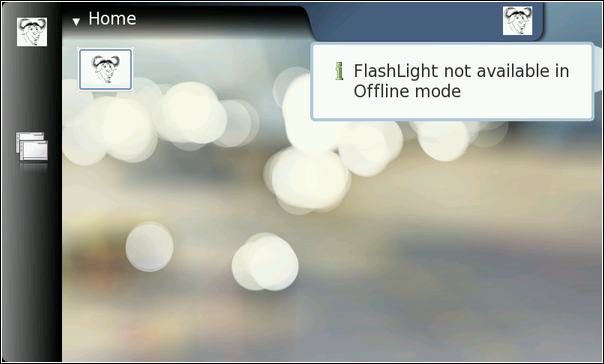
In order to return the device back to normal mode, it needs to be sent the same signal as before (sig_device_mode_ind), but with the argument normal.
[sbox-DIABLO_X86: ~/libosso-flashlight] > run-standalone.sh  \
 dbus-send --system --type=signal /com/nokia/mce/signal  \
 com.nokia.mce.signal.sig_device_mode_ind string:'normal'
7.3.3 Using GLib Wrappers for D-Bus
7.3.3.1 Introduction to GObjects
In order to support runtime binding of GTK+ widgets to interpreted languages, a somewhat complicated system for implementing object-oriented machinery for C was developed. Depending on the particular viewpoint, this system is either called GObject or GType. GType is the low-level runtime type system, which is used to implement GObjects, and GObjects are the implementations of objects using the GType framework. For a short introduction about GObjects, please see the Wikipedia entry on GType. GObject/GType is part of GLib, but one might note that most of GLib is useable without the GType part of the library. In fact, the GObject/GType functionality is separated into its own library (libgobject).
The following example will use the GType in order to implement a very simple object that will be published over the D-Bus. This also means that some of the inherent complexity involved in implementing a fully fledged GObject can be forgone. For this reason, while the object will be usable over the D-Bus, it might not have all the support required to use it directly as a GObject (full dynamic type registration and properties are missing).
The implementation will be a simple non-inheriting stand-alone class, implementing an interface to access and modify two private members: value1 and value2, first of which is an 32-bit signed integer, and the second a gdouble.
It will be necessary to implement the per-class constructor as well as the per-object constructor. Both of these will be quite short for the first version of the implementation.
7.3.3.2 D-Bus Interface Definition Using XML
Since the primary objective here is to make the object available over D-Bus, the example will start by covering one of the easiest way of achieving this: the dbus-bindings-tool. The tool will generate a lot of the bindings code for both the client and server side. As its input, it uses an XML file describing the interface for the service that is being implemented.
The first step is to describe one method in XML. Each method is described with a separate method element, whose name attribute is the name of the method to be generated (this name will be copied into the generated stub code automatically by the tool). The first method is setvalue1, which will get one argument, new_value, which is an 32-bit signed integer: glib-dbus-sync/value-dbus-interface.xml
<!- setvalue1(int newValue): sets value1 ->
<method name="setvalue1">
	<arg type="i" name="new_value" direction="in"/>
</method>
Each argument needs to be defined explicitly with the arg element. The type attribute is required, since it will define the data type for the argument. Arguments are sometimes called parameters, when used with D-Bus methods. Each argument needs to specify the "direction" of the argument. Parameters for method calls are "going into" the service, hence the correct content for the direction attribute is in. Return values from method calls are "coming out" of the service. Hence, their direction will be out. If a method call does not return any value (returns void), then no argument with the direction out needs to be specified.
It should also be noted that D-Bus by itself does not limit the number of return arguments. C language supports only one return value from a function, but a lot of the higher level languages do not have this restriction.
The following argument types are supported for D-Bus methods (with respective closest types in GLib):
- b: boolean (gboolean)
- y: 8-bit unsigned integer (guint8)
- q/n: 16-bit unsigned/signed integer (guint16/gint16)
- u/i: 32-bit unsigned/signed integer (guint32/gint32)
- t/x: 64-bit unsigned/signed integer (guint64/gint64)
- d: IEEE 754 double precision floating point number (gdouble)
- s: UTF-8 encoded text string with NUL termination (only one NUL allowed) (gchar* with additional restrictions)
- a: Array of the following type specification (case-dependent)
- o/g/r/(/)/v/e//: Complex types, please see the official D-Bus documentation on type signatures.
The next step is the interface specification of another method: getvalue1, which will return the current integer value of the object. It has no method call parameters (no arguments with direction="in"), and only returns one 32-bit signed integer: glib-dbus-sync/value-dbus-interface.xml
    <!- getvalue1(): returns the first value (int) ->
    <method name="getvalue1">
      <arg type="i" name="cur_value" direction="out"/>
    </method>
Naming of the return arguments is also supported in D-Bus (as above). This will not influence the generated stub code, but serves as additional documentation.
The methods need to be bound to a specific (D-Bus) interface, and this is achieved by placing the method elements within an interface element. The interface name -attribute is optional, but very much recommended (otherwise the interface becomes unnamed, and provides less useful information on introspection).
Multiple interfaces can be implemented in the same object, and if this would be the case, the multiple interface elements would be listed within the node element. The node element is the "top-level" element in any case. In this case, only one explicit interface is implemented (the binding tools will add the introspection interfaces automatically, so specifying them is not necessary in the XML). And so, the result is the minimum required interface XML file: glib-dbus-sync/value-dbus-interface.xml
<?xml version="1.0" encoding="UTF-8" ?>
<node>
  <interface name="org.maemo.Value">
    <!- getvalue1(): returns the first value (int) ->
    <method name="getvalue1">
      <arg type="i" name="cur_value" direction="out"/>
    </method>
    <!- setvalue1(int newValue): sets value1 ->
    <method name="setvalue1">
      <arg type="i" name="new_value" direction="in"/>
    </method>
  </interface>
</node>
The minimal interface specification is then extended by adding the correct reference to the proper DTD. This will allow validation tools to work automatically with the XML file. Methods are also added to manipulate the second value. The full interface file will now contain comments, describing the purpose of the interface and the methods. This is highly recommended, if planning to publish the interface at some point, as the bare XML does not carry semantic information. glib-dbus-sync/value-dbus-interface.xml
<?xml version="1.0" encoding="UTF-8" ?>
<!- This maemo code example is licensed under a MIT-style license,
     that can be found in the file called "License" in the same
     directory as this file.
     Copyright (c) 2007-2008 Nokia Corporation. All rights reserved. ->
<!- If you keep the following DOCTYPE tag in your interface
     specification, xmllint can fetch the DTD over the Internet
     for validation automatically. ->
<!DOCTYPE node PUBLIC
	  "-//freedesktop//DTD D-Bus Object Introspection 1.0//EN"
	  "http://standards.freedesktop.org/dbus/1.0/introspect.dtd">
<!- This file defines the D-Bus interface for a simple object, that
     will hold a simple state consisting of two values (one a 32-bit
     integer, the other a double).

     The interface name is "org.maemo.Value".
     One known reference implementation is provided for it by the
     "/GlobalValue" object found via a well-known name of
     "org.maemo.Platdev_ex". ->
<node>
	<interface name="org.maemo.Value">
		<!- Method definitions ->
		<!- getvalue1(): returns the first value (int) ->
		<method name="getvalue1">
			<!- NOTE Naming arguments is not mandatory, but is recommended
			     so that D-Bus introspection tools are more useful.
			     Otherwise the arguments will be automatically named
			     "arg0", "arg1" and so on. ->
			<arg type="i" name="cur_value" direction="out"/>
		</method>
		<!- getvalue2(): returns the second value (double) ->
		<method name="getvalue2">
			<arg type="d" name="cur_value" direction="out"/>
		</method>
		<!- setvalue1(int newValue): sets value1 ->
		<method name="setvalue1">
			<arg type="i" name="new_value" direction="in"/>
		</method>
		<!- setvalue2(double newValue): sets value2 ->
		<method name="setvalue2">
			<arg type="d" name="new_value" direction="in"/>
		</method>
	</interface>
</node>
When dealing with automatic code generation, it is quite useful to also automate testing of the "source files" (in this case, XML). One important validation technique for XML is verifying for well-formedness (all XML files need to satisfy the rules in XML spec 1.0). Another is validating the structure of XML (that elements are nested correctly, that only correct elements are present and that the element attributes and data are legal). Structural validation rules are described by a DTD (Document Type Definition) document for the XML format that the file is supposed to adhere to. The DTD is specified in the XML, within the DOCTYPE processing directive.
This is still not perfect, as DTD validation can only check for syntax and structure, but not meaning or semantics.
The next step is to add a target called checkxml to the Makefile, so that it can be run whenever the validity of the interface XML is to be checked. glib-dbus-sync/Makefile
# One extra target (which requires xmllint, from package libxml2-utils)
# is available to verify the well-formedness and the structure of the
# interface definition xml file.
#
# Use the 'checkxml' target to run the interface XML through xmllint
# verification. You will need to be connected to the Internet in order
# for xmllint to retrieve the DTD from fd.o (unless you setup local
# catalogs, which are not covered here).
# ... Listing cut for brevity ...
# Interface XML name (used in multiple targets)
interface_xml := value-dbus-interface.xml
# ... Listing cut for brevity ...
# Special target to run DTD validation on the interface XML. Not run
# automatically (since xmllint is not always available and also needs
# Internet connectivity).
checkxml: $(interface_xml)
        @xmllint -valid -noout $<
        @echo $< checks out ok
[sbox-DIABLO_X86: ~/glib-dbus-sync] > make checkxml
value-dbus-interface.xml checks out ok
Just to demonstrate what kind of error messages to expect when there are problems in the XML, the valid interface specification is modified slightly by adding one invalid element (invalidElement), and by removing one starting tag (method).
[sbox-DIABLO_X86: ~/glib-dbus-sync] > make checkxml
value-dbus-interface.xml:36: element invalidElement: validity error :
  No declaration for element invalidElement
    </invalidElement>
              ^
value-dbus-interface.xml:53: parser error :
  Opening and ending tag mismatch: method line 39 and interface
  </interface>
              ^
value-dbus-interface.xml:54: parser error :
  Opening and ending tag mismatch: interface line 22 and node
</node>
       ^
value-dbus-interface.xml:55: parser error :
  Premature end of data in tag node line 21

^
make: *** [checkxml] Error 1
The first error (validity error) is detected, because the file does not adhere to the DTD. The other errors (parser errors) are detected, because the file is no longer a well-formed XML document.
If the makefile targets depend on checkxml, the validation can be integrated into the process of the build. However, as was noted before, it might not be always the best solution.
7.3.3.3 Generating Automatic Stub Code
Now the following step is to generate the "glue" code that will implement the mapping from GLib into D-Bus. The generated code will be used later on, but it is instructive to see what the dbus-binding-tool program generates.
The Makefile will be expanded to invoke the tool whenever the interface XML changes, and store the resulting glue code separately for both the client and server. glib-dbus-sync/Makefile
# Define a list of generated files so that they can be cleaned as well
cleanfiles := value-client-stub.h \
              value-server-stub.h

# ... Listing cut for brevity ...

# If the interface XML changes, the respective stub interfaces will be
# automatically regenerated. Normally this would also mean that your
# builds would fail after this since you would be missing implementation
# code.
value-server-stub.h: $(interface_xml)
        dbus-binding-tool -prefix=value_object -mode=glib-server \
          $< > $@

value-client-stub.h: $(interface_xml)
        dbus-binding-tool -prefix=value_object -mode=glib-client \
          $< > $@

# ... Listing cut for brevity ...

clean:
        $(RM) $(targets) $(cleanfiles) *.o
Two parameters are passed for the dbus-binding-tool program. The --prefix parameter is used to tell what text should be prefixed to all generated structure and function names. This will help avoid namespace collisions, when pulling the generated glue files back into the programs. The value_object will be used, since it seems like a logical prefix for the project. It is advisable to use a prefix that is not used in the code (even in the object implementation in server). This way, there is no risk of reusing the same names that are generated with the tool.
The second parameter will select what kind of output the tool will generate. At the moment, the tool only supports generating GLib/D-Bus bindings, but this might change in the future. Also, it is necessary to select which "side" of the D-Bus the bindings will be generated for. The -client side is for code that wishes to use GLib to access the Value object implementation over D-Bus. The -server side is respectively for the implementation of the Value object.
Running the tool will result in the two header files:
[sbox-DIABLO_X86: ~/glib-dbus-sync] > make value-server-stub.h value-client-stub.h
dbus-binding-tool --prefix=value_object --mode=glib-server \
  value-dbus-interface.xml > value-server-stub.h
dbus-binding-tool --prefix=value_object --mode=glib-client \
  value-dbus-interface.xml > value-client-stub.h
[sbox-DIABLO_X86: ~/glib-dbus-sync] > ls -la value*stub.h
-rw-rw-r-- 1 user user  5184 Nov 21 14:02 value-client-stub.h
-rw-rw-r-- 1 user user 10603 Nov 21 14:02 value-server-stub.h
The object implementation will be handled in a bit, but first it should be checked what the tool produced, starting with the server stub file: glib-dbus-sync/value-server-stub.h
/* Generated by dbus-binding-tool; do not edit! */

  /*... Listing cut for brevity ...*/

#include <dbus/dbus-glib.h>
static const DBusGMethodInfo dbus_glib_value_object_methods[] = {
  { (GCallback) value_object_getvalue1,
    dbus_glib_marshal_value_object_BOOLEAN__POINTER_POINTER, 0 },
  { (GCallback) value_object_getvalue2,
    dbus_glib_marshal_value_object_BOOLEAN__POINTER_POINTER, 47 },
  { (GCallback) value_object_setvalue1,
    dbus_glib_marshal_value_object_BOOLEAN__INT_POINTER, 94 },
  { (GCallback) value_object_setvalue2,
    dbus_glib_marshal_value_object_BOOLEAN__DOUBLE_POINTER, 137 },
};

const DBusGObjectInfo dbus_glib_value_object_object_info = {
  0,
  dbus_glib_value_object_methods,
  4,
"org.maemo.Value\0getvalue1\0S\0cur_value\0O\0F\0N\0i\0\0"
"org.maemo.Value\0getvalue2\0S\0cur_value\0O\0F\0N\0d\0\0"
"org.maemo.Value\0setvalue1\0S\0new_value\0I\0i\0\0"
"org.maemo.Value\0setvalue2\0S\0new_value\0I\0d\0\0\0",
"\0",
"\0"
};
The interest here lies in the method table, mainly because it lists the names of the functions that are needed to be implemented: value_object_getvalue1, 0_object_getvalue2, value_object_setvalue1 and value_object_setvalue2. Each entry in the table consists of a function address, and the function to use to marshal data from/to GLib/D-Bus (the functions that start with dbus_glib_marshal_*). The marshaling functions are defined in the same file, but were omitted from the listing above.
Marshaling in its most generic form means the conversion of parameters or arguments from one format to another, in order to make two different parameter passing conventions compatible. It is a common feature found in almost all RPC mechanisms. Since GLib has its own type system (which will be shown shortly) and D-Bus its own, it would be very tedious to write the conversion code manually. This is where the binding generation tool really helps.
The other interesting feature of the above listing is the _object_info structure. It will be passed to the D-Bus daemon, when the object is ready to be published on the bus (so that clients may invoke methods on it). The very long string (that contains binary zeroes) is the compact format of the interface specification. Similarities can be seen between the names in the string and the names of the interface, methods and arguments that were declared in the XML. It is also an important part of the D-Bus introspection mechanism, which will be covered at the end of this chapter.
As the snippet says at the very first line, it should never be edited manually. This holds true while using the XML file as the source of an interface. It is also possible to use the XML only once, when starting the project, and then just start copy-pasting the generated glue code around, while discarding the XML file and dbus-binding-tool. Needless to say, this makes maintenance of the interface much more difficult and is not really recommended. The generated stub code will not be edited in this material.
The example will next continue with the server implementation for the functions that are called via the method table.
7.3.3.4 Creating Simple GObject for D-Bus
The starting point here is with the per-instance and per-class state structures for the object. The per-class structure contains only the bare minimum contents, which are required from all classes in GObject. The per-instance structure contains the required "parent object" state (GObject), but also includes the two internal values (value1 and value2), with which the rest of this example will be concerned: glib-dbus-sync/server.c
/* This defines the per-instance state.
   Each GObject must start with the 'parent' definition so that common
   operations that all GObjects support can be called on it. */
typedef struct {
  /* The parent class object state. */
  GObject parent;
  /* Our first per-object state variable. */
  gint value1;
  /* Our second per-object state variable. */
  gdouble value2;
} ValueObject;
/* Per class state.
   For the first Value implementation we only have the bare minimum,
   that is, the common implementation for any GObject class. */
typedef struct {
  /* The parent class state. */
  GObjectClass parent;
} ValueObjectClass;
Then convenience macros will be defined in a way expected for all GTypes. The G_TYPE_-macros are defined in GType, and include the magic by which the object implementation does not need to know much about the internal specifics of GType. The GType macros are described in the GObject API reference for GType at [57].
Some of the macros will be used internally in this implementation later on. glib-dbus-sync/server.c
/* Forward declaration of the function that will return the GType of
   the Value implementation. Not used in this program since we only
   need to push this over the D-Bus. */
GType value_object_get_type(void);

/* Macro for the above. It is common to define macros using the
   naming convention (seen below) for all GType implementations,
   and that is why we are going to do that here as well. */
#define VALUE_TYPE_OBJECT (value_object_get_type())

#define VALUE_OBJECT(object) \
        (G_TYPE_CHECK_INSTANCE_CAST((object), \
         VALUE_TYPE_OBJECT, ValueObject))
#define VALUE_OBJECT_CLASS(klass) \
        (G_TYPE_CHECK_CLASS_CAST((klass), \
         VALUE_TYPE_OBJECT, ValueObjectClass))
#define VALUE_IS_OBJECT(object) \
        (G_TYPE_CHECK_INSTANCE_TYPE((object), \
         VALUE_TYPE_OBJECT))
#define VALUE_IS_OBJECT_CLASS(klass) \
        (G_TYPE_CHECK_CLASS_TYPE((klass), \
         VALUE_TYPE_OBJECT))
#define VALUE_OBJECT_GET_CLASS(obj) \
        (G_TYPE_INSTANCE_GET_CLASS((obj), \
         VALUE_TYPE_OBJECT, ValueObjectClass))

/* Utility macro to define the value_object GType structure. */
G_DEFINE_TYPE(ValueObject, value_object, G_TYPE_OBJECT)
After the macros, the next phase cpntains the instance initialization and class initialization functions, of which the class initialization function contains the integration call into GLib/D-Bus: glib-dbus-sync/server.c
/**
 * Since the stub generator will reference the functions from a call
 * table, the functions must be declared before the stub is included.
 */
gboolean value_object_getvalue1(ValueObject* obj, gint* value_out,
                                                  GError** error);
gboolean value_object_getvalue2(ValueObject* obj, gdouble* value_out,
                                                  GError** error);
gboolean value_object_setvalue1(ValueObject* obj, gint value_in,
                                                  GError** error);
gboolean value_object_setvalue2(ValueObject* obj, gdouble value_in,
                                                  GError** error);
/**
 * Pull in the stub for the server side.
 */
#include "value-server-stub.h"
  /*... Listing cut for brevity ...*/
/**
 * Per object initializer
 *
 * Only sets up internal state (both values set to zero)
 */
static void value_object_init(ValueObject* obj) {
  dbg("Called");
  g_assert(obj != NULL);
  obj->value1 = 0;
  obj->value2 = 0.0;
}
/**
 * Per class initializer
 *
 * Registers the type into the GLib/D-Bus wrapper so that it may add
 * its own magic.
 */
static void value_object_class_init(ValueObjectClass* klass) {
  dbg("Called");
  g_assert(klass != NULL);
  dbg("Binding to GLib/D-Bus");
  /* Time to bind this GType into the GLib/D-Bus wrappers.
     NOTE: This is not yet "publishing" the object on the D-Bus, but
           since it is only allowed to do this once per class
           creation, the safest place to put it is in the class
           initializer.
           Specifically, this function adds "method introspection
           data" to the class so that methods can be called over
           the D-Bus. */
  dbus_g_object_type_install_info(VALUE_TYPE_OBJECT,
                                 &dbus_glib_value_object_object_info);
  dbg("Done");
  /* All done. Class is ready to be used for instantiating objects */
}
The dbus_g_object_type_install_info will take a pointer to the structure describing the D-Bus integration (dbus_glib_value_object_object_info), which is generated by dbus-bindings-tool. This function will create all the necessary runtime information for the GType, so the details can be left alone. It will also attach the introspection data to the GType, so that D-Bus introspection may return information on the interface that the object will implement.
The next functions to be implemented are the get and set functions, which allow us to inspect the interface as well. N.B. The names of the functions and their prototypes are ultimately dictated by dbus-bindings-tool generated stub header files. This means that if the interface XML is sufficiently changed, the code will fail to build (since the generated stubs will yield different prototypes): glib-dbus-sync/server.c
/**
 * Function that gets called when someone tries to execute "setvalue1"
 * over the D-Bus. (Actually the marshaling code from the stubs gets
 * executed first, but they will eventually execute this function.)
 *
 * NOTE: If you change the name of this function, the generated
 *       stubs will no longer find it! On the other hand, if you
 *       decide to modify the interface XML, this is one of the places
 *       that you will have to modify as well.
 *       This applies to the next four functions (including this one).
 */
gboolean value_object_setvalue1(ValueObject* obj, gint valueIn,
                                                  GError** error) {
  dbg("Called (valueIn=%d)", valueIn);
  g_assert(obj != NULL);
  /* Change the value. */
  obj->value1 = valueIn;
  /* Return success to GLib/D-Bus wrappers. In this case we do not need
     to touch the supplied error pointer-pointer. */
  return TRUE;
}
/**
 * Function that gets executed on "setvalue2".
 * Other than this function operating with different type input
 * parameter (and different internal value), all the comments from
 * set_value1 apply here as well.
 */
gboolean value_object_setvalue2(ValueObject* obj, gdouble valueIn,
                                                  GError** error) {
  dbg("Called (valueIn=%.3f)", valueIn);
  g_assert(obj != NULL);
  obj->value2 = valueIn;
  return TRUE;
}
/**
 * Function that gets executed on "getvalue1".
 */
gboolean value_object_getvalue1(ValueObject* obj, gint* valueOut,
                                                  GError** error) {
  dbg("Called (internal value1 is %d)", obj->value1);
  g_assert(obj != NULL);
  /* Check that the target pointer is not NULL.
     Even is the only caller for this will be the GLib-wrapper code,
     we cannot trust the stub generated code and should handle the
     situation. We will terminate with an error in this case.
     Another option would be to create a new GError, and store
     the error condition there. */
  g_assert(valueOut != NULL);
  /* Copy the current first value to caller specified memory. */
  *valueOut = obj->value1;
  /* Return success. */
  return TRUE;
}
/**
 * Function that gets executed on "getvalue2".
 * (Again, similar to "getvalue1").
 */
gboolean value_object_getvalue2(ValueObject* obj, gdouble* valueOut,
                                                  GError** error) {
  dbg("Called (internal value2 is %.3f)", obj->value2);
  g_assert(obj != NULL);
  g_assert(valueOut != NULL);
  *valueOut = obj->value2;
  return TRUE;
}
The GLib/D-Bus wrapper logic will implement all of the parameter conversion necessary from D-Bus into the functions, so it is only necessary to handle the GLib corresponding types (gint and gdouble). The method implementations will always receive an object reference to the object as their first parameter, and a pointer to a place where to store new GError objects if the method decides an error should be created. This error would then be propagated back to the caller of the D-Bus method. This simple get/set examples will never set errors, so the last parameter can be ignored here.
N.B. Returning the values is not performed via the conventional C way (by using return someVal), but instead return values are written via the given pointers. The return value of the method is always a gboolean, signifying either success or failure. If failure (FALSE) is returned, it is also necessary to create and setup an GError object, and store its address to the error location.
7.3.3.5 Publishing GType on D-Bus
Once the implementation is complete, it will be necessary to publish an instance of the class onto the D-Bus. This will be done inside the main of the server example, and involves performing a D-Bus method call on the bus.
So that both the server and client do not have to be changed, if the object or well-known names are changed later, they are put into a common header file that will be used by both: glib-dbus-sync/common-defs.h
/* Well-known name for this service. */
#define VALUE_SERVICE_NAME        "org.maemo.Platdev_ex"
/* Object path to the provided object. */
#define VALUE_SERVICE_OBJECT_PATH "/GlobalValue"
/* And we're interested in using it through this interface.
   This must match the entry in the interface definition XML. */
#define VALUE_SERVICE_INTERFACE   "org.maemo.Value"
The decision to use /GlobalValue as the object path is based on clarity only. Most of the time something like /org/maemo/Value would be used instead.
Before using any of the GType functions, it is necessary to initialize the runtime system by calling g_type_init. This will create the built-in types and set-up all the machinery necessary for creating custom types as well. When using GTK+, the function is called automatically, when initializing GTK+. Since this example only uses GLib, it is necessary to call the function manually.
After initializing the GType system, the next step is to open a connection to the session bus, which will be used for the remainder of the publishing sequence: glib-dbus-sync/server.c
/* Pull symbolic constants that are shared (in this example) between
   the client and the server. */
#include "common-defs.h"

  /*... Listing cut for brevity ...*/

int main(int argc, char** argv) {

  /*... Listing cut for brevity ...*/

  /* Initialize the GType/GObject system. */
  g_type_init();

  /*... Listing cut for brevity ...*/

  g_print(PROGNAME ":main Connecting to the Session D-Bus.\n");
  bus = dbus_g_bus_get(DBUS_BUS_SESSION, &error);
  if (error != NULL) {
    /* Print error and terminate. */
    handleError("Could not connect to session bus", error->message, TRUE);
  }
In order for prospective clients to find the object on the session bus, it is necessary to attach the server to a well-known name. This is done with the RequestName method call on the D-Bus server (over D-Bus). In order to target the server, it is necessary to create a GLib/D-Bus proxy object first: glib-dbus-sync/server.c
  g_print(PROGNAME ":main Registering the well-known name (%s)\n",
          VALUE_SERVICE_NAME);

  /* In order to register a well-known name, we need to use the
     "RequestMethod" of the /org/freedesktop/DBus interface. Each
     bus provides an object that will implement this interface.

     In order to do the call, we need a proxy object first.
     DBUS_SERVICE_DBUS = "org.freedesktop.DBus"
     DBUS_PATH_DBUS = "/org/freedesktop/DBus"
     DBUS_INTERFACE_DBUS = "org.freedesktop.DBus" */
  busProxy = dbus_g_proxy_new_for_name(bus,
                                       DBUS_SERVICE_DBUS,
                                       DBUS_PATH_DBUS,
                                       DBUS_INTERFACE_DBUS);
  if (busProxy == NULL) {
    handleError("Failed to get a proxy for D-Bus",
                "Unknown(dbus_g_proxy_new_for_name)", TRUE);
  }

  /* Attempt to register the well-known name.
     The RPC call requires two parameters:
     - arg0: (D-Bus STRING): name to request
     - arg1: (D-Bus UINT32): flags for registration.
       (please see "org.freedesktop.DBus.RequestName" in
        http://dbus.freedesktop.org/doc/dbus-specification.html)
     Will return one uint32 giving the result of the RPC call.
     We are interested in 1 (we are now the primary owner of the name)
     or 4 (we were already the owner of the name, however in this
     application it would not make much sense).

     The function will return FALSE if it sets the GError. */
  if (!dbus_g_proxy_call(busProxy,
                         /* Method name to call. */
                         "RequestName",
                         /* Where to store the GError. */
                         &error,
                         /* Parameter type of argument 0. Note that
                            since we are dealing with GLib/D-Bus
                            wrappers, you will need to find a suitable
                            GType instead of using the "native" D-Bus
                            type codes. */
                         G_TYPE_STRING,
                         /* Data of argument 0. In our case, this is
                            the well-known name for our server
                            example ("org.maemo.Platdev_ex"). */
                         VALUE_SERVICE_NAME,
                         /* Parameter type of argument 1. */
                         G_TYPE_UINT,
                         /* Data of argument 0. This is the "flags"
                            argument of the "RequestName" method which
                            can be use to specify what the bus service
                            should do when the name already exists on
                            the bus. We will go with defaults. */
                         0,
                         /* Input arguments are terminated with a
                            special GType marker. */
                         G_TYPE_INVALID,
                         /* Parameter type of return value 0.
                            For "RequestName" it is UINT32 so we pick
                            the GType that maps into UINT32 in the
                            wrappers. */
                         G_TYPE_UINT,
                         /* Data of return value 0. These will always
                            be pointers to the locations where the
                            proxy can copy the results. */
                         &result,
                         /* Terminate list of return values. */
                         G_TYPE_INVALID)) {
    handleError("D-Bus.RequestName RPC failed", error->message,
                                                TRUE);
    /* Note that the whole call failed, not "just" the name
       registration (we deal with that below). This means that
       something bad probably has happened and there is not much we can
       do (hence program termination). */
  }
  /* Check the result code of the registration RPC. */
  g_print(PROGNAME ":main RequestName returned %d.\n", result);
  if (result != 1) {
    handleError("Failed to get the primary well-known name.",
                "RequestName result != 1", TRUE);
    /* In this case we could also continue instead of terminating.
       We could retry the RPC later. Or "lurk" on the bus waiting for
       someone to tell us what to do. If we would be publishing
       multiple services and/or interfaces, it even might make sense
       to continue with the rest anyway.

       In our simple program, we terminate. Not much left to do for
       this poor program if the clients will not be able to find the
       Value object using the well-known name. */
  }
The dbus_g_proxy_call function is used to do synchronous method calls in GLib/D-Bus wrappers, and in this case, it will be used to run the two argument RequestName method call. The method returns one value (and uint32), which encodes the result of the well-known name registration.
One needs to be careful with the order and correctness of the parameters to the function call, as it is easy to get something wrong, and the C compiler cannot really check for parameter type validity here.
After the successful name registration, it is finally time to create an instance of the ValueObject and publish it on the D-Bus: glib-dbus-sync/server.c
  g_print(PROGNAME ":main Creating one Value object.\n");
  /* The NULL at the end means that we have stopped listing the
     property names and their values that would have been used to
     set the properties to initial values. Our simple Value
     implementation does not support GObject properties, and also
     does not inherit anything interesting from GObject directly, so
     there are no properties to set. For more examples on properties
     see the first GTK+ example programs from the maemo Application
     Development material.

     NOTE: You need to keep at least one reference to the published
           object at all times, unless you want it to disappear from
           the D-Bus (implied by API reference for
           dbus_g_connection_register_g_object(). */
  valueObj = g_object_new(VALUE_TYPE_OBJECT, NULL);
  if (valueObj == NULL) {
    handleError("Failed to create one Value instance.",
                "Unknown(OOM?)", TRUE);
  }

  g_print(PROGNAME ":main Registering it on the D-Bus.\n");
  /* The function does not return any status, so can not check for
     errors here. */
  dbus_g_connection_register_g_object(bus,
                                      VALUE_SERVICE_OBJECT_PATH,
                                      G_OBJECT(valueObj));

  g_print(PROGNAME ":main Ready to serve requests (daemonizing).\n");

  /*... Listing cut for brevity ...*/

}
And after this, the main will enter into the main loop, and will serve client requests coming over the D-Bus, until the server is terminated. N.B. All the callback registration is performed automatically by the GLib/D-Bus wrappers on object publication, so there is no need to worry about them.
Implementing the dependencies and rules for the server and the generated stub code will give this snippet: glib-dbus-sync/Makefile
server: server.o
        $(CC) $^ -o $@ $(LDFLAGS)

# ... Listing cut for brevity ...

# The server and client depend on the respective implementation source
# files, but also on the common interface as well as the generated
# stub interfaces.
server.o: server.c common-defs.h value-server-stub.h
        $(CC) $(CFLAGS) -DPROGNAME=\"$(basename $@)\" -c $< -o $@
When implementing makefiles that separate compilation from linking, it is not possible to pass the target name (automatic variable $@) directly as the PROGNAME-define (since that would expand into server.o, and would look slightly silly when all the messages were prefixed with the name). Instead, a GNU make function (basename) is used to strip any prefixes and suffixes out of the parameter. This way, the PROGNAME will be set to server.
The next step is to build the server and start it:
[sbox-DIABLO_X86: ~/glib-dbus-sync] > make server
dbus-binding-tool --prefix=value_object --mode=glib-server \
  value-dbus-interface.xml > value-server-stub.h
cc -I/usr/include/dbus-1.0 -I/usr/lib/dbus-1.0/include
   -I/usr/include/glib-2.0 -I/usr/lib/glib-2.0/include -g -Wall
   -DG_DISABLE_DEPRECATED -DNO_DAEMON  -DPROGNAME=\"server\"
   -c server.c -o server.o
cc server.o -o server -ldbus-glib-1 -ldbus-1 -lgobject-2.0 -lglib-2.0
[sbox-DIABLO_X86: ~/glib-dbus-sync] > run-standalone.sh ./server
server:main Connecting to the Session D-Bus.
server:main Registering the well-known name (org.maemo.Platdev_ex)
server:main RequestName returned 1.
server:main Creating one Value object.
server:value_object_class_init: Called
server:value_object_class_init: Binding to GLib/D-Bus
server:value_object_class_init: Done
server:value_object_init: Called
server:main Registering it on the D-Bus.
server:main Ready to serve requests (daemonizing).
server: Not daemonizing (built with NO_DAEMON-build define)
After this, dbus-send is used to test out the implementation details from the server. This is done in the same session (for simplicity) by first suspending the server with Ctrl+z, and then continuing running it with the bg shell built-in command. This is done so that it will be easier to see the reaction of the server to each dbus-send command.
The first step here is to test the getvalue1 and setvalue1 methods:
[Ctrl+z]
[1]+  Stopped                 run-standalone.sh ./server
[sbox-DIABLO_X86: ~/glib-dbus-sync] > bg
[1]+ run-standalone.sh ./server &
[sbox-DIABLO_X86: ~/glib-dbus-sync] > run-standalone.sh dbus-send \
 --type=method_call --print-reply --dest=org.maemo.Platdev_ex \
 /GlobalValue org.maemo.Value.getvalue1
server:value_object_getvalue1: Called (internal value1 is 0)
method return sender=:1.15 -> dest=:1.20
 int32 0
[sbox-DIABLO_X86: ~/glib-dbus-sync] > run-standalone.sh dbus-send \
 --type=method_call --print-reply --dest=org.maemo.Platdev_ex \
 /GlobalValue org.maemo.Value.setvalue1 int32:5
server:value_object_setvalue1: Called (valueIn=5)
method return sender=:1.15 -> dest=:1.21
[sbox-DIABLO_X86: ~/glib-dbus-sync] > run-standalone.sh dbus-send \
 --type=method_call --print-reply --dest=org.maemo.Platdev_ex \
 /GlobalValue org.maemo.Value.getvalue1
server:value_object_getvalue1: Called (internal value1 is 5)
method return sender=:1.15 -> dest=:1.22
 int32 5
The next step is to test the double state variable with getvalue2 and setvalue2 methods:
[sbox-DIABLO_X86: ~/glib-dbus-sync] > run-standalone.sh dbus-send \
 --type=method_call --print-reply --dest=org.maemo.Platdev_ex \
 /GlobalValue org.maemo.Value.getvalue2
server:value_object_getvalue2: Called (internal value2 is 0.000)
method return sender=:1.15 -> dest=:1.23
 double 0
[sbox-DIABLO_X86: ~/glib-dbus-sync] > run-standalone.sh dbus-send \
 --type=method_call --print-reply --dest=org.maemo.Platdev_ex \
 /GlobalValue org.maemo.Value.setvalue2 double:42.0
server:value_object_setvalue2: Called (valueIn=42.000)
method return sender=:1.15 -> dest=:1.24
[sbox-DIABLO_X86: ~/glib-dbus-sync] > run-standalone.sh dbus-send \
 --type=method_call --print-reply --dest=org.maemo.Platdev_ex \
 /GlobalValue org.maemo.Value.getvalue2
server:value_object_getvalue2: Called (internal value2 is 42.000)
method return sender=:1.15 -> dest=:1.25
 double 42
This results in a fully functional D-Bus service implementation, albeit a very simple one.
The next step is to utilize the service from a client.
7.3.3.6 Using GLib/D-Bus Wrapper from Client
By using the generated client stub file, it is now possible to write the client that will invoke the methods on the Value object. The D-Bus method calls could also be performed "manually" (either with GLib/D-Bus functions, or even by using libdbus directly, but the latter is discouraged).
The dbus-bindings-tool (when run with the --mode=glib-client parameter) will generate functions for each of the interface methods, and the functions will handle data marshaling operations internally.
Two generated stub functions are presented below, and they will be used shortly: glib-dbus-sync/value-client-stub.h
/* Generated by dbus-binding-tool; do not edit! */
  /*... Listing cut for brevity ...*/
static
#ifdef G_HAVE_INLINE
inline
#endif
gboolean
org_maemo_Value_getvalue1 (DBusGProxy *proxy, gint* OUT_cur_value,
                                              GError **error)
{
  return dbus_g_proxy_call (proxy, "getvalue1", error, G_TYPE_INVALID,
                            G_TYPE_INT, OUT_cur_value, G_TYPE_INVALID);
}
  /*... Listing cut for brevity ...*/
static
#ifdef G_HAVE_INLINE
inline
#endif
gboolean
org_maemo_Value_setvalue1 (DBusGProxy *proxy, const gint IN_new_value,
                                              GError **error)
{
  return dbus_g_proxy_call (proxy, "setvalue1", error, G_TYPE_INT,
                            IN_new_value, G_TYPE_INVALID,
                            G_TYPE_INVALID);
}
The two functions presented above are both blocking, which means that they will wait for the result to arrive over the D-Bus, and only then return to the caller. The generated stub code also includes asynchronous functions (their names end with _async), but their usage will be covered later.
For now, it is important to notice how the prototypes of the functions are named, and what are the parameters that they expect to be passed to them.
The org_maemo_Value prefix is taken from the interface XML file, from the name attribute of the interface element. All dots will be converted into underscores (since C reserves the dot character for other uses), but otherwise the name will be preserved (barring dashes in the name).
The rest of the function name will be the method name for each method defined in the interface XML file.
The first parameter for all the generated stub functions will always be a pointer to a DBusProxy object, which will be necessary to use with the GLib/D-Bus wrapper functions. After the proxy, a list of method parameters is passed. The binding tool will prefix the parameter names with either IN_ or OUT_ depending on the "direction" of the parameter. Rest of the parameter name is taken from the name attributed of the arg element for the method, or if not given, will be automatically generated as arg0, arg1, etc. Input parameters will be passed as values (unless they are complex or strings, in which case they will be passed as pointers). Output parameters are always passed as pointers.
The functions will always return a gboolean, indicating failure or success, and if they fail, they will also create and set the error pointer to an GError -object which can then be checked for the reason for the error (unless the caller passed a NULL pointer for error, in which case the error object will not be created). glib-dbus-sync/client.c
#include <glib.h>
#include <dbus/dbus-glib.h>
#include <stdlib.h> /* exit, EXIT_FAILURE */
#include <string.h> /* strcmp */
/* Pull the common symbolic defines. */
#include "common-defs.h"
/* Pull in the client stubs that were generated with
   dbus-binding-tool */
#include "value-client-stub.h"
This will allow the client code to use the stub code directly as follows: glib-dbus-sync/client.c
/**
 * This function will be called repeatedly from within the mainloop
 * timer launch code.
 *
 * The function will start with two statically initialized variables
 * (int and double) which will be incremented after each time this
 * function runs and will use the setvalue* remote methods to set the
 * new values. If the set methods fail, program is not aborted, but an
 * message will be issued to the user describing the error.
 */
static gboolean timerCallback(DBusGProxy* remoteobj) {

  /* Local values that we'll start updating to the remote object. */
  static gint localValue1 = -80;
  static gdouble localValue2 = -120.0;

  GError* error = NULL;

  /* Set the first value. */
  org_maemo_Value_setvalue1(remoteobj, localValue1, &error);
  if (error != NULL) {
    handleError("Failed to set value1", error->message, FALSE);
  } else {
    g_print(PROGNAME ":timerCallback Set value1 to %d\n", localValue1);
  }

  /* If there was an error with the first, release the error, and
     don't attempt the second time. Also, don't add to the local
     values. We assume that errors from the first set are caused by
     server going off the D-Bus, but are hopeful that it will come
     back, and hence keep trying (returning TRUE). */
  if (error != NULL) {
    g_clear_error(&error);
    return TRUE;
  }

  /* Now try to set the second value as well. */
  org_maemo_Value_setvalue2(remoteobj, localValue2, &error);
  if (error != NULL) {
    handleError("Failed to set value2", error->message, FALSE);
    g_clear_error(&error); /* Or g_error_free in this case. */
  } else {
    g_print(PROGNAME ":timerCallback Set value2 to %.3lf\n", localValue2);
  }

  /* Step the local values forward. */
  localValue1 += 10;
  localValue2 += 10.0;

  /* Tell the timer launcher that we want to remain on the timer
     call list in the future as well. Returning FALSE here would
     stop the launch of this timer callback. */
  return TRUE;
}
What is left is connecting to the correct D-Bus, creating a GProxy object which will be done in the test program: glib-dbus-sync/client.c
/**
 * The test program itself.
 *
 * 1) Setup GType/GSignal
 * 2) Create GMainLoop object
 * 3) Connect to the Session D-Bus
 * 4) Create a proxy GObject for the remote Value object
 * 5) Start a timer that will launch timerCallback once per second.
 * 6) Run main-loop (forever)
 */
int main(int argc, char** argv) {
  /* The D-Bus connection object. Provided by GLib/D-Bus wrappers. */
  DBusGConnection* bus;
  /* This will represent the Value object locally (acting as a proxy
     for all method calls and signal delivery. */
  DBusGProxy* remoteValue;
  /* This will refer to the GMainLoop object */
  GMainLoop* mainloop;
  GError* error = NULL;

  /* Initialize the GType/GObject system. */
  g_type_init();

  /* Create a new GMainLoop with default context (NULL) and initial
     state of "not running" (FALSE). */
  mainloop = g_main_loop_new(NULL, FALSE);
  /* Failure to create the main loop is fatal (for us). */
  if (mainloop == NULL) {
    handleError("Failed to create the mainloop", "Unknown (OOM?)",
                TRUE);
  }

  g_print(PROGNAME ":main Connecting to Session D-Bus.\n");
  bus = dbus_g_bus_get(DBUS_BUS_SESSION, &error);
  if (error != NULL) {
    handleError("Couldn't connect to the Session bus", error->message,
                TRUE);
    /* Normally you'd have to also g_error_free() the error object
       but since the program will terminate within handleError,
       it is not necessary here. */
  }

  g_print(PROGNAME ":main Creating a GLib proxy object for Value.\n");

  /* Create the proxy object that we'll be using to access the object
     on the server. If you would use dbus_g_proxy_for_name_owner(),
     you would be also notified when the server that implements the
     object is removed (or rather, the interface is removed). Since
     we don't care who actually implements the interface, we'll use the
     more common function. See the API documentation at
     http://maemo.org/api_refs/4.0/dbus/ for more details. */
  remoteValue =
    dbus_g_proxy_new_for_name(bus,
                              VALUE_SERVICE_NAME, /* name */
                              VALUE_SERVICE_OBJECT_PATH, /* obj path */
                              VALUE_SERVICE_INTERFACE /* interface */);
  if (remoteValue == NULL) {
    handleError("Couldn't create the proxy object",
                "Unknown(dbus_g_proxy_new_for_name)", TRUE);
  }

  g_print(PROGNAME ":main Starting main loop (first timer in 1s).\n");

  /* Register a timer callback that will do RPC sets on the values.
     The userdata pointer is used to pass the proxy object to the
     callback so that it can launch modifications to the object. */
  g_timeout_add(1000, (GSourceFunc)timerCallback, remoteValue);

  /* Run the program. */
  g_main_loop_run(mainloop);
  /* Since the main loop is not stopped (by this code), we shouldn't
     ever get here. The program might abort() for other reasons. */

  /* If it does, return failure as exit code. */
  return EXIT_FAILURE;
}
Integrating the client into the Makefile is done the same way as was did for the server before: glib-dbus-sync/Makefile
client: client.o
        $(CC) $^ -o $@ $(LDFLAGS)

# ... Listing cut for brevity ...

client.o: client.c common-defs.h value-client-stub.h
        $(CC) $(CFLAGS) -DPROGNAME=\"$(basename $@)\" -c $< -o $@
After building the client, will be started, and let it execute in the same terminal session where the server is still running:
[sbox-DIABLO_X86: ~/glib-dbus-sync] > make client
dbus-binding-tool --prefix=value_object --mode=glib-client \
 value-dbus-interface.xml > value-client-stub.h
cc -I/usr/include/dbus-1.0 -I/usr/lib/dbus-1.0/include \
 -I/usr/include/glib-2.0 -I/usr/lib/glib-2.0/include -g -Wall \
 -DG_DISABLE_DEPRECATED -DNO_DAEMON -DPROGNAME=\"client\" \
 -c client.c -o client.o
cc client.o -o client -ldbus-glib-1 -ldbus-1 -lgobject-2.0 -lglib-2.0
[sbox-DIABLO_X86: ~/glib-dbus-sync] > run-standalone.sh ./client
client:main Connecting to Session D-Bus.
client:main Creating a GLib proxy object for Value.
client:main Starting main loop (first timer in 1s).
server:value_object_setvalue1: Called (valueIn=-80)
client:timerCallback Set value1 to -80
server:value_object_setvalue2: Called (valueIn=-120.000)
client:timerCallback Set value2 to -120.000
server:value_object_setvalue1: Called (valueIn=-70)
client:timerCallback Set value1 to -70
server:value_object_setvalue2: Called (valueIn=-110.000)
client:timerCallback Set value2 to -110.000
server:value_object_setvalue1: Called (valueIn=-60)
client:timerCallback Set value1 to -60
...
[Ctrl+c]
[sbox-DIABLO_X86: ~/glib-dbus-sync] > fg
run-standalone.sh ./server
[Ctrl+c]
Since the client will normally run forever, it will now be terminated, and then the server will be moved to the foreground, so that it can also be terminated. This concludes the first GLib/D-Bus example, but for more information about the GLib D-Bus wrappers, please consult D-BUS GLib Bindings Documentation [57].
7.3.3.7 D-Bus Introspection
D-Bus supports a mechanism by which programs can interrogate the bus for existing well-known names, and then get the interfaces implemented by the objects available behind the well-known names. This mechanism is called introspection in D-Bus terminology.
The main goal of supporting introspection in D-Bus is allowing dynamic bindings to be made with high-level programming languages. This way, the language wrappers for D-Bus can be more intelligent automatically (assuming they utilize the introspection interface). The GLib-wrappers do not use the introspection interface.
Introspection is achieved with three D-Bus methods: ListNames, GetNameOwner and Introspect. The destination object must support the introspection interface in order to provide this information. If the dbus-bindings-tool is used, and the GObject is registered correctly, the service will automatically support introspection.
D-Bus (at this moment) does not come with introspection utilities, but some are available from other sources. One simple program is the "DBus Inspector" that is written in Python, and uses the Python D-Bus bindings and GTK+. If planning to write one's own tool, it is necessary to prepare to parse XML data, since that is the format of results that the Introspect method returns.

Introspection can also be useful, when trying to find out what are the different interfaces and methods available for use on a system. It just has to be remembered that not all D-Bus services actually implement the introspection interface. Their well-known names can still be received, but their interface descriptions will come up empty when using Introspect.
7.3.4 Implementing and Using D-Bus Signals
7.3.4.1 D-Bus Signal properties
Performing remote method invocations over the D-Bus is only one half of D-Bus capabilities. As was noted before, D-Bus also supports a broadcast method of communication, which is also asynchronous. This mechanism is called a signal (in D-Bus terminology), and is useful when it is necessary to notify a lot of receivers about a state change that could affect them. Some examples where signals could be useful are notifying a lot of receivers, when the system is being shut down, network connectivity has been lost, and similar system-wide conditions. This way, the receivers do not need to poll for the status continuously.
However, signals are not the solution to all problems. If a recipient is not processing its D-Bus messages quickly enough (or there just are too many), a signal might get lost on its way to the recipient. There might also be other complications, as with any RPC mechanism. For these reasons, if the application requires extra reliability, it will be necessary to think how to arrange it. One possibility would be to occasionally check the state that the application is interested in, assuming it can be checked over the D-Bus. It just should not be done too often; the recommended interval is once a minute or less often, and only when the application is already active for other reasons. This model will lead to reduction in battery life, so its use should be carefully weighed.
Signals in D-Bus are able to carry information. Each signal has its own name (specified in the interface XML), as well as "arguments". In signal's case, the argument list is actually just a list of information that is passed along the signal, and should not be confused with method call parameters (although both are delivered in the same manner).
Signals do not "return", meaning that when a D-Bus signal is sent, no reply will be received, nor will one be expected. If the signal emitter wants to be sure that the signal was delivered, additional mechanisms need to be constructed for this (D-Bus does not include them directly). A D-Bus signal is very similar to most datagram-based network protocols, for example UDP. Sending a signal will succeed, even if there are no receivers interested in that specific signal.
Most D-Bus language bindings will attempt to map D-Bus signals into something more natural in the target language. Since GLib already supports the notion of signals (as GLib signals), this mapping is quite natural. So in practice, the client will register for GLib signals, and then handle the signals in callback functions (a special wrapper function must be used to register for the wrapped signals: dbus_g_proxy_connect_signal).
7.3.4.2 Declaring Signals in Interface XML
Next, the Value object will be extended so that it contains two threshold values (minimum and maximum), and the object will emit signals, whenever a set operation falls outside the thresholds.
A signal will also be emitted, whenever a value is changed (i.e. the binary content of the new value is different from the old one).
In order to make the signals available to introspection data, the interface XML file will be modified accordingly: glib-dbus-signals/value-dbus-interface.xml
<node>
	<interface name="org.maemo.Value">
		<!- ... Listing cut for brevity ... ->
		<!- Signal (D-Bus) definitions ->
		<!- NOTE: The current version of dbus-bindings-tool doesn't
		     actually enforce the signal arguments _at_all_. Signals need
		     to be declared in order to be passed through the bus itself,
		     but otherwise no checks are done! For example, you could
		     leave the signal arguments unspecified completely, and the
		     code would still work. ->
		<!- Signals to tell interested clients about state change.
		     We send a string parameter with them. They never can have
		     arguments with direction=in. ->
		<signal name="changed_value1">
			<arg type="s" name="change_source_name" direction="out"/>
		</signal>
		<signal name="changed_value2">
			<arg type="s" name="change_source_name" direction="out"/>
		</signal>
		<!- Signals to tell interested clients that values are outside
		     the internally configured range (thresholds). ->
		<signal name="outofrange_value1">
			<arg type="s" name="outofrange_source_name" direction="out"/>
		</signal>
		<signal name="outofrange_value2">
			<arg type="s" name="outofrange_source_name" direction="out"/>
		</signal>
	</interface>
</node>
The signal definitions are required, if planning to use the dbus-bindings-tool; however, the argument specification for each signal is not required by the tool. In fact, it will just ignore all argument specifications, and as can be seen below, a lot of "manual coding" has to be made in order to implement and use the signals (on both the client and server side). The dbus-bindings-tool might get more features in the future, but for now, some labor is required.
7.3.4.3 Emitting Signals from GObject
So that the signal names can easily be changed later, they will be defined in a header file, and the header file will be used in both the server and client. The following is the section with the signal names: glib-dbus-signals/common-defs.h
/* Symbolic constants for the signal names to use with GLib.
   These need to map into the D-Bus signal names. */
#define SIGNAL_CHANGED_VALUE1    "changed_value1"
#define SIGNAL_CHANGED_VALUE2    "changed_value2"
#define SIGNAL_OUTOFRANGE_VALUE1 "outofrange_value1"
#define SIGNAL_OUTOFRANGE_VALUE2 "outofrange_value2"
Before a GObject can emit a GLib signal, the signal itself needs to be defined and created. This is best done in the class constructor code (since the signal types need to be created only once): glib-dbus-signals/server.c
/**
 * Define enumerations for the different signals that we can generate
 * (so that we can refer to them within the signals-array [below]
 * using symbolic names). These are not the same as the signal name
 * strings.
 *
 * NOTE: E_SIGNAL_COUNT is NOT a signal enum. We use it as a
 *       convenient constant giving the number of signals defined so
 *       far. It needs to be listed last.
 */
typedef enum {
  E_SIGNAL_CHANGED_VALUE1,
  E_SIGNAL_CHANGED_VALUE2,
  E_SIGNAL_OUTOFRANGE_VALUE1,
  E_SIGNAL_OUTOFRANGE_VALUE2,
  E_SIGNAL_COUNT
} ValueSignalNumber;
  /*... Listing cut for brevity ...*/
typedef struct {
  /* The parent class state. */
  GObjectClass parent;
  /* The minimum number under which values will cause signals to be
     emitted. */
  gint thresholdMin;
  /* The maximum number over which values will cause signals to be
     emitted. */
  gint thresholdMax;
  /* Signals created for this class. */
  guint signals[E_SIGNAL_COUNT];
} ValueObjectClass;
  /*... Listing cut for brevity ...*/
/**
 * Per class initializer
 *
 * Sets up the thresholds (-100 .. 100), creates the signals that we
 * can emit from any object of this class and finally registers the
 * type into the GLib/D-Bus wrapper so that it may add its own magic.
 */
static void value_object_class_init(ValueObjectClass* klass) {
  /* Since all signals have the same prototype (each will get one
     string as a parameter), we create them in a loop below. The only
     difference between them is the index into the klass->signals
     array, and the signal name.
     Since the index goes from 0 to E_SIGNAL_COUNT-1, we just specify
     the signal names into an array and iterate over it.
     Note that the order here must correspond to the order of the
     enumerations before. */
  const gchar* signalNames[E_SIGNAL_COUNT] = {
    SIGNAL_CHANGED_VALUE1,
    SIGNAL_CHANGED_VALUE2,
    SIGNAL_OUTOFRANGE_VALUE1,
    SIGNAL_OUTOFRANGE_VALUE2 };
  /* Loop variable */
  int i;
  dbg("Called");
  g_assert(klass != NULL);
  /* Setup sane minimums and maximums for the thresholds. There is no
     way to change these afterwards (currently), so you can consider
     them as constants. */
  klass->thresholdMin = -100;
  klass->thresholdMax = 100;
  dbg("Creating signals");
  /* Create the signals in one loop, since they all are similar
     (except for the names). */
  for (i = 0; i < E_SIGNAL_COUNT; i++) {
    guint signalId;
    /* Most of the time you will encounter the following code without
       comments. This is why all the parameters are documented
       directly below. */
    signalId =
      g_signal_new(signalNames[i], /* str name of the signal */
                   /* GType to which signal is bound to */
                   G_OBJECT_CLASS_TYPE(klass),
                   /* Combination of GSignalFlags which tell the
                      signal dispatch machinery how and when to
                      dispatch this signal. The most common is the
                      G_SIGNAL_RUN_LAST specification. */
                   G_SIGNAL_RUN_LAST,
                   /* Offset into the class structure for the type
                      function pointer. Since we're implementing a
                      simple class/type, we'll leave this at zero. */
                   0,
                   /* GSignalAccumulator to use. We don't need one. */
                   NULL,
                   /* User-data to pass to the accumulator. */
                   NULL,
                   /* Function to use to marshal the signal data into
                      the parameters of the signal call. Luckily for
                      us, GLib (GCClosure) already defines just the
                      function that we want for a signal handler that
                      we don't expect any return values (void) and
                      one that will accept one string as parameter
                      (besides the instance pointer and pointer to
                      user-data).
                      If no such function would exist, you would need
                      to create a new one (by using glib-genmarshal
                      tool). */
                   g_cclosure_marshal_VOID__STRING,
                   /* Return GType of the return value. The handler
                      does not return anything, so we use G_TYPE_NONE
                      to mark that. */
                   G_TYPE_NONE,
                   /* Number of parameter GTypes to follow. */
                   1,
                   /* GType(s) of the parameters. We only have one. */
                   G_TYPE_STRING);
    /* Store the signal Id into the class state, so that we can use
       it later. */
    klass->signals[i] = signalId;
    /* Proceed with the next signal creation. */
  }
  /* All signals created. */
  dbg("Binding to GLib/D-Bus");
  /*... Listing cut for brevity ...*/
}
The signal types will be kept in the class structure, so that they can be referenced easily by the signal emitting utility (covered next). The class constructor code will also set up the threshold limits, which in this implementation will be immutable (i.e. they cannot be changed). It is advisable to experiment with adding more methods to adjust the thresholds as necessary.
Emitting the signals is then quite easy, but in order to reduce code amount, a utility function will be created to launch a given signal based on its enumeration: glib-dbus-signals/server.c
/**
 * Utility helper to emit a signal given with internal enumeration and
 * the passed string as the signal data.
 *
 * Used in the setter functions below.
 */
static void value_object_emitSignal(ValueObject* obj,
                                    ValueSignalNumber num,
                                    const gchar* message) {
  /* In order to access the signal identifiers, we need to get a hold
     of the class structure first. */
  ValueObjectClass* klass = VALUE_OBJECT_GET_CLASS(obj);
  /* Check that the given num is valid (abort if not).
     Given that this file is the module actually using this utility,
     you can consider this check superfluous (but useful for
     development work). */
  g_assert((num < E_SIGNAL_COUNT) && (num >= 0));
  dbg("Emitting signal id %d, with message '%s'", num, message);
  /* This is the simplest way of emitting signals. */
  g_signal_emit(/* Instance of the object that is generating this
                   signal. This will be passed as the first parameter
                   to the signal handler (eventually). But obviously
                   when speaking about D-Bus, a signal caught on the
                   other side of D-Bus will be first processed by
                   the GLib-wrappers (the object proxy) and only then
                   processed by the signal handler. */
                obj,
                /* Signal id for the signal to generate. These are
                   stored inside the class state structure. */
                klass->signals[num],
                /* Detail of signal. Since we are not using detailed
                   signals, we leave this at zero (default). */
                0,
                /* Data to marshal into the signal. In our case it's
                   just one string. */
                message);
  /* g_signal_emit returns void, so we cannot check for success. */
  /* Done emitting signal. */
}
So that it would not be necessary to check the threshold values in multiple places in the source code, that will also be implemented as a separate function. Emitting the "threshold exceeded" signal is still up to the caller. glib-dbus-signals/server.c
/**
 * Utility to check the given integer against the thresholds.
 * Will return TRUE if thresholds are not exceeded, FALSE otherwise.
 *
 * Used in the setter functions below.
 */
static gboolean value_object_thresholdsOk(ValueObject* obj,
                                          gint value) {
  /* Thresholds are in class state data, get access to it */
  ValueObjectClass* klass = VALUE_OBJECT_GET_CLASS(obj);
  return ((value >= klass->thresholdMin) &&
          (value <= klass->thresholdMax));
}
Both utility functions are then used from within the respective set functions, one of which is presented below: glib-dbus-signals/server.c
/**
 * Function that gets called when someone tries to execute "setvalue1"
 * over the D-Bus. (Actually the marshalling code from the stubs gets
 * executed first, but they will eventually execute this function.)
 */
gboolean value_object_setvalue1(ValueObject* obj, gint valueIn,
                                                  GError** error) {
  dbg("Called (valueIn=%d)", valueIn);
  g_assert(obj != NULL);
  /* Compare the current value against old one. If they're the same,
     we don't need to do anything (except return success). */
  if (obj->value1 != valueIn) {
    /* Change the value. */
    obj->value1 = valueIn;
    /* Emit the "changed_value1" signal. */
    value_object_emitSignal(obj, E_SIGNAL_CHANGED_VALUE1, "value1");
    /* If new value falls outside the thresholds, emit
       "outofrange_value1" signal as well. */
    if (!value_object_thresholdsOk(obj, valueIn)) {
      value_object_emitSignal(obj, E_SIGNAL_OUTOFRANGE_VALUE1,
                                   "value1");
    }
  }
  /* Return success to GLib/D-Bus wrappers. In this case we don't need
     to touch the supplied error pointer-pointer. */
  return TRUE;
}
The role of the "value1" string parameter that is sent along both of the signals above might raise a question. Sending the signal origin name with the signal allows one to reuse the same callback function in the client. It is quite rare that this kind of "source naming" would be useful, but it allows for writing a slightly shorter client program.
The implementation of setvalue2 is almost identical, but deals with the gdouble parameter.
The getvalue functions are identical to the versions before as is the Makefile.
Next, the server is built and started on the background (in preparation for testing with dbus-send):
[sbox-DIABLO_X86: ~/glib-dbus-signals] > make server
dbus-binding-tool --prefix=value_object --mode=glib-server \
  value-dbus-interface.xml > value-server-stub.h
cc -I/usr/include/dbus-1.0 -I/usr/lib/dbus-1.0/include \
 -I/usr/include/glib-2.0 -I/usr/lib/glib-2.0/include -g -Wall \
 -DG_DISABLE_DEPRECATED -DNO_DAEMON -DPROGNAME=\"server\" \
 -c server.c -o server.o
cc server.o -o server -ldbus-glib-1 -ldbus-1 -lgobject-2.0 -lglib-2.0
[sbox-DIABLO_X86: ~/glib-dbus-signals] > run-standalone.sh ./server &
[1] 15293
server:main Connecting to the Session D-Bus.
server:main Registering the well-known name (org.maemo.Platdev_ex)
server:main RequestName returned 1.
server:main Creating one Value object.
server:value_object_class_init: Called
server:value_object_class_init: Creating signals
server:value_object_class_init: Binding to GLib/D-Bus
server:value_object_class_init: Done
server:value_object_init: Called
server:main Registering it on the D-Bus.
server:main Ready to serve requests (daemonizing).
server: Not daemonizing (built with NO_DAEMON-build define)
[sbox-DIABLO_X86: ~/glib-dbus-signals] >
The next step is to test the setvalue1 method:
[sbox-DIABLO_X86: ~/glib-dbus-signals] > run-standalone.sh dbus-send \
 --type=method_call --print-reply --dest=org.maemo.Platdev_ex \
 /GlobalValue org.maemo.Value.setvalue1 int32:10
server:value_object_setvalue1: Called (valueIn=10)
server:value_object_emitSignal: Emitting signal id 0, with message 'value1'
method return sender=:1.38 -> dest=:1.41
[sbox-DIABLO_X86: ~/glib-dbus-signals] > run-standalone.sh dbus-send \
 --type=method_call --print-reply --dest=org.maemo.Platdev_ex \
 /GlobalValue org.maemo.Value.setvalue1 int32:-200
server:value_object_setvalue1: Called (valueIn=-200)
server:value_object_emitSignal: Emitting signal id 0, with message 'value1'
server:value_object_emitSignal: Emitting signal id 2, with message 'value1'
method return sender=:1.38 -> dest=:1.42
And then setvalue2 (with doubles). At this point, something strange might be noticed in the threshold triggering:
[sbox-DIABLO_X86: ~/glib-dbus-signals] > run-standalone.sh dbus-send \
 --type=method_call --print-reply --dest=org.maemo.Platdev_ex \
 /GlobalValue org.maemo.Value.setvalue2 double:100.5
server:value_object_setvalue2: Called (valueIn=100.500)
server:value_object_emitSignal: Emitting signal id 1, with message 'value2'
method return sender=:1.38 -> dest=:1.44
[sbox-DIABLO_X86: ~/glib-dbus-signals] > run-standalone.sh dbus-send \
 --type=method_call --print-reply --dest=org.maemo.Platdev_ex \
 /GlobalValue org.maemo.Value.setvalue2 double:101
server:value_object_setvalue2: Called (valueIn=101.000)
server:value_object_emitSignal: Emitting signal id 1, with message 'value2'
server:value_object_emitSignal: Emitting signal id 3, with message 'value2'
method return sender=:1.38 -> dest=:1.45
Since the threshold testing logic will truncate the gdouble before testing against the (integer) thresholds, a value of 100.5 will be detected as 100, and will still fit within the thresholds.
Instead of printing out the emitted signal names, their enumeration values are printed. This could be rectified with a small enumeration to string table, but it was emitted from the program for simplicity.
It can also be noticed that other than seeing the server messages about emitting the signals, there is not a trace of them being sent or received. This is because dbus-send does not listen for signals. There is a separate tool for tracing signals, and it will be covered at the end of this chapter (dbus-monitor).
7.3.4.4 Catching Signals in GLib/D-Bus Clients
In order to receive D-Bus signals in the client, one needs to do quite a bit of work per signal. This is because dbus-bindings-tool does not generate any code for signals (at the moment). The aim is to make the GLib wrappers emit GSignals, whenever an interesting D-Bus signal arrives. This also means that it will be necessary to register the interest for a particular D-Bus signal.
When implementing the callbacks for the signals, it is necessary to take care to implement the prototype correctly. Since the signals will be sent with one attached string value, the callbacks will receive at least the string parameter. Besides the signal attached arguments, the callback will receive the proxy object, through which the signal was received, and optional user-specified data (which will not be used in this example, so it will be always NULL). glib-dbus-signals/client.c
/**
 * Signal handler for the "changed" signals. These will be sent by the
 * Value-object whenever its contents change (whether within
 * thresholds or not).
 *
 * Like before, we use strcmp to differentiate between the two
 * values, and act accordingly (in this case by retrieving
 * synchronously the values using getvalue1 or getvalue2.
 *
 * NOTE: Since we use synchronous getvalues, it is possible to get
 *       this code stuck if for some reason the server would be stuck
 *       in an eternal loop.
 */
static void valueChangedSignalHandler(DBusGProxy* proxy,
                                      const char* valueName,
                                      gpointer userData) {
  /* Since method calls over D-Bus can fail, we'll need to check
     for failures. The server might be shut down in the middle of
     things, or might act badly in other ways. */
  GError* error = NULL;

  g_print(PROGNAME ":value-changed (%s)\n", valueName);

  /* Find out which value changed, and act accordingly. */
  if (strcmp(valueName, "value1") == 0) {
    gint v = 0;
    /* Execute the RPC to get value1. */
    org_maemo_Value_getvalue1(proxy, &v, &error);
    if (error == NULL) {
      g_print(PROGNAME ":value-changed Value1 now %d\n", v);
    } else {
      /* You could interrogate the GError further, to find out exactly
         what the error was, but in our case, we'll just ignore the
         error with the hope that some day (preferably soon), the
         RPC will succeed again (server comes back on the bus). */
      handleError("Failed to retrieve value1", error->message, FALSE);
    }
  } else {
    gdouble v = 0.0;
    org_maemo_Value_getvalue2(proxy, &v, &error);
    if (error == NULL) {
      g_print(PROGNAME ":value-changed Value2 now %.3f\n", v);
    } else {
      handleError("Failed to retrieve value2", error->message, FALSE);
    }
  }
  /* Free up error object if one was allocated. */
  g_clear_error(&error);
}
The callback will first determine, what was the source value that caused the signal to be generated. For this, it uses the string argument of the signal. It will then retrieve the current value using the respective RPC methods (getvalue1 or getvalue2), and print out the value.
If any errors occur during the method calls, the errors will be printed out, but the program will continue to run. If an error does occur, the GError object will need to be freed (performed with g_clear_error). The program will not be terminated on RPC errors, since the condition might be temporary (the Value object server might be restarted later).
The code for the outOfRangeSignalHandler callback has been omitted, since it does not contain anything beyond what valueChangedSignalHandler demonstrates.
Registering for the signals is a two-step process. First, it is necessary to register the interest in the D-Bus signals, and then install the callbacks for the respective GLib signals. This is done within main: glib-dbus-signals/client.c
/**
 * The test program itself.
 *
 * 1) Setup GType/GSignal
 * 2) Create GMainLoop object
 * 3) Connect to the Session D-Bus
 * 4) Create a proxy GObject for the remote Value object
 * 5) Register signals that we're interested from the Value object
 * 6) Register signal handlers for them
 * 7) Start a timer that will launch timerCallback once per second.
 * 8) Run main-loop (forever)
 */
int main(int argc, char** argv) {

  /*... Listing cut for brevity ...*/

  remoteValue =
    dbus_g_proxy_new_for_name(bus,
                              VALUE_SERVICE_NAME, /* name */
                              VALUE_SERVICE_OBJECT_PATH, /* obj path */
                              VALUE_SERVICE_INTERFACE /* interface */);
  if (remoteValue == NULL) {
    handleError("Couldn't create the proxy object",
                "Unknown(dbus_g_proxy_new_for_name)", TRUE);
  }

  /* Register the signatures for the signal handlers.
     In our case, we'll have one string parameter passed to use along
     the signal itself. The parameter list is terminated with
     G_TYPE_INVALID (i.e., the GType for string objects. */

  g_print(PROGNAME ":main Registering signal handler signatures.\n");

  /* Add the argument signatures for the signals (needs to be done
     before connecting the signals). This might go away in the future,
     when the GLib-bindings will do automatic introspection over the
     D-Bus, but for now we need the registration phase. */
  { /* Create a local scope for variables. */

    int i;
    const gchar* signalNames[] = { SIGNAL_CHANGED_VALUE1,
                                   SIGNAL_CHANGED_VALUE2,
                                   SIGNAL_OUTOFRANGE_VALUE1,
                                   SIGNAL_OUTOFRANGE_VALUE2 };
    /* Iterate over all the entries in the above array.
       The upper limit for i might seem strange at first glance,
       but is quite common idiom to extract the number of elements
       in a statically allocated arrays in C.
       NOTE: The idiom will not work with dynamically allocated
             arrays. (Or rather it will, but the result is probably
             not what you expect.) */
    for (i = 0; i < sizeof(signalNames)/sizeof(signalNames[0]); i++) {
      /* Since the function doesn't return anything, we cannot check
         for errors here. */
      dbus_g_proxy_add_signal(/* Proxy to use */
                              remoteValue,
                              /* Signal name */
                              signalNames[i],
                              /* Will receive one string argument */
                              G_TYPE_STRING,
                              /* Termination of the argument list */
                              G_TYPE_INVALID);
    }
  } /* end of local scope */

  g_print(PROGNAME ":main Registering D-Bus signal handlers.\n");

  /* We connect each of the following signals one at a time,
     since we'll be using two different callbacks. */

  /* Again, no return values, cannot hence check for errors. */
  dbus_g_proxy_connect_signal(/* Proxy object */
                              remoteValue,
                              /* Signal name */
                              SIGNAL_CHANGED_VALUE1,
                              /* Signal handler to use. Note that the
                                 typecast is just to make the compiler
                                 happy about the function, since the
                                 prototype is not compatible with
                                 regular signal handlers. */
                              G_CALLBACK(valueChangedSignalHandler),
                              /* User-data (we don't use any). */
                              NULL,
                              /* GClosureNotify function that is
                                 responsible in freeing the passed
                                 user-data (we have no data). */
                              NULL);

  dbus_g_proxy_connect_signal(remoteValue, SIGNAL_CHANGED_VALUE2,
                              G_CALLBACK(valueChangedSignalHandler),
                              NULL, NULL);

  dbus_g_proxy_connect_signal(remoteValue, SIGNAL_OUTOFRANGE_VALUE1,
                              G_CALLBACK(outOfRangeSignalHandler),
                              NULL, NULL);

  dbus_g_proxy_connect_signal(remoteValue, SIGNAL_OUTOFRANGE_VALUE2,
                              G_CALLBACK(outOfRangeSignalHandler),
                              NULL, NULL);

  /* All signals are now registered and we're ready to handle them. */

  g_print(PROGNAME ":main Starting main loop (first timer in 1s).\n");

  /* Register a timer callback that will do RPC sets on the values.
     The userdata pointer is used to pass the proxy object to the
     callback so that it can launch modifications to the object. */
  g_timeout_add(1000, (GSourceFunc)timerCallback, remoteValue);

  /* Run the program. */
  g_main_loop_run(mainloop);
  /* Since the main loop is not stopped (by this code), we shouldn't
     ever get here. The program might abort() for other reasons. */

  /* If it does, return failure as exit code. */
  return EXIT_FAILURE;
}
When adding the argument signatures for the signals
(with dbus_g_proxy_add_signal), one needs to be very careful with the parameter list. The signal argument types must be exactly the same as are sent from the server (irrespective of the argument specification in the interface XML). This is because the current version of dbus-bindings-tool does not generate any checks to enforce signal arguments based on the interface. In this simple case, only one string is received with each different signal, so this is not a big issue. The implementation for the callback function will need to match the argument specification given to the _add_signal-function, otherwise data layout on the stack will be incorrect, and cause problems.
Building the client happens in the same manner as before (i.e. make client). Since the server is still (hopefully) running on the background, the client will now be started in the same session:
[sbox-DIABLO_X86: ~/glib-dbus-signals] > run-standalone.sh ./client
client:main Connecting to Session D-Bus.
client:main Creating a GLib proxy object for Value.
client:main Registering signal handler signatures.
client:main Registering D-Bus signal handlers.
client:main Starting main loop (first timer in 1s).
server:value_object_setvalue1: Called (valueIn=-80)
server:value_object_emitSignal: Emitting signal id 0, with message 'value1'
client:timerCallback Set value1 to -80
server:value_object_setvalue2: Called (valueIn=-120.000)
server:value_object_emitSignal: Emitting signal id 1, with message 'value2'
server:value_object_emitSignal: Emitting signal id 3, with message 'value2'
client:timerCallback Set value2 to -120.000
client:value-changed (value1)
server:value_object_getvalue1: Called (internal value1 is -80)
client:value-changed Value1 now -80
client:value-changed (value2)
server:value_object_getvalue2: Called (internal value2 is -120.000)
client:value-changed Value2 now -120.000
client:out-of-range (value2)!
client:out-of-range Value 2 is outside threshold
server:value_object_setvalue1: Called (valueIn=-70)
server:value_object_emitSignal: Emitting signal id 0, with message 'value1'
client:timerCallback Set value1 to -70
server:value_object_setvalue2: Called (valueIn=-110.000)
server:value_object_emitSignal: Emitting signal id 1, with message 'value2'
server:value_object_emitSignal: Emitting signal id 3, with message 'value2'
client:timerCallback Set value2 to -110.000
client:value-changed (value1)
server:value_object_getvalue1: Called (internal value1 is -70)
client:value-changed Value1 now -70
client:value-changed (value2)
server:value_object_getvalue2: Called (internal value2 is -110.000)
client:value-changed Value2 now -110.000
...
The client will start with the timer callback being executed once per second (as before). Each iteration, it will call the setvalue1 and setvalue2 RPC methods with increasing values. The number for value2 is intentionally set below the minimum threshold, so that it will cause an outofrange_value2 signal to be emitted. For each set, the changed_value signals will also be emitted. Whenever the client receives either of the value change signals, it will perform a getvalue RPC method call to retrieve the current value and print it out.
This will continue until the client is terminated.
7.3.4.5 Tracing D-Bus Signals
Sometimes it is useful to see which signals are actually carried on the buses, especially when adding signal handlers for signals that are emitted from undocumented interfaces. The dbus-monitor tool will attach to the D-Bus daemon, and ask it to watch for signals and report them back to the tool, so that it can decode the signals automatically, as they appear on the bus.
While the server and client are still running, the next step is to start the dbus-monitor (in a separate session this time) to see whether the signals are transmitted correctly. It should be noted that signals will appear on the bus even if there are no clients currently interested in them. In this case, signals are emitted by the server, based on client-issued RPC methods, so if the client is terminated, the signals will cease.
[sbox-DIABLO_X86: ~/glib-dbus-signals] > run-standalone.sh dbus-monitor type='signal'
signal sender=:1.38 -> dest=(null destination)
 interface=org.maemo.Value; member=changed_value1
 string "value1"
signal sender=:1.38 -> dest=(null destination)
 interface=org.maemo.Value; member=changed_value2
 string "value2"
signal sender=:1.38 -> dest=(null destination)
 interface=org.maemo.Value; member=outofrange_value2
 string "value2"
signal sender=:1.38 -> dest=(null destination)
 interface=org.maemo.Value; member=changed_value1
 string "value1"
signal sender=:1.38 -> dest=(null destination)
 interface=org.maemo.Value; member=changed_value2
 string "value2"
signal sender=:1.38 -> dest=(null destination)
 interface=org.maemo.Value; member=changed_value1
 string "value1"
signal sender=:1.38 -> dest=(null destination)
 interface=org.maemo.Value; member=changed_value2
 string "value2"
The tool will automatically decode the parameters to the best of its ability (the string parameter for the signals above). It does not know the semantic meaning for the different signals, so sometimes it will be necessary to perform some additional testing to decide what they actually mean. This is especially true, when mapping out undocumented interfaces (for which there might not be source code available).
Some examples of displaying signals on the system bus on a device follow:
- A device turning off the backlight after inactivity
Nokia-N810-xx-xx:~# run-standalone.sh dbus-monitor --system
signal sender=:1.3 -> dest=(null destination) path=/com/nokia/mce/signal;
 interface=com.nokia.mce.signal; member=display_status_ind
 string "dimmed"
signal sender=:1.3 -> dest=(null destination) path=/com/nokia/mce/signal;
 interface=com.nokia.mce.signal; member=system_inactivity_ind
 boolean true
signal sender=:1.3 -> dest=(null destination) path=/com/nokia/mce/signal;
 interface=com.nokia.mce.signal; member=save_unsaved_data_ind
signal sender=:1.3 -> dest=(null destination) path=/com/nokia/mce/signal;
 interface=com.nokia.mce.signal; member=display_status_ind
 string "off"
- A device coming back to life after a screen tap
signal sender=:1.3 -> dest=(null destination) path=/com/nokia/mce/signal;
 interface=com.nokia.mce.signal; member=system_inactivity_ind
 boolean false
signal sender=:1.3 -> dest=(null destination) path=/com/nokia/mce/signal;
 interface=com.nokia.mce.signal; member=display_status_ind
 string "on"
signal sender=:1.3 -> dest=(null destination) path=/com/nokia/mce/signal;
 interface=com.nokia.mce.signal; member=tklock_mode_ind
 string "unlocked"
- A device going into offline mode
signal sender=:1.0 -> dest=(null destination)
 path=/org/freedesktop/Hal/devices/computer_logicaldev_input_0;
 interface=org.freedesktop.Hal.Device; member=Condition
   string "ButtonPressed"
   string "power"
signal sender=:1.3 -> dest=(null destination) path=/com/nokia/mce/signal;
 interface=com.nokia.mce.signal; member=sig_device_mode_ind
   string "offline"
signal sender=:1.26 -> dest=(null destination)
 path=/com/nokia/wlancond/signal;
 interface=com.nokia.wlancond.signal; member=disconnected
   string "wlan0"
signal sender=:1.28 -> dest=(null destination) path=/com/nokia/icd;
 interface=com.nokia.icd; member=status_changed
   string "SSID"
   string "WLAN_INFRA"
   string "DISCONNECTING"
   string "com.nokia.icd.error.network_error"
signal sender=:1.22 -> dest=(null destination) path=/org/bluez/hci0;
 interface=org.bluez.Adapter; member=ModeChanged
   string "off"
signal sender=:1.25 -> dest=(null destination)
 path=/com/nokia/btcond/signal;
 interface=com.nokia.btcond.signal; member=hci_dev_down
   string "hci0"
- A device going back into normal mode
signal sender=:1.0 -> dest=(null destination)
 path=/org/freedesktop/Hal/devices/computer_logicaldev_input_0;
 interface=org.freedesktop.Hal.Device; member=Condition
   string "ButtonPressed"
   string "power"
signal sender=:1.3 -> dest=(null destination) path=/com/nokia/mce/signal;
 interface=com.nokia.mce.signal; member=sig_device_mode_ind
   string "normal"
signal sender=:1.39 -> dest=(null destination)
 path=/org/kernel/class/firmware/hci_h4p;
 interface=org.kernel.kevent; member=add
signal sender=:1.39 -> dest=(null destination)
 path=/org/kernel/class/firmware/hci_h4p;
 interface=org.kernel.kevent; member=remove
signal sender=:1.25 -> dest=(null destination)
 path=/com/nokia/btcond/signal;
 interface=com.nokia.btcond.signal; member=hci_dev_up
   string "hci0"
signal sender=:1.22 -> dest=(null destination) path=/org/bluez/hci0;
 interface=org.bluez.Adapter; member=ModeChanged
   string "connectable"
signal sender=:1.22 -> dest=(null destination) path=/org/bluez/hci0;
 interface=org.bluez.Adapter; member=NameChanged
   string "Nokia N810"
signal sender=:1.28 -> dest=(null destination) path=/com/nokia/icd;
 interface=com.nokia.icd; member=status_changed
   string "SSID"
   string "WLAN_INFRA"
   string "CONNECTING"
   string ""
signal sender=:1.26 -> dest=(null destination)
 path=/com/nokia/wlancond/signal;
 interface=com.nokia.wlancond.signal; member=connected
   string "wlan0"
   array [
      byte 0
      byte 13
      byte 157
      byte 198
      byte 120
      byte 175
   ]
   int32 536870912
signal sender=:1.100 -> dest=(null destination) path=/com/nokia/eap/signal;
 interface=com.nokia.eap.signal; member=auth_status
   uint32 4
signal sender=:1.28 -> dest=(null destination) path=/com/nokia/icd;
 interface=com.nokia.icd; member=proxies
   uint32 0
   string ""
   int32 0
   string ""
   int32 0
   string ""
   int32 0
   string ""
   int32 0
   string ""
   int32 0
   array [ ]
   string ""
signal sender=:1.28 -> dest=(null destination) path=/com/nokia/icd;
 interface=com.nokia.icd; member=status_changed
   string "SSID"
   string "WLAN_INFRA"
   string "CONNECTED"
   string ""
It is also possible to send signals from the command line, which is useful when wanting to emulate some feature of a device inside the SDK. This (like RPC method calls) can be performed with the dbus-send tool, and an example of this kind of simulation was given in the LibOSSO section.
7.3.5 Asynchronous GLib/D-Bus
7.3.5.1 Asynchronicity in D-Bus clients
So far all the RPC method calls that have been implemented here have been "fast", i.e. their execution has not depended on an access to slow services or external resources. In real life, however, it is quite likely that some services cannot be provided immediately, but will have to wait for some external service to complete, before completing the method call.
The GLib wrappers provide a version of making method calls, where the call will be launched (almost) immediately, and a callback will be executed when the method call returns (either with a return value, or an error).
Using the asynchronous wrappers is important, when the program needs to update some kind of status, or be reactive to the user (via a GUI or other interface). Otherwise, the program would block waiting for the RPC method to return, and would not be able to refresh the GUI or screen when required. An alternative solution would be to use separate threads that would run the synchronous methods, but synchronization between threads would become an issue, and debugging threaded programs is much harder than single-threaded ones. Also, implementation of threads might be suboptimal in some environments. These are the reasons why the thread scenario will not be covered here.
Slow running RPC methods will be simulated here by adding a delay into the server method implementations, so that it will become clear why asynchronous RPC mechanisms are important. As signals, by their nature, are asynchronous as well, they do not add anything to this example now. In order to simplify the code listings, the signal support from the asynchronous clients will be dropped here, even though the server still contains them and will emit the.
7.3.5.2 Slow Test Server
The only change on the server side is the addition of delays into each of the RPC methods (setvalue1, setvalue2, getvalue1 and getvalue2). This delay is added to the start of each function as follows: glib-dbus-async/server.c
/* How many microseconds to delay between each client operation. */
#define SERVER_DELAY_USEC (5*1000000UL)
  /*... Listing cut for brevity ...*/
gboolean value_object_setvalue1(ValueObject* obj, gint valueIn,
                                                  GError** error) {
  dbg("Called (valueIn=%d)", valueIn);
  g_assert(obj != NULL);
  dbg("Delaying operation");
  g_usleep(SERVER_DELAY_USEC);
  /* Compare the current value against old one. If they're the same,
     we don't need to do anything (except return success). */
  if (obj->value1 != valueIn) {
Building the server is done as before, but we'll notice the delay when we call an RPC method:
[sbox-DIABLO_X86: ~/glib-dbus-async] > run-standalone.sh ./server &
server:main Connecting to the Session D-Bus.
server:main Registering the well-known name (org.maemo.Platdev_ex)
server:main RequestName returned 1.
server:main Creating one Value object.
server:value_object_class_init: Called
server:value_object_class_init: Creating signals
server:value_object_class_init: Binding to GLib/D-Bus
server:value_object_class_init: Done
server:value_object_init: Called
server:main Registering it on the D-Bus.
server:main Ready to serve requests (daemonizing).
server: Not daemonizing (built with NO_DAEMON-build define)
[sbox-DIABLO_X86: ~/glib-dbus-async] > time run-standalone.sh dbus-send \
 --type=method_call --print-reply --dest=org.maemo.Platdev_ex \
 /GlobalValue org.maemo.Value.getvalue1
server:value_object_getvalue1: Called (internal value1 is 0)
server:value_object_getvalue1: Delaying operation
method return sender=:1.54 -> dest=:1.56
 int32 0

real    0m5.066s
user    0m0.004s
sys     0m0.056s
In the example above, the time shell built-in command was used. It will run the given command while measuring the wall clock time (a.k.a. real time), and time used while executing the code and system calls. In this case, only the real time is of any interest. The method call will delay for about 5 seconds, as it should. The delay (even if given with microsecond resolution) is always approximate, and longer than the requested amount. Exact delay will depend on many factors, most of which cannot be directly influenced.
The next experiment deals with a likely scenario, where another method call comes along while the first one is still being executed. This is best tested by just repeating the sending command twice, but running the first one on the background (so that the shell does not wait for it to complete first). The server is still running on the background from the previous test:
[sbox-DIABLO_X86: ~/glib-dbus-async] > time run-standalone.sh dbus-send \
 --type=method_call --print-reply --dest=org.maemo.Platdev_ex \
 /GlobalValue org.maemo.Value.getvalue1 &
[2] 17010
server:value_object_getvalue1: Called (internal value1 is 0)
server:value_object_getvalue1: Delaying operation
[sbox-DIABLO_X86: ~/glib-dbus-async] > time run-standalone.sh dbus-send \
 --type=method_call --print-reply --dest=org.maemo.Platdev_ex \
 /GlobalValue org.maemo.Value.getvalue1
method return sender=:1.54 -> dest=:1.57
 int32 0

real    0m5.176s
user    0m0.008s
sys     0m0.092s
server:value_object_getvalue1: Called (internal value1 is 0)
server:value_object_getvalue1: Delaying operation
method return sender=:1.54 -> dest=:1.58
 int32 0

real    0m9.852s
user    0m0.004s
sys     0m0.052s
What can be seen from the above output is that the first client is delayed for about 5 seconds, while the second client (which was launched shortly after the first) is already delayed by a much longer period. This is to be expected, as the server can only process one request at a time, and will delay each request by 5 seconds.
Some server concurrency issues will be covered later, but for now, it is necessary that the clients are able to continue their "normal work" while they wait for the response from the server. Since this is just example code, "normal work" for our clients would be just waiting for the response, while blocking on incoming events (converted into callbacks). However, if the example programs were graphical, the asynchronous approach would make it possible for them to react to user input. D-Bus by itself does not support cancellation of method calls, once processing has started on the server side, so adding cancellation support would require a separate method call to the server. Since the server only handles one operation at a time, the current server cannot support method call cancellations at all.
7.3.5.3 Asynchronous Method Calls Using Stubs
When the glib-bindings-tool is run, it will already generate the necessary wrapping stubs to support launching asynchronous method calls. What is then left to do is implementing the callback functions correctly, processing the return errors and launching the method call. glib-dbus-async/client-stubs.c
/* Pull in the client stubs that were generated with
   dbus-binding-tool */
#include "value-client-stub.h"
The client has been simplified, so that it now only operates on value1. The callback that is called from the stub code is presented next: glib-dbus-async/client-stubs.c
/**
 * This function will be called when the async setvalue1 will either
 * complete, timeout or fail (our server however does not signal
 * errors, but the client D-Bus library might). When this example
 * program is left running for a while, you will see all three cases.
 *
 * The prototype must match the one generated by the dbus-binding-tool
 * (org_maemo_Value_setvalue1_reply).
 *
 * Since there is no return value from the RPC, the only useful
 * parameter that we get is the error object, which we'll check.
 * If error is NULL, that means no error. Otherwise the RPC call
 * failed and we should check what the cause was.
 */
static void setValue1Completed(DBusGProxy* proxy, GError *error,
                                                  gpointer userData) {

  g_print(PROGNAME ":%s:setValue1Completed\n", timestamp());
  if (error != NULL) {
    g_printerr(PROGNAME "       ERROR: %s\n", error->message);
    /* We need to release the error object since the stub code does
       not do it automatically. */
    g_error_free(error);
  } else {
    g_print(PROGNAME "       SUCCESS\n");
  }
}
Since the method call does not return any data, the parameters for the callback are at minimum (those three will always be received). Handling errors must be performed within the callback, since errors could be delayed from the server, and not visible immediately at launch time. N.B. The callback will not terminate the program on errors. This is done on purpose in order to demonstrate some common asynchronous problems below. The timestamp function is a small utility function to return a pointer to a string, representing the number of seconds since the program started (useful to visualize the order of the different asynchronous events below). glib-dbus-async/client-stubs.c
/**
 * This function will be called repeatedly from within the mainloop
 * timer launch code.
 *
 * It will launch asynchronous RPC method to set value1 with ever
 * increasing argument.
 */
static gboolean timerCallback(DBusGProxy* remoteobj) {

  /* Local value that we'll start updating to the remote object. */
  static gint localValue1 = -80;

  /* Start the RPC.
     This is done by calling the stub function that will take the new
     value and the callback function to call on reply getting back.

     The stub returns a DBusGProxyCall object, but we don't need it
     so we'll ignore the return value. The return value could be used
     to cancel a pending request (from client side) with
     dbus_g_proxy_cancel_call. We could also pass a pointer to
     user-data (last parameter), but we don't need one in this example.
     It would normally be used to "carry around" the application state.
     */
  g_print(PROGNAME ":%s:timerCallback launching setvalue1\n",
          timestamp());
  org_maemo_Value_setvalue1_async(remoteobj, localValue1,
                                  setValue1Completed, NULL);
  g_print(PROGNAME ":%s:timerCallback setvalue1 launched\n",
          timestamp());

  /* Step the local value forward. */
  localValue1 += 10;

  /* Repeat timer later. */
  return TRUE;
}
Using the stub code is rather simple. For each generated synchronous version of a method wrapper, there will also be a _async version of the call. The main difference with the parameters is the removal of the GError pointer (since errors will be handled in the callback), and the addition of the callback function to use when the method completes, times out or encounters an error.
The main function remains the same from the previous client examples (a once-per-second timer will be created and run from the mainloop, until the program is terminated).
7.3.5.4 Problems with Asynchronicity
When the simple test program is built and run, it can be seen that everything starts off quite well. But at some point, problems will start to appear:
[sbox-DIABLO_X86: /glib-dbus-async] > make client-stubs
dbus-binding-tool --prefix=value_object --mode=glib-client \
  value-dbus-interface.xml > value-client-stub.h
cc -I/usr/include/dbus-1.0 -I/usr/lib/dbus-1.0/include \
 -I/usr/include/glib-2.0 -I/usr/lib/glib-2.0/include -g -Wall \
 -DG_DISABLE_DEPRECATED -DNO_DAEMON -DPROGNAME=\"client-stubs\" \
 -c client-stubs.c -o client-stubs.o
cc client-stubs.o -o client-stubs -ldbus-glib-1 -ldbus-1 -lgobject-2.0 -lglib-2.0
[sbox-DIABLO_X86: /glib-dbus-async] > run-standalone.sh ./client-stubs
client-stubs:main Connecting to Session D-Bus.
client-stubs:main Creating a GLib proxy object for Value.
client-stubs: 0.00:main Starting main loop (first timer in 1s).
client-stubs: 1.00:timerCallback launching setvalue1
client-stubs: 1.00:timerCallback setvalue1 launched
server:value_object_setvalue1: Called (valueIn=-80)
server:value_object_setvalue1: Delaying operation
client-stubs: 2.00:timerCallback launching setvalue1
client-stubs: 2.00:timerCallback setvalue1 launched
client-stubs: 3.01:timerCallback launching setvalue1
client-stubs: 3.01:timerCallback setvalue1 launched
client-stubs: 4.01:timerCallback launching setvalue1
client-stubs: 4.01:timerCallback setvalue1 launched
client-stubs: 5.02:timerCallback launching setvalue1
client-stubs: 5.02:timerCallback setvalue1 launched
server:value_object_emitSignal: Emitting signal id 0, with message 'value1'
server:value_object_setvalue1: Called (valueIn=-70)
server:value_object_setvalue1: Delaying operation
client-stubs: 6.01:setValue1Completed
client-stubs       SUCCESS
client-stubs: 6.02:timerCallback launching setvalue1
client-stubs: 6.02:timerCallback setvalue1 launched
client-stubs: 7.02:timerCallback launching setvalue1
client-stubs: 7.02:timerCallback setvalue1 launched
...
client-stubs:25.04:timerCallback launching setvalue1
client-stubs:25.04:timerCallback setvalue1 launched
server:value_object_emitSignal: Emitting signal id 0, with message 'value1'
server:value_object_setvalue1: Called (valueIn=-30)
server:value_object_setvalue1: Delaying operation
client-stubs:26.03:setValue1Completed
client-stubs       SUCCESS
client-stubs:26.05:timerCallback launching setvalue1
client-stubs:26.05:timerCallback setvalue1 launched
client-stubs:27.05:timerCallback launching setvalue1
client-stubs:27.05:timerCallback setvalue1 launched
client-stubs:28.05:timerCallback launching setvalue1
client-stubs:28.05:timerCallback setvalue1 launched
client-stubs:29.05:timerCallback launching setvalue1
client-stubs:29.05:timerCallback setvalue1 launched
client-stubs:30.05:timerCallback launching setvalue1
client-stubs:30.05:timerCallback setvalue1 launched
client-stubs:31.02:setValue1Completed
client-stubs       ERROR: Did not receive a reply. Possible causes include:
 the remote application did not send a reply, the message bus security policy
 blocked the reply, the reply timeout expired, or the network connection was
 broken.
server:value_object_emitSignal: Emitting signal id 0, with message 'value1'
server:value_object_setvalue1: Called (valueIn=-20)
server:value_object_setvalue1: Delaying operation
client-stubs:31.05:timerCallback launching setvalue1
client-stubs:31.05:timerCallback setvalue1 launched
client-stubs:32.03:setValue1Completed
client-stubs       ERROR: Did not receive a reply. Possible causes include:
 the remote application did not send a reply, the message bus security policy
 blocked the reply, the reply timeout expired, or the network connection was
 broken.
client-stubs:32.05:timerCallback launching setvalue1
client-stubs:32.05:timerCallback setvalue1 launched
client-stubs:33.03:setValue1Completed
client-stubs       ERROR: Did not receive a reply. Possible causes include:
 the remote application did not send a reply, the message bus security policy
 blocked the reply, the reply timeout expired, or the network connection was
 broken.
client-stubs:33.05:timerCallback launching setvalue1
client-stubs:33.05:timerCallback setvalue1 launched
client-stubs:34.03:setValue1Completed
client-stubs       ERROR: Did not receive a reply. Possible causes include:
 the remote application did not send a reply, the message bus security policy
 blocked the reply, the reply timeout expired, or the network connection was
 broken.
client-stubs:34.06:timerCallback launching setvalue1
client-stubs:34.06:timerCallback setvalue1 launched
client-stubs:35.03:setValue1Completed
client-stubs       ERROR: Did not receive a reply. Possible causes include:
 the remote application did not send a reply, the message bus security policy
 blocked the reply, the reply timeout expired, or the network connection was
 broken.
client-stubs:35.05:timerCallback launching setvalue1
client-stubs:35.05:timerCallback setvalue1 launched
client-stubs:36.04:setValue1Completed
client-stubs       ERROR: Did not receive a reply. Possible causes include:
 the remote application did not send a reply, the message bus security policy
 blocked the reply, the reply timeout expired, or the network connection was
 broken.
server:value_object_emitSignal: Emitting signal id 0, with message 'value1'
server:value_object_setvalue1: Called (valueIn=-10)
server:value_object_setvalue1: Delaying operation
client-stubs:36.06:timerCallback launching setvalue1
client-stubs:36.06:timerCallback setvalue1 launched
client-stubs:37.04:setValue1Completed
client-stubs       ERROR: Did not receive a reply. Possible causes include:
 the remote application did not send a reply, the message bus security policy
 blocked the reply, the reply timeout expired, or the network connection was
 broken.
[Ctrl+c]
[sbox-DIABLO_X86: /glib-dbus-async] >
server:value_object_emitSignal: Emitting signal id 0, with message 'value1'
server:value_object_setvalue1: Called (valueIn=30)
server:value_object_setvalue1: Delaying operation
server:value_object_emitSignal: Emitting signal id 0, with message 'value1'
server:value_object_setvalue1: Called (valueIn=40)
server:value_object_setvalue1: Delaying operation
server:value_object_emitSignal: Emitting signal id 0, with message 'value1'
server:value_object_setvalue1: Called (valueIn=50)
server:value_object_setvalue1: Delaying operation
server:value_object_emitSignal: Emitting signal id 0, with message 'value1'
...
What happens above is rather subtle. The timer callback in the client launches once per second and performs the RPC method launch. The server, however, still has the 5 second delay for each method call in it. It can be seen that the successive launches go on without any responses for a while. The first response comes back at about 6 seconds from the starting of the client. At this point, the server already has four other outstanding method calls that it has not handled. Slowly the method calls are accumulating at the server end, and it does not deal with them quickly enough to satisfy the client.
After about 30 seconds, it can be seen how the setValue1Completed callback is invoked, but the method call fails. This has managed to trigger the method call timeout mechanism. After this point, all the method calls that have accumulated into the server (into a message queue) will fail in the client, since they all will now return late, even if the server actually does handle them.
Once the client is terminated, it can be seen that the server is still happily continuing serving the requests, oblivious to the fact that there is no client to process the responses.
The above test demonstrates quite brutally that the services need to be designed properly, so that there is a clearly defined protocol what to do in case a method call is delayed. It is also advisable to design a notification protocol to tell clients that something has completed, instead of forcing them to time out. Using D-Bus signals is one way, but it is necessary to take care not to generate signals, when tere is nothing listening to them. This can be done by only sending signals when an long operation finishes (assuming this has been documented as part of the service description).
One partial fix would be for the client to track and make sure that only one method call to one service is outstanding at any given time. So, instead of just blindly launching the RPC methods, it should defer from launching, if it has not yet received a response from the server (and the call has not timed out).
However, this fix is not complete, since the same problem will manifest itself once there are multiple clients running in parallel and requesting the same methods. The proper fix is to make the server capable of serving multiple requests in parallel. Some hints on how to do this are presented later on.
7.3.5.5 Asynchronous Method Calls Using GLib Wrappers
Sometimes the interface XML will be missing, so the dbus-bindings-tool cannot be run to generate the stub code. The GLib wrappers are generic enough to enable building own method calls, when necessary.
It is often easiest to start with some known generated stub code to see, which parts can possibly be reused with some modifications. This is what is shown in the last step of this example, in order to make a version of the asynchronous client that will work without the stub generator.
The first step is to take a peek at the stub-generated code for the setvalue1 call (when used asynchronously): glib-dbus-async/value-client-stub.h
typedef void (*org_maemo_Value_setvalue1_reply) (DBusGProxy *proxy,
                                                 GError *error,
                                                 gpointer userdata);
static void
org_maemo_Value_setvalue1_async_callback (DBusGProxy *proxy,
                                          DBusGProxyCall *call,
                                          void *user_data)
{
  DBusGAsyncData *data = user_data;
  GError *error = NULL;
  dbus_g_proxy_end_call (proxy, call, &error, G_TYPE_INVALID);
  (*(org_maemo_Value_setvalue1_reply)data->cb) (proxy, error,
                                                data->userdata);
  return;
}
static
#ifdef G_HAVE_INLINE
inline
#endif
DBusGProxyCall*
org_maemo_Value_setvalue1_async (DBusGProxy *proxy,
                                 const gint IN_new_value,
                             org_maemo_Value_setvalue1_reply callback,
                                 gpointer userdata)
{
  DBusGAsyncData *stuff;
  stuff = g_new (DBusGAsyncData, 1);
  stuff->cb = G_CALLBACK (callback);
  stuff->userdata = userdata;
  return dbus_g_proxy_begin_call (
    proxy, "setvalue1", org_maemo_Value_setvalue1_async_callback,
    stuff, g_free, G_TYPE_INT, IN_new_value, G_TYPE_INVALID);
}
What is notable in the code snippet above is that the _async method will create a temporary small structure that will hold the pointer to the callback function, and a copy of the userdata pointer. This small structure will then be passed to dbus_g_proxy_begin_call, along with the address of the generated callback wrapper function (org_maemo_Value_setvalue1_async_callback). The GLib async launcher will also take a function pointer to a function to use when the supplied "user-data" (in this case, the small structure) will need to be disposed of after the call. Since it uses g_new to allocate the small structure, it passes g_free as the freeing function. Next comes the argument specification for the method call, which obeys the same rules as the LibOSSO ones before.
On RPC completion, the generated callback will be invoked, and it will get the real callback function pointer and the userdata as its "user-data" parameter. It will first collect the exit code for the call with dbus_g_proxy_end_call, unpack the data and invoke the real callback. After returning, the GLib wrappers (which called the generated callback) will call g_free to release the small structure, and the whole RPC launch will end.
The next step is to re-implement pretty much the same logic, but also dispose of the small structure, since the callback will be implemented directly, not as a wrapper-callback (it also omits the need for one memory allocation and one free).
The first step for that is to implement the RPC asynchronous launch code: glib-dbus-async/client-glib.c
/**
 * This function will be called repeatedly from within the mainloop
 * timer launch code.
 *
 * It will launch asynchronous RPC method to set value1 with ever
 * increasing argument.
 */
static gboolean timerCallback(DBusGProxy* remoteobj) {

  /* Local value that we'll start updating to the remote object. */
  static gint localValue1 = -80;

  /* Start the first RPC.
     The call using GLib/D-Bus is only slightly more complex than the
     stubs. The overall operation is the same. */
  g_print(PROGNAME ":timerCallback launching setvalue1\n");
  dbus_g_proxy_begin_call(remoteobj,
                          /* Method name. */
                          "setvalue1",
                          /* Callback to call on "completion". */
                          setValue1Completed,
                          /* User-data to pass to callback. */
                          NULL,
                          /* Function to call to free userData after
                             callback returns. */
                          NULL,
                          /* First argument GType. */
                          G_TYPE_INT,
                          /* First argument value (passed by value) */
                          localValue1,
                          /* Terminate argument list. */
                          G_TYPE_INVALID);
  g_print(PROGNAME ":timerCallback setvalue1 launched\n");

  /* Step the local value forward. */
  localValue1 += 10;

  /* Repeat timer later. */
  return TRUE;
}
And the callback that will be invoked on method call completion, timeouts or errors: glib-dbus-async/client-glib.c
/**
 * This function will be called when the async setvalue1 will either
 * complete, timeout or fail (same as before). The main difference in
 * using GLib/D-Bus wrappers is that we need to "collect" the return
 * value (or error). This is done with the _end_call function.
 *
 * Note that all callbacks that are to be registered for RPC async
 * notifications using dbus_g_proxy_begin_call must follow the
 * following prototype: DBusGProxyCallNotify .
 */
static void setValue1Completed(DBusGProxy* proxy,
                               DBusGProxyCall* call,
                               gpointer userData) {

  /* This will hold the GError object (if any). */
  GError* error = NULL;

  g_print(PROGNAME ":setValue1Completed\n");

  /* We next need to collect the results from the RPC call.
     The function returns FALSE on errors (which we check), although
     we could also check whether error-ptr is still NULL. */
  if (!dbus_g_proxy_end_call(proxy,
                             /* The call that we're collecting. */
                             call,
                             /* Where to store the error (if any). */
                             &error,
                             /* Next we list the GType codes for all
                                the arguments we expect back. In our
                                case there are none, so set to
                                invalid. */
                             G_TYPE_INVALID)) {
    /* Some error occurred while collecting the result. */
    g_printerr(PROGNAME " ERROR: %s\n", error->message);
    g_error_free(error);
  } else {
    g_print(PROGNAME " SUCCESS\n");
  }
}
The generated stub code is no longer needed, so the dependency rules for the stubless GLib version will also be somewhat different: glib-dbus-async/Makefile
client-glib: client-glib.o
        $(CC) $^ -o $@ $(LDFLAGS)
# Note that the GLib client doesn't need the stub code.
client-glib.o: client-glib.c common-defs.h
        $(CC) $(CFLAGS) -DPROGNAME=\"$(basename $@)\" -c $< -o $@
Since the example program logic has not changed from the previous version, testing client-glib is not presented here (it can of course be tested if so desired, since the source code contains the fully working program). This version of the client will also launch the method calls without waiting for previous method calls to complete.
7.3.6 D-Bus Server Design Issues
7.3.6.1 Definition of Server
When talking about software, a server is commonly understood to mean some kind of software component that provides a service to its clients. In Linux, servers are usually implemented as daemons, which is a technical term for a process that has detached from the terminal session, and performed other preparatory actions, so that it will stay running on the background until it terminates (or is terminated).
Sometimes people might refer to servers as engines, but it is a more generic term, and normally is not related directly to the way a service is implemented (as a separate process, or as part of some library, directly used from within a client process). Broadly defined, an engine is the part of application that implements the functionality, but not the interface, of an application. In Model-View-Controller, it would be the Model.
The servers in these examples have so far been running without daemonization, in order to display debugging messages on the terminal/screen more easily. Often a server can be started with a "--stay-on-foreground" option (or -f or something similar), which means that they will not daemonize. This is a useful feature to have, since it will allow the use of simpler outputting primitives, when testing the software.
By default, when a server daemonizes, its output and input files will be closed, so reading user input (from the terminal session, not GUI) will fail, as will each output write (including printf and g_print).
7.3.6.2 Daemonization
The objective of turning a process into a daemon is to detach it from its parent process, and create a separate session for it. This is necessary, so that parent termination does not automatically cause the termination of the server as well. There is a library call that will perform most of the daemonization work, called daemon, but it is also instructive to see what is necessary (and common) to do when implementing the functionality oneself:
- Fork the process, so that the original process can be terminated and this will cause the child process to move under the system init process.
- Create a new session for the child process with setsid.
- Possibly switch working directory to root (/), so that the daemon will not keep file systems from being unmounted.
- Set up a restricted umask, so that directories and files that are created by the daemon (or its child processes) will not create publicly accessible objects in the filesystem. In Internet Tablets, this does not really apply, since the devices only have one user.
- Close all standard I/O file descriptors (and preferably also files), so that if the terminal device closes (user logs out), it will not cause SIGPIPE signals to the daemon, when it next accesses the file descriptors (by mistake or intentionally because of g_print/printf). It is also possible to reopen the file descriptors, so that they will be connected to a device, which will just ignore all operations (like /dev/null that is used with daemon).
The daemon function allows to select, whether a change of the directory is wanted, and to close the open file descriptors. That will utilize in the servers of this example in the following way: glib-dbus-sync/server.c
#ifndef NO_DAEMON

  /* This will attempt to daemonize this process. It will switch this
     process working directory to / (chdir) and then reopen stdin,
     stdout and stderr to /dev/null. Which means that all printouts
     that would occur after this, will be lost. Obviously the
     daemonization will also detach the process from the controlling
     terminal as well. */
  if (daemon(0, 0) != 0) {
    g_error(PROGNAME ": Failed to daemonize.\n");
  }
#else
  g_print(PROGNAME
          ": Not daemonizing (built with NO_DAEMON-build define)\n");
#endif
This define is then available to the user inside the Makefile: glib-dbus-sync/Makefile
# -DNO_DAEMON : do not daemonize the server (on a separate line so can
#               be disabled just by commenting the line)
ADD_CFLAGS += -DNO_DAEMON
# Combine flags
CFLAGS  := $(PKG_CFLAGS) $(ADD_CFLAGS) $(CFLAGS)
Combining the options so that CFLAGS is appended to the Makefile provided defaults allows the user to override the define as well:
[sbox-DIABLO_X86: ~/glib-dbus-sync] > CFLAGS='-UNO_DAEMON' make server
dbus-binding-tool --prefix=value_object --mode=glib-server \
  value-dbus-interface.xml > value-server-stub.h
cc -I/usr/include/dbus-1.0 -I/usr/lib/dbus-1.0/include
   -I/usr/include/glib-2.0 -I/usr/lib/glib-2.0/include
   -g -Wall -DG_DISABLE_DEPRECATED -DNO_DAEMON -UNO_DAEMON
   -DPROGNAME=\"server\" -c server.c -o server.o
cc server.o -o server -ldbus-glib-1 -ldbus-1 -lgobject-2.0 -lglib-2.0
Since all -D and -U options will be processed from left to right by gcc, this allows the -UNO_DAEMON to undefine the symbol that is preset in the Makefile. If the user does not know this technique, it is also possible to edit the Makefile directly. Grouping all additional flags that the user might be interested in to the top of the Makefile will make this simpler (for the user).
Running the server with daemonization support is performed as before, but this time the & (do not wait for child exit) token for the shell will be left out:
[sbox-DIABLO_X86: ~/glib-dbus-sync] > run-standalone.sh ./server
server:main Connecting to the Session D-Bus.
server:main Registering the well-known name (org.maemo.Platdev_ex)
server:main RequestName returned 1.
server:main Creating one Value object.
server:main Registering it on the D-Bus.
server:main Ready to serve requests (daemonizing).
[sbox-DIABLO_X86: ~/glib-dbus-sync] >
Since server messages will not be visible any more, some other mechanism is needed to find out that the server is still running:
[sbox-DIABLO_X86: ~/glib-dbus-sync] > ps aux | grep "\./server" | grep -v pts
user 8982  0.0  0.1 2780 664 ? Ss 00:14 0:00 ./server
The slightly convoluted way of using grep was necessary to only list those lines of the ps report, which have ./server in them, and to remove the lines which do not have pts in them (so that it is possible to see processes which have no controlling terminals).
The client could have been used to test, whether the server responds, but the above technique is slightly more general. If the pstree tool is available, it could be run it with -pu options to see how the processes relate to each other, and that the daemonized server is running directly as a child of init (which was the objective of the fork).
7.3.6.3 Event Loops and Power Consumption
Most modern CPUs (even for desktops and servers) allow multiple levels of power savings to be selected. Each of the levels will be progressively more power-conservative, but there is always a price involved. The deeper the power saving level required, the more time it normally takes to achieve it, and the more time it also takes to come out of it. In some CPUs, it also requires special sequences of instructions to run, hence taking extra power itself.
All this means that changing the power state of the CPU should be avoided whenever possible. Obviously, this is in contrast to the requirement to conserve battery life, so in effect, what is needed is to require the attention of the CPU as rarely as possible.
One way at looking the problem field is contrasting event-based and polling-based programming. Code that continuously checks for some status, and only occasionally performs useful work, is clearly keeping the CPU from powering down properly. This model should be avoided at all cost, or at least its use should be restricted to bare minimum, if no other solution is possible.
In contrast, event-based programming is usually based on the execution of callback functions when something happens, without requiring a separate polling loop. This then leaves the question of how to trigger the callbacks, so that they will be issued, when something happens. Using timer callbacks might seem like a simple solution, so that it continuously (once per second or more often) checks for status, and then possibly reacts to the change in status. This model is undesirable as well, since the CPU will not be able to enter into deep sleep modes, but fluctuate between full power and high-power states.
Most operating system kernels provide a mechanism (or multiple mechanisms) by which a process can be woken up when data is available, and kept off the running queue of the scheduler otherwise. The most common mechanism in Linux is based around the select/poll system calls, which are useful when waiting for a change in status for a set of file descriptors. Since most of the interesting things in Linux can be represented as a "file" (an object supporting read and write system calls), using select and poll is quite common. However, when writing software that uses GLib (implicitly like in GTK+ or explicitly like in the non-GUI examples in this document), the GMainLoop structure will be used instead. Internally, it will use the event mechanism available on the platform (select/poll/others), but the program will need to register callbacks, start the main loop execution and then just execute the callbacks as they come.
If there are some file descriptors (network sockets, open files, etc), they can be integrated into the GMainLoop using GIOChannels (please see the GLib API reference on this).
This still leaves the question of using timers and callbacks that are triggered by timers. They should be avoided when:
- You plan to use the timer at high frequencies (> 1 Hz) for long periods of time (> 5 sec).
- There is a mechanism that will trigger a callback when something happens, instead of forcing you to poll for the status "manually" or re-execute a timer callback that does the checking.
As an example, the LibOSSO program (FlashLight) that was covered before, will have to use timers in order to keep the backlight active. However, the timer is very slow (only once every 45 seconds), so this is not a big issue. Also, in flashlight's defense, the backlight is on all the time, so having a slow timer will not hurt battery life very much anyway.
Another example could be a long-lasting download operation, which proceeds slowly, but steadily. It would be advisable to consider, whether updating a progress bar after each small bit of data is received makes sense (normally it does not). Instead, it is better to keep track of when was the last time when the progress bar was updated, and if enough time has passed since the last time, update the GUI. In some cases, this will allow the CPU to be left in a somewhat lower power state than full-power, and will allow it to fall back to sleep more quickly.
Having multiple separate programs running, each having their own timers, presents another interesting problem. Since the timer callback is not precise, at some time the system will be waking at a very high frequency, handling each timer separately (the frequency and the number of timers executing in the system is something that cannot be controlled from a single program, but instead is a system-wide issue).
If planning a GUI program, it is fairly easy to avoid contributing to this problem, since it is possible to get a callback from LibOSSO, which will tell when the program is "on top", and when it is not visible. When not visible, the GUI does not need to be updated, especially with timer-based progress indicators and such.
Since servers do not have a GUI (and their visibility is not controlled by the window manager), such mechanism does not exist. One possible solution in this case would be avoiding using timers (or any resources for that matter), when the server does not have any active clients. Resources should only be used when there is a client connection, or there is a need to actually do something. As soon as it becomes likely that the server will not be used again, the resources should be released (timer callbacks removed, etc.).
If possible, one should try and utilize the D-Bus signals available on the system bus (or even the hardware state structure via LibOSSO) to throttle down activity based on the conditions in the environment. Even if making a non-GUI server, the system shutdown signals should be listened to, as they will tell the process to shutdown gracefully.
All in all, designing for a dynamic low-powered environment is not always simple. Four simple rules will hold for most cases (all of them being important):
- Avoid doing extra work when possible.
- Do it as fast as possible (while trying to minimize resource usage).
- Do it as rarely as possible.
- Keep only those resources allocated that you need to get the work done.
For GUI programs, one will have to take into account the "graphical side" of things as well. Making a GUI that is very conservative in its power usage will, most of the time, be very simple, provide little excitement to users and might even look quite ugly. The priorities for the programmer might lie in a different direction.
7.3.6.4 Supporting Parallel Requests
The value object server with delays has one major deficiency: it can only handle one request at a time, while blocking the progress of all the other requests. This will be a problem, if multiple clients use the same server at the same time.
Normally one would add support for parallel requests by using some kind of multiplexing mechanism right on top of the message delivery mechanism (in this case, libdbus).
One can group the possible solutions around three models:
- Launching a separate thread to handle each request. This might seem like an easy way out of the problem, but coordinating access to shared resources (object states in this case) between multiple threads is prone to cause synchronization problems, and makes debugging much harder. Also, performance of such an approach would depend on efficient synchronization primitives in the platform (which might not always be available), as well as lightweight thread creation and tear-down capabilities of the platform.
- Using an event-driven model that supports multiple event sources simultaneously and "wakes up" only when there is an event on any of the event sources. The select and poll (and epoll on Linux) are very often used in these cases. Using them will normally require an application design that is driven by the requirements of the system calls (i.e. it is very difficult to retrofit them into existing "linear" designs). However, the event-based approach normally outperforms the thread approach, since there is no need for synchronization (when implemented correctly), and there will only be one context to switch from the kernel and back (there will be extra contexts with threads). GLib provides a high-level abstraction on top of the low-level event programming model, in the form of GMainLoop. One would use GIOChannel objects to represent each event source, and register callbacks that will be triggered on the events.
- Using fork to create a copy of the server process, so that the new copy will just handle one request and then terminate (or return to the pool of "servers"). The problem here is the process creation overhead, and the lack of implicit sharing of resources between the processes. One would have to arrange a separate mechanism for synchronization and data sharing between the processes (using shared memory and proper synchronization primitives). In some cases, resource sharing is not actually required, or happens at some lower level (accessing files), so this model should not be automatically ruled out, even if it seems quite heavy at first. Many static content web servers use this model because of its simplicity (and they do not need to share data between themselves).
However, the problem for the slow server lies elsewhere: the GLib/D-Bus wrappers do not support parallel requests directly. Even using the fork model would be problematic, as there would be multiple processes accessing the same D-Bus connection. Also, this problem is not specific to the slow server only. The same issues will be encountered when using other high-level frameworks (such as GTK+) whenever they cannot complete something immediately, because not all data is present in the application. In the latter case, it is normally sufficient to use the GMainLoop/GIOChannel approach in parallel with GTK+ (since it uses GMainLoop internally anyway), but with GLib/D-Bus there is no mechanism which could be used to integrate own multiplexing code (no suitable API exists).
In this case, the solution would be picking one of the above models, and then using libdbus functions directly. In effect, this would require a complete rewrite of the server, forgetting about the GType implementation, and possibly creating a light-weight wrapper for integrating libdbus functions into GLib GMainLoop mechanism (but dropping support for GType).
Dropping support for the GType and stub code will mean that it would be necessary to implement the introspection support manually and be dependent on possible API changes in libdbus in the future.
Another possible solution would be to "fake" the completion of client method calls, so that the RPC method would complete immediately, but the server would continue (using GIOChannel integration) processing the request, until it really completes. The problem in this solution is that it is very difficult to know, which client actually issued the original method call, and how to communicate the final result (or errors) of the method call to the client once it completes. One possible model here would be using signals to broadcast the end result of the method call, so that the client would get the result at some point (assuming the client is still attached to the message bus). Needless to say, this is quite inelegant and difficult to implement correctly, especially since sending signals will cause unnecessary load by waking up all the clients on the bus (even if they are not interested in that particular signal).
In short, there is no simple solution that works properly when GLib/D-Bus wrappers are used.
7.3.6.5 Debugging
The simplest way to debug servers is intelligent use of print out of events in the code sections that are relevant. Tracing everything that goes on rarely makes sense, but having a reliable and working infrastructure (in code level) will help. One such mechanism is utilizing various built-in tricks that gcc and cpp provide. In the server example, a macro called dbg is used, which will expand to g_print, when the server is built as non-daemonizing version. If the server becomes a daemon, the macro expands to "nothing", meaning that no code will be generated to format the parameters, or to even access them. It is advisable to extend this idea to support multiple levels of debugging, and possibly use different "subsystem" identifiers, so that a single subsystem can be switched on or off, depending on what it is that is to be debugged.
The dbg macro utilizes the __func__ symbol, which expands to the function name where the macro will be expanded, which is quite useful so that the function name does not need to be explicitly added: glib-dbus-sync/server.c
/* A small macro that will wrap g_print and expand to empty when
   server will daemonize. We use this to add debugging info on
   the server side, but if server will be daemonized, it does not
   make sense to even compile the code in.

   The macro is quite "hairy", but very convenient. */
#ifdef NO_DAEMON
#define dbg(fmtstr, args...) \
  (g_print(PROGNAME ":%s: " fmtstr "\n", __func__, ##args))
#else
#define dbg(dummy...)
#endif
Using the macro is then quite simple, as it will look and act like a regular printf-formatting function (g_print included): glib-dbus-sync/server.c
dbg("Called (internal value2 is %.3f)", obj->value2);
The only small difference here is that it is not necessary to explicitly add the trailing newline (\n) into each call, since it will be automatically added.
Assuming NO_DAEMON is defined, the macro would expand to the following output when the server was run:
server:value_object_getvalue2: Called (internal value2 is 42.000)
For larger projects, it is advisable to combine __file__, so that tracing multifile programs will become easier.
Coupled with proper test cases (which would be using the client code, and possibly also dbus-send in D-Bus related programs), this is a very powerful technique, and often much easier than single stepping through the code with a debugger (gdb), or setting evaluation breakpoints. It can also be of interest to use Valgrind to help detecting memory leaks (and some other errors). More information on these topics and examples is available in section Maemo Debugging Guide 14.2 of chapter Debugging on Maemo Reference Manual.
7.4 Application Preferences - GConf
GConf is used by the GNOME desktop environment for storing shared configuration settings for the desktop and applications. The daemon process GConfd follows the changes in the database. When a change occurs in the database, the daemon applies the new settings to the applications using them. For example, the control panel application uses GConf.
If settings are used only by a single application, Glib utility for .ini style files should
be used instead. Applications should naturally have working default settings. Settings
should be saved only when the user changes them.
GConf Basics
GConf is a system for GNOME applications to store settings into a database system in a centralized manner. The aim of the GConf library is to provide applications a consistent view of the database access functions, as well as to provide tools for system administrators to enable them to distribute software settings in a centralized manner (across multiple computers).
The GConf "database" may consist of multiple databases (configured by the system administrator), but normally there will be at least one database engine that uses XML to store settings. This keeps the database still in a human readable form (as opposed to binary), and allows some consistency checks via schema verifications.
The interface for the client (program that uses GConf to store its settings) is always the same, irrespective of the database back-end (the client does not see this).
What makes GConf interesting, is its capability of notifying running clients that their settings have been changed by some other process than themselves. This allows for the clients to react soon (not quite real-time), and this leads to a situation where a user will change, for example, the GNOME HTTP proxy settings, and clients that are interested in that setting will get a notification (via a callback function) that the setting has changed. The clients will then read the new setting and modify their data structures to take the new setting into account.
7.4.1 Using GConf
The GConf model consists of two parts: the GConf client library (which will be used here) and the GConf server daemon that is the guardian and reader/writer of the back-end databases. In a regular GNOME environment, the client communicates with the server either by using the Bonobo library (lightweight object IPC mechanism) or D-Bus.As Bonobo is not used in maemo (it is quite heavy, even if lightweight), the client will communicate with the server using D-Bus. This also allows the daemon to be started on demand, when there is at least one client wanting to use that service (this is a feature of D-Bus). The communication mechanism is encapsulated by the GConf client library, and as such, will be transparent.
In order to read or write the preference database, it is necessary to decide on the key to use to access the application values. The database namespace is hierarchical, and uses the '/'-character to implement this hierarchy, starting from a root location similar to UNIX file system namespace.
Each application will use its own "directory" under /apps/Maemo/appname/. N.B. Even when the word "directory" is seen in connection to GConf, one has to be careful to distinguish real directories from preference namespaces inside the GConf namespace. The /apps/Maemo/appname/ above is in the GConf namespace, so there will not actually be a physical directory called /apps/ on a system.
The keys should be named according to the platform guidelines. The current guideline is that each application should store its configuration keys under /apps/Maemo/appname/, where appname is the name of the application. There is no central registry on the names in use currently, so names should be selected carefully. Key names should all be lowercase, with underscore used to separate multiple words. Also, ASCII should be used, since GConf does not support localization for key names (it does for key values, but that is not covered in this material).
GConf values are typed, which means that it is necessary to select the type for the data that the key is supposed to hold.
The following types are supported for values in GConf:
- gint (32-bit signed)
- gboolean
- gchar (ASCII/ISO 8859-1/UTF-8 C string)
- gfloat (with the limitation that the resolution is not guaranteed nor specified by GConf because of portability issues)
- a list of values of one type
- a pair of values, each having their own type (useful for storing "mapping" data)
What is missing from the above list is storing binary data (for a good reason). The type system is also fairly limited. This is on purpose, so that complex configurations (like the Apache HTTP daemon uses, or Samba) are not attempted using GConf.
There is a diagnostic and administration tool called gconftool-2 that is also available in the SDK. It can be used to set and unset keys, as well as display their current contents.
Some examples of using gconftool-2 (on the SDK):
- Displaying the contents of all keys stored under /apps/ (listing cut for brevity)
[sbox-DIABLO_X86: ~] > run-standalone.sh gconftool-2 -R /apps /apps/osso: /apps/osso/inputmethod: launch_finger_kb_on_select = true input_method_plugin = himExample_vkb available_languages = [en_GB] use_finger_kb = true /apps/osso/inputmethod/hildon-im-languages: language-0 = en_GB current = 0 language-1 = list = [] /apps/osso/fontconfig: font_scaling_factor = Schema (type: `float' list_type: '*invalid*' car_type: '*invalid*' cdr_type: '*invalid*' locale: `C') /apps/osso/apps: /apps/osso/apps/controlpanel: groups = [copa_ia_general,copa_ia_connectivity, copa_ia_personalisation] icon_size = false group_ids = [general,connectivity,personalisation] /apps/osso/osso: /apps/osso/osso/thumbnailers: /apps/osso/osso/thumbnailers/audio@x-mp3: command = /usr/bin/hildon-thumb-libid3 /apps/osso/osso/thumbnailers/audio@x-m4a: command = /usr/bin/hildon-thumb-libid3 /apps/osso/osso/thumbnailers/audio@mp3: command = /usr/bin/hildon-thumb-libid3 /apps/osso/osso/thumbnailers/audio@x-mp2: command = /usr/bin/hildon-thumb-libid3 - Creating and setting the value to a new key.
[sbox-DIABLO_X86: ~] > run-standalone.sh gconftool-2  \
 --set /apps/Maemo/testing/testkey --type=int 5
- Listing all keys under the namespace /apps/Maemo/testing.
[sbox-DIABLO_X86: ~] > run-standalone.sh gconftool-2  \
 -R /apps/Maemo/testing
 testkey = 5
- Removing the last key will also remove the key directory.
[sbox-DIABLO_X86: ~] > run-standalone.sh gconftool-2  \
 --unset /apps/Maemo/testing/testkey
[sbox-DIABLO_X86: ~] > run-standalone.sh gconftool-2  \
 -R /apps/Maemo/testing
- Removing whole key hierarchies is also possible.
[sbox-DIABLO_X86: ~] > run-standalone.sh gconftool-2  \
 --recursive-unset /apps/Maemo/testing
7.4.2 Using GConf to Read and Write Preferences
Section Application Settings 6.9.3 of chapter Application Development in Maemo Reference Manual presents a short introductory example of gconf usage. The following example is a bit more complicated.The example is required to:
- Store the color that the user selects when the color button (in the toolbar) is used.
- Load the color preference on application startup.
Even if GConf concepts seem to be logical, it can be seen that using GConf will require one to learn some new things (e.g. the GError-object). Since the GConf client code is in its own library, the relevant compiler flags and library options need to be added again. The pkg-config package name is gconf-2.0 hildon_helloworld-9.c
/**
 * hildon_helloworld-9.c
 *
 * This maemo code example is licensed under a MIT-style license,
 * that can be found in the file called "License" in the same
 * directory as this file.
 * Copyright (c) 2007-2008 Nokia Corporation. All rights reserved.
 *
 * We'll store the color that the user selects into a GConf
 * preference. In fact, we'll have three settings, one for each
 * channel of the color (red, green and blue).
 *
 * Look for lines with "NEW" or "MODIFIED" in them.
 */

#include <stdlib.h>
#include <hildon/hildon-program.h>
#include <hildon/hildon-color-button.h>
#include <hildon/hildon-find-toolbar.h>
#include <hildon/hildon-file-chooser-dialog.h>
#include <hildon/hildon-banner.h>
#include <libgnomevfs/gnome-vfs.h>
/* Include the prototypes for GConf client functions (NEW). */
#include <gconf/gconf-client.h>

/* The application name -part of the GConf namespace (NEW). */
#define APP_NAME "hildon_hello"
/* This will be the root "directory" for our preferences (NEW). */
#define GC_ROOT  "/apps/Maemo/" APP_NAME "/"

  /*... Listing cut for brevity ...*/

/**
 * NEW
 *
 * Utility function to store the given color into our application
 * preferences. We could use a list of integers as well, but we'll
 * settle for three separate properties; one for each of RGB
 * channels.
 *
 * The config keys that will be used are 'red', 'green' and 'blue'.
 *
 * NOTE:
 *   We're doing things very non-optimally. If our application would
 *   have multiple preference settings, and we would like to know
 *   when someone will change them (external program, another
 *   instance of our program, etc), we'd have to keep a reference to
 *   the GConf client connection. Listening for changes in
 *   preferences would also require a callback registration, but this
 *   is covered in the "maemo Platform Development" material.
 */
static void confStoreColor(const GdkColor* color) {

  /* We'll store the pointer to the GConf connection here. */
  GConfClient* gcClient = NULL;

  /* Make sure that no NULLs are passed for the color. GdkColor is
     not a proper GObject, so there is no GDK_IS_COLOR macro. */
  g_assert(color);

  g_print("confStoreColor: invoked\n");

  /* Open a connection to gconfd-2 (via D-Bus in maemo). The GConf
     API doesn't say whether this function can ever return NULL or
     how it will behave in error conditions. */
  gcClient = gconf_client_get_default();
  /* We make sure that it's a valid GConf-client object. */
  g_assert(GCONF_IS_CLIENT(gcClient));

  /* Store the values. */
  if (!gconf_client_set_int(gcClient, GC_ROOT "red", color->red,
                            NULL)) {
    g_warning(" failed to set %s/red to %d\n", GC_ROOT, color->red);
  }
  if (!gconf_client_set_int(gcClient, GC_ROOT "green", color->green,
                            NULL)) {
    g_warning(" failed to set %s/green to %d\n", GC_ROOT,
              color->green);
  }
  if (!gconf_client_set_int(gcClient, GC_ROOT "blue", color->blue,
                            NULL)) {
    g_warning(" failed to set %s/blue to %d\n", GC_ROOT,
              color->blue);
  }

  /* Release the GConf client object (with GObject-unref). */
  g_object_unref(gcClient);
  gcClient = NULL;
}

/**
 * NEW
 *
 * A utility function to get an integer but also return the status
 * whether the requested key existed or not.
 *
 * NOTE:
 *   It's also possible to use gconf_client_get_int(), but it's not
 *   possible to then know whether they key existed or not, because
 *   the function will return 0 if the key doesn't exist (and if the
 *   value is 0, how could you tell these two conditions apart?).
 *
 * Parameters:
 * - GConfClient: the client object to use
 * - const gchar*: the key
 * - gint*: the address to store the integer to if the key exists
 *
 * Returns:
 * - TRUE: if integer has been updated with a value from GConf.
 *   FALSE: there was no such key or it wasn't an integer.
 */
static gboolean confGetInt(GConfClient* gcClient, const gchar* key,
                           gint* number) {

  /* This will hold the type/value pair at some point. */
  GConfValue* val = NULL;
  /* Return flag (tells the caller whether this function wrote behind
     the 'number' pointer or not). */
  gboolean hasChanged = FALSE;

  /* Try to get the type/value from the GConf DB.
     NOTE:
       We're using a version of the getter that will not return any
       defaults (if a schema would specify one). Instead, it will
       return the value if one has been set (or NULL).

     We're not really interested in errors as this will return a NULL
     in case of missing keys or errors and that is quite enough for
     us. */
  val = gconf_client_get_without_default(gcClient, key, NULL);
  if (val == NULL) {
    /* Key wasn't found, no need to touch anything. */
    g_warning("confGetInt: key %s not found\n", key);
    return FALSE;
  }

  /* Check whether the value stored behind the key is an integer. If
     it is not, we issue a warning, but return normally. */
  if (val->type == GCONF_VALUE_INT) {
    /* It's an integer, get it and store. */
    *number = gconf_value_get_int(val);
    /* Mark that we've changed the integer behind 'number'. */
    hasChanged = TRUE;
  } else {
    g_warning("confGetInt: key %s is not an integer\n", key);
  }

  /* Free the type/value-pair. */
  gconf_value_free(val);
  val = NULL;

  return hasChanged;
}

/**
 * NEW
 *
 * Utility function to change the given color into the one that is
 * specified in application preferences.
 *
 * If some key is missing, that channel is left untouched. The
 * function also checks for proper values for the channels so that
 * invalid values are not accepted (guint16 range of GdkColor).
 *
 * Parameters:
 * - GdkColor*: the color structure to modify if changed from prefs.
 *
 * Returns:
 * - TRUE if the color was been changed by this routine.
 *   FALSE if the color wasn't changed (there was an error or the
 *   color was already exactly the same as in the preferences).
 */
static gboolean confLoadCurrentColor(GdkColor* color) {

  GConfClient* gcClient = NULL;
  /* Temporary holders for the pref values. */
  gint red = -1;
  gint green = -1;
  gint blue = -1;
  /* Temp variable to hold whether the color has changed. */
  gboolean hasChanged = FALSE;

  g_assert(color);

  g_print("confLoadCurrentColor: invoked\n");

  /* Open a connection to gconfd-2 (via d-bus). */
  gcClient = gconf_client_get_default();
  /* Make sure that it's a valid GConf-client object. */
  g_assert(GCONF_IS_CLIENT(gcClient));

  if (confGetInt(gcClient, GC_ROOT "red", &red)) {
    /* We got the value successfully, now clamp it. */
    g_print(" got red = %d, ", red);
    /* We got a value, so let's limit it between 0 and 65535 (the
       legal range for guint16). We use the CLAMP macro from GLib for
       this. */
    red = CLAMP(red, 0, G_MAXUINT16);
    g_print("after clamping = %d\n", red);
    /* Update & mark that at least this component changed. */
    color->red = (guint16)red;
    hasChanged = TRUE;
  }
  /* Repeat the same logic for the green component. */
  if (confGetInt(gcClient, GC_ROOT "green", &green)) {
    g_print(" got green = %d, ", green);
    green = CLAMP(green, 0, G_MAXUINT16);
    g_print("after clamping = %d\n", green);
    color->green = (guint16)green;
    hasChanged = TRUE;
  }
  /* Repeat the same logic for the last component (blue). */
  if (confGetInt(gcClient, GC_ROOT "blue", &blue)) {
    g_print(" got blue = %d, ", blue);
    blue = CLAMP(blue, 0, G_MAXUINT16);
    g_print("after clamping = %d\n", blue);
    color->blue = (guint16)blue;
    hasChanged = TRUE;
  }

  /* Release the client object (with GObject-unref). */
  g_object_unref(gcClient);
  gcClient = NULL;

  /* Return status if the color was been changed by this routine. */
  return hasChanged;
}

/**
 * MODIFIED
 *
 * Invoked when the user selects a color (or will cancel the dialog).
 *
 * Will also write the color to preferences (GConf) each time the
 * color changes. We'll compare whether it has really changed (to
 * avoid writing to GConf is nothing really changed).
 */
static void cbActionColorChanged(HildonColorButton* colorButton,
                                 ApplicationState* app) {

  /* Local variables that we'll need to handle the change (NEW). */
  gboolean hasChanged = FALSE;
  GdkColor newColor = {};
  GdkColor* curColor = NULL;

  g_assert(app != NULL);

  g_print("cbActionColorChanged invoked\n");
  /* Retrieve the new color from the color button (NEW). */
  hildon_color_button_get_color(colorButton, &newColor);
  /* Just an alias to save some typing (could also use
     app->currentColor) (NEW). */
  curColor = &app->currentColor;

  /* Check whether the color really changed (NEW). */
  if ((newColor.red   != curColor->red) ||
      (newColor.green != curColor->green) ||
      (newColor.blue  != curColor->blue)) {
    hasChanged = TRUE;
  }
  if (!hasChanged) {
    g_print(" color not really changed\n");
    return;
  }
  /* Color really changed, store to preferences (NEW). */
  g_print(" color changed, storing into preferences.. \n");
  confStoreColor(&newColor);
  g_print(" done.\n");

  /* Update the changed color into the application state. */
  app->currentColor = newColor;
}

  /*... Listing cut for brevity ...*/

/**
 * MODIFIED
 *
 * The color of the color button will be loaded from the application
 * preferences (or keep the default if preferences have no setting).
 */
static GtkWidget* buildToolbar(ApplicationState* app) {

  GtkToolbar*  toolbar = NULL;
  GtkToolItem* tbOpen = NULL;
  GtkToolItem* tbSave = NULL;
  GtkToolItem* tbSep = NULL;
  GtkToolItem* tbFind = NULL;
  GtkToolItem* tbColorButton = NULL;
  GtkWidget*   colorButton = NULL;

  g_assert(app != NULL);

  tbOpen = gtk_tool_button_new_from_stock(GTK_STOCK_OPEN);
  tbSave = gtk_tool_button_new_from_stock(GTK_STOCK_SAVE);
  tbSep  = gtk_separator_tool_item_new();
  tbFind = gtk_tool_button_new_from_stock(GTK_STOCK_FIND);

  tbColorButton = gtk_tool_item_new();
  colorButton = hildon_color_button_new();
  /* Copy the color from the color button into the application state.
     This is done to detect whether the color in preferences matches
     the default color or not (NEW). */
  hildon_color_button_get_color(HILDON_COLOR_BUTTON(colorButton),
                                &app->currentColor);
  /* Load preferences and change the color if necessary. */
  g_print("buildToolbar: loading color pref.\n");
  if (confLoadCurrentColor(&app->currentColor)) {
    g_print(" color not same as default one\n");
    hildon_color_button_set_color(HILDON_COLOR_BUTTON(colorButton),
                                  &app->currentColor);
  } else {
    g_print(" loaded color same as default\n");
  }
  gtk_container_add(GTK_CONTAINER(tbColorButton), colorButton);

  /*... Listing cut for brevity ...*/

}
Since the graphical appearance of the program does not change (except that the ColorButton will display the correct initial color), a look will be taken at the stdout display of the program.
[sbox-DIABLO_X86: ~/appdev] > run-standalone.sh ./hildon_helloworld-9
buildToolbar: loading color pref.
confLoadCurrentColor: invoked
hildon_helloworld-9[19840]: GLIB WARNING ** default -
 confGetInt: key /apps/Maemo/hildon_hello/red not found
hildon_helloworld-9[19840]: GLIB WARNING ** default -
 confGetInt: key /apps/Maemo/hildon_hello/green not found
hildon_helloworld-9[19840]: GLIB WARNING ** default -
 confGetInt: key /apps/Maemo/hildon_hello/blue not found
 loaded color same as default
main: calling gtk_main
cbActionMainToolbarToggle invoked
cbActionColorChanged invoked
 color changed, storing into preferences..
confStoreColor: invoked
 done.
main: returned from gtk_main and exiting with success
When running the program for the first time, warnings about the missing keys can be expected (since the values were not present in GConf).
Run the program again and exit:
[sbox-DIABLO_X86: ~/appdev] > run-standalone.sh ./hildon_helloworld-9
buildToolbar: loading color pref.
confLoadCurrentColor: invoked
 got red = 65535, after clamping = 65535
 got green = 65535, after clamping = 65535
 got blue = 0, after clamping = 0
 color not same as default one
main: calling gtk_main
main: returned from gtk_main and exiting with success
The next step is to remove one key (red), and run the program again (this is to test and verify that the logic works):
[sbox-DIABLO_X86: ~/appdev] > run-standalone.sh gconftool-2  \
 --unset /apps/Maemo/hildon_hello/red
[sbox-DIABLO_X86: ~/appdev] > run-standalone.sh gconftool-2  \
 -R /apps/Maemo/hildon_hello
 green = 65535
 blue = 0
[sbox-DIABLO_X86: ~/appdev] > run-standalone.sh ./hildon_helloworld-9
buildToolbar: loading color pref.
confLoadCurrentColor: invoked
hildon_helloworld-9[19924]: GLIB WARNING ** default -
 confGetInt: key /apps/Maemo/hildon_hello/red not found
 got green = 65535, after clamping = 65535
 got blue = 0, after clamping = 0
 color not same as default one
main: calling gtk_main
main: returned from gtk_main and exiting with success
7.4.3 Asynchronous GConf
7.4.3.1 Listening to changes in GConf
Now it is time to see how to extend GConf to be more suitable in asynchronous work, and especially when implementing services.
When the configuration needs for the service are simple, and reacting to configuration changes in "realtime" is desired, it is advisable to use GConf. Also, people tend to use GConf when they are too lazy to write their own configuration file parsers (although there is a simple one in GLib), or too lazy to write the GUI part to change the settings. This example program will simulate the first case, and react to changes in a subset of GConf configuration name space when the changes happen.
The application will be interested in two string values; one to set the device to use for communication (connection), and the other to set the communication parameters for the device (connectionparams). Since this example will be concentrating on just the change notifications, the program logic is simplified by omitting the proper set-up code in the program. This means that it is necessary to set up some values to the GConf keys prior to running the program. For this, gconftool-2 will be used, and a target has been prepared in the Makefile just for this (see section (see section GNU Make and Makefiles 4.2 in chapter GNU Build System if necessary): gconf-listener/Makefile
# Define a variable for this so that the GConf root may be changed
gconf_root := /apps/Maemo/platdev_ex

# ... Listing cut for brevity ...

# This will setup the keys into default values.
# It will first do a clear to remove any existing keys.
primekeys: clearkeys
        gconftool-2 -set -type string \
                    $(gconf_root)/connection btcomm0
        gconftool-2 -set -type string \
                    $(gconf_root)/connectionparams 9600,8,N,1

# Remove all application keys
clearkeys:
        @gconftool-2 -recursive-unset $(gconf_root)

# Dump all application keys
dumpkeys:
        @echo Keys under $(gconf_root):
        @gconftool-2 -recursive-list $(gconf_root)
The next step is to prepare the keyspace by running the primekeys target, and to verify that it succeeds by running the dumpkeys target:
[sbox-DIABLO_X86: ~/gconf-listener] > make primekeys
gconftool-2 --set --type string \
            /apps/Maemo/platdev_ex/connection btcomm0
gconftool-2 --set --type string \
            /apps/Maemo/platdev_ex/connectionparams 9600,8,N,1
[sbox-DIABLO_X86: ~/gconf-listener] > make dumpkeys
Keys under /apps/Maemo/platdev_ex:
 connectionparams = 9600,8,N,1
 connection = btcomm0
7.4.3.2 Implementing Notifications on Changes in GConf
The first step here is to take care of the necessary header information. The GConf namespace settings have been all implemented using cpp macros, so that one can easily change the prefix of the name space if required later on. gconf-listener/gconf-key-watch.c
#include <glib.h>
#include <gconf/gconf-client.h>
#include <string.h> /* strcmp */

/* As per maemo Coding Style and Guidelines document, we use the
   /apps/Maemo/ -prefix.
   NOTE: There is no central registry (as of this moment) that you
         could check that your application name doesn't collide with
         other application names, so caution is advised! */
#define SERVICE_GCONF_ROOT "/apps/Maemo/platdev_ex"

/* We define the names of the keys symbolically so that we may change
   them later if necessary, and so that the GConf "root directory" for
   our application will be automatically prefixed to the paths. */
#define SERVICE_KEY_CONNECTION \
        SERVICE_GCONF_ROOT "/connection"
#define SERVICE_KEY_CONNECTIONPARAMS \
        SERVICE_GCONF_ROOT "/connectionparams"
The main starts innocently enough, by creating a GConf client object (that encapsulates the connection to the GConf daemon), and then displays the two values on output: gconf-listener/gconf-key-watch.c
int main (int argc, char** argv) {
  /* Will hold reference to the GConfClient object. */
  GConfClient* client = NULL;
  /* Initialize this to NULL so that we'll know whether an error
     occurred or not (and we don't have an existing GError object
     anyway at this point). */
  GError* error = NULL;
  /* This will hold a reference to the mainloop object. */
  GMainLoop* mainloop = NULL;

  g_print(PROGNAME ":main Starting.\n");

  /* Must be called to initialize GType system. The API reference for
     gconf_client_get_default() insists.
     NOTE: Using gconf_init() is deprecated! */
  g_type_init();

  /* Create a new mainloop structure that we'll use. Use default
     context (NULL) and set the 'running' flag to FALSE. */
  mainloop = g_main_loop_new(NULL, FALSE);
  if (mainloop == NULL) {
    g_error(PROGNAME ": Failed to create mainloop!\n");
  }

  /* Create a new GConfClient object using the default settings. */
  client = gconf_client_get_default();
  if (client == NULL) {
    g_error(PROGNAME ": Failed to create GConfClient!\n");
  }

  g_print(PROGNAME ":main GType and GConfClient initialized.\n");

  /* Display the starting values for the two keys. */
  dispStringKey(client, SERVICE_KEY_CONNECTION);
  dispStringKey(client, SERVICE_KEY_CONNECTIONPARAMS);
The dispStringKey utility is rather simple as well, building on the GConf material that was covered in the previous section 7.4.2: gconf-listener/gconf-key-watch.c
/**
 * Utility to retrieve a string key and display it.
 * (Just as a small refresher on the API.)
 */
static void dispStringKey(GConfClient* client,
                          const gchar* keyname) {

  /* This will hold the string value of the key. It will be
     dynamically allocated for us, so we need to release it ourselves
     when done (before returning). */
  gchar* valueStr = NULL;

  /* We're not interested in the errors themselves (the last
     parameter), but the function will return NULL if there is one,
     so we just end in that case. */
  valueStr = gconf_client_get_string(client, keyname, NULL);

  if (valueStr == NULL) {
    g_error(PROGNAME ": No string value for %s. Quitting\n", keyname);
    /* Application terminates. */
  }

  g_print(PROGNAME ": Value for key '%s' is set to '%s'\n",
          keyname, valueStr);

  /* Normally one would want to use the value for something beyond
     just displaying it, but since this code doesn't, we release the
     allocated value string. */
  g_free(valueStr);
}
Next, the GConf client is told to attach itself to a specific name space part that this example is going to operate with: gconf-listener/gconf-key-watch.c
  /**
   * Register directory to watch for changes. This will then tell
   * GConf to watch for changes in this namespace, and cause the
   * "value-changed"-signal to be emitted. We won't be using that
   * mechanism, but will opt to a more modern (and potentially more
   * scalable solution). The directory needs to be added to the
   * watch list in either case.
   *
   * When adding directories, you can sometimes optimize your program
   * performance by asking GConfClient to preload some (or all) keys
   * under a specific directory. This is done via the preload_type
   * parameter (we use GCONF_CLIENT_PRELOAD_NONE below). Since our
   * program will only listen for changes, we don't want to use extra
   * memory to keep the keys cached.
   *
   * Parameters:
   * - client: GConf-client object
   * - SERVICEPATH: the name of the GConf namespace to follow
   * - GCONF_CLIENT_PRELOAD_NONE: do not preload any of contents
   * - error: where to store the pointer to allocated GError on
   *          errors.
   */
  gconf_client_add_dir(client,
                       SERVICE_GCONF_ROOT,
                       GCONF_CLIENT_PRELOAD_NONE,
                       &error);

  if (error != NULL) {
    g_error(PROGNAME ": Failed to add a watch to GCClient: %s\n",
            error->message);
    /* Normally we'd also release the allocated GError, but since
       this program will terminate on g_error, we won't do that.
       Hence the next line is commented. */
    /* g_error_free(error); */

    /* When you want to release the error if it has been allocated,
       or just continue if not, use g_clear_error(&error); */
  }

  g_print(PROGNAME ":main Added " SERVICE_GCONF_ROOT ".\n");
Proceeding with the callback function registration, we have: gconf-listener/gconf-key-watch.c
  /* Register our interest (in the form of a callback function) for
     any changes under the namespace that we just added.

     Parameters:
     - client: GConfClient object.
     - SERVICEPATH: namespace under which we can get notified for
                    changes.
     - gconf_notify_func: callback that will be called on changes.
     - NULL: user-data pointer (not used here).
     - NULL: function to call on user-data when notify is removed or
             GConfClient destroyed. NULL for none (since we don't
             have user-data anyway).
     - error: return location for an allocated GError.

     Returns:
     guint: an ID for this notification so that we could remove it
            later with gconf_client_notify_remove(). We're not going
            to use it so we don't store it anywhere. */
  gconf_client_notify_add(client, SERVICE_GCONF_ROOT,
                          keyChangeCallback, NULL, NULL, &error);
  if (error != NULL) {
    g_error(PROGNAME ": Failed to add register the callback: %s\n",
            error->message);
    /* Program terminates. */
  }

  g_print(PROGNAME ":main CB registered & starting main loop\n");
When dealing with regular desktop software, one could use multiple callback functions; one for each key to track. However, this would require implementing multiple callback functions, and this runs a risk of enlarging the size of the code. For this reason, the example code uses one callback function, which will internally multiplex between the two keys (by using strcmp): gconf-listener/gconf-key-watch.c
/**
 * Callback called when a key in watched directory changes.
 * Prototype for the callback must be compatible with
 * GConfClientNotifyFunc (for ref).
 *
 * It will find out which key changed (using strcmp, since the same
 * callback is used to track both keys) and the display the new value
 * of the key.
 *
 * The changed key/value pair will be communicated in the entry
 * parameter. userData will be NULL (can be set on notify_add [in
 * main]). Normally the application state would be carried within the
 * userData parameter, so that this callback could then modify the
 * view based on the change. Since this program does not have a state,
 * there is little that we can do within the function (it will abort
 * the program on errors though).
 */
static void keyChangeCallback(GConfClient* client,
                              guint        cnxn_id,
                              GConfEntry*  entry,
                              gpointer     userData) {

  /* This will hold the pointer to the value. */
  const GConfValue* value = NULL;
  /* This will hold a pointer to the name of the key that changed. */
  const gchar* keyname = NULL;
  /* This will hold a dynamically allocated human-readable
     representation of the changed value. */
  gchar* strValue = NULL;

  g_print(PROGNAME ": keyChangeCallback invoked.\n");

  /* Get a pointer to the key (this is not a copy). */
  keyname = gconf_entry_get_key(entry);

  /* It will be quite fatal if after change we cannot retrieve even
     the name for the gconf entry, so we error out here. */
  if (keyname == NULL) {
    g_error(PROGNAME ": Couldn't get the key name!\n");
    /* Application terminates. */
  }

  /* Get a pointer to the value from changed entry. */
  value = gconf_entry_get_value(entry);

  /* If we get a NULL as the value, it means that the value either has
     not been set, or is at default. As a precaution we assume that
     this cannot ever happen, and will abort if it does.
     NOTE: A real program should be more resilient in this case, but
           the problem is: what is the correct action in this case?
           This is not always simple to decide.
     NOTE: You can trip this assert with 'make primekeys', since that
           will first remove all the keys (which causes the CB to
           be invoked, and abort here). */
  g_assert(value != NULL);

  /* Check that it looks like a valid type for the value. */
  if (!GCONF_VALUE_TYPE_VALID(value->type)) {
    g_error(PROGNAME ": Invalid type for gconfvalue!\n");
  }

  /* Create a human readable representation of the value. Since this
     will be a new string created just for us, we'll need to be
     careful and free it later. */
  strValue = gconf_value_to_string(value);

  /* Print out a message (depending on which of the tracked keys
     change. */
  if (strcmp(keyname, SERVICE_KEY_CONNECTION) == 0) {
    g_print(PROGNAME ": Connection type setting changed: [%s]\n",
            strValue);
  } else if (strcmp(keyname, SERVICE_KEY_CONNECTIONPARAMS) == 0) {
    g_print(PROGNAME ": Connection params setting changed: [%s]\n",
            strValue);
  } else {
    g_print(PROGNAME ":Unknown key: %s (value: [%s])\n", keyname,
            strValue);
  }

  /* Free the string representation of the value. */
  g_free(strValue);

  g_print(PROGNAME ": keyChangeCallback done.\n");
}
The complications in the above code rise from the fact that GConf communicates values using a GValue structure, which can carry values of any simple type. Since GConf (or the user for that matter) cannot be completely trusted to return the correct type for the value, it is necessary to be extra careful, and not assume that it will always be a string. GConf also supports "default" values, which are communicated to the application using NULLs, so it is also necessary to guard against that. Especially since the application does not provide a schema for the configuration space that would contain the default values.
The next step is to build and test the program. The program will be started on the background, so that gconftool-2 can be used to see how the program reacts to changing parameters:
[sbox-DIABLO_X86: ~/gconf-listener] > make
cc -I/usr/include/glib-2.0 -I/usr/lib/glib-2.0/include -I/usr/include/gconf/2 \
   -I/usr/include/dbus-1.0 -I/usr/lib/dbus-1.0/include -Wall -g \
   -DPROGNAME=\"gconf-key-watch\" gconf-key-watch.c -o gconf-key-watch \
   -lgconf-2 -ldbus-glib-1 -ldbus-1 -lgobject-2.0 -lglib-2.0
[sbox-DIABLO_X86: ~/gconf-listener] > run-standalone.sh ./gconf-key-watch &
[2] 21385
gconf-key-watch:main Starting.
gconf-key-watch:main GType and GConfClient initialized.
gconf-key-watch: Value for key '/apps/Maemo/platdev_ex/connection'
 is set to 'btcomm0'
gconf-key-watch: Value for key '/apps/Maemo/platdev_ex/connectionparams'
 is set to '9600,8,N,1'
gconf-key-watch:main Added /apps/Maemo/platdev_ex.
gconf-key-watch:main CB registered & starting main loop
[sbox-DIABLO_X86: ~/gconf-listener] > gconftool-2 --set --type string \
  /apps/Maemo/platdev_ex/connection ttyS0
gconf-key-watch: keyChangeCallback invoked.
gconf-key-watch: Connection type setting changed: [ttyS0]
gconf-key-watch: keyChangeCallback done.
[sbox-DIABLO_X86: ~/gconf-listener] > gconftool-2 --set --type string \
  /apps/Maemo/platdev_ex/connectionparams ''
gconf-key-watch: keyChangeCallback invoked.
gconf-key-watch: Connection params setting changed: []
gconf-key-watch: keyChangeCallback done.
The latter change is somewhat problematic (which the code needs to deal with as well). It is necessary to decide how to react to values that are of the correct type, but with senseless values. GConf in itself does not provide syntax checking for the values, or any semantic checking support. It is recommended that configuration changes will only be reacted to when they pass some internal (to the application) logic that will check their validity, both at syntax level and also at semantic level.
One option would also be resetting the value back to a valid value, whenever the program detects an invalid value set attempt. This will lead to a lot of problems, if the value is set programmatically from another program that will obey the same rule, so it is not advisable. Quitting the program on invalid values is also an option that should not be used, since the restricted environment does not provide many ways to inform the user that the program has quit.
An additional possible problem is having multiple keys that are all "related" to a single setting or action. It is necessary to decide, how to deal with changes across multiple GConf keys that are related, yet changed separately. The two key example code demonstrates the inherent problem: should the server re-initialize the (theoretic) connection, when the connection key is changed, or when the connectionparams key is changed? If the connection is re-initialized when either of the keys is changed, then the connection will be re-initialized twice when both are changed "simultaneously" (user presses "Apply" on a settings dialog, or gconftool-2 is run and sets both keys). It is easy to see how this might be an even larger problem, if instead of two keys, there were five per connection. GConf and the GConfClient GObject wrapper that has been used here do not support "configuration set transactions", which would allow setting and processing multiple related keys using an atomic model. The example program ignores this issue completely.
The next step is to test how the program (which is still running) reacts to other problematic situations:
[sbox-DIABLO_X86: ~/gconf-listener] > gconftool-2 --set --type int \
  /apps/Maemo/platdev_ex/connectionparams 5
gconf-key-watch: keyChangeCallback invoked.
gconf-key-watch: Connection params setting changed: [5]
gconf-key-watch: keyChangeCallback done.
[sbox-DIABLO_X86: ~/gconf-listener] > gconftool-2 --set --type boolean \
  /apps/Maemo/platdev_ex/connectionparams true
gconf-key-watch: keyChangeCallback invoked.
gconf-key-watch: Connection params setting changed: [true]
gconf-key-watch: keyChangeCallback done.
The next example removes the configuration keys, while the program is still running:
[sbox-DIABLO_X86: ~/gconf-listener] > make clearkeys
gconf-key-watch: keyChangeCallback invoked.
gconf-key-watch[21403]: GLIB ERROR ** default -
  file gconf-key-watch.c: line 129 (keyChangeCallback):
  assertion failed: (value != NULL)
aborting...
/usr/bin/run-standalone.sh: line 11: 21403 Aborted (core dumped) "$@"
[1]+  Exit 134 run-standalone.sh ./gconf-key-watch
Since the code (in the callback function) contains an assert that checks for non-NULL values, it will abort when the key is removed, and that causes the value to go to NULL. So the abortion in the above case is expected.
7.5 Alarm Framework
The maemo alarm framework provides an easy way to manage timed events in the device. It is powerful, and not restricted only to wake up alarms. The framework provides many other features, including:
- Setting multiple alarm events
- Configuring the number of recurrences and the time between each one
- Choosing whether the alarm dialog should be shown
- Setting the title and the message to be shown in the alarm dialog
- Selecting a custom icon file to be shown in the alarm dialog
- Selecting a custom sound file to be played while the alarm dialog is shown
- Choosing to boot the device if it is turned off
- Choosing to run the alarm only if the device is connected
- Choosing to run the alarm in the system start up if it is missed
- Choosing to postpone the alarm if it is missed
- Executing a given file (e.g. a program or a script)
- Sending a message to a D-Bus message bus
- Querying for existing alarm events in a given period of time
- Deleting an existing alarm event
- Configuring the snooze time for the event
- Configuring the default snooze time for all alarm events
This section shows how to use the alarm interface, describes all its functions and gives examples of use cases.
Timed event functionality is provided by the alarmd daemon. It makes it possible for applications to get D-Bus messages or exec calls at certain times.
Applications register an event happening at a certain time. The alarmd daemon will then call the application when the event is due, so the application does not need to be running during the waiting period. This is useful for applications that need to update their status at regular intervals.
A single event may be set to repeat itself over and over again, at regular intervals. The alarmd daemon will remember these events over system shutdowns too.
The alarmd daemon can also be asked to start the system up for an event, even when powered off. These events may also be set to run in a hidden power-on mode, where the display stays off, but the device is on. The alarmd daemon also supports the use of osso-systemui-alarm to show an alarm dialog for the event, which can be followed by a power up device confirmation dialog, if the device is in the hidden power-up mode.
Communication with the alarmd daemon is performed through D-Bus. It listens to both system and session buses. The easiest way is to use the C client API library, which offers straightforward API to modify the queue.
The alarm queue used by the alarmd daemon is stored in /var/lib/alarmd/alarm_queue.xml file.
7.5.1 Alarm Events
Alarm events and the functions to manage them are defined in alarm_event.h header file located in /usr/include/alarmd. It is a part of the libalarm-dev debian package.
Each alarm event is identified by a unique key, also known as a "cookie". These identifiers are obtained, when a new event is added to the queue. They are used whenever needed, and to retrieve information about a specific event, or delete it. An alarm event is identified by the alarm_event_t structure, described as follows: alarmd/alarm_event.h
    /**
     * cookie_t:
     *
     * Unique identifier type for the alarm events.
     **/
    typedef long cookie_t;
    /**
     * alarm_event_t:
     *
     * Describes an alarm event.
     **/
    typedef struct {
        time_t alarm_time;
        uint32_t recurrence;
        int32_t recurrence_count;
        uint32_t snooze;
        char *title;
        char *message;
        char *sound;
        char *icon;
        char *dbus_interface;
        char *dbus_service;
        char *dbus_path;
        char *dbus_name;
        char *exec_name;
        int32_t flags;
        uint32_t snoozed;
    } alarm_event_t;
The flags field in the alarm_event_t structure above holds the options of an alarm event. This field is a bitwise of one or more items described in alarmeventflags enumeration: alarmd/alarm_event.h
    typedef enum {
        ALARM_EVENT_NO_DIALOG = 1 « 0,
        ALARM_EVENT_NO_SNOOZE = 1 « 1,
        ALARM_EVENT_SYSTEM = 1 « 2,
        ALARM_EVENT_BOOT = 1 « 3,
        ALARM_EVENT_ACTDEAD = 1 « 4,
        ALARM_EVENT_SHOW_ICON = 1 « 5,
        ALARM_EVENT_RUN_DELAYED = 1 « 6,
        ALARM_EVENT_CONNECTED = 1 « 7,
        ALARM_EVENT_ACTIVATION = 1 « 8,
        ALARM_EVENT_POSTPONE_DELAYED = 1 « 9,
        ALARM_EVENT_BACK_RESCHEDULE = 1 « 10,
    } alarmeventflags;
7.5.2 Managing Alarm Events
7.5.2.1 Adding Alarm Event to Queue
To add a new alarm event to the queue, a new instance of alarm_error_t structure is needed, and the necessary fields have to be filled in. The only mandatory one is alarm_time. Check time(2) and ctime(3) manpages for more instructions on how to manipulate a time_t type.
With the fields of the structure set, all that is needed is a call to the alarm_event_add function, passing a pointer to the structure as parameter. alarmd/alarm_event.h
        /**
         * alarm_event_add:
         *
         * Adds an event to the alarm queue.
         **/
        cookie_t alarm_event_add(alarm_event_t *event);
On success, this function returns the cookie for the alarm event, otherwise it returns 0. For example, the following program sets an alarm event to 2 seconds from now: maemo-examples/example_alarm.c
alarm_event_t event; time_t current_time; struct tm *alarm_time; /* Reset the event-structure to zero */ memset(&event, 0, sizeof(event)); /* Get current time and add two seconds to it, * meaning that alarm should be sent at * this time */ time(¤t_time); alarm_time = localtime(¤t_time); alarm_time->tm_sec += 2; /* Set the alarm time */ event.alarm_time = mktime(alarm_time); /* Set interface, service name, path and method * name of the HelloAlarm D-BUS interface */ event.dbus_interface = "org.maemo.alarm_example"; event.dbus_service = "org.maemo.alarm_example"; event.dbus_path = "/org/maemo/alarm_example"; event.dbus_name = "hello_alarm"; /* The application presents its own dialog, * so the system provided isn't needed */ event.flags = ALARM_EVENT_NO_DIALOG; /* Add the alarm to alarmd and * verify that it was correctly created */ if(!alarm_event_add(&event)) { hildon_banner_show_information(button, "gtk-dialog-error", "Couldn't set alarm"); g_warning("Couldn't set alarm. Error code %d\n", alarmd_get_error()); return; } hildon_banner_show_information(button, NULL, "Alarm set");
7.5.2.2 Fetching Details of Alarm Event
Having set an alarm event, it is not possible to edit its details anymore, but it is possible to fetch the alarm details using the alarm_event_get function, passing the event cookie as parameter. alarmd/alarm_event.h
        /**
         * alarm_event_get:
         *
         * Finds an alarm with given identifier
         * and returns alarm_event struct describing it.
         **/
        alarm_event_t *alarm_event_get(cookie_t event_cookie);
This function returns a newly allocated alarm_event_t structure. After manipulating the structure fields, it is possible to set another alarm event with the same details. It is necessary to free the allocated structure obtained with the alarm_event_get function. For this task, it is necessary a call to the alarm_event_free function, receiving the alarm event structure as parameter: alarmd/alarm_event.h
        /**
         * alarm_event_free:
         *
         * Frees given alarm_event struct.
         **/
        void alarm_event_free(alarm_event_t *event);
7.5.2.3 Deleting Alarm Event
Finally, to delete an alarm event, the alarm_event_del function needs to be called, passing the event cookie as a parameter. alarmd/alarm_event.h
        /**
         * alarm_event_del:
         *
         * Deletes alarm from the alarm queue.
         **/
        int alarm_event_del(cookie_t event_cookie);
On success, this function returns 1, otherwise it returns 0.
7.5.3 Checking for Errors
Whenever an error occurs during a call to any of the functions, an error code is set, and it can be obtained with the alarmd_get_error function. It has the following signature: alarmd/alarm_event.h
    /**
     * alarmd_get_error:
     *
     * Gets the error code for previous action.
     **/
    alarm_error_t alarmd_get_error(void);
The possible values returned by this function are defined by alarm_error_t enumeration, described below: alarmd/alarm_event.h
    typedef enum {
        ALARMD_SUCCESS,
        ALARMD_ERROR_DBUS,
        ALARMD_ERROR_CONNECTION,
        ALARMD_ERROR_INTERNAL,
        ALARMD_ERROR_MEMORY,
        ALARMD_ERROR_ARGUMENT,
        ALARMD_ERROR_NOT_RUNNING
    } alarm_error_t;
7.5.4 Localized Strings
If the message in the alarm dialog is needed to be available in the language that is being used in the device, specially formatted strings can be used. The translations are fetched with dgettext. To get the message translated, it is necessary to specify the package from which to fetch the translation and the message id. The format is as follows:
{message domain,message id}
If the translation contains "%s", the replacements for these can be given too:
{message domain,message id,replacement1,replacement2...}
The replacement may be in form ..., but cannot contain anything else; the translated part can be embedded in the main string. Positional parameters or any other format options than %s are not supported.
7.5.4.1 Escaping Strings
If the message comes from user, the alarm_escape_string function can be used to escape all such formatting from the string. alarm_escape_string escapes the string to be used as title or message of the alarm dialog, so that it is not considered as a localization string. All occurrences of '', '' characters should be escaped with a backslash, and all backslashes should be duplicated. The function receives a string as parameter, and returns a newly allocated string that should be freed with free. This function has the following syntax: alarmd/alarm_event.h
    /**
     * alarm_escape_string:
     *
     * Escapes a string to be used as alarm dialog message or title.
     **/
    char *alarm_escape_string(const char *string);
7.5.4.2 Unescaping Strings
To unescape a string escaped with alarm_escape_string, or any other escaped string that uses backslashes to escape characters, the alarm_unescape_string function must be called. It receives a string as parameter, and returns a newly allocated string that should be freed with free. The syntax is as follows: alarmd/alarm_event.h
    /**
     * alarm_unescape_string:
     *
     * Unescapes a string escaped with alarm_escape_string.
     **/
    char *alarm_unescape_string(const char *string);
Alternatively, the alarm_unescape_string_noalloc can be used to unescape a string. The difference between the functions is that alarm_unescape_string allocates memory for the returned string, whereas alarm_unescape_string_noalloc modifies the passed string. This is possible, since the unescaped string cannot be longer than the original string. alarmd/alarm_event.h
    /**
     * alarm_unescape_string_noalloc:
     *
     * Unescapes a string escaped with alarm_escape_string.
     **/
    char *alarm_unescape_string_noalloc(char *string);
The unescape functions have checking for strings ending with double backslashes, and the single backslash is put into the resulting string. If NULL is passed, NULL is returned by all functions.
7.6 Usage of Back-up Application
The back-up application saves and restores user data stored in /MyDocs (by default) and setting directories/files /etc/osso-af-init/gconf-dir (a link to GConf database /var/lib/gconf), /etc/osso-af-init/locale, and /etc/bluetooth/name. It can be configured to back up other locations and files as well, by custom configuration files.The back-up application must not be disrupted by other applications writing or reading during a back-up or restore operation.
For restore process, back-up therefore will, if the user approves, ask the application killer to close all applications, and then wait until it has been done.
For backing up, the backup_start and backup_finish D-BUS signals will be emitted on the session bus, indicating to applications that they should not write to disk.
D-BUS description and methods of back-up Application
Service      com.nokia.backup
Interfaces   com.nokia.backup
Object Paths /com/nokia/backup

Method: cancel

Name            cancel
Parameters      none
Returns         Empty reply
Description     Cancels any ongoing back-up or restore operation

Method: activate

Name            activate
Parameters      none
Returns         Empty reply
Description     Used to activate the application with auto-activation
7.6.1 Custom Back-up Locations
For other data not normally backed up, the so-called locations configuration is used. It is important that the locations configuration paths MUST NOT overlap with the documents path.
The locations configuration lets applications install a configuration file with a list of files and directories that should be included in the back-up. The files should be installed into /etc/osso-backup/applications, named <application>.conf and consist of simple XML format. For the application, the example_libosso.conf looks like the following:
<backup-configuration>
  <locations>
    <location type="file"
              category="settings" auto="true">/etc/example.ini</location>
    <location type="dir"
              category="documents">/home/user/foo</location>
    <exclusion type="file"
              category="settings">/home/user/bigfile</exclusion>
    <exclusion type="file"
              category="settings">/tmp/*.jpg</exclusion>
  </locations>
</backup-configuration>
With the <location> tag, different locations can be given to be backed up. N.B. The path must be absolute. <exclusion> tag can be used, if some files in certain directories are not wanted to be backed up, for example, in the case of some setting file changing from one software version to another. This way, the new setting file of updated software will not be destroyed, if the back-up is restored. Wild cards '?' and '*' are also supported.
Both tags have TYPE and CATEGORY arguments and <location> tag additional AUTO argument:
TYPE - Its value can be "file" or "dir" for a file or directory. This argument must be provided.
CATEGORY - It is used for handling selective back-up and restore. It may be omitted, in which case the location will only be backed up when backing up or restoring everything. The value can be:
- emails
- documents
- media
- contacts
- bookmarks
- settings
- applications
AUTO - Its value can be true or false. It is used to tell the back-up application not to request a user response in case of a conflict, but automatically replace the file. N.B. The auto argument is only used for files, not for directories. It may be omitted, in which case it defaults to false.
7.6.2 After Restore Run Scripts
The back-up application makes it possible to execute scripts after a restore operation. There are two kinds of scripts. First, there can be scripts that are executed after every restore operation. Then there are also scripts that are executed only, if the restore is made from a back-up created in an earlier product.
For the scripts that are used to transform data between the device software versions, the location for applications to install the scripts is /etc/osso-backup/restore.d/<dir>, where <dir> is a subdirectory for each transition between two different consecutive version of the platform. For transforming between IT-2006 and IT-2007 versions, the directory is
/etc/osso-backup/restore.d/it2007/. For scripts that are executed after every restore, the location is /etc/osso-backup/restore.d/always.
The files installed here should have the executable bit set. Any files ending with "~" or ".bak" are ignored, just like directories or files starting with a dot (".").
Each script will be executed with a command line argument that is the path of a file containing the list of all files that have been restored, per category. The format of this file is:
[CATEGORY]
/path/to/file1
/path/to/file2
...
[CATEGORY]
...
CATEGORY is one of the OSSO categories (emails, documents, media, contacts, bookmarks, settings or applications). This makes it possible for the scripts to check, which files they need to upgrade, if any at all. The format is chosen to be easy to parse with a simple script or program.
The scripts will be executed after a successful restoration, or after a restoration has been canceled. In both cases, the scripts will only be executed if any files were actually restored. Scripts should clean up after transforming, so that old files are not left behind. The script or program should use the common convention and return zero on success, and non-zero in case of failure. Application developers should try and make their programs execute and finish quickly.
7.7 Using Maemo Address Book API
The maemo platform features a centralized storage for address book data, which is implemented using the Evolution Data Server (EDS). This allows different applications to effortlessly share contacts in a standardized form, so that the user does not have to specify them in every program separately.This section describes how to use address book APIs provided by the libosso-abook component in the maemo platform. Libosso-abook is a collection of powerful widgets and objects, allowing the creation of programs that integrate fully into the address book and communication frameworks of the maemo platform. More in-depth information can be found at the Maemo API Reference[57], and the Evolution project's web site[16].
This section will look at the steps required in creating a simple application showing all of the user's contacts, allowing some interaction with them, and being able to dump the raw VCard data to the terminal. This section shows how to open and manipulate an address book, how to create and populate the models and views required to display the contacts, and how to use some of them.
7.7.1 Using Library
7.7.1.1 Include Files
There are only two include files needed to deal with the functions in this tutorial. All the relevant data for the Evolution Data Server functions is included with statement
#include <libebook/e-book.h>
and all the data for the libosso-abook functions is included with statement
#include <libosso-abook/osso-abook.h>
Notes on how to compile a program using libosso-abook can be found at the end of this how-to, including a description on how to add a check for libosso-abook to the configuration file.
7.7.1.2 Application Initialization
The start of the program is similar to other maemo applications. The first step that is needed is the initialization of libosso to notify that the application has started.
osso_context_t *osso_context;
/* Initialize osso */
osso_context = osso_initialize ("com.nokia.osso-abook-example",
                                VERSION, TRUE, NULL);
if (osso_context == NULL) {
        g_critical ("Error initializing osso");
        return 1;
}
When initializing libosso-abook, this osso_context variable needs to be passed to osso_abook_init. It is necessary for supplying the help dialogs and for integrating certain features into the whole of the maemo platform. osso_abook_init also initializes GTK+, gnome-vfs and Galago, so the application does not have to initialize them itself.
This is the prototype for osso_abook_init: libosso-abook/osso-abook-init.h
gboolean osso_abook_init (int *argc, char ***argv, osso_context_t *osso_context);
osso_abook_init also takes the command line arguments passed to the application, and uses them to initialize GTK+. In certain cases, such as plug-ins and libraries, however, it is not possible to pass these arguments. For such cases, libosso-abook also provides osso_abook_init_with_name, where the name parameter is used to name the Galago connection. The name should not contain any spaces or special characters: libosso-abook/osso-abook-init.h
gboolean osso_abook_init_with_name (const char *name, osso_context_t *osso_context);
When the example application can pass the command line arguments, the first version can be used.
/* Init abook */
if (!osso_abook_init (&argc, &argv, osso_context)) {
        g_critical ("Error initializing libosso-abook");
        osso_deinitialize (osso_context);
        return 1;
}
The rest of the main function just creates the application and enters the main loop. After the main loop quits, all the resources are tidied up, libosso is deinitialized and the program exits normally.
/* Make our UI */
app = app_create ();
/* Run */
gtk_main ();
/* Shutdown */
app_destroy (app);
osso_deinitialize (osso_context);
return 0;
7.7.2 Accessing Evolution Data Server (EDS)
7.7.2.1 Loading Contacts from EDS
In EDS, contacts are stored in a database called a book. There are three different ways to retrieve contacts: as a single contact, as a static list of contacts meeting unchanging criteria, or as a live view on the book that changes as contacts are added or removed. The last method is the most powerful, and it is also the way that most applications will use.
7.7.2.2 Opening Book
Before any operation can be performed on the contacts, the book containing them needs to be created and then opened. There are a number of different calls that create a book. The call to create a book depends on which kind of a book is required. libebook/e-book.h
EBook *e_book_new (ESource *source, GError **error);
EBook *e_book_new_from_uri (const char *uri, GError **error);
EBook *e_book_new_system_addressbook (GError **error);
EBook *e_book_new_default_addressbook (GError **error);
The calls create different kinds of books. The first two calls can create any kind of a book, the latter two can only create pre-defined books. In nearly all circumstances, the call to use is e_book_new_system_addressbook.
Once an EBook object is created, the book must be opened. Books can either be opened synchronously, meaning that the application will pause until the book is opened; or asynchronously, meaning that control will return to the application immediately, but the book will not be ready for use until the open_response callback is called.
The following are the two prototypes for opening books: libebook/e-book.h
gboolean e_book_open (EBook *book, gboolean only_if_exists, GError **error);
guint e_book_async_open (EBook *book, gboolean only_if_exists,
EBookCallback open_response, gpointer closure);
There is a parameter called only_if_exists. This parameter controls whether a database is created on disk. If set to TRUE and the application attempts to open a book that does not already exist, an error will be returned. If set to FALSE and a non-existing book is opened, the database structure will be created on the disk with no contacts in it. On a new system, there will not be any address books, so TRUE should never be passed, as then the call would fail.
As mentioned above, when using the asynchronous version, control will return to the application immediately. When the book is opened, the open_response callback will be called, and closure will be passed to it. The EBookCallback is defined as: libebook/e-book.h
void (*EBookCallback) (EBook *book, EBookStatus status, gpointer closure);
When the open_response callback and the status do not report any errors, the book is open and ready for use.
The only difficulty in opening a book is that the main loop needs to be running for it to work. This means that if the main loop is not running, and the book needs to be opened automatically, then the e_book_new call needs to be made in an idle handler. The example program does this at the end of the app_create function, passing in the AppData structure.
AppData *app;
/* Install an idle handler to open the address book
   when in the main loop */
g_idle_add (open_addressbook, app);
This means that once the main loop is running, open_addressbook will be called. open_addressbook is the function that creates and opens the book using the asynchronous functions discussed above.
static gboolean
open_addressbook (gpointer user_data)
{
               AppData *app;
        GError *error;
               app = user_data;
        error = NULL;
        app->book = e_book_new_system_addressbook (&error);
        if (!app->book) {
                g_warning ("Error opening system address book: %s", error->message);
                       g_error_free (error);
                       return FALSE;
               }
               e_book_async_open (app->book, FALSE, book_open_cb, app);
        /* Return FALSE so this callback is only run once */
               return FALSE;
}
This function attempts to open the system address book, and creates it, if it does not exist already. Error checking is performed by passing a GError into a function, and if the function returns NULL or FALSE (depending on the return type of the function), an error has occurred and will be reported in the GError.
7.7.2.3 Retrieving Contacts
Once the book has been successfully opened, either directly after a call to e_book_open, or in the open_response callback of e_book_async_open, the contacts can be manipulated.
Even though the book view is the way used by most applications to get the contacts, it is possible to get single contacts and perform synchronous queries. For getting single contacts, the contact id is required. This means that all the contacts must have been retrieved before using one of the other two methods.
This operation can be performed either synchronously or asynchronously, as required, by using e_book_get_contact or e_book_async_get_contact: libebook/e-book.h
gboolean e_book_get_contact (EBook *book, const char *id,
                             EContact **contact, GError **error);
guint e_book_async_get_contact (EBook *book,
                                const char *id,
                                EBookContactCallback cb,
                                gpointer closure);
The EBookContactCallback is defined as libebook/e-book.h
void (*EBookContactCallback) (EBook *book,
                              EBookStatus status,
                              EContact *contact,
                              gpointer closure);
7.7.2.4 Queries
Queries are used to define the required contacts both when retrieving multiple contacts and when the book view is used. These queries are built from various basic queries, combined using the Boolean operations AND, OR and NOT. The basic queries are created with the following four functions: libebook/e-book-query.h
EBookQuery *e_book_query_field_exists (EContactField field);
EBookQuery *e_book_query_vcard_field_exists (const char *field);
EBookQuery *e_book_query_field_test (EContactField field,
                                     EBookQueryTest test, const char *value);
EBookQuery *e_book_query_any_field_contains (const char *value);
Of these, e_book_query_any_field_contains is the most generic and, if passed an empty string (""), acts as the method for getting all the contacts in the book. The other three functions check for specific fields. Functions _book_query_field_exists and e_book_query_vcard_field_exists both check for the existence of a specific field. The difference between them is the method of checking: e_book_query_field_exists uses the EContactField enumeration that contains many common field types, such as E_CONTACT_FULL_NAME, E_CONTACT_HOMEPAGE_URL and E_CONTACT_EMAIL_1 (the full list can be found in the include file libebook/e-contact.h).
The final function, e_book_query_field_test, is the most powerful, and uses the EBookQueryTest to define the type of test to perform on the field. There are four possible tests: IS, CONTAINS, BEGINS_WITH and ENDS_WITH. These are defined in the file libebook/e-book-query.h. The term the query should search for is given in the third parameter. For the call:
query = e_book_query_field_test (E_CONTACT_FULL_NAME, E_BOOK_QUERY_BEGINS_WITH, "ross");
the resulting query will match contacts with the full name field containing "Ross Smith" and "Ross Bloggs" (queries are case insensitive), but will not match "Jonathan Ross" or "Diana Ross".
These basic queries can be combined in any desired way using the following functions that implement the Boolean operations: libebook/e-book-query.h
EBookQuery *e_book_query_and (int nqs, EBookQuery **qs, gboolean unref);
EBookQuery *e_book_query_or (int nqs, EBookQuery **qs, gboolean unref);
EBookQuery *e_book_query_not (int nqs, EBookQuery **qs, gboolean unref);
Each of these three functions takes in a number of queries, combines them and returns a new query that represents the correct operation applied to all the original queries.
The following code example will combine the three queries, so that the contacts returned are contacts who have a blog, and whose name begins with either Matthew or Ross.
EBookQuery *name_query[2], *blog_query[2];
EBookQuery *query;
name_query[0] = e_book_query_field_test (E_CONTACT_FULL_NAME,
                                         E_BOOK_QUERY_BEGINS_WITH, "ross");
name_query[1] = e_book_query_field_test (E_CONTACT_FULL_NAME,
                                         E_BOOK_QUERY_BEGINS_WITH, "matthew");
blog_query[0] = e_book_query_field_exists (E_CONTACT_BLOG_URL);
/* Combine the name queries with an OR operation
 * to create the second bit of the blog query. */
blog_query[1] = e_book_query_or (2, name_query, TRUE);
query = e_book_query_and (2, blog_query, TRUE);
/* carry out query on book */
e_book_query_unref (query);
When combining queries, the Boolean operation functions are able to take the ownership of the queries that have been passed in, meaning that the application only needs to unref the result.
7.7.2.5 Getting Static List of Contacts
When using this query to get a list of contacts, the contacts in the list will never change. As with most functions that operate on the book, there is a synchronous and an asynchronous way to get a static list of contacts. libebook/e-book.h
gboolean e_book_get_contacts (EBook *book, EBookQuery *query,
                              GList **contacts, GError **error);
guint e_book_async_get_contacts (EBook *book, EBookQuery *query,
                                 EBookListCallback cb, gpointer closure);
The EBookListCallback is defined as libebook/e-book.h
void (*EBookListCallback) (EBook *book, EBookStatus status, GList *list, gpointer closure);
Once the application has finished and the contacts have been returned, they should be unreffed with g_object_unref and call g_list_free on the list to free all the memory used.
7.7.2.6 Getting Dynamic Set of Contacts
Even though under certain circumstances, getting single contacts and static lists of contacts is useful, most applications need to use the book view method to get contacts. A book view is a dynamic representation of a query performed on a book.
The book view is an object that has signals to indicate when contacts have been modified, removed or added. If the application uses the libosso-abook widgets, this will be handled automatically, and any changes in the book view will be correctly updated in the widgets. However, if the application is performing actions with book views that are not covered by the supplied widgets, then it is necessary to listen for these signals, and deal with them accordingly.
With a query created, the application can request a book view from the open book. Again, as with opening a book, there are two methods for getting a book view from a book: synchronous and asynchronous. libebook/e-book.h
gboolean e_book_get_book_view (EBook *book, EBookQuery *query,
                               GList *requested_fields,
                               int max_results,
                               EBookView **book_view, GError **error);
guint e_book_async_get_book_view (EBook *book, EBookQuery *query,
                                  GList *requested_fields,
                                  int max_results,
                                  EBookBookViewCallback cb,
                                  gpointer closure);
These functions are more powerful than needed for this example. The only requirement is the query "-1" passed in for the max_results, meaning that all the results will be returned, and NULL can be passed in for requested_fields. These two parameters are not as much explicit controls as they are suggestions. The default back-end will ignore them and just return all the results, with all the fields available. In the LDAP back-end, there is support for them.
The book view can be used once it has been returned, either from the e_book_get_book_view call, or from the callback by e_book_async_get_book_view.
static void book_open_cb (EBook *book, EBookStatus status, gpointer user_data)
{
        AppData *app;
        EBookQuery *query;
        app = user_data;
        if (status != E_BOOK_ERROR_OK) {
                g_warning ("Error opening book");
                return;
        }
        query = e_book_query_any_field_contains ("");
        e_book_async_get_book_view (app->book, query, NULL, -1, get_book_view_cb, app);
        e_book_query_unref (query);
}
EBookBookViewCallback has the following prototype: libebook/e-book.h
void (*EBookBookViewCallback) (EBook *book, EBookStatus status,
                               EBookView *book_view, gpointer closure);
The status parameter returns information on whether the call to _book_async_get_book_view was successful, and the new book view is in the book_view parameter.
Finally, the book view needs to be told to start sending signals to the application when contacts are modified. The function for this is e_book_view_start. There is also a similar function for stopping the book view: e_book_view_stop. libebook/e-book-view.h
void e_book_view_start (EBookView *book_view);
void e_book_view_stop (EBookView *book_view);
The application should connect signals to the book view before calling e_book_view_start, in case the reporting of some contacts is missed.
7.7.3 Creating User Interface
The tutorial application simply displays all the contacts in the system address book as a list. There are two parts in creating this list: the list widget, which is derived from the GtkTreeView widget, and the model that drives the aforementioned widget and stores all the data.
7.7.3.1 Creating Contact Model
Libosso-abook provides a model derived from the GtkTreeModel object to store the contact data, and handles all that is required to deal with contacts being added and changed. The model is called OssoABookContactModel, and it is created with osso_abook_contact_model_new(), which takes no arguments.
app->contact_model = osso_abook_contact_model_new ();
OssoABookContactModel populates itself from an EBookView. All that is required to populate it, is to set the book view if the application has one. In the get_book_view_cb discussed earlier, the line
osso_abook_tree_model_set_book_view (OSSO_ABOOK_TREE_MODEL (app->contact_model), book_view);
will perform everything that is required.
7.7.3.2 Creating Contact View
To create a contact view, the application just uses the function _abook_contact_view_new_basic (). This function takes the contact model that will be used to obtain the contacts.
app->contact_view = osso_abook_contact_view_new_basic (app->contact_model);
g_object_unref (app->contact_model);
This new widget can be treated just like any other widget, and placed in the UI in the usual way. Once the contact view has been created, the model is unreffed, as the application does not need to hold a reference to it anymore. This means that when the contact view is destroyed, the model will be as well. If the application needed to keep the model around after the view had been destroyed, then unreffing it would not be necessary here.
There is another, more powerful (but also more complicated) way of creating views that can automatically filter contacts based on a filter model: the function osso_abook_contact_view_new (). libosso-abook/osso-abook-contact-view.h
GtkWidget *osso_abook_contact_view_new (OssoABookContactModel *model,
                                        OssoABookFilterModel *filter_model);
7.7.3.3 Performing Actions on Contacts
In the Osso-Addressbook application, the main way of interacting with contacts is through the "contact starter dialog". This dialog is able to start chat and voip sessions with contacts, to start the composer to write an e-mail to a contact, and to edit, delete or organize contacts. It is a very powerful dialog, but one that is very simple to use in other applications.
In order to use the contact starter dialog, there has to be a contact (obviously), and a book view. The contact is needed to get the contact information, and the book view is used to listen to any changes in the contact that may happen while the dialog is open. N.B. Multiple applications are able to access the address book simultaneously, and while one program has a dialog open, another program may change some details in the contact, or even delete it. The stock dialogs and widgets in libosso-abook handle these cases, but it is important to remember that applications doing anything else with the address book need to handle the changes as well.
To create the contact starter dialog, the function _abook_contact_starter_new() is used. This function returns a widget derived from GtkDialog, and so can be manipulated using all the standard GtkDialog functions. libosso-abook/osso-abook-contact-starter.h
GtkWidget *osso_abook_contact_starter_new ();
The contact and book view can be set on the dialog with the following functions: libosso-abook/osso-abook-contact-starter.h
void osso_abook_contact_starter_set_contact (OssoABookContactStarter *starter,
                                             EContact *contact);
void osso_abook_contact_starter_set_book_view (OssoABookContactStarter *starter,
                                               EBookView *book_view);
After this, the ContactStarter can be treated just as a normal dialog.
7.7.3.4 Connecting ContactStarter Dialog to View
It is necessary to have a way to make the contact starter appear for a contact. Even though applications can perform in any chosen way, for this tutorial the dialog will appear whenever the user double-clicks on a contact in the list. The OssoABookContactView contains a signal that can help here, contact_activated. Its signature is libosso-abook/osso-abook-contact-view.h
void (* contact_activated) (OssoABookContactView *view, EContact *contact);
It returns the contact that received the double-click, making it ideal in this situation.
static void
contact_activated_cb (OssoABookContactView *view,
                      EContact *contact,
                      gpointer user_data)
{
        AppData *app;
        GtkWidget *starter;
        app = user_data;
        starter = osso_abook_contact_starter_new ();
        osso_abook_contact_starter_set_book_view (OSSO_ABOOK_CONTACT_STARTER (starter),
                                                  app->book_view);
        osso_abook_contact_starter_set_contact (OSSO_ABOOK_CONTACT_STARTER (starter),
                                                contact);
        gtk_dialog_run (GTK_DIALOG (starter));
        gtk_widget_destroy (starter);
}
/* ... */
g_signal_connect (app->contact_view, "contact-activated",
                  G_CALLBACK (contact_activated_cb), app);
With this simple callback function, the application can present the user with the ability to carry out very powerful functionality, and to integrate fully into the maemo platform.
7.7.3.5 Accessing Raw VCard Data
An EContact is an object derived from the EVCard object. This means that EContacts can be treated as EVCards, and anything that can be performed to an EVCard, can be performed to an EContact. To demonstrate this, the application has a button to dump the raw vcard data of any selected contacts.
This button is just a normal button, created with gtk_button_new_with_label, and added to the UI in the usual way.
app->dump_button = gtk_button_new_with_label ("Dump VCards");
gtk_box_pack_start (GTK_BOX (box), app->dump_button, FALSE, FALSE, 0);
gtk_widget_show (app->dump_button);
g_signal_connect (app->dump_button, "clicked", G_CALLBACK (dump_vcards), app);
In the dump_vcards function, the application gets a list of selected contacts and iterates through them, printing the vcards. There was an example above showing how to get a single contact that was selected from the contact view, but this requires a list. The OssoABookContactView contains a function that performs exactly that: libosso-abook/osso-abook-contact-view.h
GList *osso_abook_contact_view_get_selection (OssoABookContactView *view);
This function returns a list of all the selected EContact objects. Iterating through them is a simple list operation. As mentioned above, the EContact object is also an EVCard object, meaning that the function e_vcard_to_string will return the raw VCard data. This function needs to know the format of the raw vcard data, either version 2.1 or version 3.0 of the VCard specification. The enums to do this are EVC_FORMAT_VCARD_21 and _FORMAT_VCARD_30 for version 2.1 and 3.0 respectively.
static void
dump_vcards (GtkWidget *button,
             gpointer user_data)
{
        AppData *app;
        GList *contacts, *c;
        int count;

        app = user_data;

        count = 1;
        contacts = osso_abook_contact_view_get_selection
                    (OSSO_ABOOK_CONTACT_VIEW (app->contact_view));
        for (c = contacts; c; c = c->next) {
                EContact *contact = E_CONTACT (c->data);
                EVCard *vcard = E_VCARD (contact);
                char *v;

                v = e_vcard_to_string (vcard, EVC_FORMAT_VCARD_30);
                g_print ("Card %d\n", count);
                g_print ("%s", v);
                g_print ("----\n");

                g_free (v);

                count++;
        }

        g_list_free (contacts);
}
It is not necessary to free the contacts in the list, but the list itself does need to be freed, or else it will leak.
7.7.3.6 Listening to Selection Change on Contact View
It is useful to know when the selection on the contact view has changed: the "Dump VCard" button in the tutorial is not of much use when there is no contact selected, so the proper way is to make it insensitive in these cases. Once again, OssoABookContactView provides a signal that is useful in these situations: libosso-abook/osso-abook-contact-view.h
void (* selection_changed) (OssoABookContactView *view, guint n_selected_rows);
selection_changed tells the callback the number of selected rows, and that can be used to decide whether various controls are to be made sensitive.
static void
selection_changed_cb (OssoABookContactView *view,
                      guint n_selected_rows,
                      gpointer user_data)
{
        AppData *app;
        app = user_data;
        gtk_widget_set_sensitive (app->dump_button, (n_selected_rows > 0));
}
7.7.3.7 Compiling Programs That Use Libosso-Abook
Libosso-abook provides a pkgconfig file for getting all the required cflags and library link flags to compile programs.
7.7.4 Using Autoconf
Applications using autoconf can add the lines
libosso
osso-addressbook-1.0
to the PKG_CHECK_MODULES macro to enable the libosso-abook options.
7.8 Clipboard Usage
In maemo, there is a number of clipboard enhancements to the X clipboard and Gtk+, in order to
- Support retaining the clipboard data when applications that own the clipboard exit.
- Be able to copy and paste rich text data between Gtk+ text views in different applications.
- Provide a generally more pleasant user experience; make it easy for application developers to gray out "Paste" menu items when the clipboard data format is not supported by the application.
7.8.1 GtkClipboard API Changes
gboolean gtk_clipboard_set_can_store (GtkClipboard   *clipboard
                                      GtkTargetEntry *targets,
                                      gint            n_targets);
This function sets what data targets the current clipboard owner can transfer to the clipboard manager. NULL can be passed as targets, together with 0 as n_targets to indicate that all targets can be transferred.
When the clipboard owner changes, these values are reset.
void gtk_clipboard_store (GtkClipboard *clipboard);
This function tells the clipboard to try and store the contents of the targets specified using gtk_clipboard_set_can_store. If no such call has been made, or if there is no clipboard manager around, this function is simply a no-op.
Applications can call this function when exiting, but it is called automatically, when the application is quitting, if quitting with gtk_main_quit(). If the application is not the owner of the clipboard, the function will simply be a no-op.
In addition, adding a convenience function for finding out if a target is supported (in order to be able to gray out "Paste" items, if none of the existing clipboard targets are supported)
gboolean gtk_clipboard_wait_is_target_available (GtkClipboard *clipboard,
                                                 GdkAtom       target);
7.8.2 GtkTextBuffer API Changes
In order to support rich text copy and paste, some new functions were introduced:
void
gtk_text_buffer_set_enable_paste_rich_text (GtkTextBuffer *buffer,
                                            gboolean       can_paste_rich_text);
gboolean
gtk_text_buffer_get_enable_paste_rich_text (GtkTextBuffer *buffer);
The setter function toggles, whether it should be possible to paste rich text in a text buffer.
To prevent applications from getting confused, when text with unexpected tags is pasted to a buffer, the notion of "rich text format" was added:
void
gtk_text_buffer_set_rich_text_format (GtkTextBuffer *buffer,
                                      const gchar   *format);
G_CONST_RETURN *
gtk_text_buffer_get_rich_text_format (GtkTextBuffer *buffer);
When a buffer has a certain text format, it can only paste rich text from buffers that have the same text format. If the formats differ, only plain text will be pasted. If a buffer has its format set to NULL, it means that it can paste from any format. For example, a format called "html" could include the tags "bold", "italic" etc. Thus, it would only be possible to paste text from buffers having the same format specified.
N.B. The string is just an identifier. It is up to the application developers to make sure that when specifying an application as supporting a certain format, also the tags in the buffer are specified for that format.
For further details, MaemoPad source code is a good example to study.
7.9 Global Search Usage
Global Search framework is provided for making different global searches for the content. It has capabilities to search local, Bluetooth gateway and UPnP server file systems. Some subsystems have their own search plug-ins, e.g. for searching bookmarks or e-mails.
Global Search is launched with a D-BUS message defining the search type:
| OGS_DBUS_METHOD_SEARCH_BROAD | Search on all content. |
| OGS_DBUS_METHOD_SEARCH_FILE | Search only files. |
| OGS_DBUS_METHOD_SEARCH_EMAIL | Search only e-mails. |
| OGS_DBUS_METHOD_SEARCH_BOOKMARK | Search only bookmarks. |
D-BUS call launches a Global Search dialog, which is used to make the search. Below is a simple example of a Global Search D-BUS call, showing the user a file search dialog.
#include <libogs/ogs.h>
osso_context_t *osso = osso_initialize("ogs_test", "0.1", FALSE, NULL);
osso_rpc_t foo;
osso_rpc_run_with_defaults(osso, OGS_DBUS_SERVICE, OGS_DBUS_METHOD_SEARCH_FILE,
                           &foo, DBUS_TYPE_INVALID);
osso_rpc_free_val(&foo);
7.9.1 Global Search Plug-ins
Search plug-ins are libraries that are loaded into the process memory, when needed for searching. They are implemented as GObjects, using GTypeModule. They are searched for during the runtime and linked dynamically. For exact API descriptions, see the header files in libogs-dev package.
The following ogs_module_* functions are used for loading, registering and unloading the plug-in.
#include <libogs/ogs.h>
G_MODULE_EXPORT void ogs_module_load(OgsModule *module) {
    gstest_email_plugin_get_type (G_TYPE_MODULE (module));
}
G_MODULE_EXPORT void ogs_module_query(OgsModule *module) {
    ogs_search_module_register_plugin (OGS_SEARCH_MODULE (module),
                                       OGS_SEARCH_CATEGORY_EMAIL,
                                       gstest_email_plugin_type);
}
G_MODULE_EXPORT void ogs_module_unload (OgsModule *module) {
    /* free allocated memory here if needed */
}
gstest_email_plugin_get_type() simply registers the new type in the type system using a GTypeInfo structure, and finally registering the type with parent_type OGS_TYPE_PLUGIN. In plug-in class initialization, query and finalize functions and search options were set.
static void gstest_email_plugin_class_init (GSTestEmailPluginClass *class)
{
    OgsPluginClass *plugin_class;
    GObjectClass   *object_class;
    plugin_class = OGS_PLUGIN_CLASS (class);
    object_class = G_OBJECT_CLASS (class);
    parent_class = g_type_class_peek_parent(class);
    plugin_class->query = gstest_email_plugin_query;
    plugin_class->options_type = OGS_TYPE_SEARCH_OPTIONS;
    plugin_class->hit_type = OGS_TYPE_EMAIL_HIT;
    object_class->finalize = gstest_email_plugin_finalize;
}
In plug-in initialization, it is possible for wexample to set properties.
static void gstest_email_plugin_init(GSTestEmailPlugin *plugin)
{
    g_object_set(plugin,
                 "id", "gstest-email-plugin",
                 "category", (gint) OGS_SEARCH_CATEGORY_EMAIL,
                 NULL);
    /* ... */
}
Query function does the searching, and emits a signal when new hits are found.
static void gstest_email_plugin_query(OgsPlugin         *plugin,
                                      const gchar       *query,
                                      OgsSearchContext  *context,
                                      OgsFileSystem     *fs,
                                      OgsSearchCategory  category,
                                      OgsSearchOptions  *options)
{
    GSList *l;
    glong   timestamp;
    if (!ogs_plugin_supports_category (plugin, category)) {
        return;
    }
    if (query == NULL || strlen (query) == 0) {
        return;
    }
    timestamp = time (NULL);
    for (l = GSTEST_EMAIL_PLUGIN(plugin)->mails; l; l = l->next) {
        OgsSearchHit *hit;
        TestEMail *mail;
        int i;
        mail = (TestEMail *) l->data;
        if (!strstr(mail->sender, query) &&
            !strstr(mail->subject, query) &&
            !strstr(mail->mailbox, query)) {
            continue;
        }
        hit = g_object_new(OGS_TYPE_EMAIL_HIT,
                           "name", mail->subject,
                           "folder", mail->mailbox,
                           "contact", mail->sender,
                           "mime-type", "email",
                           "timestamp", timestamp,
                           "size", (glong) 12345,
                           "category", (gint) category,
                           "has_attachment", mail->has_attachment,
                           NULL);
        timestamp += 60*60*24*3;
        g_signal_emit_by_name(plugin, "new-hit", hit, context);
        g_object_unref(hit);
        for (i = 0; i < 4; ++i) {
            if (ogs_search_context_is_cancelled(context)) {
                return;
            }
            g_usleep(500);
        }
    }
}
Finalize function is naturally for finalizing the plug-in by freeing memory.
static void gstest_email_plugin_finalize(GObject *object)
{
    GSList *l;
    GSTestEmailPlugin *plugin;
    plugin = GSTEST_EMAIL_PLUGIN (object);
    /* ... */
    G_OBJECT_CLASS(parent_class)->finalize(object);
}
7.10 Writing "Send Via" Functionality
Send Via functionality is provided by the platform to enable applications to send data via e-mail, or over a Bluetooth connection. Since several applications share this functionality, the platform provides a public interface to facilitate deployment of these services in user applications. The interfaces are defined in two header files: libmodest-dbus-client.h (in package libmodest-dbus-client-dev) and conbtdialogs-dbus.h (in package conbtdialogs-dev). The following sample code is an example of the usage of these interfaces. See MaemoPad source code for a fully functional application using these services. maemopad/src/ui/callbacks.c
/*send via email*/
#include <libmodest-dbus-client/libmodest-dbus-client.h>
/*send via bt */
#include <conbtdialogs-dbus.h>

/* ... */

void callback_sendvia_email ( GtkAction * action, gpointer data )
{
    gboolean result = TRUE;
    GSList *list = NULL;
    AppUIData *mainview = NULL;
    mainview = ( AppUIData * ) data;

    /* Attach the saved file (and not the one currently on screen). If the file
     * has not yet been saved, nothing will be attached */

    if (mainview->file_name) {
        list = g_slist_append(list, mainview->file_name);
        result = libmodest_dbus_client_compose_mail(mainview->data->osso, /*osso_context_t*/
        NULL, /*to*/
        NULL, /*cc*/
        NULL, /*bcc*/
        NULL, /*body*/
        NULL, /*subject*/
        list /*attachments*/);
    }

    g_slist_free(list);

    if (result == FALSE) {
        g_print("Could not send via email\n");
    }
}

gboolean rpc_send_via_bluetooth(gchar *path)
{
    DBusGProxy *proxy = NULL;
    DBusGConnection *sys_conn = NULL;
    GError *error = NULL;
    gboolean result = TRUE;
    gchar **files = NULL;

    sys_conn = dbus_g_bus_get(DBUS_BUS_SYSTEM, &error);

    if(sys_conn == NULL)
    {
        return FALSE;
    }

    files = g_new0(gchar*, 2);
    *files = g_strdup(path);
    files[1] = NULL;

    /* Open connection for btdialogs service */
    proxy = dbus_g_proxy_new_for_name(sys_conn,
                           CONBTDIALOGS_DBUS_SERVICE,
                           CONBTDIALOGS_DBUS_PATH,
                           CONBTDIALOGS_DBUS_INTERFACE);

    /* Send send file request to btdialogs service */
    if (!dbus_g_proxy_call(proxy, CONBTDIALOGS_SEND_FILE_REQ,
                             &error, G_TYPE_STRV, files,
                             G_TYPE_INVALID, G_TYPE_INVALID))
    {
        g_print("Error: %s\n", error->message);
        g_clear_error(&error);
        result = FALSE;
    }

    g_strfreev(files);

    g_object_unref(G_OBJECT(proxy));
    return result;
}
7.11 Using HAL
This section gives a quick tour of HAL (Hardware Abstraction Layer). For in-depth background information, technical documentation and a specification, consult http://www.freedesktop.org/wiki/Software/hal.7.11.1 Background
The purpose of HAL is to provide means for storing data about hardware devices, gathered from multiple sources and to provide an interface for applications to access this data. In essence, HAL provides a list of devices, and a way to add configuration values for each device. As a concrete example of what kind of information HAL contains, the command line application 'lshal' can be used to query the HAL daemon for all device objects that it is aware of. Here is some example output from Internet Tablet device:
Dumping 54 device(s) from the Global Device List:
-------------------------------------------------
udi = '/org/freedesktop/Hal/devices/computer'
  info.addons = {'hald-addon-cpufreq'} (string list)
  info.bus = 'unknown'  (string)
  info.callouts.add = {'hal-storage-cleanup-all-mountpoints'} (string list)
  info.capabilities = {'cpufreq_control'} (string list)
  info.interfaces = {'org.freedesktop.Hal.Device.SystemPowerManagement',
'org.freedesktop.Hal.Device.CPUFreq'} (string list)
  info.product = 'Computer'  (string)
  info.subsystem = 'unknown'  (string)
  info.udi = '/org/freedesktop/Hal/devices/computer'  (string)
  org.freedesktop.Hal.Device.SystemPowerManagement.method_argnames =
{'num_seconds_to_sleep', 'num_seconds_to_sleep', '', '', '', 'enable_power_save'}
(string list)
  org.freedesktop.Hal.Device.SystemPowerManagement.method_execpaths =
{'hal-system-power-suspend', 'hal-system-power-suspend-hybrid', 'hal-system-power-hibernate',
'hal-system-power-shutdown', 'hal-system-power-reboot', 'hal-system-power-set-power-save'}
(string list)
  org.freedesktop.Hal.Device.SystemPowerManagement.method_names =
{'Suspend', 'SuspendHybrid', 'Hibernate', 'Shutdown', 'Reboot', 'SetPowerSave'}
(string list)
  org.freedesktop.Hal.Device.SystemPowerManagement.method_signatures =
{'i', 'i', '', '', '', 'b'} (string list)
  power_management.can_hibernate = false  (bool)
  power_management.can_suspend = true  (bool)
  power_management.can_suspend_hybrid = false  (bool)
  power_management.can_suspend_to_disk = false  (bool)
  power_management.can_suspend_to_ram = true  (bool)
  power_management.is_powersave_set = false  (bool)
  system.firmware.name = 'NOLO'  (string)
  system.firmware.product = 'N800'  (string)
  system.firmware.version = '1.1.6'  (string)
  system.formfactor = 'unknown'  (string)
  system.hardware.product = 'RX-34'  (string)
  system.hardware.serial = '0000000000000000'  (string)
  system.hardware.uuid = '24202524'  (string)
  system.hardware.vendor = 'Nokia'  (string)
  system.hardware.version = '1301'  (string)
  system.kernel.machine = 'armv6l'  (string)
  system.kernel.name = 'Linux'  (string)
  system.kernel.version = '2.6.21-omap1'  (string)
udi = '/org/freedesktop/Hal/devices/computer_mtd_0_8'
  info.bus = 'mtd'  (string)
  info.parent = '/org/freedesktop/Hal/devices/computer'  (string)
  info.product = 'MTD Device'  (string)
  info.subsystem = 'mtd'  (string)
  info.udi = '/org/freedesktop/Hal/devices/computer_mtd_0_8'  (string)
  linux.device_file = '/dev/mtd4ro'  (string)
  linux.hotplug_type = 2  (0x2)  (int)
  linux.subsystem = 'mtd'  (string)
  linux.sysfs_path = '/sys/class/mtd/mtd4ro'  (string)
  mtd.host = 0  (0x0)  (int)
...
udi = '/org/freedesktop/Hal/devices/platform_mmci_omap_1_mmc_host_mmc_card_rca58916_storage'
  block.device = '/dev/mmcblk0'  (string)
  block.is_volume = false  (bool)
  block.major = 254  (0xfe)  (int)
  block.minor = 0  (0x0)  (int)
  block.storage_device =
'/org/freedesktop/Hal/devices/platform_mmci_omap_1_mmc_host_mmc_card_rca58916_storage'
(string)
  info.capabilities = {'storage', 'block'} (string list)
  info.category = 'storage'  (string)
  info.parent =
'/org/freedesktop/Hal/devices/platform_mmci_omap_1_mmc_host_mmc_card_rca58916'
(string)
  info.udi =
'/org/freedesktop/Hal/devices/platform_mmci_omap_1_mmc_host_mmc_card_rca58916_storage'
(string)
  linux.hotplug_type = 3  (0x3)  (int)
  linux.sysfs_path = '/sys/block/mmcblk0'  (string)
  storage.automount_enabled_hint = true  (bool)
  storage.bus = 'mmc'  (string)
  storage.drive_type = 'sd_mmc'  (string)
  storage.hotpluggable = true  (bool)
  storage.media_check_enabled = false  (bool)
  storage.model = ''  (string)
  storage.no_partitions_hint = false  (bool)
  storage.originating_device =
'/org/freedesktop/Hal/devices/platform_mmci_omap_1_mmc_host_mmc_card_rca58916'  (string)
  storage.partitioning_scheme = 'none'  (string)
  storage.physical_device =
'/org/freedesktop/Hal/devices/platform_mmci_omap_1_mmc_host_mmc_card_rca58916'  (string)
  storage.removable = false  (bool)
  storage.removable.media_available = true  (bool)
  storage.removable.media_size = 125960192  (0x7820000)  (uint64)
  storage.requires_eject = false  (bool)
  storage.size = 125960192  (0x7820000)  (uint64)
  storage.vendor = ''  (string)
As can be seen in the output, the configuration data for each device, identified by a UDI (Unique Device Identifier), is stored as key-value pairs. Similar information can be queried about each device known to HAL. For instance, the type and size of an MMC memory card can be found in the HAL database, as well as other essential information (see the last device in the above example). HAL also contains information about disk volumes, such as file system types, mount points, volume sizes etc. The 'category' and 'capabilities' fields of the configuration describe what the device is and what it does. For a complete description of the device properties, see HAL specification [43].
The following example illustrates data contained in HAL about the Internet Tablet's camera device. The example demonstrates an important aspect of HAL: its ability to monitor the state of each device in real-time. State changes in devices known to HAL are broadcast to D-BUS. Thus, the state of each interesting device from an application's point of view can be asynchronously monitored. Notice how the database keeps track of the exact state of the camera in the following example: whether the camera is active, and whether it has been turned 180 degrees.
udi = '/org/freedesktop/Hal/devices/platform_cam_turn'
  button.has_state = true  (bool)
  button.state.value = true  (bool)
  button.type = 'activity'  (string)
  info.addons = {'hald-addon-omap-gpio'} (string list)
  info.bus = 'platform'  (string)
  info.capabilities = {'button'} (string list)
  info.linux.driver = 'gpio-switch'  (string)
  info.parent = '/org/freedesktop/Hal/devices/platform_gpio_switch'  (string)
  info.product = 'Platform Device (cam_turn)'  (string)
  info.subsystem = 'platform'  (string)
  info.udi = '/org/freedesktop/Hal/devices/platform_cam_turn'  (string)
  linux.hotplug_type = 2  (0x2)  (int)
  linux.subsystem = 'platform'  (string)
  linux.sysfs_path = '/sys/devices/platform/gpio-switch/cam_turn'  (string)
  platform.id = 'cam_turn'  (string)

udi = '/org/freedesktop/Hal/devices/platform_cam_act'
  button.has_state = true  (bool)
  button.state.value = true  (bool)
  button.type = 'activity'  (string)
  info.addons = {'hald-addon-omap-gpio'} (string list)
  info.bus = 'platform'  (string)
  info.capabilities = {'button'} (string list)
  info.linux.driver = 'gpio-switch'  (string)
  info.parent = '/org/freedesktop/Hal/devices/platform_gpio_switch'  (string)
  info.product = 'Platform Device (cam_act)'  (string)
  info.subsystem = 'platform'  (string)
  info.udi = '/org/freedesktop/Hal/devices/platform_cam_act'  (string)
  linux.hotplug_type = 2  (0x2)  (int)
  linux.subsystem = 'platform'  (string)
  linux.sysfs_path = '/sys/devices/platform/gpio-switch/cam_act'  (string)
  platform.id = 'cam_act'  (string)
It is important to notice, that the devices in HAL database do not necessarily have a one-to-one correspondence with a physical device. For instance, in the previous example the camera has two separate devices in HAL for two different functionalities. This is intentional: the purpose of HAL is to abstract the entire set of physical devices into a functional categorization. The devices in HAL represent the smallest addressable unit. [43]
7.11.2 C API
In order to make developers' life easier, the communication to the HAL daemon has been wrapped into a C library. Thus, applications can easily use the services provided by the library to monitor and query different devices. For a complete description of the API, see libhal.h (in package libhal-dev). Here, the basic steps to set up a connection to HAL and some basic functions are described. Error checking etc. are omitted from the examples, for the sake of clarity.
Setting up a connection to HAL is performed as follows:
include <libhal.h>
void set_up(void)
{
    LibHalContext *ctx;
    DBusConnection *dbus_connection;
    DBusError error;
    ctx = libhal_ctx_new();
    dbus_error_init(&error);
    dbus_connection = dbus_bus_get(DBUS_BUS_SYSTEM, &error);
    libhal_ctx_set_dbus_connection(ctx, dbus);
    /* ... */
After setting up a connection, listener callbacks can be registered:
    libhal_ctx_set_device_added (ctx, _device_added);
    libhal_ctx_set_device_removed (ctx, _device_removed);
    libhal_ctx_set_device_property_modified(ctx, _property_modified);
Finally, initialize the connection and start listening to HAL:
    libhal_ctx_init(ctx, &error);
    libhal_device_property_watch_all(ctx, &error);
The listener functions and the application in general can obtain information about devices using functions in libhal. For instance, as a device gets connected, the following functions can be used to obtain information about it:
    /* If UDI is known (the callbacks provide a UDI for added/removed devices),
       existence of specific capabilities can be queried with the following function: */
    if(libhal_device_query_capability(ctx, udi, "volume", NULL)) {
        /* Capability "volume" exists */
        ...
    }
    /* The library also provides plenty of get/set functions for querying specific
       information about a device by its UDI. For instance, querying the storage.
       drive_type property of the device, which is created by HAL when a memory card
       is inserted into the Internet Tablet device, returns 'sd_mmc', indicating an
       active memory card reader for SecureDigital/MultiMediaCard memory cards. */
    libhal_device_get_property_string (ctx, udi, "storage.drive_type", NULL);
All the query functions follow the same pattern. The HAL specification describes the type of each property. The types can optionally be queried with the 'lshal' tool, which adds type information into its output. For each type, libhal provides a get/set function, such as libhal_device_get_property_string(), libhal_device_get_property_int(), etc. The library also provides functions for listing all devices and their properties: libhal_get_all_devices(), _device_get_all_properties(), if more user-controlled filtering is needed.
7.12 Certificate Storage Guide
This section presents the first material to be read by developers involved with the Maemo Certificate Manager API. It offers a gradual approach to certificates and their management on the maemo platform.This material is complemented by the Maemo Certificate Manager API Reference. Even though this material introduces some cryptographic notions and OpenSSL commands/functions, it is not intended in any way to be a reference on OpenSSL or cryptography.
It is recommended that the API sample programs are downloaded and compiled before reading this section, since some sections refer to these programs.
7.12.1 Digital Certificates
Public key encryption, also known as asymmetric encryption, is essentially a scheme where the encryption key differs from the decryption key. Once the message is encrypted, the encryption key cannot decrypt it.
The encryption key is also known as the public key, since it can be distributed without fear of revealing the decryption (i.e. private) key. Typically, a user creates a pair of keys, then distributes the public key (for example, on a public key server), and when this is done, the user is able to receive securely encrypted messages, and can be assured that nobody else is able to decrypt the received messages, unless they have access to the private key.
Therefore, keeping the private key safe is a major concern, and most schemes encrypt the private key locally, demanding a password or security card to disclose it.
In most public key systems, the keys are mathematically related and can be used in inverse order, so encrypting with the private key and decrypting with public key also works. However, encrypting a message with the private key does not guarantee secrecy, since anybody can decrypt it with the widely known public key.
But it allows a second, equally important feature of public key systems: authentication or signing. Encrypting with the private key proves that the sender possesses the private key in question, so (provided the private key is safely guarded) it must be the same person who has issued the public key. Authentication also means non-repudiation (i.e. the sender cannot deny sending the message).
Public key systems based on prime numbers are very slow. So, most practical encryption schemes do not apply it to whole messages, only to message hashes (for authentication) and for symmetric keys (for encryption).
X.509 certificates are a portable and standardized way to distribute public keys along with the identity of the holder. It contains some information about the holder, including but not limited to:
- The name of the certificate holder, also known as Distinguished Name (DN)
- Contact e-mail
- Internet domain
- Address
- Issue date
- Activation date
- Expiration date
- Public key
- Private key (must never be included in the publicly available certificate).
- Certification authority (see below)
- Certification authority signature (see below)
Since it is easy to generate a certificate claiming to be anybody, a trustable certificate is not generated by the holder. Instead, it is generated and signed by a trusted third-party - a certification authority (CA), e.g. Verisign or CACert. The CA is expected to make positive checks on the certificate requester in order to verify the identity of the requester (without this check, the CA signature would be worthless).
If, for example, the Web client of a bank needs to establish an encrypted connection, it asks for the certificate and checks the signature against the CA's certificate. Obviously, the CA certificate is necessary to do this. In practice, most products, including Web browsers, come bundled with several well-known CA certificates, so the user rarely needs to download and install a new CA certificate.
A CA certificate is generally self-signed, since it is the highest trusted entity in the certificate hierarchy. It is also possible to build a chain of trust: a CA certificate may be signed by another CA. More commonly, an entity generates its own certificates by itself, signing them with the CA-issued one. This is commonly done, for instance, for the establishment of VPNs and wireless connections, where the certificate is only to be used within the entity.
Each CA maintains a monotonic serial number counter that is incremented with every new certificate. In this way, every CA-signed (and therefore widely trustable) certificate has a worldwide unique ID, consisting of the certificate issuer and the serial number.
Self-signed non-CA certificates are also common on the Internet. Since CA certificates cost money, several sites choose to generate the certificate themselves. Most web browsers warn the user about these untrusted certificates, and prompt for permission to continue connecting. An alternative method would be to request a certificate form CACert (www.cacert.org), which is free of charge. The required root certificate is already included in the product, and in most of the free web browsers as well.
Visiting again the Web client/bank example, most HTTPS connections only check the certificate of the server. It is also possible for a client to have its own certificate, and some services may even demand it, since the server needs to be sure that the client is who it claims to be.
X.509 certificates are incompatible with PGP, and different from it in several aspects. X.509 certificates are formally signed by trusted authorities wishing to earn money with this service; PGP/GPG keys rely on a web of trust and are signed by other PGP key holders (a key signed by a trusted person becomes itself trusted, at least in the niche to which the signed key belongs).
S/MIME is a standard separate from X.509, but both appear together in this maemo API, because an S/MIME message sender needs to know the public key and cryptographic capabilities of the message recipient. That information is provided by the X.509 public certificate of the recipient.
Certificate Revocation Lists (CRL) are lists of certificates that have actively expired before their natural expiration date. A typical reason for premature expiration is the leaking of the private key. The diffusion of CRLs in a timely manner remains a challenge.
7.12.2 Certificates in Maemo Platform
The maemo platform offers an API to deal with certificate manager storage and manipulation. This enables all the software to have access to all certificates so that, for example, installing a new CA certificate takes immediate effect in all relevant programs (such as Web browser, e-mail, VPN and wireless connection). This saves both effort and disk space.
7.12.3 Creating Own Certificates with OpenSSL
It is useful to explain how certificates are created by using them in
the code examples. OpenSSL tools are used for that purpose. OpenSSL
tools are not installed by default, so they must be installed
manually. In order to install the package "openssl", the user must be
either root or set Application manager to the Red Pill mode (see
section Red Pill Mode 13.3.3 of the
chapter Packaging, Deploying and Distributing in Maemo
Reference Manual). The important configurations for certification creation at /etc/ssl/openssl.cnf are:
[ CA_default ]
dir = /root/certificates       # Where all the files are kept
certs = $dir/certs             # Where the issued certs are kept
crl_dir = $dir/crl             # Where the issued crls are kept
database = $dir/index.txt      # database index file.
new_certs_dir = $dir/newcerts  # default place for new certs.
certificate = $dir/my-ca.crt   # The CA certificate
serial = $dir/serial           # The current serial number
crl = $dir/crl.pem             # The current CRL
private_key = $dir/my-ca.key   # The private key
default_days = 1095            # how long to certify for
Once configured, the Certificate Authority can be created with the command line tool openssl:
cd /root/certificates
touch index.txt
echo 01 > serial
openssl req -nodes -new -x509 -keyout my-ca.key -out my-ca.crt
All required fields should be filled with sensible data, otherwise the certificate may be rejected by some software. The my-ca.key file contains the CA's private key, which must be kept safe, because the CA security depends on its secrecy. my-ca.crt is the public distributable CA certificate.
When this has been done, it is possible to create certificates. The first command creates the certificate, the second command signs it:
openssl req -nodes -new -keyout certificate.key -out certificate.csr
openssl ca -out certificate.crt -in certificate.csr
OpenSSL learns from the /etc/ssl/openssl.cnf configuration, which CA to use for signing the new regular certificate. Again, all requested data fields should be filled.
The certificate.key file contains the private key, and it must be safely guarded by the certificate holder; certificate.crt is the signed public certificate; certificate.csr is the unsigned intermediate certificate that can be discarded.
Queries can be made to a certificate file content by issuing
openssl x509 -in cert01.crt -noout -text
OpenSSL can also be ordered to include all the data in human-readable text format, alongside the binary (base64-encoded) certificate. Finally, to make an actual encryption test with public keys (this test should be performed using small messages):
# encrypt to a public certificate recipient
cat certificate.crt | openssl rsautl -encrypt -in message -certin -out message.enc

# recipient decrypts using the private key
openssl rsautl -decrypt -in message.enc -inkey certificate.key
7.12.4 Maemo Certificate Databases
In maemo, certificates are stored in Berkeley DB version 1 format files. Fortunately, the API user never needs to cope with low-level details of BDB databases. The default maemo certificate file is /usr/share/certs/certman.cst, even though alternative databases can be created and used.
The figure below shows the Certificate Manager plug-in for the maemo control panel, with the focus on a certification authority (CA) that has been created using OpenSSL and manually inserted in the default maemo certificate file, using the sample import program with following command:
./import /usr/share/certs/certman.cst ca my-ca.crt
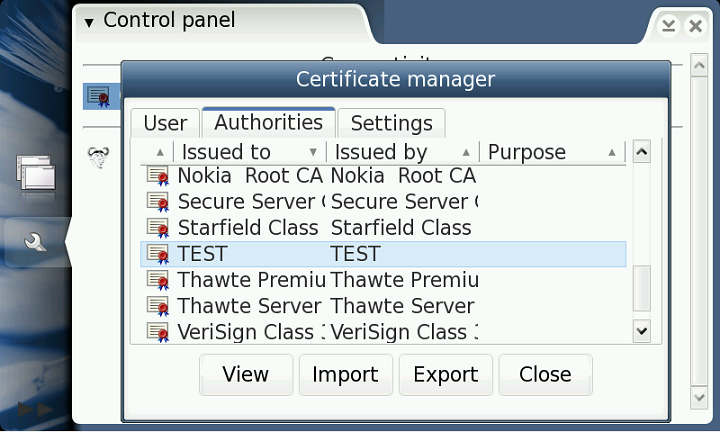
Inside every database, there is a set of "folders", a simple classification of the certificates useful to limit the scope of searches. The constants for these folders are: CST_FOLDER_CA, CST_FOLDER_OTHER, CST_FOLDER_PERSONAL, CST_FOLDER_SITE and CST_FOLDER_UNKNOWN. These constants can be found in most code samples.
Even though certificate UIDs are said to be unique, most functions in the API refer to certificates by a storage ID. This ID has no relationship with UID, and it is unique only within a specific database.
The following sections comment on snippets of code with basic certificate manager operations. It is recommended that the accompanying example programs are tried while reading this material. The samples must be compiled inside Scratchbox with the maemo SDK installed.
7.12.5 Creating Databases
$ ./dbcreate test.db
This program only opens the specified database file. If it does not exist, it must be created. This behavior is provided by the open file API call: certman-examples/dbcreate.c
// CST_open_file(filename, readonly [ignored], password [ignored]);
storage = CST_open_file(argv[1], FALSE, NULL);
if (! storage) {
        printf("Could not create certificate database %s.\n", argv[1]);
        return 1;
}
After opening or creating the database, the program counts the available certificates, walking the GSList tree. This list is found by searching by purpose, specifying "any" as the purpose. certman-examples/dbcreate.c
// get any certificate we find
certificates = CST_search_by_purpose(storage, CST_PURPOSE_NONE);
for (i = certificates; i; i = i->next) {
        ++count;
}
if (certificates > 0) {
        printf("Database already exists and it has %d certificates inside.", count);
}
Finally, all allocated resources must be freed: certman-examples/dbcreate.c
g_slist_free(certificates);
CST_free(storage);
7.12.6 Importing Certificates and Keys
$ ./import test.db ca certs/ca.crt
$ ./import test.db server certs/cert01.crt
$ ./import test.db client certs/cert02.crt certs/cert02.key
The first example imports a CA certificate. The second one imports a regular SSL server certificate. The third one imports a SSL client certificate. Since this is supposed to be your own certificate, you also need to import the related private key in order to sign and decrypt messages.
The most important API call here is CST_import_cert. An open file must be provided for it (with the certificate inside). certman-examples/import.c
// get present list
oldlist = CST_search_by_purpose(storage, CST_PURPOSE_NONE);
fcert = fopen(cert, "r");
if (! fcert) {
        printf("Certificate file could not be open, errno = %d\n", errno);
        CST_free(storage);
        return 1;
}
err = CST_import_cert(storage, fcert, NULL);
if (err) {
        printf("Error %d when trying to import certificate %s\n", err, cert);
        CST_free(storage);
        return 1;
}
It is necessary to know, which certificate has just been imported. There is a quick method to pinpoint it: by comparing two lists, one collected before import, the second collected just after. certman-examples/import.c
// get new list
list = CST_search_by_purpose(storage, CST_PURPOSE_NONE);

// discover new certID by comparing the two lists
for (i = list; i; i = i->next) {
        if (! g_slist_find(oldlist, i->data)) {
                certID = GPOINTER_TO_UINT(i->data);
        }
}

g_slist_free(list);
g_slist_free(oldlist);
if (! certID) {
        printf("Newly imported certificate not found!\n");
        CST_free(storage);
        return 1;
}
After getting the certID of the new certificate, its purpose should be set (based on command line parameter) and its account name gotten, since this name is the identifier for the forthcoming import key. certman-examples/import.c
CST_set_purpose(storage, certID, purpose, TRUE);

printf("Getting x.509 certificate...\n");
x509cert = CST_get_cert(storage, certID);

printf("Getting x.509 subject name...\n");
// should NOT be freed since X509_get_*(X509* certificate)
// return pointers to certificate's own memory
account = X509_get_subject_name(x509cert);
If it is necessary to import a private key, CST_import_priv_key does the hard work. certman-examples/import.c
if (privkey) {
        fprivkey = fopen(privkey, "r");
        if (! fprivkey) {
                printf("Key file could not be open, errno = %d\n", errno);
                        CST_free(storage);
                        return 1;
                }
                printf("Importing key...\n");
                err = CST_import_priv_key(storage, account, fprivkey, password, password);
                if (err) {
                        printf("Error %d when trying to import private key %s\n",
                               err, privkey);
                        CST_free(storage);
                        return 1;
                }
        /* ... */
}
Now both the certificate and the private key are in storage, but they are not bound to each other. The private key can be searched for by its account name. Then CST_assign can be called to bind the certificate to the key. certman-examples/import.c
keylist = CST_priv_key_search_by_name(storage, account);

if (! keylist) {
        printf("Error %d when trying to list of appended keys\n",
               CST_last_error());
        CST_free(storage);
        return 1;
}

// picks the first of the list
keyID = GPOINTER_TO_UINT(keylist->data);

printf("Newly imported private key is keyID %d\n", keyID);

err = CST_assign(storage, certID, keyID, password);
The figure below shows the Certificate Manager with a client certificate created by OpenSSL and manually inserted in maemo certificate file using the import sample program.
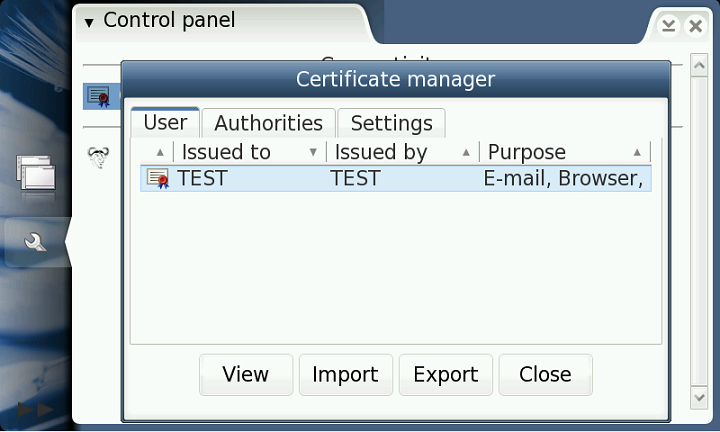
7.12.7 Sample Program for Searching and Listing Certificates
$ ./listcerts testdb.cst ca
$ ./listcerts testdb.cst any
This program collects a list of certificates given a purpose, and lists the certIDs on the screen in a simple manner. The list collecting is here performed by CST_search_by_purpose, but there is a whole family of CST_search_* functions to choose from, covering all search needs. Most search functions return lists instead of X.509 certificates, since most search arguments are not unique (i.e. they may match with an unbound number of registers). Code snippet: certman-examples/listcerts.c
certificates = CST_search_by_purpose(storage, purpose);
for (i = certificates; i; i = i->next) {
        printf("CertID found: %d\n", GPOINTER_TO_UINT(i->data));
        ++count;
}
An interesting detail about searching by purpose: searching by _PURPOSE_NONE returns all stored certificates, since only certificates matching all specified purpose bits are returned; CST_PURPOSE_NONE equals zero, so no purpose is specified, so all certificates are fit.
7.12.8 Deleting Certificates
$ ./delcert testdb.cst 101
This sample deletes a certificate with a given storage and certID. (The ID of a certificate can be obtained by using the listcerts program). The X.509 certificate must be retrieved through CST_get_cert(), only to make sure that it exists. certman-examples/delcert.c
certificate = CST_get_cert(storage, certID);
if (! certificate) {
        if (! CST_last_error()) {
                printf("Certificate %d does not exist\n", certID);
                CST_free(storage);
                return 1;
        } else {
                printf("Error %d while getting certificate\n", CST_last_error());
                CST_free(storage);
                return 1;
        }
}
Before releasing the X.509 certificate, some data should be chosen from it using OpenSSL functions. This is different from most functions that return pointers; the functions X509_get_*_name return X509_NAME pointers to the certificate memory, so they need not be released. certman-examples/delcert.c
issuer = X509_NAME_oneline(X509_get_issuer_name(certificate), NULL, 0);
subject = X509_NAME_oneline(X509_get_subject_name(certificate), NULL, 0);
printf("Issuer: %s Subject (holder): %s\n", issuer, subject);
As X509_NAME objects cannot be displayed directly, they should be converted to characters using X509_NAME_oneline(). This function returns buffers that must be freed. certman-examples/delcert.c
free(issuer);
free(subject);
X509_free(certificate);
Finally, the certificate should be deleted from the storage: certman-examples/delcert.c
err = CST_delete_cert(storage, certID);
7.12.9 Validating Certificate Files
$ ./validate test.db certs/cert01.crt
This program validates a certificate file. Since CST_is_valid* functions still do not check the trust chain, they accept any non-corrupted certificate as valid. This behavior will change in future API versions (this is why this function already needs the storage parameter). Code: certman-examples/validate.c
fcert = fopen(argv[2], "r"); if (! fcert) { printf("Certificate file could not be open, errno = %d\n", errno); CST_free(storage); return 1; } if (CST_is_valid_f(storage, fcert, NULL)) { printf("Certificate is valid.\n"); } else if (CST_last_error()) { printf("Error while validating certificate\n."); } else { printf("Certificate is invalid (corrupted or not trusted)\n"); } fclose(fcert);
7.12.10 Exporting Certificates
$ ./export test.db 101
The program source is almost equal to the delcert program, except that the certificate is exported to stdout instead of deleting it: certman-examples/export.c
err = CST_export_cert_by_id(storage, certID, stdout);
7.13 Extending Hildon Input Methods
7.13.1 Overview
Maemo platform is intended to be used on embedded devices. It is a quite straightforward request that one might want to have different input methods from the ones available by default, or just simply want a different layout for the virtual keyboard. For this reason, maemo 4.1 introduces a way to enable writing custom plug-ins for Hildon Input Method.
This section describes writing a simple plug-in for Hildon Input Method. This example plug-in is going to implement a very basic virtual keyboard.
The illustration below shows what area of the Hildon Input Method can be redefined with the custom plug-in.
Technically, the plug-in is an almost standard GTK widget (with additional steps to support dynamic loading). The widget of the plug-in will be placed in the Plug-in area.
The illustration below shows the data flow of a user's input:
User inputs directly to the plug-in, then the plug-in sends the inputted data to HIM main user interface. The HIM main UI will interact with the IM context, and then commit the inputted text to the client widget.
In case of a custom plug-in, the plug-in itself - i.e. its writer - is responsible for handling all the inputs (even the buttons that are part of HIM main UI, e.g. tab or enter) and propagate them to the right modules (e.g. IM context).
The function and outlook of the buttons in HIM main UI can be customized, but one cannot remove them completely from the UI - only dim them (see handwriting plug-in), and they cannot be rearranged (for further information, see section Common buttons).
7.13.2 Plug-in Features
Hildon Input Method plug-in must be a GTK widget. In addition to the GTK widget interface, the plug-in must implement certain functions.
7.13.2.1 Interface
As already mentioned, the plug-in must handle all the inputs - both real user input and management signals from the system - that are coming to the HIM main UI. The first step is to take a look at which functions need to be implemented and provided by the plug-in to the Hildon Input Method Plug-in Interface. Later on, it will be shown how these functions are actually registered for the HIM Plug-in Interface.
The essential functions that must be implemented by a basic plug-in:
hildon-input-method/hildon-im-plugin.h
void (*enable) (HildonIMPlugin *plugin, gboolean init);
enable is called whenever the plug-in becomes available to the user. init holds TRUE whenever this is the initialization time. hildon-input-method-plugins-example/src/him-vkb-example.c
/* Called when the plugin is available to the user */ static void enable (HildonIMPlugin *plugin, gboolean init) { HimExampleVKBPrivate *priv; HimExampleVKB *vkb; vkb = HIMEXAMPLE_VKB (plugin); priv = HIMEXAMPLE_VKB_GET_PRIVATE (vkb); if (init == TRUE) { hildon_im_ui_button_set_toggle (priv->ui, HILDON_IM_BUTTON_MODE_A, TRUE); hildon_im_ui_button_set_toggle (priv->ui, HILDON_IM_BUTTON_MODE_B, TRUE); hildon_im_ui_button_set_label (priv->ui, HILDON_IM_BUTTON_MODE_A, "ABC"); hildon_im_ui_button_set_label (priv->ui, HILDON_IM_BUTTON_MODE_B, "Shift"); } hildon_im_ui_send_communication_message(priv->ui, HILDON_IM_CONTEXT_DIRECT_MODE); }
hildon-input-method/hildon-im-plugin.h
void (*disable) (HildonIMPlugin *plugin);
disable is called whenever the plug-in becomes unavailable to the user (e.g. when the main UI is closed). hildon-input-method-plugins-example/src/him-vkb-example.c
/* Called when the plugin is disabled */ static void disable(HildonIMPlugin *plugin) { /* not implemented */ }
hildon-input-method/hildon-im-plugin.h
void (*settings_changed) (HildonIMPlugin *plugin, const gchar *key, const GConfValue *value);
settings_changed is called whenever the HIM main UI receives a notification from GConf about Hildon Input Method settings being changed. The affected settings are all settings residing in /apps/osso/inputmethod path. key and value hold the GConf key and its value respectively. hildon-input-method-plugins-example/src/him-vkb-example.c
/* Called when the standard input method settings has been changed */ static void settings_changed (HildonIMPlugin *plugin, const gchar *key, const GConfValue *value) { /* not implemented */ }
hildon-input-method/hildon-im-plugin.h
void (*input_mode_changed) (HildonIMPlugin *plugin);
input_mode_changed is called whenever the input mode is changed. Input mode is changed to what has been specified by the client widget. The input mode puts constraints to the plug-in to limit whether input shall be accepted or ignored. hildon-input-method-plugins-example/src/him-vkb-example.c
/* Called when input mode changed */ static void input_mode_changed (HildonIMPlugin *plugin) { /* not implemented */ }
hildon-input-method/hildon-im-plugin.h
void (*clear) (HildonIMPlugin *plugin);
clear is called whenever the HIM main UI requests the plug-in to clear or refresh its user interface. hildon-input-method-plugins-example/src/him-vkb-example.c
/* Called when the plugin is requested to 'clear'/refresh its UI */ static void clear(HildonIMPlugin *plugin) { /* not implemented */ }
hildon-input-method/hildon-im-plugin.h
void (*client_widget_changed) (HildonIMPlugin *plugin);
client_widget_changed is called whenever the client widget is changed from one to another. For instance, the case could be that the user taps on another text entry. hildon-input-method-plugins-example/src/him-vkb-example.c
/* Called when the client widget changed */ static void client_widget_changed (HildonIMPlugin *plugin) { /* not implemented */ }
hildon-input-method/hildon-im-plugin.h
void (*save_data) (HildonIMPlugin *plugin);
save_data is called whenever the HIM main UI is requested to save its (and the plug-in's) data. Usually it is called when the main UI is requested to quit. hildon-input-method-plugins-example/src/him-vkb-example.c
/* Called when the plugin is requested to save its data */ static void save_data(HildonIMPlugin *plugin) { /* not implemented */ }
hildon-input-method/hildon-im-plugin.h
void (*mode_a) (HildonIMPlugin *plugin);
mode_a is called whenever the Mode A (Caps Lock in virtual keyboard plug-in) is pressed. hildon-input-method-plugins-example/src/him-vkb-example.c
/* Called when the MODE_A button is pressed */ static void mode_a(HildonIMPlugin *plugin) { HimExampleVKBPrivate *priv; HimExampleVKB *vkb; vkb = HIMEXAMPLE_VKB (plugin); priv = HIMEXAMPLE_VKB_GET_PRIVATE (vkb); if (hildon_im_ui_button_get_active (priv->ui, HILDON_IM_BUTTON_MODE_B)) { hildon_im_ui_button_set_active (priv->ui, HILDON_IM_BUTTON_MODE_B, FALSE); if (hildon_im_ui_button_get_active (priv->ui, HILDON_IM_BUTTON_MODE_A)) { priv->case_mode = CASE_UPPER; } else { priv->case_mode = CASE_LOWER; } } else { if (hildon_im_ui_button_get_active (priv->ui, HILDON_IM_BUTTON_MODE_A)) { priv->case_mode = CASE_UPPER; } else { priv->case_mode = CASE_LOWER; } } update_layout (vkb); }
hildon-input-method/hildon-im-plugin.h
void (*mode_b) (HildonIMPlugin *plugin);
mode_b is called whenever the Mode B (Shift in virtual keyboard plug-in) is pressed. hildon-input-method-plugins-example/src/him-vkb-example.c
/* Called when the MODE_B button is pressed */ static void mode_b(HildonIMPlugin *plugin) { HimExampleVKBPrivate *priv; HimExampleVKB *vkb; vkb = HIMEXAMPLE_VKB (plugin); priv = HIMEXAMPLE_VKB_GET_PRIVATE (vkb); if (hildon_im_ui_button_get_active (priv->ui, HILDON_IM_BUTTON_MODE_B)) { if (hildon_im_ui_button_get_active (priv->ui, HILDON_IM_BUTTON_MODE_A)) { priv->case_mode = CASE_LOWER; } else { priv->case_mode = CASE_UPPER; } } else { if (hildon_im_ui_button_get_active (priv->ui, HILDON_IM_BUTTON_MODE_A)) { priv->case_mode = CASE_UPPER; } else { priv->case_mode = CASE_LOWER; } } update_layout (vkb); }
hildon-input-method/hildon-im-plugin.h
void (*backspace) (HildonIMPlugin *plugin);
backspace is called whenever the virtual backspace key is pressed. hildon-input-method-plugins-example/src/him-vkb-example.c
/* Called when the backspace button is pressed */ static void backspace (HildonIMPlugin *plugin) { HimExampleVKBPrivate *priv; priv = HIMEXAMPLE_VKB_GET_PRIVATE (HIMEXAMPLE_VKB (plugin)); hildon_im_ui_send_communication_message (priv->ui, HILDON_IM_CONTEXT_HANDLE_BACKSPACE); }
hildon-input-method/hildon-im-plugin.h
void (*enter) (HildonIMPlugin *plugin);
enter is called whenever the virtual enter key is pressed. hildon-input-method-plugins-example/src/him-vkb-example.c
/* Called when the enter button is pressed */ static void enter (HildonIMPlugin *plugin) { HimExampleVKBPrivate *priv; priv = HIMEXAMPLE_VKB_GET_PRIVATE (HIMEXAMPLE_VKB (plugin)); hildon_im_ui_send_communication_message (priv->ui, HILDON_IM_CONTEXT_HANDLE_ENTER); }
hildon-input-method/hildon-im-plugin.h
void (*tab) (HildonIMPlugin *plugin);
tab is called whenever the virtual tab key is pressed. hildon-input-method-plugins-example/src/him-vkb-example.c
/* Called when the tab button is pressed */ static void tab (HildonIMPlugin *plugin) { HimExampleVKBPrivate *priv; priv = HIMEXAMPLE_VKB_GET_PRIVATE (HIMEXAMPLE_VKB (plugin)); hildon_im_ui_send_communication_message (priv->ui, HILDON_IM_CONTEXT_HANDLE_TAB); }
Couple of functions related to changing language:
hildon-input-method/hildon-im-plugin.h
void (*language) (HildonIMPlugin *plugin);
language is called whenever a new language is selected from the HIM main UI menu. hildon-input-method-plugins-example/src/him-vkb-example.c
/* Called when the language has been changed */ static void language (HildonIMPlugin *plugin) { /* not implemented */ }
hildon-input-method/hildon-im-plugin.h
void (*language_settings_changed) (HildonIMPlugin *plugin, gint index);
language_settings_changed is called whenever the language settings for the specified language index have been changed.
7.13.2.2 Plug-in Loading
A nature of a plug-in is that it can be dynamically loaded. In this case also, the HIM plug-in is loaded whenever the user selects it, so in order to support the dynamic loading, the plug-in has to provide the following three specific functions for Hildon Input Method plug-in system:
void module_init (GTypeModule *module);
This function initializes the plug-in as a module, meaning the type of GTypeInfo needs to be registered, and the interface and instance information (GInterfaceInfo) need to be added to the module. hildon-input-method-plugins-example/src/him-vkb-example.c
void module_init(GTypeModule *module) { static const GTypeInfo type_info = { sizeof(HimExampleVKBClass), NULL, /* base_init */ NULL, /* base_finalize */ (GClassInitFunc) himExample_vkb_class_init, NULL, /* class_finalize */ NULL, /* class_data */ sizeof(HimExampleVKB), 0, /* n_preallocs */ (GInstanceInitFunc) himExample_vkb_init, }; static const GInterfaceInfo plugin_info = { (GInterfaceInitFunc) himExample_vkb_iface_init, NULL, /* interface_finalize */ NULL, /* interface_data */ }; himExample_vkb_type = g_type_module_register_type(module, GTK_TYPE_WIDGET, "HimExampleVKB", &type_info, 0); g_type_module_add_interface(module, HIMEXAMPLE_VKB_TYPE, HILDON_IM_TYPE_PLUGIN, &plugin_info); }
The himExample_vkb_iface_init function should register the custom interface functions in HildonIMPluginIface: hildon-input-method-plugins-example/src/him-vkb-example.c
/* Standard GTK stuff */ static void himExample_vkb_iface_init (HildonIMPluginIface *iface) { iface->enable = enable; iface->disable = disable; iface->enter = enter; iface->tab = tab; iface->backspace = backspace; iface->clear = clear; iface->input_mode_changed = input_mode_changed; iface->client_widget_changed = client_widget_changed; iface->save_data = save_data; iface->language = language; iface->mode_a = mode_a; iface->mode_b = mode_b; iface->language_settings_changed = language_settings_changed; iface->settings_changed = settings_changed; return; }
void module_exit (void);
This function defines actions when the module is unloaded from the memory. hildon-input-method-plugins-example/src/him-vkb-example.c
void module_exit(void) { /* empty */ }
HildonIMPlugin* module_create (HildonIMUI *ui);
This function creates and returns the plug-in widget to the main UI. hildon-input-method-plugins-example/src/him-vkb-example.c
HildonIMPlugin* module_create (HildonIMUI *keyboard) { return HILDON_IM_PLUGIN (himExample_vkb_new (keyboard)); }
7.13.2.3 Plug-in Info
Some basic information of the plug-in needs to be provided to the HIM plug-in system, so it can keep up with the kinds of plug-ins that are available in the system. This is performed with two specific functions:
const HildonIMPluginInfo* hildon_im_plugin_get_info(void);
The function creates HildonIMPluginInfo struct for providing the required information. hildon-input-method-plugins-example/src/him-vkb-example.c
/* Input Method plugin information. * This structure tells the main UI about this plugin */ const HildonIMPluginInfo * hildon_im_plugin_get_info(void) { static const HildonIMPluginInfo info = { "HIM VKB Example", /* description */ "himExample_vkb", /* name */ "Keyboard (EXAMPLE)", /* menu title */ NULL, /* gettext domain */ TRUE, /* visible in menu */ FALSE, /* cached */ HILDON_IM_TYPE_DEFAULT, /* UI type */ HILDON_IM_GROUP_LATIN, /* group */ HILDON_IM_DEFAULT_PLUGIN_PRIORITY, /* priority */ NULL, /* special character plugin */ "", /* help page */ FALSE, /* disable common UI buttons */ HILDON_IM_DEFAULT_HEIGHT, /* plugin height */ HILDON_IM_TRIGGER_STYLUS /* trigger */ }; return &info; }
gchar** hildon_im_plugin_get_available_languages (gboolean *free);
The function returns a NULL terminated array of string, containing language codes supported by the plug-in. Set free to TRUE if HIM main UI should free the returned value when no longer used. hildon-input-method-plugins-example/src/him-vkb-example.c
/* * This function returns the list of available languages supported * by the plugin. * */ gchar ** hildon_im_plugin_get_available_languages (gboolean *free) { static gchar *list[] = { "en_GB", NULL }; *free = FALSE; return list; }
7.13.3 Interaction with Main User Interface
As mentioned above, the plug-in is placed inside the HIM main UI. This section deals with interacting with it. This is mainly done by calling its functions, as defined in hildon-im-ui.h.
7.13.3.1 Handling Input
hildon-input-method/hildon-im-ui.hvoid hildon_im_ui_send_utf8(HildonIMUI *main_ui, const gchar *text);
The plug-in can request the main UI to commit a UTF-8 encoded text by calling this function. hildon-input-method/hildon-im-ui.h
void hildon_im_ui_send_communication_message(HildonIMUI *main_ui, gint message);
The plug-in can use this function to tell the main UI that Enter, Backspace, or Tab virtual buttons are pressed. Simply call this function and pass one of the constants below as the message argument:
HILDON_IM_CONTEXT_HANDLE_ENTERHILDON_IM_CONTEXT_HANDLE_BACKSPACEHILDON_IM_CONTEXT_HANDLE_TAB
7.13.3.2 UI Visibility
hildon-input-method/hildon-im-ui.hvoid hildon_im_ui_set_visible(HildonIMUI *ui, gboolean visible);
The plug-in can request the main UI to set it's visibility by calling this function. hildon-input-method/hildon-im-ui.h
gboolean hildon_im_ui_get_visibility(HildonIMUI *main_ui);
By calling this function, the plug-in can get the visibility status of the main UI.
7.13.3.3 Get Input Method State
The following two state reader functions could be very handy in case the plug-in receives a state change notification (e.g. language change), because this way all the state information does not need to be saved. hildon-input-method/hildon-im-ui.h
HildonIMCommand hildon_im_ui_get_autocase_mode(HildonIMUI *main_ui);
The function returns the auto-capitalization mode of the current client widget. hildon-input-method/hildon-im-ui.h
const gchar * hildon_im_ui_get_active_language(HildonIMUI *main_ui);
The function returns the current language code.
7.13.3.4 Common Buttons
As mentioned in the Overview section, the outlook and even the function of the buttons in the main UI can be modified. N.B. It is not recommended to alter buttons, except the Mode A and Mode B buttons! Other buttons may have hardwired behavior within the main UI.
If the plug-in changes the functionality of a button, one might want to reflect this also in the UI by changing the label of the button. The layout of the buttons can be altered by the following two functions:
hildon-input-method/hildon-im-ui.h
void hildon_im_ui_button_set_label(HildonIMUI *keyboard, HildonIMButton button, const gchar *label);
With this function, the plug-in can set the label of a button.
Possible values of HildonIMButton (see hildon-im-ui.h):
HILDON_IM_BUTTON_TABHILDON_IM_BUTTON_MODE_AHILDON_IM_BUTTON_MODE_BHILDON_IM_BUTTON_INPUT_MENUHILDON_IM_BUTTON_BACKSPACEHILDON_IM_BUTTON_ENTERHILDON_IM_BUTTON_SPECIAL_CHARBUTTON_CLOSE
hildon-input-method/hildon-im-ui.h
void hildon_im_ui_button_set_id(HildonIMUI *self, HildonIMButton button, const gchar *id);
This function sets a name to a particular button.
Since every input to the HIM main UI is caught by the plug-in, it is necessary to keep the button state (active or in-active) in sync. The state of a particular button can be changed, queried and toggled with the following functions:
hildon-input-method/hildon-im-ui.h
void hildon_im_ui_button_set_active(HildonIMUI *keyboard, HildonIMButton button, gboolean active);
This function sets the active state of a particular button.
hildon-input-method/hildon-im-ui.h
gboolean hildon_im_ui_button_get_active(HildonIMUI *keyboard, HildonIMButton button);
This function returns the active state of a particular button.
hildon-input-method/hildon-im-ui.h
void hildon_im_ui_button_set_toggle(HildonIMUI *keyboard, HildonIMButton button, gboolean toggle);
The plug-in can set the toggle state of a particular button with this function.
Miscellaneous button manipulation functions:
hildon-input-method/hildon-im-ui.h
void hildon_im_ui_button_set_menu(HildonIMUI *keyboard, HildonIMButton button, GtkWidget *menu);
With this function, the plug-in can attach a menu - which is a GtkWidget - to a particular button.
hildon-input-method/hildon-im-ui.h
void hildon_im_ui_button_set_sensitive(HildonIMUI *keyboard, HildonIMButton button, gboolean sensitive);
All the buttons defined on the HIM main UI may not be needed, or the functionality of a button may be wished to be switched off in some states. In this case, the sensitivity of a particular button can be set by calling this function.
hildon-input-method/hildon-im-ui.h
void hildon_im_ui_button_set_repeat(HildonIMUI *keyboard, HildonIMButton button, gboolean repeat);
This function controls whether a particular button will repeat when pressed for a long time.
7.13.4 Component Dependencies
At least the following headers shall be included in the plug-in:
#include <hildon-im-plugin.h> #include <hildon-im-ui.h>
hildon-input-method-framework-dev and libhildon-im-ui-dev packages.
7.13.5 Language Codes
These are the language codes recognized; they are numbered, the first, af_ZA, being 0.
af_ZA am_ET ar_AE ar_BH ar_DZ ar_EG ar_IN ar_IQ ar_JO ar_KW ar_LB ar_LY ar_MA ar_OM ar_QA ar_SA ar_SD ar_SY ar_TN ar_YE az_AZ be_BY bg_BG bn_IN br_FR bs_BA ca_ES cs_CZ cy_GB da_DK de_AT de_BE de_CH de_DE de_LU el_GR en_AU en_BW en_CA en_DK en_GB en_HK en_IE en_IN en_NZ en_PH en_SG en_US en_ZA en_ZW eo_EO es_AR es_BO es_CL es_CO es_CR es_DO es_EC es_ES es_GT es_HN es_MX es_NI es_PA es_PE es_PR es_PY es_SV es_US es_UY es_VE et_EE eu_ES fa_IR fi_FI fo_FO fr_BE fr_CA fr_CH fr_FR fr_LU ga_IE gd_GB gl_ES gv_GB he_IL hi_IN hr_HR hu_HU hy_AM id_ID is_IS it_CH it_IT iw_IL ja_JP ka_GE kl_GL ko_KR kw_GB lt_LT lv_LV mi_NZ mk_MK mr_IN ms_MY mt_MT nl_BE nl_NL nn_NO no_NO oc_FR pl_PL pt_BR pt_PT ro_RO ru_RU ru_UA se_NO sk_SK sl_SI sq_AL sr_YU sv_FI sv_SE ta_IN te_IN tg_TJ th_TH ti_ER ti_ET tl_PH tr_TR tt_RU uk_UA ur_PK uz_UZ vi_VN wa_BE yi_US zh_CN zh_HK zh_SG zh_TW