- 3.1 Introduction
- 3.2 Maemo Software Development Kit
- 3.3 Installing SDK
-
- 3.3.1 Prerequisites
- 3.3.2 Automatic Install of Scratchbox
- 3.3.3 Manual Install of Scratchbox
- 3.3.4 Automatic Install of Maemo SDK
- 3.3.5 Manual Install of Maemo SDK
- 3.3.6 Manual Install of ARMEL Target
- 3.4 Testing SDK Installation
-
- 3.4.1 Testing Scratchbox
- 3.4.2 Writing GUI Hello World
- 3.4.3 Running GUI Hello World
- 3.4.4 Starting Virtual X Server (Xephyr)
- 3.4.5 Directing Client to Virtual Server
- 3.4.6 Starting Application Framework
- 3.4.7 Running Hello World in Application Framework
- 3.5 Setting up USB Networking
-
- 3.6 CPU Transparency
-
- 3.6.1 Setting up Host Linux PC Environment
- 3.6.2 Setting up Scratchbox ARMEL Target
- 3.6.3 Setting up Device for CPU Transparency
- 3.6.4 Testing CPU Transparency
- 3.7 Using Linux Flasher Tool
3. Development Environment
3.1 Introduction
The following code examples are used in this chapter:
The development environment for maemo running on the desktop is called maemo SDK[72]. It will only install and run on a Linux operating system. Supported Linux distributions for maemo SDK are currently Debian and Ubuntu, but installing maemo SDK is also possible for other distributions. On other operating systems such as Windows, a VMWare image[74] can be used to provide a working Linux environment.
3.2 Maemo Software Development Kit
The maemo SDK creates a sandboxed maemo development environment on a GNU/Linux desktop system largely built on a tool called Scratchbox[90]. In most ways, this environment behaves like the operating system on the device, but with added development tools. This means that the development process is very similar to a normal desktop GNU/Linux, and the kinks of embedded development, such as cross-compiling, are handled transparently by Scratchbox.
Scratchbox is a specially packaged "sandbox" environment, providing the necessary tools and also isolating the development efforts from the real Linux system. Scratchbox also makes it easy to perform cross-compiling, which means building the software into a binary format that is executable in the target device.
The name "Scratchbox" comes from "Linux from scratch" + "chroot jail" (sandbox). This also tells something about its implementation and intended use. While working inside Scratchbox, programs will be running in a changed root environment (chroot). In Linux systems, it is possible to change the part of file paths that a process will see. Scratchbox uses this mechanism on start to switch its root directory (/) to something other than the real root. This is part of the isolation technique used. Because of this, the environment is called a sandbox, a private area where it is possible to play around without disturbing the environment, and without all the mess that real sand would cause. The other parts of the isolation technique are library call diversions (using LD_PRELOAD), wrapping of compiler executables and other commands.
Scratchbox:
- Is a software package to implement development sandboxes (for isolation)
- Contains easy-to-use tools to assist cross-compilation
- Supports multiple developers using the same development system
- Supports multiple configurations for each developer
- Supports executing target executables on the hardware target, via a mechanism called sbrsh
- Supports running non-native binaries on the host system via instruction set emulators (Qemuis used [87]).
Besides these main features, it is possible to develop own software packages that can be installed and used inside a Scratchbox environment. Scratchbox also includes some integration for Debian package management, so that once the source files are set up correctly and a couple of configuration files have been written, binary distribution packages can be created for various architectures (similar to .msi-files in Windows, or .rpm-files in Fedora Core, RHEL and SUSE). These tools are also used to provide the environment with a packaging database, so that other development packages can be installed over the Internet when needed (by using standard Debian package management tools).
The Internet Tablet also uses a similar packaging system, and this means that packages built using Scratchbox and the SDK can be installed on the real device.
Scratchbox is licensed under the GPL and it is open for outside contributions. For an in-depth coverage on Scratchbox capabilities please see [90].
This material discusses only the Scratchbox capabilities that are necessary to use the maemo SDK.
Hardware architectures
Maemo SDK supports two architectures and has an environment for them both. x86 is used for native performance and better tool support through native execution without the need for emulation. ARMEL is used for working with the actual device's architecture. Both have their advantages and roles in maemo development. It is important to understand that maemo SDK actually provides these two environments as preconfigured targets inside a working Scratchbox installation. This is explained in detail later.
Generally the x86 environment is used in active development, because it provides practically the same performance as normal GNU/Linux applications. Also, although the underlying architecture is different from the actual device, programs usually behave exactly as they would, when compiled and run on ARMEL. As stated before, many tools are available only for the x86 environment.
Working means that application also functions properly and not just run, the next step is to compile it for the ARMEL architecture. The process for compilation and packaging is exactly the same as in x86, albeit a bit slower, because some of the required software is emulated. The developer needs not to concern themselves with cross-compilation. This is the main reason maemo SDK use Scratchbox in the first place.
The applications compiled in ARMEL environment can be run straight on the device. Additionally, it is possible to run some of the applications inside the ARMEL environment in maemo SDK. This is possible, because of the automatic emulation maemo SDK provides. The emulation is not complete, and things like multithreading will cause problems, so actual testing must be performed on the device.
Using emulation for the whole development process may not sound ideal because
of the effect on performance. That is why even when in ARMEL environment, native
performance is achieved with Scratchbox by internally using the host computer's tools
without emulation, when possible. For example, compilation on ARMEL environment
is actually performed by an x86-ARMEL cross-compiler, but Scratchbox hides the details so
that the developer can execute GCC like on any GNU/Linux system.
Scratchbox In-Depth
Scratchbox is maemo SDK's cross-compiling environment. The default Scratchbox installation works as-is under most conditions, but some details are good to know for more specialized usage.
The target inside Scratchbox contains a root file system that is being worked on. When a new target inside Scratchbox is created, a toolchain must be specified for it. Using this toolchain, applications are built for the target. Examples of a target are X86 and ARMEL, which are provided by the maemo SDK on top of Scratchbox.
Host tools are native to the host provided for convenience and speed. They are always preferred over target tools and transparently for example cross-compile applications to the target architecture. Host tools consist of devkits and toolchains.
A toolchain provides the minimal set of tools for compiling binaries for the target. One and only one toolchain must be selected for every Scratchbox target.
CPU transparency methods take care of running the applications on an emulator, target device or directly on the host transparently to the user. The available CPU transparency methods come from a special devkit called cputransp. For each of maemo SDK's pre-defined targets, a CPU transparency method is selected and defined.
A toolchain is a collection of tools used to produce binaries for the target environment. In addition to a compiler (gcc), it contains a linker (ld) and other binutils, such as strip, objdump and strings.
A devkit is a collection of tools native to the host. A toolkit can be selected or disabled for a target. An example of a devkit is doctools devkit, which provides tools (like doxygen) for building documentation.
A rootstrap is a root file system for the target device. Maemo SDK provides root file systems for both targets (X86 and ARMEL) inside Scratchbox. Note that the user's home directory is shared for all targets. The /tmp directory is shared for all targets and also with the host.
From Scratchbox's point of view, maemo SDK is a set of preconfigured targets and root file systems. One set is provided for both X86 and ARMEL architectures on top of a working Scratchbox installation.
More Scratchbox information can be found at Scratchbox's web site[90].
Development on Maemo SDK
The maemo SDK provides all of its development tools inside Scratchbox. Also the Hildon Desktop is started with a single command af-sb-init start inside Scratchbox. However, the Hildon Desktop needs a secondary X server of proper size and bitdepth to be displayed on.
As an exception to the rule, the X server such as Xephyr[105] must be started on the
host Linux environment, instead of being started inside Scratchbox. The use of Xephyr is described in section 3.4.
Development Tools on Scratchbox
As the Scratchbox environment is practically a full GNU/Linux system, it includes the standard GNU/Linux development tools. Debugging is performed with tools like GDB[24], valgrind[99], ltrace and strace[93]. Performance profiling can be performed with tools like htop[50], oprofile[82] and time, and compiling with the GCC toolchain. Some of these tools offer graphical user interfaces, which can also be used. Naturally, this is not a comprehensive list of the tools, and if the tools shipped with the SDK do not suit to needs or personal preferences, most utilities can be easily run practically unchanged in Scratchbox.
Chapter Application Development of Maemo Diablo Reference Manual gives good introductions to development using Scratchbox,
and the debugging tools are described in depth in chapter Debugging14.
Testing and Debugging on Device
Even though Scratchbox is quite accurate in emulating a full target environment on the device, it isn't 100% identical. Especially applications that make use of the device's special hardware can behave differently on the device than on Scratchbox. They even may not work at all. Fortunately, testing the software on device is quite straightforward using either SSH or a tool called sbrsh to run target binaries on the device transparently from Scratchbox.
The CPU Transparency section 3.6 has instructions for getting started with sbrsh.
SSH server and client for maemo can be downloaded from maemo web site[65].
Other Programming Languages
Currently C is the only official programming language for maemo. But thanks to the community, unofficial support exist for several other languages. To name a few, the SDK itself compiles C++, and by adding hildonmm bindings[45], Hildon applications can be created the C++ way. Python scripting language also has a good support in form of pymaemo[86], and Ruby bindings are in the works[71], not to forget Mono[78]. For Java support, JaliMo[52] is an interesting project to track.
3.3 Installing SDK
3.3.1 Prerequisites
Before continuing, the installation instructions of the maemo SDK should be reviewed.
There is a special feature that the kernel needs to support in order for the instruction emulator in sbox to work properly. This is the binfmt_misc-feature. It is normally built as a module, so verify that it is loaded in Linux (no root access needed for this):
user@system:~$ lsmod | grep binfmt
binfmt_misc 12936 0
If you do not see a line of output, attempt to do a modprobe binfmt_misc as root (or with sudo). If this still does not work, you will have to find the module somewhere, or even recompile the kernel. On most Debian-based systems (Debian, Ubuntu), the module is included, so there should not be any problems, unless you have built your own kernel. It is also possible that the feature has been built inside the kernel directly, instead of a module.
Also a pseudo X server should be installed to act as an X client to the real system. It will be necessary to run the applications that are developed, after installing the SDK.
There are a few options for this purpose, but this material will cover the usage of Xephyr. Xephyr is a Kdrive-based X server/client that can emulate 16-color depth for its clients even if it is acting as a client to an 24-bit depth real X server. It also implements modern X protocol extensions.
The concept of having a program that is both X server and a client may seem weird. However, there is no reason to worry, as it is a tested technology and works quite well. If, on the other hand, it does not make any sense, revisit the X Window System introduction in the previous chapter.
To install Xephyr to Debian based Linux:
- Issue the command sudo apt-get install xserver-xephyr on your real Linux system.
- Verify installation status by issuing the command 'dpkg -l | grep xephyr' (as non-root).
3.3.2 Automatic Install of Scratchbox
Up-to-date installation instructions can be found from [72] with instructions for each maemo SDK release.The preferred way to install the Scratchbox is to use the automated installation script. Manual installation of the Scratchbox is described here for educational purposes, and for situations where the automatic installation script fails.
Quick installation of Scratchbox on a Debian system with the automated install-script:
user@system:~$ sudo sh ./maemo-scratchbox-install_X.X.sh -u user
The -u user option is used, so that Scratchbox will add the user account "user" automatically into the group that is allowed to use Scratchbox.
3.3.3 Manual Install of Scratchbox
Scratchbox can also be installed manually. The Debian packages (for the real Linux system) are located at [91]. Apophis is the release of Scratchbox that is suited to be used with maemo 4.x SDK. Please refer to the Scratchbox documentation for further instructions [92].3.3.4 Automatic Install of Maemo SDK
Up-to-date installation instructions can be found from [72], with instructions for each maemo SDK Release.The preferred way to install the the maemo SDK is to use the automated installation script. In some cases, using a manual process is more suitable; this is covered later. Installing the SDK in an offline environment is officially unsupported, but possible as well.
Quick installation with automated install-script:
user@system:~$ sh maemo-sdk-install_X.X.sh
Running this script will display the end user license agreement. Pressing Enter key to accept the license presents you with package selection dialog.
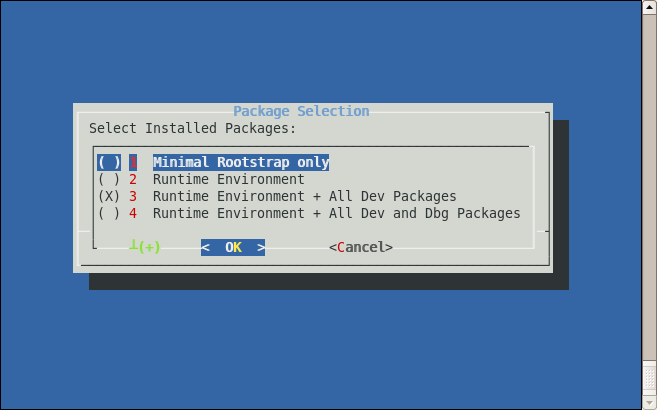
You are presented with four options for installing SDK:
- Minimal Rootstrap only. Choose this only if you are going to install all packages you need from repository.
- Runtime Environment. Use this to install and run software inside Scratchbox. Cannot be used for building software.
- Runtime Environment + All Dev Packages. Choose this to get a full development environment.
- Runtime Environment + All Dev and Dbg Packages. You will get a full development environment plus debug symbols for many system components.
By default, option 3 is selected.
N.B.: The SDK installer will always download and install the minimal rootstrap, but will install additional packages using apt-get based on your choice.
In the next dialog, you can choose to install closed Nokia binaries or not.
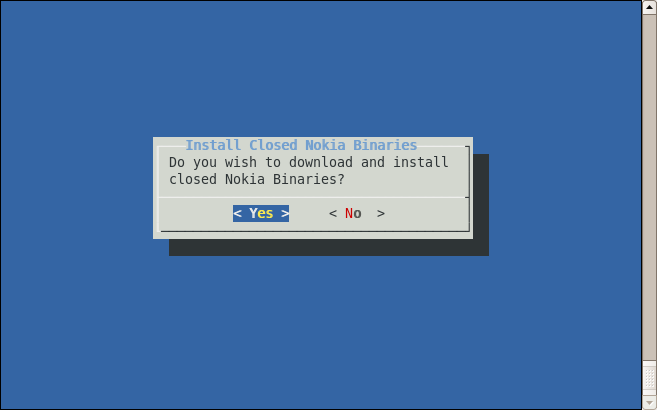
Selecting 'yes' will run the Nokia binaries installer script which will display the EUSA(End User Software Agreement). If you accept the agreement, the installer script will extract the Nokia binaries into a folder under the user's home directory inside scratchbox. It will also configure the /etc/apt/sources.list file in the scratchbox targets to make this 'local repository' visible to the Debian apt tools.
In the next dialog, a summary of your selections so far and the default settings are listed.
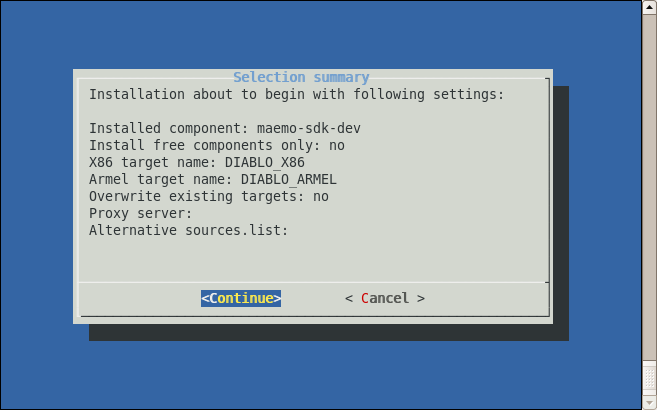
Selecting 'Continue' will initiate the SDK installation process. If the selection summary is not OK, you can cancel the process and re-start the SDK installation script.
After it's successful execution, you will have 2 scratchbox targets ready for use:
DIABLO_X86: Suitable for software development and testing.DIABLO_ARMEL: Suitable for building software for the ARM architecture.
The Nokia binaries are not installed by default but just made available. If you wish to install all of them , then execute the following command inside the scratchbox targets:
[sbox-DIABLO_<target>: ~] > fakeroot apt-get install maemo-explicit
N.B. The installer script by default will prompt the user to install the Nokia binaries, which are not open source. To disable this feature, please use -f command line parameter for the script. For more options, use the command line help option.
user@system:~$ sh maemo-sdk-install_X.X.sh --help
3.3.5 Manual Install of Maemo SDK
In order to install the maemo SDK manually, the first step is to download the necessary rootstrap files. There will be two: one for the X86 target, and the other one for the ARM target.The rootstrap files are available in the same location as the automatic install scripts (for maemo 4.1 SDK they can be found at [61]).
It is necessary to download the minimal rootstraps for i386 and arm, so the filenames will be as follows:
- i386/maemo-sdk-rootstrap_4.1_i386.tgz for the X86 version
- armel/maemo-sdk-rootstrap_4.1_armel.tgz for the ARMEL version
Do not extract the downloaded files. They have to be moved under a location where Scratchbox setup tools can find them (/scratchbox/packages/):
user@system:~$ sudo mv /tmp/download-location/maemo-sdk-rootstrap*  \
 /scratchbox/packages/
You are now ready to setup your first sbox target. Scratchbox comes with a simple menu-driven tool (sb-menu), which can be used for this. The other option would be using a command line driver tool (sb-conf), but using the menu driver tool is easier.
The first step is to log in on the Scratchbox environment:
user@system:~$ /scratchbox/login

You dont have active target in scratchbox chroot.
Please create one by running "sb-menu" before continuing


Welcome to Scratchbox, the cross-compilation toolkit!

Use 'sb-menu' to change your compilation target.
See /scratchbox/doc/ for documentation.

sb-conf: No current target
[sbox-: ~] >
By default, Scratchbox will activate the same target that was used previously, but since this is the first time Scratchbox is used, there is no target to activate. One can be built with sb-menu:
- Type sb-menu inside Scratchbox to launch the tool.
[sbox-: ~] > sb-menu
- Select "Setup" in order to create a new target.
Normally the tool would display all configured targets in a list, but since there are none, the dialog is empty. Select "NEW" in order to create a new target.
- Using the same names as the automatic install script uses allows you to use the Nokia binaries installer later. Type DIABLO_X86 as the target name.
- Since the first target will be for X86 environment, select the i386 compiler version (
cs2005q3.2-glibc2.5-i386). - Next, you will need to select all the devkit packages that you want to enable for the new target. You will need
debian-etch,maemo3-toolsandperl. Do not select cputransp for the X86 target. Select each of them in a row and then press "DONE". - Since the cputransp devkit was not selected in the previous step, selecting the CPU transparency becomes "none".
- This concludes the target-specific tool choices, but there are still things to do. The next step is to select a rootstrap package to extract into the target (select "Yes").
- And since the rootstraps were already downloaded and copied to the proper location, select "File".
- Using TAB arrows, navigate to the proper rootstrap file (the one that ends with i386), and select it by pressing space and then press ENTER to go forward.
- Unpacking the rootstrap will not take long, and soon after that, a dialog will come up with a question about files installation. Select "Yes" (even if it is not entirely obvious what the question means), and then select the
C-library,/etc,Devkitsandfakeroot. Other tools can be installed later from the maemo SDK repository (or local mirror of the repository). - After extracting the selected files from the rootstrap, the target is now ready. You should next opt to select the target (so that it becomes active and will be default target from now on).
Selecting the target will restart the Scratchbox session and if everything went well, you are now left with a very minimal maemo SDK environment:
Shell restarting...
[sbox-DIABLO_X86: ~] > arch
i686
[sbox-DIABLO_X86: ~] > dpkg -l | grep maemo-repository
ii  maemo-repository       4.1-1               Configuration for maemo repository.
- In order to complete the SDK installation, you will have to fetch the package list and then install the maemo-sdk-dev meta-package. The package depends on a lot of other packages, and all of them will be downloaded into the target. The number of packages is quite significant, so reserve some time for this step. This step will require a working Internet connection (or DNS redirection into a local copy of the repository).
[sbox-DIABLO_X86: ~] > apt-get update
[sbox-DIABLO_X86: ~] > fakeroot apt-get install maemo-sdk-dev
Using fakeroot is important in the above command so that the package install scripts think that they are running as the root user. Otherwise the installation phase will fail with errors. Modern Debian-style repositories are signed with GPG keys in order to prevent tampering with the repository contents. The maemo repositories, however, do not use this convention, and this makes
apt-getslightly conserned. This can be ignored by accepting installation of unverified packages. - The closed Nokia binaries can be obtained by running the script maemo-sdk-nokia-binaries_X.X.sh. If you choose to accept the EUSA, then proceed to the following step.
- You can install all the nokia binaries in your targets by installing the meta package 'maemo-explicit'.
After apt-get finishes installing all the packages, the SDK installation is ready.
When you are finished with sbox, you need to logout. This is done by terminating the command shell with the exit command, or by using logout.
3.3.6 Manual Install of ARMEL Target
If the X86 target was installed manually (above), it is advisable to create the ARMEL target to enable building software for the Internet Tablets. This step can also be postponed until the need to perform cross-building for Internet Tablets arises.If the automatic install process was used, the ARMEL target is already available (as DIABLO_ARMEL), and the following steps are not necessary.
Creating the ARMEL target requires creating a new target in Scratchbox, using the same steps that were taken for the X86 target.
Here is how the ARMEL target install process differs from the X86 (described above):
- Stop any processes you may have running on the X86 sbox target (sb-conf killall)
- Then start sb-menu as you did with the X86 target:
- Name your target DIABLO_ARMEL (for compatibility)
- You will need to select the arm version of the compiler.
- You will need to select the cputransp devkit and then select qemu-arm-0.8.2-sb2 as the CPU transparency method (instead of none, as used for X86).
- You will need to select the arm version of the maemo SDK base rootstrap.
You may wish to verify the target by using the steps below (see section 3.4.1), at least build the hello world program and verify the architecture of the resulting executable with file command.
3.4 Testing SDK Installation
3.4.1 Testing Scratchbox
The following shows how to create a small non-graphical Hello World program, to verify that the Scratchbox environment works: helloworld.c
/**
 * helloworld.c
 *
 * This maemo code example is licensed under a MIT-style license,
 * that can be found in the file called "License" in the same
 * directory as this file.
 * Copyright (c) 2007-2008 Nokia Corporation. All rights reserved.
 *
 * Simple standard I/O (printf)-based Hello World that we can use to
 * test our toolchains.
 */

#include <stdio.h> /* printf */

/* main implementation */
int main(int argc, char** argv) {

  printf("Hello world\n");

  /* In Linux, each process upon termination must set its exit code.
     Exit code 0 means success to whoever executed this program. It
     is routinely used inside scripts to test whether running some
     program succeeded or not. Other exit codes mean failure. Each
     program is free to use different non-zero codes to signify
     different kinds of failures. These are normally listed in the
     manual page for the program (since there is no standard). If you
     forget to set your exit code, it will be undefined. */
  return 0;
}
First, it has to be verified that the proper directory is chosen. This can be done by using pwd (print working directory). At this point, the work directory should be your home directory:
[sbox-DIABLO_X86: ~] > pwd
/home/user
Then, start an editor and write the small hello world program (you may use the above listing as a template if you wish):
[sbox-DIABLO_X86: ~] > nano helloworld.c
nano is a GNU version of "pico" editor, which is a simple text file editor. Use Control+character to execute the commands listed on the bottom of the screen. WriteOut means "save". You may also use vi or an external editor to the SDK environment (see below for hints on using vi and emacs).
[sbox-DIABLO_X86: ~] > gcc -Wall -g helloworld.c -o helloworld
[sbox-DIABLO_X86: ~] > ls -F hello*
helloworld* helloworld.c
The -g option to gcc tells the compiler to add debugging symbols to the generated output file. -Wall will tell the compiler to enable most of the syntax and other warnings that the source code could trigger. -o helloworld then tells the output filename to which gcc will write the result binary.
The -F option to ls is mainly useful when working with a non-color terminal (e.g. paper) to indicate the type of different files. The asterisk after helloworld signifies that the file is an executable.
[sbox-DIABLO_X86: ~] > ./helloworld
Hello world
Running the binary should not produce any surprises.
[sbox-DIABLO_X86: ~] > file helloworld
helloworld: ELF 32-bit LSB executable, Intel 80386, version 1 (SYSV),
for GNU/Linux 2.6.0, dynamically linked (uses shared libs), not stripped
The file tool is a generic utility that will load some bytes from the start of the given file and then use its internal database to decode what the file might "mean". In this case, it will correctly decode the file as a X86 format binary file.
[sbox-DIABLO_X86: ~] > ldd helloworld
   linux-gate.so.1 =>  (0xffffe000)
   libc.so.6 => /lib/libc.so.6 (0xb7e9f000)
   /lib/ld-linux.so.2 (0xb7fd2000)
[sbox-DIABLO_X86: ~] > ls -l /lib/libc.so.6
lrwxrwxrwx  1 user user 11 Nov 12 15:52 /lib/libc.so.6 -> libc-2.5.so
[sbox-DIABLO_X86: ~] > ls -l /lib/libc-2.5.so
-rwxr-xr-x  1 user user 1213256 Sep  7 13:28 /lib/libc-2.5.so
The names of dynamic libraries that the executable uses will be shown on the left-hand column, and the files where the libraries live on the system if executing the program will be shown on the right-hand column. After that, use ls to check out the exact version of the C library that is used in the SDK by using the "long listing format" -l option (running these commands using the ARMEL target would yield more or less the same results). N.B. The linux-gate.so.1 is a so-called hack to support a certain way of doing system calls on the X86 architecture, and is not always present on newer systems.
When comparing the version of libc used on the real system with ls -l, it will probably show a difference (in version numbers). This means that the executables that were built inside sbox use libraries that are also inside sbox. This also means a stable development platform, especially when working in team where each member has their own Linux, which they have customized. This might not seem very important at this stage, but when encountering all the different tools that are used in free software development, this feature of sbox will come in handy.
Scratchbox does not contain any logic to emulate the kernel (or to use a different kernel for running programs inside sbox). The only easy possibility for this is using the sbrsh CPU-transparency option.
vi
It is also possible to use vi (Visual Interactive) editor inside sbox. It is possible to install own favorite editors inside sbox (with the debian-devkit), but the following examples will use nano, since it is the easiest to start with. To learn vi, it is best to ask an Internet search engine for a "vi tutorial". There are lots of them to be found. To understand why vi can be considered to be "strange", it is useful to know its history first. Using vi is optional of course.
The version of vi that is commonly installed on Linux systems is really vim (VI iMproved), which is a more user friendly vi, including syntax high-lighting and all kinds of improvements. sbox has a program called vimtutor installed to help in learning the use of vi interactively.
It is also fairly simple to use existing editors. /scratchbox/users/x/home/x/ is the home directory of user x when accessing it from the real Linux desktop. Ubuntu comes with gedit, which is a fairly good graphical editor that also supports syntax high-lighting and multiple tabs for editing multiple files at the same time.
And as a final note, also emacs can be used.
Here is how to do it:
- Start emacs outside of sbox
- In emacs, use M-x server-start
- Inside sbox use emacsclient filename to open the file for editing in your emacs
3.4.2 Writing GUI Hello World
The following example shows how to write the first GUI program. N.B. Only GTK+ library is used here, meaning that the platform provided widgets or coding style are not utilized. That will be discussed soon. gtk_helloworld-1.c/** * gtk_helloworld-1.c * * This maemo code example is licensed under a MIT-style license, * that can be found in the file called "License" in the same * directory as this file. * Copyright (c) 2007-2008 Nokia Corporation. All rights reserved. * * A simple GTK+ Hello World. You need to use Ctrl+C to terminate * this program since it doesn't implement GTK+ signals (yet). */ #include <stdlib.h> /* EXIT_* */ /* Introduce types and prototypes of GTK+ for the compiler. */ #include <gtk/gtk.h> int main(int argc, char** argv) { /* We'll have two references to two GTK+ widgets. */ GtkWindow* window; GtkLabel* label; /* Initialize the GTK+ library. */ gtk_init(&argc, &argv); /* Create a window with window border width of 12 pixels and a title text. */ window = g_object_new(GTK_TYPE_WINDOW, "border-width", 12, "title", "Hello GTK+", NULL); /* Create the label widget. */ label = g_object_new(GTK_TYPE_LABEL, "label", "Hello World!", NULL); /* Pack the label into the window layout. */ gtk_container_add(GTK_CONTAINER(window), GTK_WIDGET(label)); /* Show all widgets that are contained by the window. */ gtk_widget_show_all(GTK_WIDGET(window)); /* Start the main event loop. */ g_print("main: calling gtk_main\n"); gtk_main(); /* Display a message to the standard output and exit. */ g_print("main: returned from gtk_main and exiting with success\n"); /* The C standard defines this condition as EXIT_SUCCESS, and this symbolic macro is defined in stdlib.h (which GTK+ will pull in in-directly). There is also a counter-part for failures: EXIT_FAILURE. */ return EXIT_SUCCESS; }
Build your program:
[sbox-DIABLO_X86: ~] > gcc -Wall -g gtk_helloworld-1.c -o gtk_helloworld-1
gtk_helloworld-1.c:15:21: gtk/gtk.h: No such file or directory
gtk_helloworld-1.c: In function `main':
gtk_helloworld-1.c:20: error: `GtkWindow' undeclared (first use in this function)
gtk_helloworld-1.c:20: error: (Each undeclared identifier is reported only once
gtk_helloworld-1.c:20: error: for each function it appears in.)
gtk_helloworld-1.c:20: error: `window' undeclared (first use in this function)
gtk_helloworld-1.c:21: error: `GtkLabel' undeclared (first use in this function)
gtk_helloworld-1.c:21: error: `label' undeclared (first use in this function)
gtk_helloworld-1.c:24: warning: implicit declaration of function `gtk_init'
gtk_helloworld-1.c:28: warning: implicit declaration of function `g_object_new'
gtk_helloworld-1.c:28: error: `GTK_TYPE_WINDOW' undeclared (first use in this function)
gtk_helloworld-1.c:34: error: `GTK_TYPE_LABEL' undeclared (first use in this function)
gtk_helloworld-1.c:39: warning: implicit declaration of function `gtk_container_add'
gtk_helloworld-1.c:39: warning: implicit declaration of function `GTK_CONTAINER'
gtk_helloworld-1.c:39: warning: implicit declaration of function `GTK_WIDGET'
gtk_helloworld-1.c:42: warning: implicit declaration of function `gtk_widget_show_all'
gtk_helloworld-1.c:45: warning: implicit declaration of function `g_print'
gtk_helloworld-1.c:46: warning: implicit declaration of function `gtk_main'
As can be seen, this does not look at all promising. At the start of the source code, there was #include. The compiler needs to be told where it should look for that critical GTK+ header file. It is also quite likely that some special flags need to be passed to the compiler in order for it to use the proper compilation settings when building GTK+ software. How to decide which flags to use?
This is where a tool called pkg-config comes to the rescue. It is a simple program that provides a unified interface to output compiler, linker flags and library version numbers. Its utility will be discussed later, when starting the automating of the building process. For now, the pkg-config will be used manually.
[sbox-DIABLO_X86: ~] > pkg-config --list-all | sort
.. listing cut to include only relevant libraries ..
dbus-glib-1    dbus-glib - GLib integration for the free desktop message bus
gconf-2.0      gconf - GNOME Config System.
gdk-2.0        GDK - GIMP Drawing Kit (x11 target)
gdk-pixbuf-2.0 GdkPixbuf - Image loading and scaling
glib-2.0       GLib - C Utility Library
gnome-vfs-2.0  gnome-vfs - The GNOME virtual file-system libraries
gtk+-2.0       GTK+ - GIMP Tool Kit (x11 target)
hildon-1       hildon - Hildon widgets library
hildon-fm-2    hildon-fm - Hildon file management widgets
pango          Pango - Internationalized text handling
x11            X11 - X Library
pkg-config also has some other commands that will be useful:
[sbox-DIABLO_X86: ~] > pkg-config --modversion gtk+-2.0
2.10.12
[sbox-DIABLO_X86: ~] > pkg-config --cflags gtk+-2.0
-I/usr/include/gtk-2.0 -I/usr/lib/gtk-2.0/include -I/usr/include/atk-1.0
-I/usr/include/cairo -I/usr/include/pango-1.0 -I/usr/include/glib-2.0
-I/usr/lib/glib-2.0/include -I/usr/include/freetype2
-I/usr/include/libpng12
As can be seen, there are many. With this version of GTK+, all of them are -I options. They are used to tell the compiler which additional directories to check for system header files in addition to the default ones.
[sbox-DIABLO_X86: ~] > pkg-config --libs gtk+-2.0
-lgtk-x11-2.0 -lgdk-x11-2.0 -latk-1.0 -lgdk_pixbuf-2.0 -lm
-lpangocairo-1.0 -lpango-1.0 -lcairo -lgobject-2.0 -lgmodule-2
-ldl -lglib-2.0
When linking the application, the linker has to be told which libraries to link against. In fact, the whole program linking phase will fail (as shown shortly) without this information.
Now it is time to try and compile the software again, this time using the compilation flags that pkg-config provides:
[sbox-DIABLO_X86: ~] > gcc -Wall -g gtk_helloworld-1.c  \
 `pkg-config --cflags gtk+-2.0` -o gtk_helloworld-1
/var/tmp/ccQ14x4c.o: In function `main':/home/user/gtk_helloworld-1.c:24:
 undefined reference to `gtk_init'
:/home/user/gtk_helloworld-1.c:28: undefined reference to `gtk_window_get_type'
:/home/user/gtk_helloworld-1.c:28: undefined reference to `g_object_new'
:/home/user/gtk_helloworld-1.c:34: undefined reference to `gtk_label_get_type'
:/home/user/gtk_helloworld-1.c:34: undefined reference to `g_object_new'
:/home/user/gtk_helloworld-1.c:39: undefined reference to `gtk_widget_get_type'
:/home/user/gtk_helloworld-1.c:39: undefined reference to `g_type_check_instance_cast'
:/home/user/gtk_helloworld-1.c:39: undefined reference to `gtk_container_get_type'
:/home/user/gtk_helloworld-1.c:39: undefined reference to `g_type_check_instance_cast'
:/home/user/gtk_helloworld-1.c:39: undefined reference to `gtk_container_add'
:/home/user/gtk_helloworld-1.c:42: undefined reference to `gtk_widget_get_type'
:/home/user/gtk_helloworld-1.c:42: undefined reference to `g_type_check_instance_cast'
:/home/user/gtk_helloworld-1.c:42: undefined reference to `gtk_widget_show_all'
:/home/user/gtk_helloworld-1.c:45: undefined reference to `g_print'
:/home/user/gtk_helloworld-1.c:46: undefined reference to `gtk_main'
:/home/user/gtk_helloworld-1.c:49: undefined reference to `g_print'
collect2: ld returned 1 exit status
The command above might seem somewhat strange to someone not having used UNIX command shells. What is happening here is the backtick expansion. It is an operation where the shell will start another shell to execute just the text inside the backticks. In this case, another shell is started to run "pkg-config cflags gtk+-2.0". Normal output from the commands is then read into the main shell, and this output is replaced into the location where the backticks were. N.B. It is very important to use the ` character. Not ', nor the other quote character that might be used in a Swedish keyboard layout (also used in Finland). In some keyboard layouts, it will be necessary to press space after the backtick since it is also used for character composition (try backtick and the letter 'a').
Something like $(pkg-config ..) might also be encountered. This is the same operation as backtick. However, backtick is more portable across antique UNIX shells. Nowadays, it is a matter of taste which way to use it.
The errors printed by gcc are quite different this time. These errors come from ld, which is the binary code linker in Linux systems and it is complaining about missing symbols (the undefined references). Obviously something is still missing.
The linker needs to be told where to find the missing symbols. Since it is the linker this is all about, and not the compiler, the missing symbols are found in the library files. To fix the problem (again with the backticks), pkg-config libs can be used:
[sbox-DIABLO_X86: ~] > gcc -Wall -g gtk_helloworld-1.c  \
 `pkg-config --cflags gtk+-2.0` -o gtk_helloworld-1  \
 `pkg-config --libs gtk+-2.0`
[sbox-DIABLO_X86: ~] >
The order and placement of the pkg-configs above is important: the cflags need to be placed as early as feasible, but the libs must come last (this does matter in some problematic linking scenarios).
The next step is to repeat the basic commands that were used before with the non-GUI hello world:
[sbox-DIABLO_X86: ~] > ls -l gtk_helloworld-1
-rwxrwxr-x  1 user user 16278 Nov 20 00:22 gtk_helloworld-1
[sbox-DIABLO_X86: ~] > file gtk_helloworld-1
gtk_helloworld-1: ELF 32-bit LSB executable, Intel 80386, version 1 (SYSV),
for GNU/Linux 2.6.0, dynamically linked (uses shared libs), not stripped
[sbox-DIABLO_X86: ~] > ldd gtk_helloworld-1
  linux-gate.so.1 =>  (0xffffe000)
  libgtk-x11-2.0.so.0 => /usr/lib/libgtk-x11-2.0.so.0 (0xb7c4c000)
  libgdk-x11-2.0.so.0 => /usr/lib/libgdk-x11-2.0.so.0 (0xb7bc8000)
  libatk-1.0.so.0 => /usr/lib/libatk-1.0.so.0 (0xb7bad000)
  libgdk_pixbuf-2.0.so.0 => /usr/lib/libgdk_pixbuf-2.0.so.0 (0xb7b97000)
  libm.so.6 => /lib/libm.so.6 (0xb7b71000)
  libpangocairo-1.0.so.0 => /usr/lib/libpangocairo-1.0.so.0 (0xb7b68000)
  libpango-1.0.so.0 => /usr/lib/libpango-1.0.so.0 (0xb7b2b000)
  libcairo.so.2 => /usr/lib/libcairo.so.2 (0xb7ab5000)
  libgobject-2.0.so.0 => /usr/lib/libgobject-2.0.so.0 (0xb7a7a000)
  libgmodule-2.0.so.0 => /usr/lib/libgmodule-2.0.so.0 (0xb7a76000)
  libdl.so.2 => /lib/libdl.so.2 (0xb7a71000)
  libglib-2.0.so.0 => /usr/lib/libglib-2.0.so.0 (0xb79dd000)
  libc.so.6 => /lib/libc.so.6 (0xb78b2000)
  libX11.so.6 => /usr/lib/libX11.so.6 (0xb77bd000)
  libXfixes.so.3 => /usr/lib/libXfixes.so.3 (0xb77b8000)
  libXtst.so.6 => /usr/lib/libXtst.so.6 (0xb77b3000)
  libfontconfig.so.1 => /usr/lib/libfontconfig.so.1 (0xb7788000)
  libXext.so.6 => /usr/lib/libXext.so.6 (0xb777a000)
  libXrender.so.1 => /usr/lib/libXrender.so.1 (0xb7771000)
  libXi.so.6 => /usr/lib/libXi.so.6 (0xb7769000)
  libXrandr.so.2 => /usr/lib/libXrandr.so.2 (0xb7762000)
  libXcursor.so.1 => /usr/lib/libXcursor.so.1 (0xb7759000)
  /lib/ld-linux.so.2 (0xb7fc3000)
  libpangoft2-1.0.so.0 => /usr/lib/libpangoft2-1.0.so.0 (0xb772b000)
  libfreetype.so.6 => /usr/lib/libfreetype.so.6 (0xb76c6000)
  libz.so.1 => /usr/lib/libz.so.1 (0xb76b7000)
  libpng12.so.0 => /usr/lib/libpng12.so.0 (0xb7692000)
  libXau.so.6 => /usr/lib/libXau.so.6 (0xb768f000)
  libXdmcp.so.6 => /usr/lib/libXdmcp.so.6 (0xb7689000)
  libexpat.so.1 => /usr/lib/libexpat.so.1 (0xb7669000)
As can be seen from the last ldd listing, this simple Hello World manages to require quite a number of other libraries to run. The program directly only requires GTK+, but GTK+ needs GDK (and all the other libraries that were covered in the introduction). Those libraries in turn need other libraries and so on.
So, what is seen here is almost the full list of all required libraries to run. Almost, because modern UNIX systems (and Linux) can also load libraries on demand (called runtime dynamic module loading).
This might make one wonder, why writing simple Hello World is this painful. It is actually much simpler in real life. The reason why this chapter introduces the various errors is that they will be encountered in actual situations quite early on. This chapter serves as a reference to some possible errors, and (hopefully) also show a solution.
All of these tools will be needed later on, when starting the packaging of the software, and they will not be covered at this level of detail there.
3.4.3 Running GUI Hello World
Let's try to execute our nice Hello World (inside sbox):[sbox-DIABLO_X86: ~] > ./gtk_helloworld-1 gtk_helloworld-1[4759]: GLIB WARNING ** Gtk - cannot open display: [sbox-DIABLO_X86: ~] > echo $DISPLAY
Seems that GTK+ is having problems opening the connection to the X server. This can be verified by displaying the contents of the DISPLAY environmental variable, and indeed, it comes out empty. If the DISPLAY variable contains :0.0, it means that the value has been copied from the real graphical session into sbox, and clients will try to connect to the real X server (and probably fail during authentication).
Xephyr was installed in the previous chapter, so now it has to be started so that it can be used as the server for all clients running inside the Scratchbox session.
3.4.4 Starting Virtual X Server (Xephyr)
Open another terminal emulator (do not close your sbox session).
Start up the server with:
user@system:~$ Xephyr :2 -host-cursor -screen 800x480x16 -dpi 96 -ac  \
 -extension Composite
The first parameter is the Display number (:2) that X server should start on (and provide to clients). :2 is used here, since it is normally unused in regular Linux desktop environments.
The screen parameters tells Xephyr how large the screen should be (in pixels), and how many bits to use for color-information (16). This is the resolution in pixels of Internet Tablets. -dpi 96 tells the server to tell its clients that the logical to physical size mapping should be done with 96 dots-per-inch setting (should the client request that information). The DPI setting is mainly important when dealing with fonts and text.
-ac tells Xephyr that any client may connect to it. This means that the networking environment should be treated with extreme caution, so that rogue users will not target your Xephyr with their own clients.
The last parameter (-extension Composite) disables the Composite extension.
When Xephyr starts, it will connect to the X server given in the DISPLAY environmental variable that it sees. Do not modify or touch your real DISPLAY variable that Xephyr sees.
By default, the server will have one screen, and it will be filled by the default X server background pattern (a tight braid made out of white pixels on black).
N.B. The terminal emulator (more specifically, the shell that the emulator started) is waiting for Xephyr to end. If all the graphical applications running in the SDK ever need to be killed, it can be done easily by just closing Xephyr. This will leave the daemons running inside sbox (D-Bus and friends). Normally this is not a good idea. To ask the foreground process to terminate itself, use Ctrl+c. Inside sbox this same technique can be used to terminate a graphical client that was started from the command line (as will be done shortly).
3.4.5 Directing Client to Virtual Server
Now that there is an X server running, it is time to switch back to sbox.
The first step is to set the environmental variable so that X server knows to use a local domain socket, and tell all X clients to connect to Display number 2, since that is where the Xephyr was just started:
[sbox-DIABLO_X86: ~] > export DISPLAY=:2
[sbox-DIABLO_X86: ~] > ./gtk_helloworld-1
main: calling gtk_main
[[Ctrl+c]]
The program has to be terminated with Ctrl+c, since it does not implement any graphical methods for closing. N.B. The DISPLAY needs to be set correctly on each sbox login (or target switch).
Since window manager is missing (there were none started for the X server), the Hello World cannot be controlled with the mouse. Kill it with Ctrl+c for now (It will be started again in a moment).
To quickly detach the foreground process from the shell and continue running it in the background, use the following key-combination Ctrl+z and then use the shell command bg. Between those two steps the process will be "paused".
3.4.6 Starting Application Framework
The next step is to have a nice graphical environment that will implement a nicer graphical screen. For this, a series of clients will be started, each of which have a specific role. These were introduced before.
To start the Application Framework (referred to as AF from now on), it is possible to use a handy script that comes with the SDK:
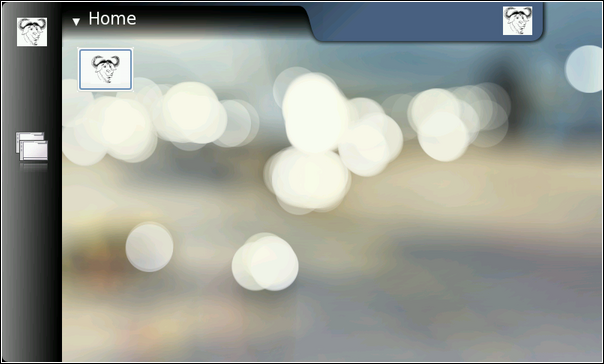
[sbox-DIABLO_X86: ~] > af-sb-init.sh start
Sample files present.
Starting DBUS system bus
Starting D-BUS session bus daemon
Starting Maemo Launcher: maemo-launcher
maemo-launcher: error rising the oom shield for pid=4847 status=5632.
Starting Sapwood image server
Starting Matchbox window manager
sapwood-server[4858]: GLIB INFO default - server started
Starting clipboard-manager
Starting Keyboard
maemo-launcher: invoking '/usr/bin/hildon-input-method.launch'
Starting Hildon Desktop
maemo-launcher: invoking '/usr/bin/hildon-desktop.launch'
.. listing cut for brevity ..
[sbox-DIABLO_X86: ~] >
The start and stop parameters are used to start and stop the graphical environment. If everything works, it should show a screen resembling this one:
3.4.7 Running Hello World in Application Framework
While AF is running, the Hello World can be started again (./gtk_helloworld-1 in sbox):
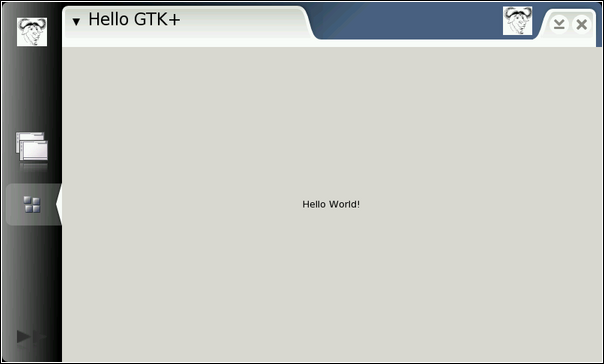
Since there now is a window manager running, the client will get much larger window to draw in. GTK+ will scale the widget accordingly (there is only one widget in the program). N.B. The screen still looks a bit off. If the application is closed by pressing the X in the top-right corner, it can be seen that the Hello World will disappear from the screen. Since no signals have been implemented yet and thus there is nothing to handle window destruction, the Hello World application will only be hidden. It is still running (as can be seen in the sbox terminal emulator, since the shell does not display its prompt). Stop the Hello World with Ctrl+c.
Next step shows how to use an SDK utility script called run-standalone.sh. Its job is to set up correct environmental variables for themes and communication for the command that is given to it as its command line parameter.
Use run-standalone.sh ./gtk_helloworld-1 to start your X client again:
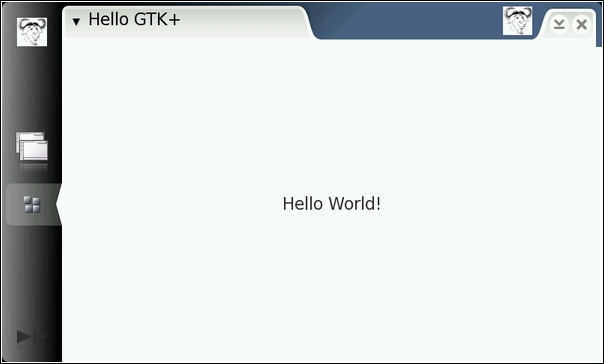
The screen is still a bit off (there are no borders around the main GtkLabel widget), but looks already better. The text is scaled to be more in sync with the other text sizes and also the color is in sync with the platform color (it is not gray anymore).
3.5 Setting up USB Networking
3.5.1 Introduction
This section describes how USB networking can be set up between the host Linux machine and Internet Tablet.
USB networking connects the device and Linux laptop with IP protocol over the USB cable. This provides fast and effortless access to the device and enables e.g. file copying, remote login over SSH, using of NFS and remote debugging.
3.5.2 Setting up Environment and Device
In order to use USB networking on the device, some extra packages must be installed, such as openssh.
Linux host side instructions are for Debian and its derivatives, and might not work on other distributions.
A root shell access on the device is needed for setting up the USB networking on the device side. For this, xterm has to be started. There is a script for root access that should be run on terminal.
$ sudo gainroot
When using USB networking, device must be booted from flash, meaning that MMC dualboot is an unavailable option. The reason for this is that the device can only act as either a mass storage or network device at any given time.
Check whether the device has been preconfigured for USB networking with IP 192.168.2.15. If not, please add the following lines to your /etc/network/interfaces:
auto usb0
iface usb0 inet static
        address 192.168.2.15
        netmask 255.255.255.0
        gateway 192.168.2.14
The IP address of the host machine in the USB network has to be 192.168.2.14 for the usb0 interface.
The following steps should prepare the device and host machine for USB networking:
- Make sure the USB cable is disconnected.
- Gain root shell access on the device, and perform the following:
# insmod /mnt/initfs/lib/modules/2.6.21-omap1/g_ether.ko
# ifup usb0
N.B. You may need to run insmod twice. - Make sure the kernel of the host machine has usbnet enabled.
- Add the following entry to the /etc/network/interfaces file of the host machine:
      mapping hotplug
              script grep
              map usb0

      auto usb0
      iface usb0 inet static
      address 192.168.2.14
      netmask 255.255.255.0
      network 192.168.2.0
      broadcast 192.168.2.255
      up iptables -t nat -A POSTROUTING -o eth0 -s 192.168.2.15 -j MASQUERADE
      up echo 1 > /proc/sys/net/ipv4/ip_forward
      down iptables -t nat -D POSTROUTING -o eth0 -s 192.168.2.15 -j MASQUERADE
      down echo 0 > /proc/sys/net/ipv4/ip_forward
- Now both the device and the host machine should be ready for initiating a USB connection
3.5.3 Testing Connection
After making the preparations, the USB network should automatically be set up when connecting the device to the host machine with a USB cable.
For basic testing, pinging can be performed from the host machine.
$ ping 192.168.2.15
PING 192.168.2.15 (192.168.2.15) 56(84) bytes of data.
64 bytes from 192.168.2.15: icmp_seq=1 ttl=245 time=79.8 ms
...
Use Application Manager to install openssh from Diablo extras. Now, an ssh root shell over the USB network from host to tablet can be initiated.
$ ssh root@192.168.2.15
The password of the root is rootme.
3.6 CPU Transparency
This document provides instructions for setting up sbrsh CPU transparency for the Scratchbox ARMEL target. N.B. The use of sbrsh is insecure. It should only be run on trusted networks.
Prerequisites for setting up CPU transparency are as follows:
- Scratchbox installed by maemo Scratchbox installer
- Scratchbox ARMEL target installed by maemo SDK installer with sbrsh set as the CPU transparency method.
- NFS support compiled and transferred onto the device. For instructions on how to do this, see 11.
- Networking set-up using static IP addresses 192.168.2.15 on the device, and 192.168.2.14 on the host Linux PC computer, as described in section 3.5.
3.6.1 Setting up Host Linux PC Environment
To set up the host environment, the following commands have to be run with root access.
- Install NFS kernel server in the Linux PC. In Debian, this is provided by the package nfs-kernel-server. Fetch the required software by running the command:
$ apt-get install nfs-kernel-server
- Edit the /etc/exports file in the Linux PC. This file lists the NFS file systems that will be exported to the device. Add the following line (replace
sbox_username,sbox_user_uidandsbox_user_gidwith correct values, i.e. use your own user names and IDs):
/scratchbox/users/<sbox_username>/targets/ 192.168.2.15(rw,all_squash,anonuid=
<sbox_user_uid>,anongid=<sbox_user_gid>,sync)
/scratchbox/users/<sbox_username>/home 192.168.2.15(rw,all_squash,anonuid=
<sbox_user_uid>,anongid=<sbox_user_gid>,sync)
Make sure that the user IDs used in the /etc/exports file in Linux PC match the user IDs that are effective inside the Scratchbox.
- Restart NFS kernel server to apply new exports:
root@host:~ # /etc/init.d/nfs-kernel-server restart
* Stopping NFS kernel daemon...                         [ ok ]
* Unexporting directories for NFS kernel daemon...      [ ok ]
* Exporting directories for NFS kernel daemon...        [ ok ]
* Starting NFS kernel daemon:                           [ ok ]
root@host:~ #
Now the Linux PC host system should be set up.
3.6.2 Setting up Scratchbox ARMEL Target
Now the ARMEL target needs to be set up inside Scratchbox. To do this, first start Scratchbox and change to the ARMEL target, if necessary.
Edit the ~/.sbrsh in the home directory of the Scratchbox user, adding the following lines, replacing <username> and <target_name> with real names using the Scratchbox:
ARMEL 192.168.2.15
nfs     192.168.2.14:/scratchbox/users/<username>/targets/<target_name>  / rw,nolock,noac
nfs     192.168.2.14:/scratchbox/users/<username>/home /home rw,nolock,noac
bind    /dev          /dev
bind    /dev/pts      /dev/pts
bind    /proc         /proc
bind    /tmp          /tmp
If you are using the sb-menu command in Scratchbox, configuring the sbrshd settings with the tool, make sure that you do not use the term localhost, but instead the full IP address of your Linux PC.
N.B. If the network connection between the Tablet and Linux PC breaks, and the Scratchbox is trying to push the required configurations to the device, it will not give any warning of failure. Check always from the device that the configurations are in order. In a later section, there are instructions to set up device configuration manually. It can also be used for checking purposes.
With these changes, the _ARMEL target should be set up accordingly.
3.6.3 Setting up Device for CPU Transparency
- Copy sbrshd and its init-script onto the device using a memory card or
scp. These can be found under /scratchbox/device_tools/sbrsh-7.4/cs2005q3.2-glibc2.5-arm, in the current stable release of Scratchbox. N.B. The initscript searches binary from /usr/sbin by default, and quietly exits if not found there. - Edit /etc/sbrshd.conf and add entry for the desktop PC:
192.168.2.14 *
N.B. There are additional configurable options for sbrshd, and these are covered in the Scratchbox documentation.
- Make sure NFS modules are loaded into the device's kernel.
- Start sbrshd
# /etc/init.d/sbrshd start
The sbrshd daemon should now be up and running, ready to accept host PC connections for CPU transparency.
3.6.4 Testing CPU Transparency
Now the CPU transparency should be set up. To test it, log into Scratchbox and change to the ARMEL target.
After this, extract the hello-world.tar.gz package and go the hello-world directory. Run ./autogen.sh and make, followed by ./hello. This should print the text hello world on the console.
[sbox-ARMEL: ~] > tar xfz /scratchbox/packages/hello-world.tar.gz
[sbox-ARMEL: ~] > cd hello-world
[sbox-ARMEL: ~/hello-world] > ./autogen.sh
+ aclocal
[... output from aclocal ...]
+ autoconf
+ autoheader
+ automake --add-missing --foreign
[... output from automake ...]
+ ./configure
[... output from ./configure ...]
[sbox-ARMEL: ~/hello-world] > make
make  all-am
make[1]: Entering directory `/home/username/hello-world'
if gcc -DHAVE_CONFIG_H -I. -I/home/username/hello-world -I.     -g -O2 -MT main.o -MD -MP
-MF ".deps/main.Tpo" -c -o main.o main.c; \
then mv -f ".deps/main.Tpo" ".deps/main.Po"; else rm -f ".deps/main.Tpo"; exit 1; fi
gcc  -g -O2   -o hello  main.o
make[1]: Leaving directory `/home/username/hello-world'
[sbox-ARMEL: ~/hello-world] > ./hello
Hello World!
[sbox-ARMEL: ~/hello-world] >
The program is run transparently on the device. It can be verified by the log written to /tmp/cputransp_username.log
[sbox-ARMEL: ~/hello-world] > cat /tmp/cputransp_username.log
[2005-10-13 17:37:26 26032] method: "sbrsh"  pwd: "/home/username/hello-world"  cmd: "/home/
username/hello-world/a.out"

[2005-10-13 17:37:30 26032] rc: 0  time: 3.944084
[2005-10-13 17:37:30 26272] method: "sbrsh"  pwd: "/home/username/hello-world"  cmd: "/home/
username/hello-world/conftest"
[2005-10-13 17:37:31 26272] rc: 0  time: 0.196024
[2005-10-13 17:37:42 26596] method: "sbrsh"  pwd: "/home/username/hello-world"  cmd: "/home/
username/hello-world/hello"

[2005-10-13 17:37:42 26596] rc: 0  time: 0.192171
[sbox-ARMEL: ~/hello-world] >
As expected, "rc" contains the result of the remote running program, and "time" contains the total running time on the device. Any sbrsh errors are also output to this file.
3.7 Using Linux Flasher Tool
This section describes how to use the Linux flasher tool, and how to flash a rootfs to the Internet Tablet device.The flasher is a command line tool that can be used to flash items to the Nokia Internet Tablet. The utility can be downloaded from this location. N.B. Attention should be paid to selecting the correct flasher for the product in question, as different Internet Tablet products may require a specific flasher tool.
The flasher tool should be saved to the directory that is to be used as the working directory. After saving the tool, the file should be changed with chmod to be executable.
$ chmod +x flasher
To run the flasher, root-user rights are needed. As a root user, type:
$ ./flasher
This command will display the following information on how to use the flasher:
                Usage: flasher [OPTIONS]
                Options:
                --fiasco, -F                  Location of a FIASCO image
                --kernel, -k                  Location of kernel image
                --initfs, -n                  Location of initfs image
                --rootfs, -r                  Location of root JFFS2 image
                --xloader, -x                 Location of X-Loader image
                --secondary, -s               Location of NOLO secondary bootloader image
                --2nd, -2                     Location of NOLO cold flasher ("2nd") image
                --unpack, -u [arg]            Unpack a FIASCO image
                --flash, -f                   Load and flash all supplied images
                --load, -l                    Only load all supplied images
                --boot, -b [arg]              Boot the kernel with optional cmdline
                --reboot, -R                  Reboot the board (e.g. after flashing NOLO)
                --read-board-id, -i           Print out the board type
                --serial-port, -S             Serial port used for cold flashing
                --initialize-port, -I         Only initialize the serial port
                --cold-flash, -c              "Cold flash" the device
                --enable-rd-mode              Enable R&D mode on the device
                --disable-rd-mode             Disable R&D mode on the device
                --set-rd-flags [arg]          Set R&D mode flags on the device
                --clear-rd-flags [arg]        Clear R&D mode flags on the device
                --query-rd-mode               Query the device R&D mode status and flags
                --set-root-device             Set the default root device
                --query-root-device           Query the default root device
                --enable-usb-host-mode        Set the device into USB host mode
                --disable-usb-host-mode       Set the device into USB peripheral mode
                --flash-only                  Flash only certain components
This shows all the necessary parameters and information that are enabled for use in the flasher.
To try out the flasher, first retrieve a flash image for your specific product. For example, software for N800 is available in tablets-dev.nokia.com.
Save the image to the same directory where the flasher tool is located, and complete the following steps:
- Make sure you are the root user on your PC
- Turn off the Nokia Internet Tablet
- Make sure your device is connected to your PC via USB
After these steps, the device is ready to receive the root file system. Enter the following command (N.B. You must be the root user or use the sudo command):
$ ./flasher -F RX-XX_20XXSE_X.20XX.XX-X_PR_COMBINED_MR0_ARM.bin -f -R
After this command, turn on the device, and the flashing will start.
If everything goes well, a progress bar should appear at the bottom of the device screen.
The command above will flash the new image to the device. When the flashing is complete, the device will reboot.