- 10.1 Introduction
- 10.2 Theme
-
- 10.3 How to Create Debian Package for Custom Data Files
- 10.4 Customizing Icons
- 10.5 Editing Theme Layouts Manually
- 10.6 Adding New Fonts
- 10.7 How to Customize Device Sounds
- 10.8 Creating Custom Background Image (Wallpaper)
- 10.9 Third Party Theme Packages and Theme Tools
- 10.10 References
10. Customizing User Interface
10.1 Introduction
The following code examples are used in this chapter:
This chapter intends to show how to customize themes, sounds, icons and wallpapers on maemo, and how basic customization can be done.
This chapter is for designers interested in customizing maemo, and developers interested in knowing how theme creation works.
Pre-requisites:
- Familiarity with maemo platform
- Familiarity with package installation
- Ability to connect to the device via ssh
- For manual customization, X-terminal and/or openssh installed on the device and device on R&D mode
- Drawing program capable of editing svg-files, e.g. Inkscape or a drawing program capable of editing png-files
Maemo supports various kinds of customization. Theme, icons, sounds, font and other things can be changed. Some customizations are simpler than others, one of the simplest customization currently being drawing an own theme, which is supported with theming tools. Theme means basically the set of graphics that represent the look of the device - in other words, pictures that are placed on top of the widgets, panels, titlebars etc. to decorate them to a desired look (without theme, gtk user interface would look very plain with no fancy eye-candy at all). In maemo, the theming is a bit different from Desktop Gnome theming, because the maemo themes heavily rely on heavy use of bitmap images, whereas in standard Gnome desktop, there are less themeable components.
Plankton development theme as represented on maemo 4.x on Scratchbox:
This chapter shows some basic possibilities to customize maemo themes and layouts using pre-existing helper tools and manual editing of layout definition files. Maemo uses Matchbox as the window manager on top of the X server and thus, Matchbox tutorials will be referred to here, as well.
As basic customization, it is possible to change, for example, just graphics and sounds by replacing the original file. This is not the best way to do it, but it will enable basic customization for end users. It is also possible to create the installation script on the package, installing the customization to back the old files up and, in case of uninstallation, copy the original files back. Creating a theme instead of just replacing files is a lot better way to do it. However, at the moment sound themes are not supported unfortunately, and changing sounds requires replacing the original files. The same thing applies with icons. Icon themes are not selectable on the device; there is always only one icon set selected and it can not be changed in any other way than by replacing its contents.
This chapter explains how to create a basic theme step by step by using theme creation template and tools, and how to test the new theme on the device. Also file reference information to the theme files is included for easy tweaking and also some brief instructions on how to customize sounds and icons are included.
10.2 Theme
Theme is a set of graphics and instructions for the system how to show them up. Theming tools are provided to make this task easier, so that the tool does the "programmer's task" for the graphics designer, and all you have to do is to draw the own images on top of the template.
A theme package consists of graphics and layout files. The graphics can be easily modified by simply replacing the bitmap images of the theme. Layout can also be tweaked if needed, or alternatively the default layout can be used. Each maemo version comes with a specific default layout, where the number in the end of the package name represents the maemo-version. The graphics designer does not need to care of these, other than answering the question, which theme layout version to use in the hildon-theme-bootsrap command as described below.
Icons are not part of the theme, so they have to be edited separately.
Basic View of Hildon Desktop
The basic view consists Task Navigator bar, Status bar and Home, each having their own pixmap images or couple of images they are build of. The icon shown on the Task Navigator is one of the icons on the device, and it is not changed along with the theme, but has to be changed separately.
Simplest Customization
Users can do very simple customization by themeselves by e.g. changing the background image. Any image (from the supported file types) can be applied as the background image with several different kind of scaling and stretching options. These include Centered, Scaled, Stretched, Tiled and Cropped. In devices bundled with the software on the level of maemo 4.x SDK, the themes can have translucent areas, and a change of simply a background image can have a dramatic effect of the look and feel of the desktop. The selection of background image hence is recommended to be done very carefully.
Downloading Themes from Internet and Installing Them on Device
To alter the default look of the maemo device, the simplest way to change it to suit the tastes is to check from Internet if there are ready-made themes available. One possible way is to go to the maemo.org downloads page and type keyword theme to the search box. Please make sure before installing a theme that was created by somebody else that it is compatible with the software release you are using.
Some themes also customize icons and sounds as explained in this chapter. Be prepared that after installing such a theme, there may not be going back to the original icons or sounds, if you did not back them up manually from command line, or the theme installer did not back them up. To return the original icons and sounds, once you have overwritten the original ones may require reflashing the device, or copying the icons and sounds manually from another maemo-device running exactly the same release.
Installing Theme Package on Maemo Device
Theme package that is made installable for the Application manager can be simply installed to the device by transferring the .deb-package into the device via memory card or by downloading it from the Internet. Alternatively, if you have set up the device in R&D-mode and have installed ssh, you can scp it to the device from Linux console. If you want to install it still with the application manager, it is advisable to put it into a directory which is visible to the application manager. A recommended place usually could be /media/mmc1 or /media/mmc2 (as the memory cards are kept intact even if you need to reflash the device).
Currently, theming is made of fixed size pixmap images. It is thus suitable only for exactly the same resolution as it was designed for. The form factor in the Internet tablet devices is 800x480, and the graphics drawn on top of the templatewill be good for exactly that resolution. However, maemo can run also on other resolutions, e.g. it can be even compiled on a laptop. In such case, if you need some other size graphics, the template provided with the Test theme will no longer apply.
KNOWN LIMITATION: When you install & apply a new theme on the device, the background image is not automatically changed to a matching one. To change the background image, the user has to go to
Home menu -> Set background image. There is a hackish workaround to this, which is explained later: you can put to your installation script a line that replaces the home-background.conf with your own custom one. However, in general, using that is not recommended.
Getting Started with Theming
First of all, a theme package is needed. If the theme is created by team of different persons (e.g. designers and programmers), the first thing to do is the programmer's task to create a theme package with theming tools (that is explained later in this chapter).
Second thing is the designer's task. Take the template.svg from the created theme package (the theme tools automatically attach this file on the theme). The task is to draw own theme on top of that.
When the theme is finished, the designer exports the drawn image as bitmap on top of the template.png on the subfolder template on the theme package (it has to have exactly the same dimensions than the original template.png).
When the template.png is saved, the theme can be built with dpkg-buildpackage -rfakeroot, as explained later in this chapter.
As mentioned already, the icons are not part of the theme package. That is partly because different icon themes are not supported on current maemo version. If the designer wants to alter the icons, they have to be changed manually, and an installation Debian package is needed to be created by the programmer. The installation script on that package is responsible of putting the pictures on correct folders on the device. This process completely overwrites the original icon files from the device.
10.2.1 Quick Start with Hildon Theme Tools
A quick way to create a new theme is to use hildon-theme-tools package, which is available for maemo SDK and Ubuntu desktop. First, you must apt-get install both hildon-theme-tools and hildon-theme-layout-4 packages in order to be able to create, edit and package your theme.
After installing the packages you have the command hildon-theme-bootstrap available. Run it in command line and answer some basic questions about your theme. It will create a new theme directory and fetch the current basic theme from subversion (N.B. If you run on a desktop machine instead of Scratchbox, you need to install also subversion in order to make things work. In Scratchbox this tool is already available). Here is an example of running hildon-theme-bootstrap:
$ hildon-theme-bootstrap                                   // starting the program
Theme bootstrap tool by Michael Dominic K.
Copyright 2007 by Nokia Corporation.

This tool will bootstrap a new theme directory structure.

Which layout do you want to use?
1) hildon-theme-layout-3
2) hildon-theme-layout-4
#?                                                         // 2
What's the theme name? [ie. My Theme]
#?                                                         // Theme 1

What's the theme directory? [ie. mytheme]
#?                                                         // theme1

What's the author name? [ie. John Doe]
#?                                                         // Mr Maemo

What's the author's e-mail? [ie. john_doe@gmail.com]
#?                                                         // xxxx@maemo.org

Summary:

Theme name      : Theme1
Layout          : hildon-theme-layout-4
Package name    : hildon-theme-theme1
Theme directory : theme1 [/usr/share/themes/theme1]
Author          : Mr Maemo

Is this correct? [y/n]
#?                                                         // y
Fetching source from subversion repository...
After that you will have a folder called hildon-theme-theme1. It contains some files, out of which the most important is template/template.png, containing the theme graphics. You are free to edit it with your favorite graphics editor.
When done with editing, you must make a theme package. In order to make the package, change to the directory containing your theme and run the packaging command as follows:
$ cd hildon-theme-theme1
$ dpkg-buildpackage -rfakeroot -b
If everything went fine, you should have hildon-theme-theme1_VERSION.deb file in the parent directory. The file can be transferred to the device, and installed with Application Manager.
Now the customization of the theme is complete; if you wish, you can proceed with manual editing process to gain a full access on theme layouts.
For a more thorough tutorial on hildon-theme-tools, visit to the Hildon Theming Overview [48].
The theme package automatically installs its contents to /usr/share/themes on the device.
The images of the theme reside on the device in /usr/share/themes/[Theme name]/images folder, for example:
/usr/share/themes/plankton/images.
10.3 How to Create Debian Package for Custom Data Files
To install the customized files on the device, a programmer needs to create a Debian package. There is 13.1 section about how to do that in detail, but here is a dummy example package that you can copy-paste for your projects, if you like. Please look at the contents of the package to learn how it works, it is not explained in more detail here. You have to make changes to configure.ac, debian/control, debian/rules, yourdatadir, yourdatadir/Makefile.am, yourdatadir/installable_file to modify it to suit your purposes (you can modify and use it to install sound, graphics, icon, wallpaper etc. files on the device or Scratchbox).
This knowledge will be needed later in this chapter in order to be able to package the data files (such as icons, sounds or wallpapers) to the device.
10.4 Customizing Icons
In order to customize Task Navigator, Status Bar, Control panel and other icons, you must manually change the icons located in the device. The icons that come with the maemo SDK are not the same ones as can be seen on the device. If you want to change just a couple of icons and not all of them, please make sure that you install only those, and do not install the whole icon set from the maemo SDK, because it overwrites the product icons with a less polished set, which is not a recommended thing to do.
Task Navigator Icons
The main icons used in maemo, such as Internet browser, Application menu, Mail and the status bar icons can be modified just by changing the images in the following directory: /usr/share/icons/hicolor/scalable/hildon/.
The icons can be customized by changing the following images. Again, the original ones should be backed up first. Also, the same file format and image size should always be used. All icons are 8-bit, 64x54 pixels .png images.
| Preview | Description | File name |
|---|---|---|
 |
Contacts | qgn_grid_tasknavigator_contact.png |
 |
Active Contact | qgn_grid_tasknavigator_contactactive.png |
 |
Mail/Inbox | qgn_grid_tasknavigator_inbox.png |
 |
New message | qgn_grid_tasknavigator_newmessage.png |
 |
Sending / Receiving | qgn_grid_tasknavigator_sendrecieve.png |
 |
Web Browser | qgn_grid_tasknavigator_web.png |
 |
Others / Menu | qgn_grid_tasknavigator_others.png |
Status Bar Icons
Also the status bar icon can be customized. Battery status, volume status, connection and phone are multiple state icons, so every single state image should be customized.
Files are located in the directory /usr/share/icons/hicolor/40x40/hildon/.
Battery, Brightness, USB and Alarm icons listing:
| Icon | File name | Icon | File Name |
|---|---|---|---|
| qgn_stat_battery_full100.png | qgn_stat_displaybright4.png | ||
| qgn_stat_battery_full75.png | qgn_stat_displaybright3.png | ||
| qgn_stat_battery_full50.png | qgn_stat_displaybright2.png | ||
| qgn_stat_battery_full25.png | qgn_stat_displaybright1.png | ||
| qgn_stat_battery_low.png | qgn_stat_usbact.png | ||
| qgn_stat_battery_verylow.png | qgn_stat_alarmact.png |
Connection and volume icon listing:
| Icon | File name | Icon | File Name |
|---|---|---|---|
| qgn_stat_internetconn_generic.png | qgn_stat_volumelevel4.png | ||
| qgn_stat_internetconn_adhocwlan.png | qgn_stat_volumelevel3.png | ||
| qgn_stat_internetconn_datacall.png | qgn_stat_volumelevel2.png | ||
| qgn_stat_internetconn_packetdata.png | qgn_stat_volumelevel1.png | ||
| qgn_stat_internetconnection_no.png | qgn_stat_volumelevel0.png | ||
| qgn_stat_volumemute.png |
Image Reference with Pixel Sizes for Manual Customization of Icons
The images of the theme reside on the device under the following folder: /usr/share/icons/hicolor/ under the following subfolders:
    scalable/hildon
    40x40/hildon
    250x250/hildon
    26x26/hildon
    12x12/hildon
    34x34/hildon
    50x50/hildon
    16x16/hildon
Designer's task: draw new icons with exactly same sizes as the original ones, and save them on the place of the original ones with exactly same file names.
Programmer's task: Please see chapter 13 to understand how to create the package that installs the files on correct locations and that is installable with the Application Manager. It is recommended that the theme package only replaces the customized icons, and not the whole set, unless all the icons are new ones and the customization is not limited to changing just couple of icons.
10.5 Editing Theme Layouts Manually
This section explains how to edit theme layouts manually. This allows broader customization of the device extending beyond mere modification of graphical elements.
Editing layout files enables the modification of the following:
- Font sizes and styles
- Widgets parameters (spacings, margins, distances)
- Hildon desktop parameters (Task Navigator size, place etc.)
N.B. The modification of colors and graphical elements is easier with hildon-theme-tools than by manipulating layouts. This should be sufficient for most customization needs.
Layouts can be edited either by modifying already existing layouts or creating custom layouts. For instance, in order to apply changes to the package created by hildon-theme-tools you can edit files under /usr/share/hildon-theme-layout-4, if hildon-theme-layout-4 has been installed. The layout files for the selected layout are used for the theme created by hildon-theme-tools. If you want easily installable themes, it is the preferred way to edit these files.
Theme Files
After installation, all maemo themes are located in the following directory: /usr/share/themes/[Theme_name].
All themes share the same structure, having a pretty straightforward meaning:
      gtk-2.0/
          gtkrc
          gtkrc.maemo_af_desktop
      images/
          *.png
      matchbox/
          theme.xml
      index.theme
Theme.xml
Some simple window decoration customization can be achieved by modifying the theme.xml. In the maemo platform, the theme.xml defines the main title bar decoration and some dialog decoration as well. More information on theme.xml files can be found in the Matchbox themes tutorial.
Basic Resources
There are three basic resources in a theme.xml file: colors, fonts and pixmaps. All of them have to be declared before using. The syntax is pretty straightforward:
For colors:
<color id="lowlightcol" def="#d4e6fd80" />
basically it is an "id" followed by a definition, the element real value.
For fonts:
<font id="osso-TitleFont" def="Nokia Sans-16.75:30px" />
or
<font id="osso-TitleFont" def="Nokia Sans,fixed bold 16.75" />
again, an id and a definition. In font elements, alternative fonts can be defined by separating them with "|" (pipe). The first match will be used.
A valid font must be used. To avoid problems, the pipe character "|" should be used to give the default Nokia sans font as second alternative:
def="your Font,fixed bold 16.75 | Nokia Sans,fixed bold 16.75"
For Pixmaps ( images ):
<pixmap id="dialoguptile" filename="../images/qgn_plat_note_frame_tile_top.png" />
Id followed by a filename, pointing to a png image.
An example of a layout file can be seen in the hildon-theme-layout-4 package. You can apt-get source it from maemo SDK or Ubuntu repository.
Gtkrc Customization
After modifying theme.xml and the basic images and fonts, the next step on maemo customization and theme creation is to modify the GTK resource file and the resources used by it. This will enable changing the visuals for almost everything else in the system, including the Hildon widgets.
Even with the gtkrc file giving control over some important things, it is recommended to modify only the images in the folders that are used by the gtkrc file. The gtkrc file is too big to describe in full detail in this material.
N.B. It should be noted again, that the most important GUI elements can be modified using the hildon-theme-tools template.
Modifying System-Wide Colors
Some sections of the gtkrc file have to be changed to match the colors of the theme. Most color definitions are located in the beginning of the file. N.B. Be careful not to enter invalid values. If possible, always test on Scratchbox first.
Modifying System-Wide Fonts
In addition to the colors, the gtkrc file can be modified to make some custom fonts to work on UI. Again, it is very important to use the correct font name and size, or the rootfs may be damaged.
style style-Identifier{ font_name="Font Name size"}
Sample of font definition:
style "osso-SystemFont" { font_name = "Nokia Sans 16.75"}
and font usage:
class "*GtkComboBox" style "osso-SystemFont"
N.B. This is just a very simple introduction to gtk resource files. The GTK documentation should always be checked, if there are any doubts about the resource files.
Distributing Themes
Themes can be distributed as an Application Manager ready package. This will make it easier for the end users to install and uninstall themes. Themes created using the hildon-theme-tools skeleton are instantly ready for building the package using dpkg-buildpackage -rfakeroot as described above. The resulting .deb file can be then installed on the device using Application Manager by the user.
10.6 Adding New Fonts
The first step is to create a fonts folder for the user:
cd /home/user/
mkdir .fonts
Adding new fonts is pretty simple: the font files ( .ttf or type1) are to be placed in the fonts folder located on:
/home/user/.fonts/
To update the font cache, the command fc-cache -fv should be run in the .fonts directory.
To change the fonts used by the whole system, theme.xml file should be modified, as was explained in this chapter.
10.7 How to Customize Device Sounds
Maemo 4.1 does not support sound-theming, however, you can alter the sounds on the device by changing the original files located into /usr/share/sounds on the device. These files are not included on the SDK rootstrap, so you have to look at these files on the device directly at that location.
The sounds are in wav-format and each sound has its own logical id as its name (which helps you to determine which sound is in question). For example, you can ls /usr/share/sounds on the device with X-Terminal or via ssh.
How to Make Sound Package
A sound designer creates new sounds, and saves them to files with the same names as can be found from the /usr/share/sounds. E.g. if the sound designer wants to create their own window opening sound, they have to save the sound with the name ui-window_open.wav (please see above how to determine the file names). Each sound file is customized in the same way. Please be sure that the file name is exactly as found on the device, Linux system is case sensitive unlike Windows, and e.g. file named ui-new_email.wav has to be exactly ui-new_email.wav, and not, for example, ui-new_email.Wav or ui-new_email.WAV.
Programmer's task is now to create a Debian package that installs these sounds on top of the original ones to the directory /usr/share/sounds on the device. Please see chapter Packaging, Deploying and Distributing 13 of the Maemo Reference Manual to understand how to create the package that installs the files on correct locations and that is installable with the Application Manager.
10.8 Creating Custom Background Image (Wallpaper)
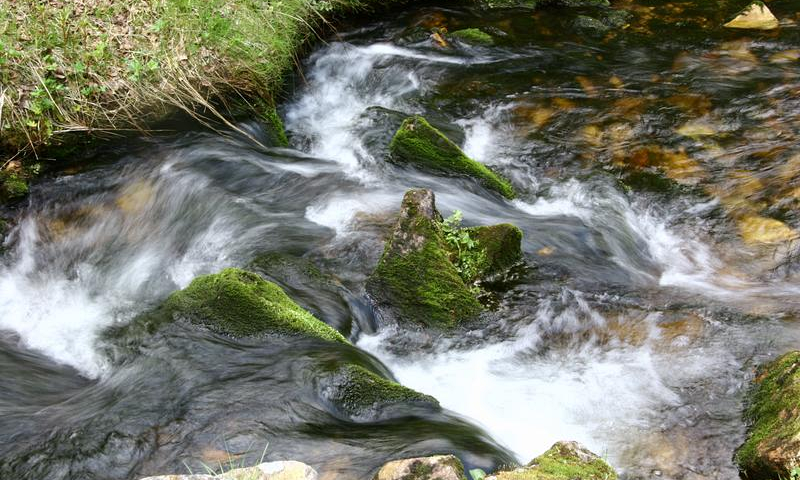
Example picture, sized 800x480 for using in the maemo devices:
The size of the background image is 800x480 pixels. It is a good idea to create the background image to be exactly that size and aspect ratio. However, the software on the device allows you to scale, stretch, crop and tile images that do not exactly fit nicely on the Home area. The best way, however, is to have the correct size and shape on the image.
In some themes, the Task Navigator and Status bar are translucent, and the background image shows up from below the panels. Therefore, it is recommended to keep this in mind, when designing the background image to ensure that it matches with the theme nicely.
The background images shall be installed into /usr/share/backgrounds. Each background image shall accompany a .desktop file in order to have it visible on the background image selection dialog. To make a background image as default, you have to replace the contents of file default.desktop in the given location to point out to the custom background image.
Format of .desktop file for a background image:
        [Desktop Entry]
        Type = Background Image
        Name = titleoftheimage
        File = /usr/share/backgrounds/imagename.png
        X-Order=01
Example puro.desktop:
        [Desktop Entry]
        Type = Background Image
        Name = Stream Scene from Lappland
        File = /usr/share/backgrounds/puro.png
        X-Order=01
To make that default, you have to also put the same information inside the default.desktop, default.desktop contents should then look like this:
        [Desktop Entry]
        Type = Background Image
        Name = Stream Scene from Lappland
        File = /usr/share/backgrounds/puro.png
        X-Order=01
To make the new image to be default on next boot of the device, you have to configure also hildon desktop. The configuration entry is in yourhomedir/.osso/hildon-desktop/home-background.conf. On the device, the location is /home/user/.osso/hildon-desktop/home-background.conf and in Scratchbox /home/yourusername/.osso/hildon-desktop/home-background.conf.
The contents of the home-background.conf:
        [Hildon Home]
        BackgroundImage=/usr/share/backgrounds/puro.png
        CachedAs=
        Red=0
        Green=0
        Blue=0
        Mode=Centered
N.B. This is not recommended for packages you create, as users may not like if their favorite background image gets replaced without questions. However, this is the way to implement it.
To create a simple package for your own custom background image, you can export this puro-backgroundpackage from svn repository, edit the configuration to use your custom image instead. Build it, and if you did everything correctly and there were no errors, you are done and your background image package is ready for distribution.
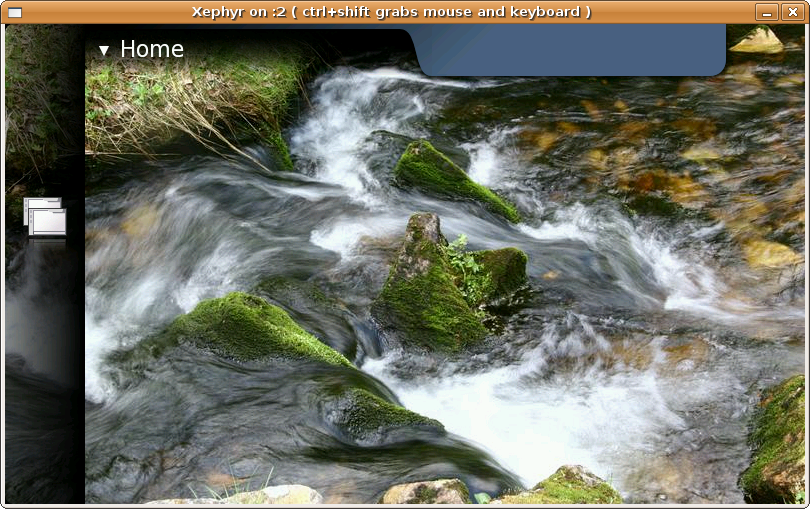
Try building and installing the wallpaper package in scratchbox:
> svn export https://garage.maemo.org/svn/maemoexamples/tags/maemo_4.1/puro-background/
  ...
> cd puro-background/
> dpkg-buildpackage -rfakeroot
  ...
> fakeroot dpkg -i ../puro-background_0.0.1_all.deb
Start desktop environment:
> export DISPLAY=:2
Outside scratchbox start Xephyr.
Inside scratchbox:
> af-sb-init.sh start
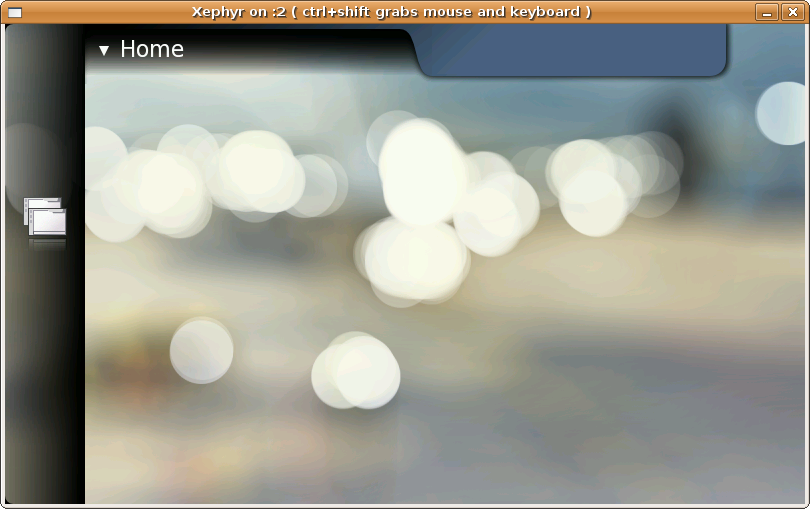
Observe the Xephyr window:
10.9 Third Party Theme Packages and Theme Tools
Some developers have made their own themes and tools. For example Urho Konttori has made a Java-based theme maker, which runs on any OS and makes the installable Debian package automatically. However, please contact the maker of the given tool to inquire about the updateness of the tool etc. - theme packages created for maemo 3.x and theme tools created for maemo 3.x do not work on maemo 4.x, because there have been a number of changes in theming in maemo 4.x.
10.10 References
- Hildon Theme Howto [46]
- Hildon Theming Overview [48]
- Hildon Theme Tools Overview [47]
- How to Become Root [49]
- Matchbox project [76]
- Open SSH [58]
- Designing Matchbox Themes HOWTO [77]
More useful information: