This chapter covers the pre-requisites and installation of the development environment. The maemo SDK consists of libraries and tools enabling the development of applications for maemo and Internet Tablets. This SDK must be installed into an development environment called Scratchbox in order for it to be useful.
At this point, you should check the maemo training wiki pages (http://maemo.org/community/wiki/maemoTraining) maintained by maemo community. They might contain some information which affects the SDK installation process. Notice that the information in maemo wiki is not verified by Nokia and thus Nokia cannot be responsible of that information.
We'll start by installing Scratchbox first and then proceed by installing the maemo SDK inside Scratchbox. The next chapter covers testing of the installation using simple text and graphical programs.
Installing the SDK can also be done by using automatic installation scripts, using which is covered in the SDK installation instructions (part of the SDK). This material will cover installation in a more step-by-step fashion, so that you may easily create custom Scratchbox targets in the future.
Now that you've seen what both Internet Tablet and applications designed for maemo are made of, you might be wondering how to write your own applications. If you've used the various GNU tools before you also might be wondering how all the different versions of tools and libraries are handled during development.
Enter Scratchbox, a specially packaged "sandbox" environment which provides the necessary tools and also isolates your development efforts from your real Linux system. Scratchbox also makes it easy to do cross compiling which means building your software into a binary format that is executable in your target device.
The name "Scratchbox" comes from "Linux from scratch" + "chroot jail" (sandbox). This also tells you something about its implementation and intended use. While working inside Scratchbox, you'll be running programs in a changed root environment (chroot). In Linux systems it's possible to change the part of file paths that a process will see. Scratchbox uses this mechanism on start to switch its root directory (/) to something else than the real root. This is part of the isolation technique used. Because of this, the environment is called a sandbox, a private area where you can play around without disturbing the environment and without all the mess that real sand would cause. The other parts of the isolation technique are library call diversions (using LD_PRELOAD), wrapping of compiler executables and other commands.
Scratchbox:
sbrsh (not covered in this material).Beside these main features, it's possible to develop your own software packages that can be installed and used inside a Scratchbox environment. Scratchbox also includes some integration for Debian package management, so that once we have setup our source files correctly and write a couple of configuration files, we can create binary distribution packages for various architectures (similar to .msi-files in Windows, or .rpm-files in Fedora Core, RHEL and SUSE). These tools are also used to provide the environment with a packaging database so that we can install other development packages over the Internet when we need them (by using standard Debian package management tools).
The Internet Tablet also uses a similar packaging system, and this means that packages built using Scratchbox and the SDK can be installed on the real device.
Scratchbox is licensed under the GPL and it's open for outside contributions. For an in depth coverage on Scratchbox capabilities please see http://www.scratchbox.org/.
In this material we'll be using only the Scratchbox capabilities that are necessary to use the maemo SDK.
Before installing Scratchbox, we need to cover some terminology that it uses in its documentation. For most of the time Scratchbox will be abbreviated as sbox from now on.
Scratchbox terminology:
apt-get to install the "rest of" the SDK after extracting the base rootstrap.Before continuing, you should quickly review the installation instructions of the maemo SDK.
There is a special feature that your kernel needs to support in order for instruction emulator in sbox to work properly. This is the binfmt_misc-feature. It normally is built as a module so verify that it is loaded in your Linux (no root access needed for this):
user@system:~$ lsmod | grep binfmt
binfmt_misc 12936 0
[ Verifying whether binfmt_misc is loaded ]
If you do not see a line of output, attempt to do a modprobe binfmt_misc as root (or with sudo). If this still doesn't work, you'll need to find the module somewhere, or even recompile the kernel. On most Debian-based systems (Debian, Ubuntu) the module is included so you shouldn't run into problems unless you've built your own kernel. It is also possible that the feature has been built inside your kernel directly instead of a module.
You should also install a pseudo X server that can act as an X client to your real system. It will be necessary to run the applications that we develop after installing the SDK.
There are three options:
If the concept of having a program that is both X server and a client seems weird, don't worry, it is a tested technology and works quite well. If on the other hand it doesn't make any sense, revisit the X Window System introduction in the previous chapter.
To install Xephyr:
sudo apt-get install xserver-xephyr on your real Linux system.dpkg -l | grep xephyr (as non-root).Up-to-date installation instructions can be found from http://maemo.org/development/sdks/ with instructions for each maemo SDK Release.
The preferred way to install the Scratchbox is to use the automated installation script. Manual installation of the Scratchbox is described here for educational purposes, and for situations where the automatic installation script fails.
Quick installation of Scratchbox on a Debian system with the automated install-script:
user@system:~$ sudo sh ./maemo-scratchbox-install_4.0.sh -u user
[ Using the automated install script to install Scratchbox for maemo SDK 4.0. ]
The -u user option is used so that Scratchbox will add the user user account automatically into the group that is allowed to use Scratchbox.
Up-to-date installation instructions can be found from http://maemo.org/development/sdks/ with instructions for each maemo SDK Release.
Since sbox is a environment that is meant for general use, we find that there are many distribution methods to choose from. We'll choose to download the sbox Debian packages before installing them. This is a suitable method when doing "offline" installs of the SDK.
The Debian packages for (for our real Linux system) are located at http://www.scratchbox.org/download/scratchbox-apophis/. Apophis is the release of Scratchbox that is suited to be used with maemo 4.0 SDK.
From this directory you must download the following files:
scratchbox-core_*_i386.deb. This is the core sbox.scratchbox-libs_*_i386.deb. This contains the libraries that core needs. Required by core.scratchbox-toolchain-cs2005q3.2-glibc2.5-i386_*_i386.deb. This package contains the toolchain for cross-building software for Linux/x86.scratchbox-toolchain-cs2005q3.2-glibc2.5-arm-_*_i386.deb. This is the toolchain for Linux/ARM. It is required to setup a sbox target suitable to be used for ARMEL cross-building (for target devices).scratchbox-devkit-debian_*_i386.deb. This package contains the Debian packaging tools.scratchbox-devkit-maemo3_*_i386.deb. This package contains the maemo SDK support tools (note that even if the package name contains maemo3, it is still suitable to be used with maemo SDK 4.0).scratchbox-devkit-perl_*_i386.deb. This package contains the support tools for perl (some software building systems might contain Perl code).scratchbox-devkit-cputransp_*_i386.deb. Contains the "CPU transparency" support, including the instruction set emulator (Qemu).Note that there are various other files available as well. The exact version number has been substituted with an asterisk character here as version numbers can vary as the product is updated. You may also opt to download the doctools devkit if you plan to build documentation for open source projects.
Once you've finished, be sure to note the location where you saved the files to. We'll use /tmp/download-location/ from now on in the material to refer to the path containing the downloaded packages.
Install the packages:
user@system:~$ sudo dpkg -i /tmp/download-location/scratch*.deb
Selecting previously deselected package scratchbox-core.
(Reading database ... 68522 files and directories currently installed.)
Unpacking scratchbox-core
 (from .../scratchbox-core_1.0.8_i386.deb) ...
Selecting previously deselected package scratchbox-devkit-cputransp.
Unpacking scratchbox-devkit-cputransp
 (from .../scratchbox-devkit-cputransp_1.0.3_i386.deb) ...
Selecting previously deselected package scratchbox-devkit-debian.
Unpacking scratchbox-devkit-debian
 (from .../scratchbox-devkit-debian_1.0.9_i386.deb) ...
Selecting previously deselected package scratchbox-devkit-maemo3.
Unpacking scratchbox-devkit-maemo3
 (from .../scratchbox-devkit-maemo3_1.0.1_i386.deb) ...
Selecting previously deselected package scratchbox-devkit-perl.
Unpacking scratchbox-devkit-perl
 (from .../scratchbox-devkit-perl_1.0.4_i386.deb) ...
Selecting previously deselected package scratchbox-libs.
Unpacking scratchbox-libs
 (from .../scratchbox-libs_1.0.8_i386.deb) ...
Selecting previously deselected package
 scratchbox-toolchain-cs2005q3.2-glibc2.5-arm.
Unpacking scratchbox-toolchain-cs2005q3.2-glibc2.5-arm
 (from .../scratchbox-toolchain-cs2005q3.2-glibc2.5-arm_1.0.7.2_i386.deb) ...
Selecting previously deselected package
 scratchbox-toolchain-cs2005q3.2-glibc2.5-i386.
Unpacking scratchbox-toolchain-cs2005q3.2-glibc2.5-i386
 (from .../scratchbox-toolchain-cs2005q3.2-glibc2.5-i386_1.0.7_i386.deb) ...
Setting up scratchbox-libs (1.0.8) ...
Setting up scratchbox-toolchain-cs2005q3.2-glibc2.5-arm (1.0.7.2) ...
Setting up scratchbox-toolchain-cs2005q3.2-glibc2.5-i386 (1.0.7) ...
Setting up scratchbox-core (1.0.8) ...
Creating group "sbox"...
No users were chosen, so no users were added to Scratchbox.
Starting Scratchbox: binfmt_misc, mount.

Setting up scratchbox-devkit-cputransp (1.0.3) ...
Setting up scratchbox-devkit-debian (1.0.9) ...
Setting up scratchbox-devkit-maemo3 (1.0.1) ...
Setting up scratchbox-devkit-perl (1.0.4) ...
[ Installing Scratchbox Apophis ]
Should you ever need to temporarily stop Scratchbox from doing its magic, run sudo /etc/init.d/scratchbox-core stop. To start Scratchbox again, use sudo /etc/init.d/scratchbox-core start. Normally stopping and starting is not required in Debian-based systems as sbox is started automatically on system boot. However, it is useful to know how to stop it when trying to fix problems that might be caused by problems in the isolation code of Scratchbox (or removing Scratchbox).
The next step is to add users to Scratchbox as a root-user (we use sudo-command to get root privileges):
user@system:~$ sudo /scratchbox/sbin/sbox_adduser user
Add user user to group 'sbox'? [yes/no] (yes): yes
Adding user `user' to group `sbox' ...
Done.
Scratchbox user account for user user added
[ Adding one user account (user) to Scratchbox allowed users. ]
Check using the id -command whether your account is part of the sbox-group after installation. If sbox is not listed in your groups, you'll need to relogin into your system. Re-verify with id if in doubt.
user@system:~$ id
uid=1000(user) gid=1000(user) groups=4(adm),20(dialout),24(cdrom),
 25(floppy),29(audio),30(dip),44(video),46(plugdev),104(scanner),
 108(lpadmin),109(admin),1000(user)
[ Using id command to verify current group membership. ]
In the above listing, sbox is not listed in the groups, so a re-login is required (exit and then connect/start terminal again).
Up-to-date installation instructions can be found from http://maemo.org/development/sdks/ with instructions for each maemo SDK Release.
The preferred way to install the the maemo SDK is to use the automated installation script. In some cases using a manual process is more suitable, and is covered later. Installing the SDK in an "offline" environment is officially unsupported, but possible as well.
Quick installation with automated install-script:
user@system:~$ sh maemo-sdk-install_4.0.sh
[ Running the automatic install script for maemo 4.0 SDK ]
Note that the installer script will by default also load the Nokia binaries which are not open source. If you wish to disable that feature, please use -f command line parameter for the script. The automatic installer will display the license (Nokia EUSA) and ask before proceeding.
The binary packages installer will extract the files under your home directory within Scratchbox and modify the apt source paths so that the packages will be available within the targets.
There's also the command line option --help which you might want to use if you wish to use the automatic script, but have a non-default environment.
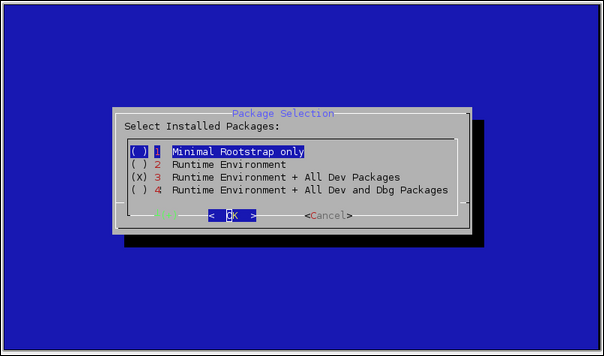
Once you start the script, it will ask you what kind of install you want to do. It will always download the base rootstrap file, but will run apt-get within the targets which will load additional packages based on your choice.
[ Select what additional package sets will be downloaded after rootstrap is installed. ]
The "Runtime Environment + All Dev Packages" choice will cause apt-get install maemo-dev-sdk to be run after the rootstrap has been downloaded and extracted.
Once the automatic script will complete, you will have two targets:
CHINOOK_X86: Suitable for using for software development and testing.CHINOOK_ARMEL: Suitable for building software for the ARM architecture.In order to install the maemo SDK manually, we'll first have to download the rootstrap files necessary. There will be two: one for the X86 target, and the other one for the ARM target (we'll call it ARMEL to differentiate between an older version of the binary API from the newer one).
The rootstrap files are available in the same location as the automatic install scripts (for maemo 4.0 SDK they can be found at http://repository.maemo.org/stable/chinook/). You may also opt to download the Nokia binaries installer (it's the large shell script which contains the Nokia EUSA license). This material does not require the Nokia binaries.
You'll need to download the SDK for i386 and arm, so the filenames will be as follows:
i386/maemo-sdk-rootstrap_4.0_i386.tgz for the X86 versionarmel/maemo-sdk-rootstrap_4.0_armel.tgz for the ARMEL versionFor other versions of the SDK, you will have to adjust the exact path names above (please consult the SDK installation instructions).
Do not extract the downloaded files. Instead they will have to be moved under a location where Scratchbox setup tools can find them (/scratchbox/packages/):
user@system:~$ sudo mv /tmp/download-location/maemo-sdk-rootstrap*  \
 /scratchbox/packages/
[ Moving the rootstraps under Scratchbox packages directory ]
You're now ready to setup your first sbox target. Scratchbox comes with a simple menu driven tool (sb-menu) which can be used for this. The other option would be using a command line driver tool (sb-conf), but using the menu driver tool is easier.
We'll start by logging in into the Scratchbox environment:
user@system:~$ /scratchbox/login

You dont have active target in scratchbox chroot.
Please create one by running "sb-menu" before continuing


Welcome to Scratchbox, the cross-compilation toolkit!

Use 'sb-menu' to change your compilation target.
See /scratchbox/doc/ for documentation.

sb-conf: No current target
[sbox-: ~] >
By default Scratchbox will active the same target that we used previously, but since this is the first time we're using Scratchbox, there's no target to active. Let's build one with sb-menu:
[sbox-: ~] > sb-menu
This will start the tool, and your screen should resemble more or less this:
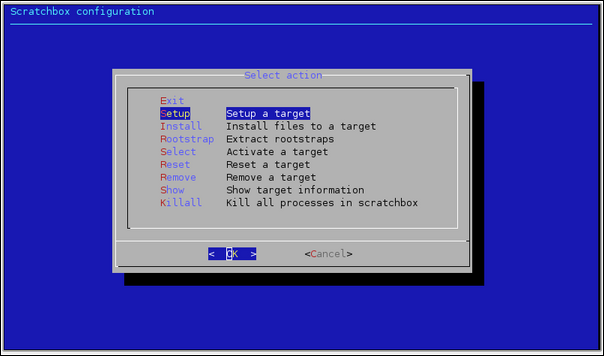
[ Main menu of the sb-menu tool ]
Select "Setup" in order to create a new target:

[ Setting up the first target ]
Normally the tool would display all configured targets in a list, but since we don't have any, the dialog is empty. Select "NEW" in order to create a new target:

Using the same names as the automatic install script uses allows you to use the Nokia binaries installer later. Type CHINOOK_X86.
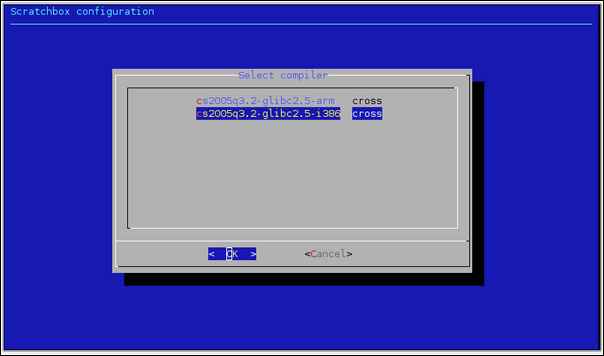
Since our first target will be for X86 environment, select the i386 compiler version.
Next, you will need to select all the devkit packages that you want to enable for the new target. You will need debian-etch, maemo3-tools and perl. Do not select cputransp for the X86 target. Select each in a row and you should then have a display similar to this one (the selections are listed above the list of devkits):

Since we didn't select the cputransp devkit in previous step, selecting the CPU transparency becomes an easy choice:
![]()
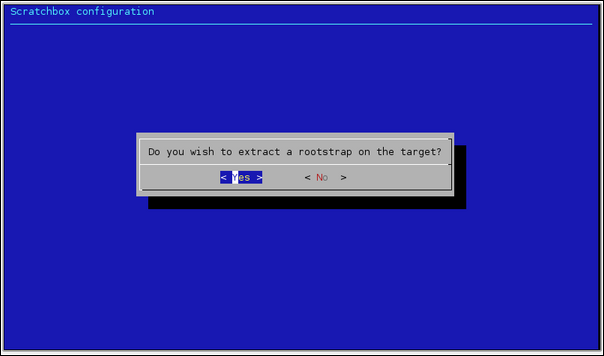
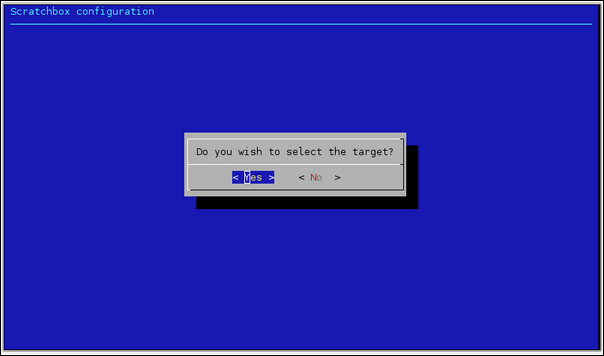
This concludes the target-specific tool choices, but we're not quite done yet. We'll next need to select a rootstrap package to extract into the target (select Yes):
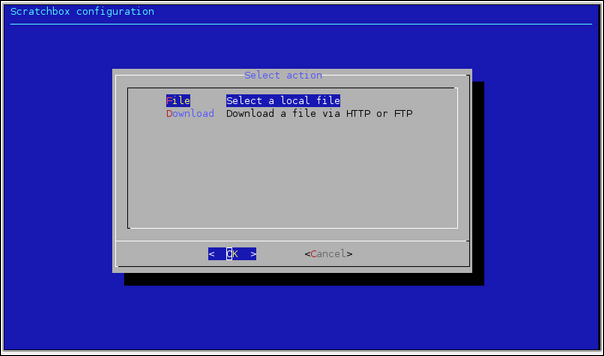
And since we already downloaded the rootstraps and copied them to the proper location, select File:
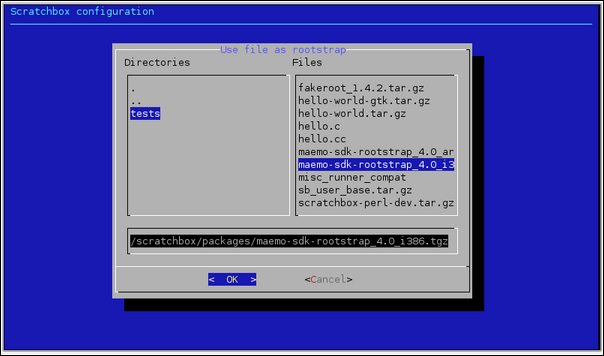
Using TAB arrows, navigate to the proper rootstrap file (the one that ends with i386) and select it by pressing space and then press ENTER to go forward:
Unpacking the rootstrap will not take long, and soon after that, you will see the following dialog:
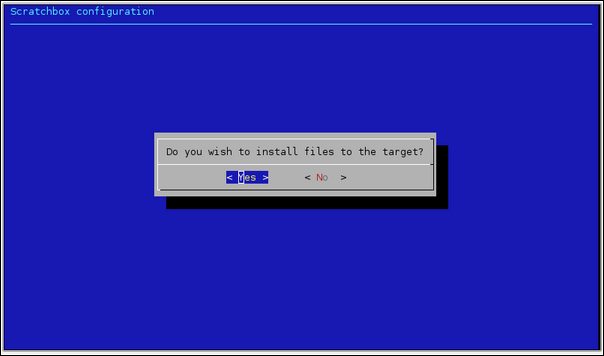
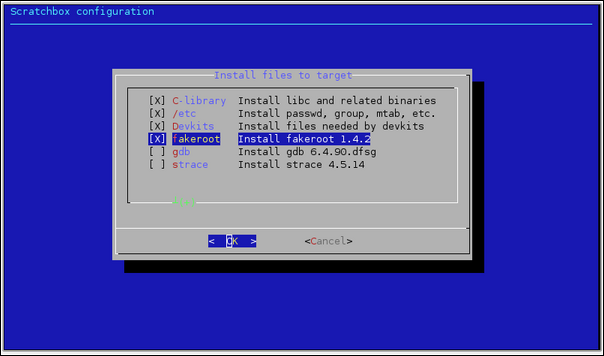
Select Yes (even if it's not entirely obvious what the question means) and then select the C-library, /etc, Devkits and fakeroot. Other tools can be installed later from the maemo SDK repository (or local mirror of the repository):
After extracting the selected files from the rootstrap, the target is now ready. You should next opt to select the target (so that becomes active and will be default target from now on):
Selecting the target will restart the Scratchbox session and if everything went well, you're now left with a very minimal maemo SDK environment:
Shell restarting...
[sbox-CHINOOK_X86: ~] > arch
i686
[sbox-CHINOOK_X86: ~] > dpkg -l | grep maemo
ii  maemo-repository       0.1                       Configuration for maemo repository.
[ Checking that the architecture is correct and that the minimal rootstrap has been installed ]
In order to complete the SDK installation, you will have to fetch the package list and then install the maemo-sdk-dev meta-package. The package depends on a lot of other packages and all of them will be downloaded into the target. The number of packages is quite significant, so reserve some time for this step. This step will require a working Internet connection (or doing DNS-redirection into a local copy of the repository).
[sbox-CHINOOK_X86: ~] > apt-get update
Ign http://repository.maemo.org chinook Release.gpg
Get:1 http://repository.maemo.org chinook Release [218B]
Get:2 http://repository.maemo.org chinook/free Packages [134kB]
Get:3 http://repository.maemo.org chinook/non-free Packages [606B]
Get:4 http://repository.maemo.org chinook/free Sources [60.4kB]
Fetched 195kB in 0s (633kB/s)
Reading package lists... Done
[ Retrieving the package list from a repository ]
[sbox-CHINOOK_X86: ~] > fakeroot apt-get install maemo-sdk-dev
Reading package lists... Done
Building dependency tree... Done
The following extra packages will be installed:
  alarmd alarmtool bluez-utils clinkc-av-dev clinkc-av0 clinkc-dev
  .. listing cut for brevity..
  xkbutils xpmutils xtrans-dev zlib-bin zlib1g-dev
0 upgraded, 403 newly installed, 0 to remove and 0 not upgraded.
Need to get 68.2MB of archives.
After unpacking 207MB of additional disk space will be used.
Do you want to continue [Y/n]? y
.. listing cut for brevity ..
Install these packages without verification [y/N]? y
Get:1 http://repository.maemo.org chinook/free makedev 2.3.1-73osso-4 [38.7kB]
Get:2 http://repository.maemo.org chinook/free udev 0.105-4osso4eabi1 [65.6kB]
.. listing cut for brevity ..
Setting up maemo-example-apps (0.2) ...
Setting up maemo-sdk-runtime (0.7) ...
Setting up maemo-sdk-dev (0.7) ...
Setting up libgtk2.0-bin (2.10.12-0osso24) ...
You don't have immodules directory for version 2.4.0.
Use default version instead.
Updating the IM modules list for GTK+-2.10.0...done.
Updating the gdk-pixbuf loaders list for GTK+-2.10.0...done.

[sbox-CHINOOK_X86: ~] >
[ Installing the rest of the SDK (including development libraries) ]
Using fakeroot is important in the above command so that the package install scripts think that they're running as the root user. Otherwise the installation phase will fail with errors. Modern Debian style repositories are signed with GPG keys in order to prevent tampering with the repository contents. The maemo repositories however do not use this convention and this makes apt-get slightly unhappy. We ignore this by accepting installation of unverified packages.
After apt-get finishes installing all the packages, the SDK installation is ready.
When you're finished with sbox, you need to logout. This is done by terminating the command shell with the exit command or by using logout.
If you installed the X86 target manually (above), at some point you'll also want to create the ARMEL target so that you may build your software for the Internet Tablets. You may also defer this step until you're ready to do cross-building for Internet Tablets.
If you used the automatic install process, the ARMEL target is already available (as CHINOOK_ARMEL) and you don't need to do any of the following steps.
Creating the ARMEL target requires creating a new target in Scratchbox, using the same steps that were done for the X86 target.
Here is how the ARMEL target install process differs from the X86 (described above):
sb-conf killall)sb-menu as you did with the X86 target:CHINOOK_ARMEL (for compatibility)arm version of the compiler.cputransp devkit and then select qemu-arm-0.8.2-sb2 as the CPU transparency method (instead of none that was used for X86).arm version of the maemo SDK base rootstrap.The apt-get command remains exactly the same, as do all of the other steps.
You may wish to verify the target by using the steps below ("Testing Scratchbox"), at least build the hello world program and verify the architecture of the resulting executable with file command.
Copyright © 2007-2008 Nokia Corporation. All rights reserved.